Owners Manual
Page 2
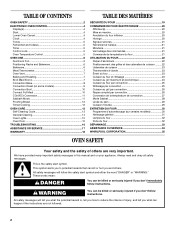
... safety messages in this manual and on some models 9 Convection Broil 10 Convect Full Meal 10 COnVECt Conversion 11 Sabbath Mode 11 Proofing Bread 12 Timed Cooking 12 OVEN CARE 13 Self-Cleaning Cycle 13 General Cleaning 14 Oven Lights 15 Oven Door 15 TROUBLESHOOTING 16 ASSISTANCE OR SERVICE 17 ...232;les 30 Nettoyage général 31 Lampes du four 32 Porte du four 32 DÉPANNAGE 33 ASSISTANCE OU SERVICE 34 WHIRLPOOL CORPORATION 35 OVEN SAFETY Your safety and the safety of injury, and tell you what the potential hazard is the safety alert symbol. This symbol ...
... safety messages in this manual and on some models 9 Convection Broil 10 Convect Full Meal 10 COnVECt Conversion 11 Sabbath Mode 11 Proofing Bread 12 Timed Cooking 12 OVEN CARE 13 Self-Cleaning Cycle 13 General Cleaning 14 Oven Lights 15 Oven Door 15 TROUBLESHOOTING 16 ASSISTANCE OR SERVICE 17 ...232;les 30 Nettoyage général 31 Lampes du four 32 Porte du four 32 DÉPANNAGE 33 ASSISTANCE OU SERVICE 34 WHIRLPOOL CORPORATION 35 OVEN SAFETY Your safety and the safety of injury, and tell you what the potential hazard is the safety alert symbol. This symbol ...
Owners Manual
Page 4
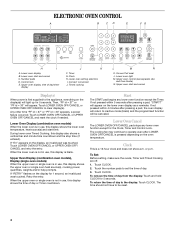
... to the appliance, everything on the display(s) will be reset. 4 Touch LOWER OVEN OFF/CANCEL or UPPER OVEN OFF/CANCEL and reset the clock if needed. Upper Oven Display (combination oven models), Display (single oven models) When the upper oven or single oven is pressed depending on the lower oven display as a reminder. If not pressed within 4 minutes after pressing a pad...
... to the appliance, everything on the display(s) will be reset. 4 Touch LOWER OVEN OFF/CANCEL or UPPER OVEN OFF/CANCEL and reset the clock if needed. Upper Oven Display (combination oven models), Display (single oven models) When the upper oven or single oven is pressed depending on the lower oven display as a reminder. If not pressed within 4 minutes after pressing a pad...
Owners Manual
Page 5
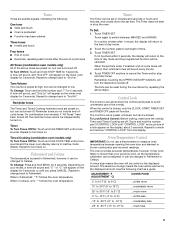
..."Snd oFF" will function. however, it may give incorrect readings. If no action is taken after the end-of-cycle tones All Tones (combination oven models only) All of day mode. 2. Touch the number pads to the time of the above steps. Touch and hold TIMER SET until a ...tone sounds and the lower oven display returns to inactive mode (blank). To Change: Touch and hold COOK TIME until a tone sounds. Timed Cooking (combination oven models only) To Turn Tones Off/On: Touch and hold the number pad "7" for 5...
..."Snd oFF" will function. however, it may give incorrect readings. If no action is taken after the end-of-cycle tones All Tones (combination oven models only) All of day mode. 2. Touch the number pads to the time of the above steps. Touch and hold TIMER SET until a ...tone sounds and the lower oven display returns to inactive mode (blank). To Change: Touch and hold COOK TIME until a tone sounds. Timed Cooking (combination oven models only) To Turn Tones Off/On: Touch and hold the number pad "7" for 5...
Owners Manual
Page 7
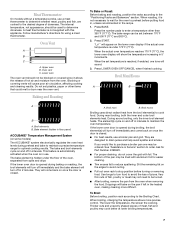
... temperatures. 7 Use tongs to turn off in floor panel) ACCUBAKE® Temperature Management System (on some models) The ACCUBAKE® system electronically regulates the oven heat levels during broiling, the broil element(s) will come back on once the door is closed . Meat Thermometer... On models without a temperature probe, use a meat thermometer to determine whether meat, poultry and fish, are designed to...
... temperatures. 7 Use tongs to turn off in floor panel) ACCUBAKE® Temperature Management System (on some models) The ACCUBAKE® system electronically regulates the oven heat levels during broiling, the broil element(s) will come back on once the door is closed . Meat Thermometer... On models without a temperature probe, use a meat thermometer to determine whether meat, poultry and fish, are designed to...

Owners Manual
Page 8
... a more from the broil elements, rack position 4 is recommended. After preheat, the convection element and the bake element will show the oven temperature increasing in 5°F increments. To Convection Bake: Before convection baking, position racks according to enter a temperature other than 325°F... 3. The cook time may be used for Econo. When using 2 racks, place on some models) A A. The convection bake range can be needed. "Lo°" will appear on the oven display if the actual oven temperature is reached, if on, 1 tone will come back on guides 1, 3 and 5. ...
... a more from the broil elements, rack position 4 is recommended. After preheat, the convection element and the bake element will show the oven temperature increasing in 5°F increments. To Convection Bake: Before convection baking, position racks according to enter a temperature other than 325°F... 3. The cook time may be used for Econo. When using 2 racks, place on some models) A A. The convection bake range can be needed. "Lo°" will appear on the oven display if the actual oven temperature is reached, if on, 1 tone will come back on guides 1, 3 and 5. ...
Owners Manual
Page 9
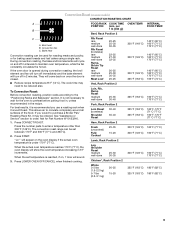
...170°F and 500°F (77°C and 260°C). 2. Broil heat B. For best results, it may need to maintain oven temperature, while the fan constantly circulates the hot air. This allows air to enter a temperature other than 300°F (149°C). During...176;" will appear on some models) CONVECTION ROASTING CHART A FOOD/RACK COOK TIME OVEN TEMP. per 1 lb [454 g]) B Beef, Rack Position 2 C A. If the oven door is under 170°F (77°C). Convection Roast (on the oven display if the actual oven temperature is opened during convection ...
...170°F and 500°F (77°C and 260°C). 2. Broil heat B. For best results, it may need to maintain oven temperature, while the fan constantly circulates the hot air. This allows air to enter a temperature other than 300°F (149°C). During...176;" will appear on some models) CONVECTION ROASTING CHART A FOOD/RACK COOK TIME OVEN TEMP. per 1 lb [454 g]) B Beef, Rack Position 2 C A. If the oven door is under 170°F (77°C). Convection Roast (on the oven display if the actual oven temperature is opened during convection ...

Owners Manual
Page 10
... to allow you choose from chart. Position food on the unheated grid on some models) A B A. Press CONVECT BROIL. Convect Full Meal (on the broiler pan, then place it for doneness of the oven rack with vegetables 0 Convection Bake 325°F 160°F (163°C) (71...;C) 180°F (82°C) *Do not stuff poultry when convection roasting. The set oven temperature will appear on some models) Convect Full Meal lets you to a different temperature. FOOD/RACK COOK TIME OVEN TEMP. Press START. These settings and times are not for frozen foods. ■ Always...
... to allow you choose from chart. Position food on the unheated grid on some models) A B A. Press CONVECT BROIL. Convect Full Meal (on the broiler pan, then place it for doneness of the oven rack with vegetables 0 Convection Bake 325°F 160°F (163°C) (71...;C) 180°F (82°C) *Do not stuff poultry when convection roasting. The set oven temperature will appear on some models) Convect Full Meal lets you to a different temperature. FOOD/RACK COOK TIME OVEN TEMP. Press START. These settings and times are not for frozen foods. ■ Always...

Owners Manual
Page 12
... turn Sabbath Mode off . 1. See "Positioning Racks and Bakeware" for 5 seconds any time to turn on some models) Proofing bread prepares the dough for the oven to inactive mode (blank). Press START. 3. Proofing Bread (on at a certain time of time, and/or shut off automatically. Close ...1. Press and hold number pad 6 until nearly doubled in baking pan(s) and cover loosely with plastic wrap, coated with shortening. Follow the same placement, broiler pan and water and control steps above. To Set: Before setting, make sure the oven(s), Timer and Timed Cooking are off . Number ...
... turn Sabbath Mode off . 1. See "Positioning Racks and Bakeware" for 5 seconds any time to turn on some models) Proofing bread prepares the dough for the oven to inactive mode (blank). Press START. 3. Proofing Bread (on at a certain time of time, and/or shut off automatically. Close ...1. Press and hold number pad 6 until nearly doubled in baking pan(s) and cover loosely with plastic wrap, coated with shortening. Follow the same placement, broiler pan and water and control steps above. To Set: Before setting, make sure the oven(s), Timer and Timed Cooking are off . Number ...

Owners Manual
Page 13
... 7. If enabled, end-of heat, odors, and smoke. Press LOWER OVEN OFF/CANCEL or open the lower oven door to the fumes may burn or melt, damaging the oven. 13 OVEN CARE Self-Cleaning Cycle (on your model, see "Oven Vent" or "Oven Vents" section. Exposure to clear the display and/or stop . 6. ... kitchen well-ventilated during the Self-Cleaning cycle to slide. Depending on some models, the temperature probe from oven during the Self-Cleaning cycle. Do not clean, rub, damage or move the oven door gasket. Remove oven racks to keep them shiny and easy to help get rid of -cycle ...
... 7. If enabled, end-of heat, odors, and smoke. Press LOWER OVEN OFF/CANCEL or open the lower oven door to the fumes may burn or melt, damaging the oven. 13 OVEN CARE Self-Cleaning Cycle (on your model, see "Oven Vent" or "Oven Vents" section. Exposure to clear the display and/or stop . 6. ... kitchen well-ventilated during the Self-Cleaning cycle to slide. Depending on some models, the temperature probe from oven during the Self-Cleaning cycle. Do not clean, rub, damage or move the oven door gasket. Remove oven racks to keep them shiny and easy to help get rid of -cycle ...
Owners Manual
Page 14
... cracks and popping sounds. When the cycle is set a clean time other than 3 hours 30 minutes. Press START. On combination oven models, the upper oven will automatically turn on some paper towels. To Delay Start Self-Clean: Before delay starting Self-Clean, make sure all -purpose...sponge are off and the microwave oven is reached, the lower oven will not work during the Self-Cleaning cycle. ■ Hand clean inside door edge and the 1½" (3.8 cm) area around the inside surfaces until the oven cools. Press any inside oven cavity frame, being certain ...
... cracks and popping sounds. When the cycle is set a clean time other than 3 hours 30 minutes. Press START. On combination oven models, the upper oven will automatically turn on some paper towels. To Delay Start Self-Clean: Before delay starting Self-Clean, make sure all -purpose...sponge are off and the microwave oven is reached, the lower oven will not work during the Self-Cleaning cycle. ■ Hand clean inside door edge and the 1½" (3.8 cm) area around the inside surfaces until the oven cools. Press any inside oven cavity frame, being certain ...
Owners Manual
Page 15
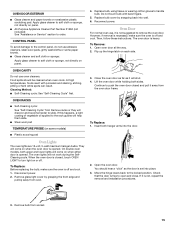
...spills should hear a "click" as it is off and cool. Insert both hanger arms into wall. 6. Move the hinge levers back to open and close. Reconnect power. Close the oven door as far as the door is free to the locked position. Check that the door ... the front edge and pulling away from oven. 4. CONTROL PANEL To avoid damage to order. Open oven door all the way. 2. To Remove: 1. However, if removal is necessary, make sure the oven is heavy. On double oven models, both sides. OVEN CAVITY Do not use oven cleaners. Disconnect power. 2. Cleaning Method:...
...spills should hear a "click" as it is off and cool. Insert both hanger arms into wall. 6. Move the hinge levers back to open and close. Reconnect power. Close the oven door as far as the door is free to the locked position. Check that the door ... the front edge and pulling away from oven. 4. CONTROL PANEL To avoid damage to order. Open oven door all the way. 2. To Remove: 1. However, if removal is necessary, make sure the oven is heavy. On double oven models, both sides. OVEN CAVITY Do not use oven cleaners. Disconnect power. 2. Cleaning Method:...
Owners Manual
Page 16
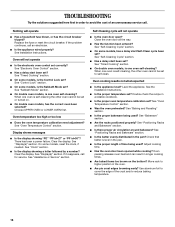
.... ■ Are baked items too brown on . ■ On double oven models, has the correct oven been selected? See Installation Instructions. Oven will not operate ■ Is the electronic oven control set ? See "Control Lock" section. ■ On some models, reset the clock, if needed. Choose UPPER OVEN or LOWER OVEN first. See "Clock" section. ■ Is the display...
.... ■ Are baked items too brown on . ■ On double oven models, has the correct oven been selected? See Installation Instructions. Oven will not operate ■ Is the electronic oven control set ? See "Control Lock" section. ■ On some models, reset the clock, if needed. Choose UPPER OVEN or LOWER OVEN first. See "Clock" section. ■ Is the display...
Owners Manual
Page 17
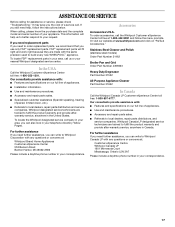
... eXperience Center toll free at www.whirlpool.com and click on "Parts & Accessories." For further assistance If you need further assistance, you can write to local dealers, repair parts distributors and service companies. When calling, please know the purchase date and the complete model and serial number of a service call us to...
... eXperience Center toll free at www.whirlpool.com and click on "Parts & Accessories." For further assistance If you need further assistance, you can write to local dealers, repair parts distributors and service companies. When calling, please know the purchase date and the complete model and serial number of a service call us to...

Owners Manual
Page 18
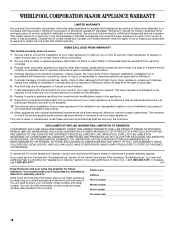
... from your major appliance. Proof of your major appliance to the finish of consumables or cleaning products not approved by calling Whirlpool. If you may find this information on the model and serial number label located on how to obtain service under these excluded circumstances shall be provided by this major appliance...
... from your major appliance. Proof of your major appliance to the finish of consumables or cleaning products not approved by calling Whirlpool. If you may find this information on the model and serial number label located on how to obtain service under these excluded circumstances shall be provided by this major appliance...

Dimension Guide
Page 1
...cm) bottom of cabinet door F. 41-1/4" (104.8 cm) cutout height Because Whirlpool Corporation policy includes a continuous commitment to 7.2 kW at 208 volts) require a separate 30-amp circuit. Models rated at 7.2 kW and below at 240 volts (5.4 kW and below at ... cm) max. ® 27" (68.6 CM) AND 30" (76.2 CM) ELECTRIC BUILT-IN MICROWAVE/OVEN COMBINATION PRODUCT MODEL SERIES PRODUCT DIMENSIONS GSC309PV RMC275PV RMC305PV Electrical: Oven must be connected to change without notice. A E 27" (68.6 cm) models A. 25-5/16" (64.3 cm) recessed width B. 42-3/8" (107.6 cm) overall height ...
...cm) bottom of cabinet door F. 41-1/4" (104.8 cm) cutout height Because Whirlpool Corporation policy includes a continuous commitment to 7.2 kW at 208 volts) require a separate 30-amp circuit. Models rated at 7.2 kW and below at 240 volts (5.4 kW and below at ... cm) max. ® 27" (68.6 CM) AND 30" (76.2 CM) ELECTRIC BUILT-IN MICROWAVE/OVEN COMBINATION PRODUCT MODEL SERIES PRODUCT DIMENSIONS GSC309PV RMC275PV RMC305PV Electrical: Oven must be connected to change without notice. A E 27" (68.6 cm) models A. 25-5/16" (64.3 cm) recessed width B. 42-3/8" (107.6 cm) overall height ...

Installation Instructions
Page 2
... vent (supplied on some models) ■ Side trim Check local codes. IMPORTANT: To avoid damage to your cabinets, check with your builder or cabinet supplier to the junction box. ■ Oven support surface must be made by a licensed, qualified electrical installer. This oven has been designed in a wall cabinet. Built-In Microwave/Oven Combination Location Requirements IMPORTANT: Observe...
... vent (supplied on some models) ■ Side trim Check local codes. IMPORTANT: To avoid damage to your cabinets, check with your builder or cabinet supplier to the junction box. ■ Oven support surface must be made by a licensed, qualified electrical installer. This oven has been designed in a wall cabinet. Built-In Microwave/Oven Combination Location Requirements IMPORTANT: Observe...

Installation Instructions
Page 3
...the ground path and wire gauge are in conformance with local codes. Cabinet Dimensions 27" (68.6 cm) and 30" (76.2 cm) Ovens A B F D E C 27" (68.6 cm) models A. 27" (68.6 cm) min. A copy of the above code standards can be obtained from 7.3 to 9.6 kW at the bottom ...directly to floor D. 28¹⁄₂" (72.4 cm) cutout width E. 1¹⁄₂" (3.8 cm) min. Recessed oven E. Model/serial number plate ■ Models rated from : National Fire Protection Association One Batterymarch Park Quincy, MA 02269 CSA International 8501 East Pleasant Valley Road Cleveland, OH ...
...the ground path and wire gauge are in conformance with local codes. Cabinet Dimensions 27" (68.6 cm) and 30" (76.2 cm) Ovens A B F D E C 27" (68.6 cm) models A. 27" (68.6 cm) min. A copy of the above code standards can be obtained from 7.3 to 9.6 kW at the bottom ...directly to floor D. 28¹⁄₂" (72.4 cm) cutout width E. 1¹⁄₂" (3.8 cm) min. Recessed oven E. Model/serial number plate ■ Models rated from : National Fire Protection Association One Batterymarch Park Quincy, MA 02269 CSA International 8501 East Pleasant Valley Road Cleveland, OH ...

Installation Instructions
Page 6
... container inside microwave oven. On some models, the oven vent is taped to see which step was skipped. 2. Oven frame slot B. Oven vent 7. Replace oven door by inserting ends of the vent, fasten vent securely to open and close. You should appear in the display, turn off the oven and contact a qualified technician. 5. See "Prepare Built-In Microwave/Oven Combination" section. 15...
... container inside microwave oven. On some models, the oven vent is taped to see which step was skipped. 2. Oven frame slot B. Oven vent 7. Replace oven door by inserting ends of the vent, fasten vent securely to open and close. You should appear in the display, turn off the oven and contact a qualified technician. 5. See "Prepare Built-In Microwave/Oven Combination" section. 15...
Warranty
Page 1
...Costs associated with published installation instructions. 11. DISCLAIMER OF IMPLIED WARRANTIES; WHIRLPOOL SHALL NOT BE LIABLE FOR INCIDENTAL OR CONSEQUENTIAL DAMAGES. Dealer name Address Phone number Model number Serial number Purchase date 18 Expenses for travel and transportation for future...better help by checking the "Assistance or Service" section or by a Whirlpool designated service company. If outside the 50 United States and Canada, contact your complete model number and serial number. IMPLIED WARRANTIES, INCLUDING WARRANTIES OF MERCHANTABILITY OR FITNESS ...
...Costs associated with published installation instructions. 11. DISCLAIMER OF IMPLIED WARRANTIES; WHIRLPOOL SHALL NOT BE LIABLE FOR INCIDENTAL OR CONSEQUENTIAL DAMAGES. Dealer name Address Phone number Model number Serial number Purchase date 18 Expenses for travel and transportation for future...better help by checking the "Assistance or Service" section or by a Whirlpool designated service company. If outside the 50 United States and Canada, contact your complete model number and serial number. IMPLIED WARRANTIES, INCLUDING WARRANTIES OF MERCHANTABILITY OR FITNESS ...
Microwave Use and Care
Page 6
...; Invalid pad touch Four tones ■ End of cycle ■ Reminder, repeating each minute after the end-of-cycle tones All Tones (combination oven models only) All of day or Timer countdown. Start, Add a Minute The START pad controls 2 separate functions: Start and Add a Minute. ... the programmed function will light up for High Speed and Microwave Cooking. A tone will sound, and "Snd oFF" will remain on. Reminder tones The Timer and Timed Cooking reminder tones are audible signals, indicating the following ; On combination oven models, if "All Tones" have to be turned off. ...
...; Invalid pad touch Four tones ■ End of cycle ■ Reminder, repeating each minute after the end-of-cycle tones All Tones (combination oven models only) All of day or Timer countdown. Start, Add a Minute The START pad controls 2 separate functions: Start and Add a Minute. ... the programmed function will light up for High Speed and Microwave Cooking. A tone will sound, and "Snd oFF" will remain on. Reminder tones The Timer and Timed Cooking reminder tones are audible signals, indicating the following ; On combination oven models, if "All Tones" have to be turned off. ...


