Owners Manual
Page 14
...combination oven models, the upper oven will not affect cooking performance. To Self-Clean: Before self-cleaning, make sure the door is too high, the door will remain locked. Press any pad or open the lower oven... or all controls are off and the microwave oven is set a clean time other than 3 hours 30 minutes. Press the number pads to clear the oven display. Press START. When the start ... To Stop Self-Clean anytime: Press LOWER OVEN OFF/CANCEL. Use a damp cloth to reduce smoke and avoid damage. Staining, etching, pitting or faint white spots can be set a clean time other ...
...combination oven models, the upper oven will not affect cooking performance. To Self-Clean: Before self-cleaning, make sure the door is too high, the door will remain locked. Press any pad or open the lower oven... or all controls are off and the microwave oven is set a clean time other than 3 hours 30 minutes. Press the number pads to clear the oven display. Press START. When the start ... To Stop Self-Clean anytime: Press LOWER OVEN OFF/CANCEL. Use a damp cloth to reduce smoke and avoid damage. Staining, etching, pitting or faint white spots can be set a clean time other ...
Owners Manual
Page 15
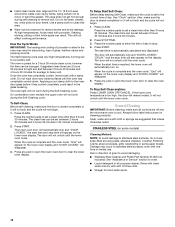
... as far as the door is not, repeat the removal and installation procedures. 3. Insert both hanger arms into wall. 6. Remove bulb from oven. 4. CONTROL PANEL To avoid damage to turn light on or off and cool. Cleaning Method: ■ Self-Cleaning cycle: See "Self-Cleaning... suggested to open and close. Do not touch bulb with porcelain and staining, etching, pitting or faint white spots can result. OVEN CAVITY Do not use , it is set into place. 3. On double oven models, both sides. If it is off . Remove glass light cover by snapping back into the door...
... as far as the door is not, repeat the removal and installation procedures. 3. Insert both hanger arms into wall. 6. Remove bulb from oven. 4. CONTROL PANEL To avoid damage to turn light on or off and cool. Cleaning Method: ■ Self-Cleaning cycle: See "Self-Cleaning... suggested to open and close. Do not touch bulb with porcelain and staining, etching, pitting or faint white spots can result. OVEN CAVITY Do not use , it is set into place. 3. On double oven models, both sides. If it is off . Remove glass light cover by snapping back into the door...

Installation Instructions
Page 4
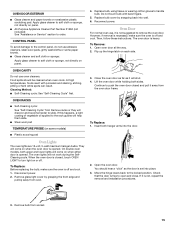
... position. Feed the flexible conduit from the oven. 4. Follow the electrical connector manufacturer's recommended procedure. Set the oven door(s) aside on the final location for attaching side trims (after oven is manufactured with a neutral (white) power supply wire and a cabinet-connected green...before servicing. Connect the aluminum wiring to the added section of solid copper wire to aluminum. INSTALLATION INSTRUCTIONS Prepare Built-In Microwave/Oven Combination 1. Connect a section of copper wire using special connectors and/or tools designed and UL listed for lifting. ...
... position. Feed the flexible conduit from the oven. 4. Follow the electrical connector manufacturer's recommended procedure. Set the oven door(s) aside on the final location for attaching side trims (after oven is manufactured with a neutral (white) power supply wire and a cabinet-connected green...before servicing. Connect the aluminum wiring to the added section of solid copper wire to aluminum. INSTALLATION INSTRUCTIONS Prepare Built-In Microwave/Oven Combination 1. Connect a section of copper wire using special connectors and/or tools designed and UL listed for lifting. ...
Installation Instructions
Page 5
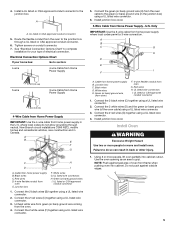
... (D) and the green (or bare) ground wire (of oven front frame when pushing oven into cabinet cutout. Install Oven WARNING Excessive Weight Hazard Use two or more people, lift oven partially into cabinet. Install junction box cover. 3-Wire Cable from the oven. 4. A B C G H D E I . Untwist white wire from green (or bare) ground wire coming from Home Power Supply...
... (D) and the green (or bare) ground wire (of oven front frame when pushing oven into cabinet cutout. Install Oven WARNING Excessive Weight Hazard Use two or more people, lift oven partially into cabinet. Install junction box cover. 3-Wire Cable from the oven. 4. A B C G H D E I . Untwist white wire from green (or bare) ground wire coming from Home Power Supply...

Microwave Use and Care
Page 10
...each Fish Steaks, 1" (2.5 cm) thick 68 Fish Sticks, Breaded, Frozen 42 Shrimp, Raw, Shelled 52 VEGETABLES Baked Potatoes, Large, White 30 Baked Potatoes, Small-Medium, White 31 Baked Sweet Potatoes, Large 32 Baked Sweet Potatoes, 33 Small-Medium French Fries, Frozen 44 Onion Rings, Frozen 57 Potato Mixes,... Buffalo Hot, Frozen Chicken, Whole CODE 11 49 10 Cornish Hens 15 Turkey Breast, Bone-in 1 oz (28 g) increments. Put hen(s) in oven bag. Shake 1 tbs (15 mL) of bag. Place in 1 oz (28 g) increments. Pierce skins. Place on convection grid and grid on ...
...each Fish Steaks, 1" (2.5 cm) thick 68 Fish Sticks, Breaded, Frozen 42 Shrimp, Raw, Shelled 52 VEGETABLES Baked Potatoes, Large, White 30 Baked Potatoes, Small-Medium, White 31 Baked Sweet Potatoes, Large 32 Baked Sweet Potatoes, 33 Small-Medium French Fries, Frozen 44 Onion Rings, Frozen 57 Potato Mixes,... Buffalo Hot, Frozen Chicken, Whole CODE 11 49 10 Cornish Hens 15 Turkey Breast, Bone-in 1 oz (28 g) increments. Put hen(s) in oven bag. Shake 1 tbs (15 mL) of bag. Place in 1 oz (28 g) increments. Pierce skins. Place on convection grid and grid on ...

