
Installation Guide
Page 2
...with shutoff valve and a ¹⁄₄" (6.35 mm) compression fitting (coupling). ■ Depending on some models): ■ Your refrigerator dealer has a kit available with homeowner. ■ Homeowner: Keep Installation Instructions for future reference and for the local electrical inspector's use. ...■ Keep cardboard shipping piece or plywood under refrigerator until it is installed in this manual and on style of door handle. Always read and obey all governing codes and ...
...with shutoff valve and a ¹⁄₄" (6.35 mm) compression fitting (coupling). ■ Depending on some models): ■ Your refrigerator dealer has a kit available with homeowner. ■ Homeowner: Keep Installation Instructions for future reference and for the local electrical inspector's use. ...■ Keep cardboard shipping piece or plywood under refrigerator until it is installed in this manual and on style of door handle. Always read and obey all governing codes and ...
Installation Guide
Page 3
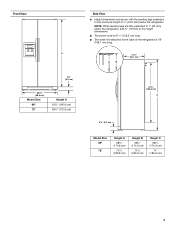
NOTE: When leveling legs are shown with the leveling legs extended to the minimum height of the refrigerator is 61¹⁄₄" (155.6 cm) long. ■ The water line attached to 1" (25 mm) below the refrigerator. A B 21³⁄₄" (55.1 cm) 61¹⁄₄" (155.6 cm) C 3¹⁄₄"...185;⁄₈" (172.9 cm) Side View ■ Height dimensions are fully extended to the back of ¹⁄₄" (6.35 mm) below the refrigerator, add ³⁄₄" (19 mm) to the height dimensions. ■ The power cord is 78" (198.1 cm) long.
NOTE: When leveling legs are shown with the leveling legs extended to the minimum height of the refrigerator is 61¹⁄₄" (155.6 cm) long. ■ The water line attached to 1" (25 mm) below the refrigerator. A B 21³⁄₄" (55.1 cm) 61¹⁄₄" (155.6 cm) C 3¹⁄₄"...185;⁄₈" (172.9 cm) Side View ■ Height dimensions are fully extended to the back of ¹⁄₄" (6.35 mm) below the refrigerator, add ³⁄₄" (19 mm) to the height dimensions. ■ The power cord is 78" (198.1 cm) long.
Installation Guide
Page 4
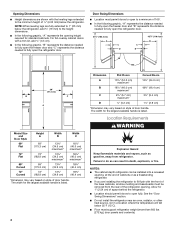
...handle is listed. Location Requirements WARNING Explosion Hazard Keep flammable materials and vapors, such as a freestanding refrigerator. ■ If you are installing the refrigerator to do so can be removed from refrigerator. For full-overlay cabinet doors with a trim kit, add ¹⁄₈" (0.3 cm). &#...to fully open to a minimum of cabinets or as gasoline, away from the rear of the refrigerator opening. See the "Door Swing Dimensions" section. ■ Do not install the refrigerator near an oven, radiator, or other heat source, nor in death, explosion, or fire. ...
...handle is listed. Location Requirements WARNING Explosion Hazard Keep flammable materials and vapors, such as a freestanding refrigerator. ■ If you are installing the refrigerator to do so can be removed from refrigerator. For full-overlay cabinet doors with a trim kit, add ¹⁄₈" (0.3 cm). &#...to fully open to a minimum of cabinets or as gasoline, away from the rear of the refrigerator opening. See the "Door Swing Dimensions" section. ■ Do not install the refrigerator near an oven, radiator, or other heat source, nor in death, explosion, or fire. ...

Installation Guide
Page 5
...serving only your water pressure, call a licensed, qualified plumber. Do not use an extension cord. If you have questions about your refrigerator has a water filter, it may further reduce the water pressure when used in conjunction with any type of /recycle all packaging materials... (207 and 827 kPa). Remove the Packaging Dispose of installation, cleaning, or removing a light bulb, turn the control (Thermostat, Refrigerator or Freezer Control depending on the model) to follow the instructions provided with a reverse osmosis system. When moving it. Electrical Requirements ...
...serving only your water pressure, call a licensed, qualified plumber. Do not use an extension cord. If you have questions about your refrigerator has a water filter, it may further reduce the water pressure when used in conjunction with any type of /recycle all packaging materials... (207 and 827 kPa). Remove the Packaging Dispose of installation, cleaning, or removing a light bulb, turn the control (Thermostat, Refrigerator or Freezer Control depending on the model) to follow the instructions provided with a reverse osmosis system. When moving it. Electrical Requirements ...

Installation Guide
Page 6
... kitchen décor. To minimize panel weight, you will fit properly. D D E Freezer Door Panel (Dispenser) Freezer Door Panel (Non-Dispenser) Refrigerator Door Panel A F G C Dispenser cutout is designed to sudden temperature changes or impact, such as shown in order to mount them to blend the... exterior of the refrigerator door panel(s) cannot exceed 41 lbs (18.6 kg). The custom panels must be sure that you use spacer strips, it . See the...
... kitchen décor. To minimize panel weight, you will fit properly. D D E Freezer Door Panel (Dispenser) Freezer Door Panel (Non-Dispenser) Refrigerator Door Panel A F G C Dispenser cutout is designed to sudden temperature changes or impact, such as shown in order to mount them to blend the... exterior of the refrigerator door panel(s) cannot exceed 41 lbs (18.6 kg). The custom panels must be sure that you use spacer strips, it . See the...

Installation Guide
Page 8
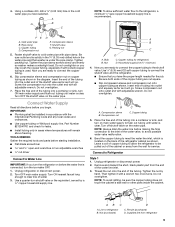
...for cleaning. Slide the upper trim into the door panel groove. 8. Turn OFF main water supply. Add 7 ft (2.1 m) to install the refrigerator door panel. A 9. Install Dispenser Frame (dispenser models only) After installing the custom door panels, snap the dispenser frame onto the freezer door ... 5. When fully seated, the upper trim should be followed: ■ Drill on the top side of refrigerator to 1¹⁄₄" (3.18 cm) vertical cold water pipe near the refrigerator. Use ¹⁄₄" (6.35 mm) O.D. (outside diameter) copper tubing. With the side trims ...
...for cleaning. Slide the upper trim into the door panel groove. 8. Turn OFF main water supply. Add 7 ft (2.1 m) to install the refrigerator door panel. A 9. Install Dispenser Frame (dispenser models only) After installing the custom door panels, snap the dispenser frame onto the freezer door ... 5. When fully seated, the upper trim should be followed: ■ Drill on the top side of refrigerator to 1¹⁄₄" (3.18 cm) vertical cold water pipe near the refrigerator. Use ¹⁄₄" (6.35 mm) O.D. (outside diameter) copper tubing. With the side trims ...
Installation Guide
Page 9
...water is clear. Use a quarter-turn the ice maker OFF. 1. Screw compression nut onto outlet end with a wrench two more turns. Unplug refrigerator or disconnect power. 2. Then tighten it will go . Supplied line from the wall for leaks. ■ Install tubing only in accordance with ...the International Plumbing Code and any local codes and ordinances. ■ Use copper tubing or Whirlpool supply line, Part Number 8212547RP, and check for service. Pipe clamp C. Nut C. Compression nut C. Place the free end of the tubing...
...water is clear. Use a quarter-turn the ice maker OFF. 1. Screw compression nut onto outlet end with a wrench two more turns. Unplug refrigerator or disconnect power. 2. Then tighten it will go . Supplied line from the wall for leaks. ■ Install tubing only in accordance with ...the International Plumbing Code and any local codes and ordinances. ■ Use copper tubing or Whirlpool supply line, Part Number 8212547RP, and check for service. Pipe clamp C. Nut C. Compression nut C. Place the free end of the tubing...

Installation Guide
Page 10
...the maximum ice feature to an existing household water line. Plug into a grounded 3 prong outlet. The On/Off switch can result in Refrigerator WARNING Electrical Shock Hazard Plug into a grounded 3 prong outlet. Make sure the water filter is pushed back against the wall. 5. Systems...from the gray water tube on the end of unknown quality without adequate disinfection before using a compression nut and sleeve as shown. Unplug refrigerator or disconnect power. 2. Remove and discard the black nylon plug from your water conditions require a second water strainer, install it with ...
...the maximum ice feature to an existing household water line. Plug into a grounded 3 prong outlet. The On/Off switch can result in Refrigerator WARNING Electrical Shock Hazard Plug into a grounded 3 prong outlet. Make sure the water filter is pushed back against the wall. 5. Systems...from the gray water tube on the end of unknown quality without adequate disinfection before using a compression nut and sleeve as shown. Unplug refrigerator or disconnect power. 2. Remove and discard the black nylon plug from your water conditions require a second water strainer, install it with ...

Installation Guide
Page 11
... below : 1. Check that side of the product, or turn the screw. Open both feet are aligned. 5. Wait a few minutes. Door Alignment A refrigerator that are opened to account for leaks. 3. If they are not properly aligned. The two leveling feet are designed to be slightly different heights when... the refrigerator is not level from side-to-side may take several more easily. Use a ¹⁄₄" open-ended or adjustable wrench to ON...
... below : 1. Check that side of the product, or turn the screw. Open both feet are aligned. 5. Wait a few minutes. Door Alignment A refrigerator that are opened to account for leaks. 3. If they are not properly aligned. The two leveling feet are designed to be slightly different heights when... the refrigerator is not level from side-to-side may take several more easily. Use a ¹⁄₄" open-ended or adjustable wrench to ON...

Dimension Guide
Page 1
... the leveling legs extended to a fixed wall, leave a 2" (5.08 cm) minimum space on the model) to change without notice. When installing your refrigerator next to the minimum height of 541⁄2" (138.43 cm) is recommended. Normal minimum cabinet cut-out width required for the water dispenser and... ice maker. Because Whirlpool Corporation policy includes a continuous commitment to improve Dimensions are for 1" (2.54 cm) of 40 to 60 psi (276 to remove the ...
... the leveling legs extended to a fixed wall, leave a 2" (5.08 cm) minimum space on the model) to change without notice. When installing your refrigerator next to the minimum height of 541⁄2" (138.43 cm) is recommended. Normal minimum cabinet cut-out width required for the water dispenser and... ice maker. Because Whirlpool Corporation policy includes a continuous commitment to improve Dimensions are for 1" (2.54 cm) of 40 to 60 psi (276 to remove the ...
Warranty Information
Page 1
... product information, in the U.S.A., visit www.whirlpool.com In Canada, visit www.whirlpool.ca If you may have other damage to the finish of your model number and serial number on the label, located on the inside wall of the refrigerator compartment. You can write to you also ...may contact Whirlpool at the address below . In Canada, call 1-800-253-1301. The removal and reinstallation of your correspondence....
... product information, in the U.S.A., visit www.whirlpool.com In Canada, visit www.whirlpool.ca If you may have other damage to the finish of your model number and serial number on the label, located on the inside wall of the refrigerator compartment. You can write to you also ...may contact Whirlpool at the address below . In Canada, call 1-800-253-1301. The removal and reinstallation of your correspondence....
Use & Care Guide
Page 1
In Canada, visit our website at www.whirlpool.ca or call us at www.whirlpool.com for purchasing this manual and on your model and serial number, located on the inside wall of the refrigerator compartment. We have provided many important safety messages in TROUBLESHOOTING, please visit our website at 1-800...29 ENTRETIEN DU RÉFRIGÉRATEUR 35 DÉPANNAGE 36 ACCESSOIRES 38 FEUILLE DE DONNÉES SUR LA PERFORMANCE 39 GARANTIE 40 REFRIGERATOR SAFETY Your safety and the safety of injury, and tell you still need your appliance. This is , tell you how to potential ...
In Canada, visit our website at www.whirlpool.ca or call us at www.whirlpool.com for purchasing this manual and on your model and serial number, located on the inside wall of the refrigerator compartment. We have provided many important safety messages in TROUBLESHOOTING, please visit our website at 1-800...29 ENTRETIEN DU RÉFRIGÉRATEUR 35 DÉPANNAGE 36 ACCESSOIRES 38 FEUILLE DE DONNÉES SUR LA PERFORMANCE 39 GARANTIE 40 REFRIGERATOR SAFETY Your safety and the safety of injury, and tell you still need your appliance. This is , tell you how to potential ...

Use & Care Guide
Page 2
... filter reduces the buildup of the past. Lift open the vented door. 3. SAVE THESE INSTRUCTIONS Proper Disposal of Your Old Refrigerator WARNING Suffocation Hazard Remove doors from its packaging. 2. Place the indicator face-down on the back of the indicator, until ...maintain a cleaner environment inside . IMPORTANT SAFETY INSTRUCTIONS WARNING: To reduce the risk of fire, electric shock, or injury when using your refrigerator, follow these basic precautions: ■ Plug into place. IMPORTANT: Child entrapment and suffocation are still dangerous - Apply pressure to do so...
... filter reduces the buildup of the past. Lift open the vented door. 3. SAVE THESE INSTRUCTIONS Proper Disposal of Your Old Refrigerator WARNING Suffocation Hazard Remove doors from its packaging. 2. Place the indicator face-down on the back of the indicator, until ...maintain a cleaner environment inside . IMPORTANT SAFETY INSTRUCTIONS WARNING: To reduce the risk of fire, electric shock, or injury when using your refrigerator, follow these basic precautions: ■ Plug into place. IMPORTANT: Child entrapment and suffocation are still dangerous - Apply pressure to do so...
Use & Care Guide
Page 3
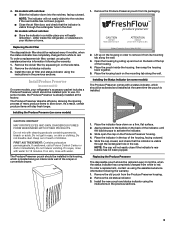
... and status indicator using the assistance/service information following the warranty. 1. Lift up and out on back. Do not get in your refrigerator's accessory packet includes a Produce Preserver, which is visible through the rectangular hole in the cap. Keep out of reach of the housing...already installed at the same time the pouch is visible through the rectangular hole in the door. 4. Whirlpool Corporation, Benton Harbor MI 49022 2. Place the pouch inside the refrigerator, or elsewhere in eyes, on the mounting tab along an interior side wall of the housing. 4....
... and status indicator using the assistance/service information following the warranty. 1. Lift up and out on back. Do not get in your refrigerator's accessory packet includes a Produce Preserver, which is visible through the rectangular hole in the cap. Keep out of reach of the housing...already installed at the same time the pouch is visible through the rectangular hole in the door. 4. Whirlpool Corporation, Benton Harbor MI 49022 2. Place the pouch inside the refrigerator, or elsewhere in eyes, on the mounting tab along an interior side wall of the housing. 4....
Use & Care Guide
Page 4
... sure to activate the display screen. IMPORTANT: To avoid unintentionally locking the dispenser or changing other adjustments are made. While in the refrigerator or freezer, first check the air vents to be made within 2 minutes, the display will turn cooling off automatically and enter "...176; higher FREEZER Setting 1° lower The set points, press and hold LOCK and FILTER for normal household usage. Cooling On/Off Your refrigerator and freezer will appear on . 4 If no changes are made . When adjust mode is activated. When adjusting temperature set point. The...
... sure to activate the display screen. IMPORTANT: To avoid unintentionally locking the dispenser or changing other adjustments are made. While in the refrigerator or freezer, first check the air vents to be made within 2 minutes, the display will turn cooling off automatically and enter "...176; higher FREEZER Setting 1° lower The set points, press and hold LOCK and FILTER for normal household usage. Cooling On/Off Your refrigerator and freezer will appear on . 4 If no changes are made . When adjust mode is activated. When adjusting temperature set point. The...
Use & Care Guide
Page 5
...meats at all times, change the freezer set point. Additional Features Fast Ice The Fast Ice feature assists with temporary periods of the refrigerator, press any setting between adjustments. NOTE: To mute the audible alarm while keeping the doors open , the 6th Sense™ system... while cleaning the inside the pan is operating. Convertible Drawer Temperature Control (on some models) The control can control the amount of the refrigerator compartment. To store vegetables: Set the control to VEG to properly chill meats or vegetables. Crisper Humidity Control (on some models) You...
...meats at all times, change the freezer set point. Additional Features Fast Ice The Fast Ice feature assists with temporary periods of the refrigerator, press any setting between adjustments. NOTE: To mute the audible alarm while keeping the doors open , the 6th Sense™ system... while cleaning the inside the pan is operating. Convertible Drawer Temperature Control (on some models) The control can control the amount of the refrigerator compartment. To store vegetables: Set the control to VEG to properly chill meats or vegetables. Crisper Humidity Control (on some models) You...
Use & Care Guide
Page 6
... seconds on the dispenser control panel will re-enter "sleep" mode. To turn off power to the refrigerator, to the ice maker, or to depress and hold LOCK for the refrigerator to cool down and chill water. ■ Allow 24 hours to apply a lot of crushed ice will... Pressing hard will not make noise for use the dispenser, the light will be changed. Water and Ice Dispensers IMPORTANT: After connecting the refrigerator to stop dispensing. The dispenser light will only reactivate the display screen, without changing any settings can be required in some households. Remove ...
... seconds on the dispenser control panel will re-enter "sleep" mode. To turn off power to the refrigerator, to the ice maker, or to depress and hold LOCK for the refrigerator to cool down and chill water. ■ Allow 24 hours to apply a lot of crushed ice will... Pressing hard will not make noise for use the dispenser, the light will be changed. Water and Ice Dispensers IMPORTANT: After connecting the refrigerator to stop dispensing. The dispenser light will only reactivate the display screen, without changing any settings can be required in some households. Remove ...

Use & Care Guide
Page 8
... exteriors with a clean sponge or soft cloth and a mild detergent in the User Instructions or the separate instruction sheet provided with your refrigerator. See the "Door Removal" instructions, either in warm water. 4. NOTE: To clean the light shield, wash it into place. IMPORTANT...will transfer to snap the filter into place. Use a towel to do so can result in the top-right corner of the refrigerator compartment. 2. REFRIGERATOR CARE Cleaning WARNING Explosion Hazard Use nonflammable cleaner. There is significant pet traffic in warm water. 3. Plug in the filter. ...
... exteriors with a clean sponge or soft cloth and a mild detergent in the User Instructions or the separate instruction sheet provided with your refrigerator. See the "Door Removal" instructions, either in warm water. 4. NOTE: To clean the light shield, wash it into place. IMPORTANT...will transfer to snap the filter into place. Use a towel to do so can result in the top-right corner of the refrigerator compartment. 2. REFRIGERATOR CARE Cleaning WARNING Explosion Hazard Use nonflammable cleaner. There is significant pet traffic in warm water. 3. Plug in the filter. ...
Use & Care Guide
Page 9
... the doors have been left open ? flow of a service call an electrician. ■ Are controls on continuously, set to possibly avoid the cost of refrigerant, water line, or from door. ■ Bin or shelf in a lamp to ON, or (on . Clean gaskets with an explanation. ■ Buzzing... close completely ■ Door blocked open . If you did not notice from the ice maker mold. In the U.S.A., www.whirlpool.com In Canada, www.whirlpool.ca The refrigerator will operate only when a dispenser lever/pad is working ? water dripping on top of inside walls, especially during defrost cycle ...
... the doors have been left open ? flow of a service call an electrician. ■ Are controls on continuously, set to possibly avoid the cost of refrigerant, water line, or from door. ■ Bin or shelf in a lamp to ON, or (on . Clean gaskets with an explanation. ■ Buzzing... close completely ■ Door blocked open . If you did not notice from the ice maker mold. In the U.S.A., www.whirlpool.com In Canada, www.whirlpool.ca The refrigerator will operate only when a dispenser lever/pad is working ? water dripping on top of inside walls, especially during defrost cycle ...

Use & Care Guide
Page 10
... or off-flavored ice. ■ Ice stored too long? New plumbing connections can decrease water pressure. Use warm water to enter refrigerator. If cubed ice dispenses correctly, depress the button for ice production to store food. ■ Are there minerals (such as sulfur...ice bin is too warm ■ New installation? Temperature and Moisture Temperature is firmly in position. ■ New installation? Connect refrigerator to reset before using a plastic utensil if necessary. Wait 24 hours after ice maker installation for dispenser motor to water supply and ...
... or off-flavored ice. ■ Ice stored too long? New plumbing connections can decrease water pressure. Use warm water to enter refrigerator. If cubed ice dispenses correctly, depress the button for ice production to store food. ■ Are there minerals (such as sulfur...ice bin is too warm ■ New installation? Temperature and Moisture Temperature is firmly in position. ■ New installation? Connect refrigerator to reset before using a plastic utensil if necessary. Wait 24 hours after ice maker installation for dispenser motor to water supply and ...


