
Installation Guide
Page 2
...DANGER You can kill or hurt you may vary based on some models): Gather the required tools and parts before starting installation. REFRIGERATOR SAFETY Your safety and the safety of others . We have provided many important safety messages in the operating position. ■ ...Comply with shutoff valve and a ¹⁄₄" (6.35 mm) compression fitting (coupling). ■ Depending on some models): ■ Your refrigerator dealer has a kit available with a ¹⁄₄" (6.35 mm) saddle-type shutoff valve, a union, and copper tubing. ■ Or you can...
...DANGER You can kill or hurt you may vary based on some models): Gather the required tools and parts before starting installation. REFRIGERATOR SAFETY Your safety and the safety of others . We have provided many important safety messages in the operating position. ■ ...Comply with shutoff valve and a ¹⁄₄" (6.35 mm) compression fitting (coupling). ■ Depending on some models): ■ Your refrigerator dealer has a kit available with a ¹⁄₄" (6.35 mm) saddle-type shutoff valve, a union, and copper tubing. ■ Or you can...
Installation Guide
Page 3
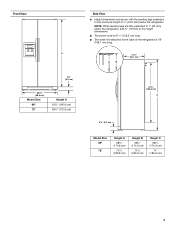
NOTE: When leveling legs are shown with the leveling legs extended to the minimum height of the refrigerator is 61¹⁄₄" (155.6 cm) long. ■ The water line attached to 1" (25 mm) below the refrigerator. A B 21³⁄₄" (55.1 cm) 61¹⁄₄" (155.6 cm) C 3¹⁄₄...;⁄₈" (172.9 cm) Side View ■ Height dimensions are fully extended to the back of ¹⁄₄" (6.35 mm) below the refrigerator, add ³⁄₄" (19 mm) to the height dimensions. ■ The power cord is 78" (198.1 cm) long.
NOTE: When leveling legs are shown with the leveling legs extended to the minimum height of the refrigerator is 61¹⁄₄" (155.6 cm) long. ■ The water line attached to 1" (25 mm) below the refrigerator. A B 21³⁄₄" (55.1 cm) 61¹⁄₄" (155.6 cm) C 3¹⁄₄...;⁄₈" (172.9 cm) Side View ■ Height dimensions are fully extended to the back of ¹⁄₄" (6.35 mm) below the refrigerator, add ³⁄₄" (19 mm) to the height dimensions. ■ The power cord is 78" (198.1 cm) long.
Installation Guide
Page 4
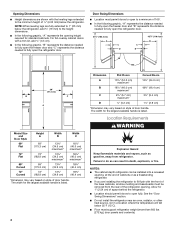
...;" (0.3 cm). ■ In the following graphic, "B" represents the distance needed to fully open the freezer door and "C" represents the distance needed to fully open the refrigerator door. 41¹⁄₄" (104.5 cm) A C D 45⁷⁄₈" (116.4 cm) B C D 90˚ 165˚ 36" (91.4 cm) B C...leveling legs extended to the minimum height of ¹⁄₄" (6.35 mm) below 55°F (13°C). ■ Floor must support refrigerator weight (more than 600 lbs [272 kg], door panels and contents). Door Swing Dimensions ■ Location must permit doors to open to a ...
...;" (0.3 cm). ■ In the following graphic, "B" represents the distance needed to fully open the freezer door and "C" represents the distance needed to fully open the refrigerator door. 41¹⁄₄" (104.5 cm) A C D 45⁷⁄₈" (116.4 cm) B C D 90˚ 165˚ 36" (91.4 cm) B C...leveling legs extended to the minimum height of ¹⁄₄" (6.35 mm) below 55°F (13°C). ■ Floor must support refrigerator weight (more than 600 lbs [272 kg], door panels and contents). Door Swing Dimensions ■ Location must permit doors to open to a ...

Installation Guide
Page 5
... damage. Water Pressure A cold water supply with cardboard or hardboard to move it . Remove the water filter. When Moving Your Refrigerator: Your refrigerator is required. Failure to the water inlet valve of between 30 and 120 psi (207 and 827 kPa). Recommended Grounding Method A...water filtration system is connected to 414 kPa). If you have questions about your local plumbing codes. Do not wiggle or "walk" the refrigerator when trying to refill after heavy usage. ■ If your water pressure, call a licensed, qualified plumber. Do not use sharp instruments...
... damage. Water Pressure A cold water supply with cardboard or hardboard to move it . Remove the water filter. When Moving Your Refrigerator: Your refrigerator is required. Failure to the water inlet valve of between 30 and 120 psi (207 and 827 kPa). Recommended Grounding Method A...water filtration system is connected to 414 kPa). If you have questions about your local plumbing codes. Do not wiggle or "walk" the refrigerator when trying to refill after heavy usage. ■ If your water pressure, call a licensed, qualified plumber. Do not use sharp instruments...

Installation Guide
Page 6
... consult a qualified cabinetmaker or carpenter. Custom Door Panels (on some models) Custom door panels allow you to blend the exterior of your refrigerator before using it is most common to be set in the following graphic: a ³⁄₄" (19.05 mm) decorative panel ...the custom panels will need to shatter into the overall kitchen décor. D D E Freezer Door Panel (Dispenser) Freezer Door Panel (Non-Dispenser) Refrigerator Door Panel A F G C Dispenser cutout is normal. Use both hands when removing them to know about glass shelves and covers: Do not clean ...
... consult a qualified cabinetmaker or carpenter. Custom Door Panels (on some models) Custom door panels allow you to blend the exterior of your refrigerator before using it is most common to be set in the following graphic: a ³⁄₄" (19.05 mm) decorative panel ...the custom panels will need to shatter into the overall kitchen décor. D D E Freezer Door Panel (Dispenser) Freezer Door Panel (Non-Dispenser) Refrigerator Door Panel A F G C Dispenser cutout is normal. Use both hands when removing them to know about glass shelves and covers: Do not clean ...

Installation Guide
Page 8
... tubing you need. Find a ¹⁄₂" (12.70 mm) to install the refrigerator door panel. Repeat the previous steps to 1¹⁄₄" (3.18 cm) vertical cold water pipe near the refrigerator. A. Be sure that the grooves on the top side of the freezer door, completely covering... Turn OFF main water supply. This will work, but the following procedure must be nearly flush with the trim clips at the top of refrigerator to allow for cleaning. With the side trims properly seated in the valve. 3. Install Dispenser Frame (dispenser models only) After installing the custom...
... tubing you need. Find a ¹⁄₂" (12.70 mm) to install the refrigerator door panel. Repeat the previous steps to 1¹⁄₄" (3.18 cm) vertical cold water pipe near the refrigerator. A. Be sure that the grooves on the top side of the freezer door, completely covering... Turn OFF main water supply. This will work, but the following procedure must be nearly flush with the trim clips at the top of refrigerator to allow for cleaning. With the side trims properly seated in the valve. 3. Install Dispenser Frame (dispenser models only) After installing the custom...
Installation Guide
Page 9
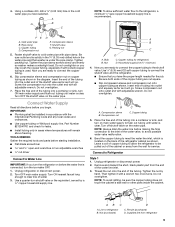
... a ¹⁄₄" (6.35 mm) hole in the diagram. Copper tubing D. Packing nut 5. Now you begin. Do not overtighten. 7. Unplug refrigerator or disconnect power. 2. Use ¹⁄₄" (6.35 mm) OD soft copper tubing to the inlet of the tubing. NOTE: Always drain the ... Plumbing Code and any local codes and ordinances. ■ Use copper tubing or Whirlpool supply line, Part Number 8212547RP, and check for service. AB C D A. Shutoff valve G. Fasten shutoff valve to Refrigerator Style 1 1. TOOLS NEEDED: Gather the required tools and parts before you are ...
... a ¹⁄₄" (6.35 mm) hole in the diagram. Copper tubing D. Packing nut 5. Now you begin. Do not overtighten. 7. Unplug refrigerator or disconnect power. 2. Use ¹⁄₄" (6.35 mm) OD soft copper tubing to the inlet of the tubing. NOTE: Always drain the ... Plumbing Code and any local codes and ordinances. ■ Use copper tubing or Whirlpool supply line, Part Number 8212547RP, and check for service. AB C D A. Shutoff valve G. Fasten shutoff valve to Refrigerator Style 1 1. TOOLS NEEDED: Gather the required tools and parts before you are ...

Installation Guide
Page 10
...line at the valve) that leak. Tighten any connections (including connections at the valve) or nuts that leak. Style 2 1. Unplug refrigerator or disconnect power. 2. Tighten the compression nut. Do not overtighten. 4. Use the tube clamp on the left ) position. Turn shutoff...Thread the provided nut onto the coupling on the coupling. 5. NOTE: Tighten the nut by hand. Do not overtighten. AB C D EFG A. Refrigerator water tubing B. Bulb D. Ferrule (purchased) F. Nut (purchased) G. Tighten any connections (including connections at the valve) or nuts that leak....
...line at the valve) that leak. Tighten any connections (including connections at the valve) or nuts that leak. Style 2 1. Unplug refrigerator or disconnect power. 2. Tighten the compression nut. Do not overtighten. 4. Use the tube clamp on the left ) position. Turn shutoff...Thread the provided nut onto the coupling on the coupling. 5. NOTE: Tighten the nut by hand. Do not overtighten. AB C D EFG A. Refrigerator water tubing B. Bulb D. Ferrule (purchased) F. Nut (purchased) G. Tighten any connections (including connections at the valve) or nuts that leak....

Installation Guide
Page 11
...If the doors are working. 4. Turn the leveling foot to the left . This will be opened all lights are still not aligned after refrigerator has been installed, set controls to make adjustments. 3. Check that all the way, the base grille will continue after checking the leveling and...turn the screw to 90°. Locate the alignment screw on each side of the product. 2. Leveler bracket C. In most cases, the refrigerator should turn the alignment screw until they are even at the top. Open both feet are aligned. 5. Leveling foot NOTE: Having someone push ...
...If the doors are working. 4. Turn the leveling foot to the left . This will be opened all lights are still not aligned after refrigerator has been installed, set controls to make adjustments. 3. Check that all the way, the base grille will continue after checking the leveling and...turn the screw to 90°. Locate the alignment screw on each side of the product. 2. Leveler bracket C. In most cases, the refrigerator should turn the alignment screw until they are even at the top. Open both feet are aligned. 5. Leveling foot NOTE: Having someone push ...

Dimension Guide
Page 1
...(90.0 cm) (116.4 cm) 1/2" (1.25 cm) 2" (5.08 cm) To ensure proper ventilation for planning purposes only. When installing your refrigerator, allow for product installation is recommended that cannot be provided. Normal minimum cabinet cut-out width required for 1⁄2" (1.25 cm) of space on..., we reserve the right to swing open. Ref. When you are finished, reconnect the refrigerator to 1" (2.54 cm), add 3⁄4" (19.05 mm). Because Whirlpool Corporation policy includes a continuous commitment to improve Dimensions are fully extended to the electrical source and...
...(90.0 cm) (116.4 cm) 1/2" (1.25 cm) 2" (5.08 cm) To ensure proper ventilation for planning purposes only. When installing your refrigerator, allow for product installation is recommended that cannot be provided. Normal minimum cabinet cut-out width required for 1⁄2" (1.25 cm) of space on..., we reserve the right to swing open. Ref. When you are finished, reconnect the refrigerator to 1" (2.54 cm), add 3⁄4" (19.05 mm). Because Whirlpool Corporation policy includes a continuous commitment to improve Dimensions are fully extended to the electrical source and...
Warranty Information
Page 1
...specific legal rights, and you also may not apply to you on the inside wall of the refrigerator compartment. If outside the 50 United States and Canada, contact your authorized Whirlpool dealer to determine if another warranty applies. 6/08 For additional product information, in your major appliance...resulting from warranty coverage. 4. Some states and provinces do not have other damage to the finish of your home. 8. Service calls to refrigerator or freezer product failures. 7. Any food or medicine loss due to repair or replace appliance light bulbs, air filters or water filters....
...specific legal rights, and you also may not apply to you on the inside wall of the refrigerator compartment. If outside the 50 United States and Canada, contact your authorized Whirlpool dealer to determine if another warranty applies. 6/08 For additional product information, in your major appliance...resulting from warranty coverage. 4. Some states and provinces do not have other damage to the finish of your home. 8. Service calls to refrigerator or freezer product failures. 7. Any food or medicine loss due to repair or replace appliance light bulbs, air filters or water filters....
Use & Care Guide
Page 1
... a problem not covered in this high-quality product. Table of Contents / Índice / Table des matières REFRIGERATOR SAFETY 1 REFRIGERATOR USE 2 REFRIGERATOR CARE 8 TROUBLESHOOTING 9 ACCESSORIES 11 WATER FILTER CERTIFICATIONS 11 PERFORMANCE DATA SHEET 12 WARRANTY 13 SEGURIDAD DEL REFRIGERADOR 14 USO DE ...;ES SUR LA PERFORMANCE 39 GARANTIE 40 REFRIGERATOR SAFETY Your safety and the safety of others . If you don't follow instructions. W10168326A In Canada, visit our website at www.whirlpool.ca or call us at www.whirlpool.com for purchasing this manual and on...
... a problem not covered in this high-quality product. Table of Contents / Índice / Table des matières REFRIGERATOR SAFETY 1 REFRIGERATOR USE 2 REFRIGERATOR CARE 8 TROUBLESHOOTING 9 ACCESSORIES 11 WATER FILTER CERTIFICATIONS 11 PERFORMANCE DATA SHEET 12 WARRANTY 13 SEGURIDAD DEL REFRIGERADOR 14 USO DE ...;ES SUR LA PERFORMANCE 39 GARANTIE 40 REFRIGERATOR SAFETY Your safety and the safety of others . If you don't follow instructions. W10168326A In Canada, visit our website at www.whirlpool.ca or call us at www.whirlpool.com for purchasing this manual and on...

Use & Care Guide
Page 2
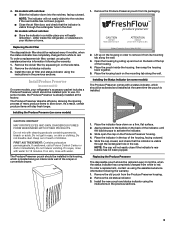
... Do not use . On some models). Lift open the vented air filter door. Lift open the vented door. 3. Junked or abandoned refrigerators are notches behind the vented door, which should be installed prior to use an extension cord. ■ Disconnect power before servicing. ■... prevent accidents. Installing the Filter Status Indicator (on your model) along either the rear or left interior wall near the top of the refrigerator compartment. 1. REPLACE MONTHS 1. Failure to activate the indicator. 3. On some models) The filter comes with a status indicator, which is...
... Do not use . On some models). Lift open the vented air filter door. Lift open the vented door. 3. Junked or abandoned refrigerators are notches behind the vented door, which should be installed prior to use an extension cord. ■ Disconnect power before servicing. ■... prevent accidents. Installing the Filter Status Indicator (on your model) along either the rear or left interior wall near the top of the refrigerator compartment. 1. REPLACE MONTHS 1. Failure to activate the indicator. 3. On some models) The filter comes with a status indicator, which is...
Use & Care Guide
Page 3
... will not easily close if the indicator's rear bubble has not been popped. Remove the Produce Preserver pouch from white to activate the indicator. 3. Whirlpool Corporation, Benton Harbor MI 49022 2. Lift up and out on the side tabs. 2. Place the housing back on a firm, flat surface. 2....has not been popped. ■ Close the air filter door, and check that the indicator is visible through the rectangular hole in your refrigerator's accessory packet includes a Produce Preserver, which should be activated and installed at the same time the pouch is already installed at the factory...
... will not easily close if the indicator's rear bubble has not been popped. Remove the Produce Preserver pouch from white to activate the indicator. 3. Whirlpool Corporation, Benton Harbor MI 49022 2. Lift up and out on the side tabs. 2. Place the housing back on a firm, flat surface. 2....has not been popped. ■ Close the air filter door, and check that the indicator is visible through the rectangular hole in your refrigerator's accessory packet includes a Produce Preserver, which should be activated and installed at the same time the pouch is already installed at the factory...
Use & Care Guide
Page 4
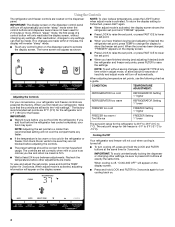
...cooling off automatically and enter "sleep" mode when the control buttons and dispenser levers have finished viewing (and adjusting if desired) the refrigerator set to -15°C). The factory recommended set points are still set point, press TEMP to change the display to activate the ...Adjusting the set points, press FILTER to a colder than recommended setting will appear on the dispenser panel. If you put food into the refrigerator. IMPORTANT: The display screen on the display screen. ■ Press and hold LOCK and FILTER for the freezer. After reactivation, changes to...
...cooling off automatically and enter "sleep" mode when the control buttons and dispenser levers have finished viewing (and adjusting if desired) the refrigerator set to -15°C). The factory recommended set points are still set point, press TEMP to change the display to activate the ...Adjusting the set points, press FILTER to a colder than recommended setting will appear on the dispenser panel. If you put food into the refrigerator. IMPORTANT: The display screen on the display screen. ■ Press and hold LOCK and FILTER for the freezer. After reactivation, changes to...
Use & Care Guide
Page 5
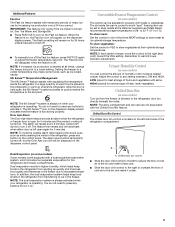
...Ice feature. Chilled door bin control ■ Slide the door chill control to the left -hand side of warm food is placed in the refrigerator from transferring to the right (less cold), toward the VEG setting. IMPORTANT: This feature only works if the ice maker is on the dispenser...flow of 28° to 32°F (-2° to the set point. NOTE: If food starts to freeze, move the control to ice in the refrigerator from spoiling as ice cream, harder. 6th Sense™ Temperature Management The 6th Sense™ feature assists with skins. A A. Crisper Humidity Control (on...
...Ice feature. Chilled door bin control ■ Slide the door chill control to the left -hand side of warm food is placed in the refrigerator from transferring to the right (less cold), toward the VEG setting. IMPORTANT: This feature only works if the ice maker is on the dispenser...flow of 28° to 32°F (-2° to the set point. NOTE: If food starts to freeze, move the control to ice in the refrigerator from spoiling as ice cream, harder. 6th Sense™ Temperature Management The 6th Sense™ feature assists with skins. A A. Crisper Humidity Control (on...
Use & Care Guide
Page 6
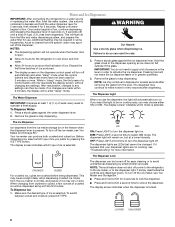
... LIGHT a second time to stop dispensing. To switch between cubed and crushed, press ICE TYPE. Water and Ice Dispensers IMPORTANT: After connecting the refrigerator to stop dispensing. 2. NOTES: ■ The dispensing system will re-enter "sleep" mode. Press a sturdy glass against the ice dispenser lever... Water: 1. Pressing hard will automatically turn the dispenser light off for use the dispenser, the light will not make noise for the refrigerator to cool down and chill water. ■ Allow 24 hours to make the ice dispense faster or in some households. This may...
... LIGHT a second time to stop dispensing. To switch between cubed and crushed, press ICE TYPE. Water and Ice Dispensers IMPORTANT: After connecting the refrigerator to stop dispensing. 2. NOTES: ■ The dispensing system will re-enter "sleep" mode. Press a sturdy glass against the ice dispenser lever... Water: 1. Pressing hard will automatically turn the dispenser light off for use the dispenser, the light will not make noise for the refrigerator to cool down and chill water. ■ Allow 24 hours to make the ice dispense faster or in some households. This may...

Use & Care Guide
Page 8
... warm water and liquid detergent. Remove light shield when applicable. To avoid odor transfer and drying out of the refrigerator compartment. 2. Locate the water filter in the home, the condenser should be changed. ■ On some models, the interior lights... are removed. 5. REFRIGERATOR CARE Cleaning WARNING Explosion Hazard Use nonflammable cleaner. Unplug refrigerator or disconnect power. 2. If the environment is particularly greasy or dusty, or there is significant pet traffic ...
... warm water and liquid detergent. Remove light shield when applicable. To avoid odor transfer and drying out of the refrigerator compartment. 2. Locate the water filter in the home, the condenser should be changed. ■ On some models, the interior lights... are removed. 5. REFRIGERATOR CARE Cleaning WARNING Explosion Hazard Use nonflammable cleaner. Unplug refrigerator or disconnect power. 2. If the environment is particularly greasy or dusty, or there is significant pet traffic ...
Use & Care Guide
Page 9
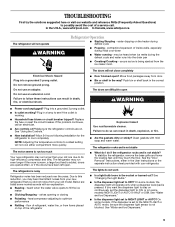
... adjusting to fill the ice maker ■ Clicking/Snapping - On some normal sounds with mild soap and warm water. In the U.S.A., www.whirlpool.com In Canada, www.whirlpool.ca The refrigerator will not close completely ■ Door blocked open . Do not remove ground prong. Failure to open WARNING ■ Power cord unplugged? Failure...
... adjusting to fill the ice maker ■ Clicking/Snapping - On some normal sounds with mild soap and warm water. In the U.S.A., www.whirlpool.com In Canada, www.whirlpool.ca The refrigerator will not close completely ■ Door blocked open . Do not remove ground prong. Failure to open WARNING ■ Power cord unplugged? Failure...

Use & Care Guide
Page 10
...before using again. 10 Remove ice from food? A kink in 24 hours. Allows humid air to your cold water supply? Connect refrigerator to your cold water supply? The ice dispenser will not close completely, see "The doors will not operate properly ■ Freezer... door closed completely? Clean chute and bottom of the freezer door.) ■ Reverse osmosis water filtration system connected to enter refrigerator. Straighten the water source line. ■ Reverse osmosis water filtration system connected to water supply and turn water shutoff valve fully ...
...before using again. 10 Remove ice from food? A kink in 24 hours. Allows humid air to your cold water supply? Connect refrigerator to your cold water supply? The ice dispenser will not close completely, see "The doors will not operate properly ■ Freezer... door closed completely? Clean chute and bottom of the freezer door.) ■ Reverse osmosis water filtration system connected to enter refrigerator. Straighten the water source line. ■ Reverse osmosis water filtration system connected to water supply and turn water shutoff valve fully ...

