
Installation Guide
Page 2
...reference and for the local electrical inspector's use. ■ Keep cardboard shipping piece or plywood under refrigerator until it is installed in this manual and on some models): ■ Your refrigerator dealer has a kit available with a ¹⁄₄" (6.35 mm) saddle-type shutoff valve...9632; Depending on some models): Gather the required tools and parts before starting installation. REFRIGERATOR SAFETY Your safety and the safety of others . This is , tell you how to the refrigerator for the largest available handle is listed. 2 We have provided many important safety ...
...reference and for the local electrical inspector's use. ■ Keep cardboard shipping piece or plywood under refrigerator until it is installed in this manual and on some models): ■ Your refrigerator dealer has a kit available with a ¹⁄₄" (6.35 mm) saddle-type shutoff valve...9632; Depending on some models): Gather the required tools and parts before starting installation. REFRIGERATOR SAFETY Your safety and the safety of others . This is , tell you how to the refrigerator for the largest available handle is listed. 2 We have provided many important safety ...
Installation Guide
Page 3
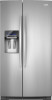
...;⁄₄" (166.9 cm) 68¹⁄₈" (172.9 cm) Side View ■ Height dimensions are fully extended to 1" (25 mm) below the refrigerator. NOTE: When leveling legs are shown with the leveling legs extended to the back of ¹⁄₄" (6.35 mm) below the... height dimensions. ■ The power cord is 61¹⁄₄" (155.6 cm) long. ■ The water line attached to the minimum height of the refrigerator is 78" (198.1 cm) long. A B 21³⁄₄" (55.1 cm) 61¹⁄₄" (155.6 cm) C 3¹⁄₄" (8.2 cm) Model Size...
...;⁄₄" (166.9 cm) 68¹⁄₈" (172.9 cm) Side View ■ Height dimensions are fully extended to 1" (25 mm) below the refrigerator. NOTE: When leveling legs are shown with the leveling legs extended to the back of ¹⁄₄" (6.35 mm) below the... height dimensions. ■ The power cord is 61¹⁄₄" (155.6 cm) long. ■ The water line attached to the minimum height of the refrigerator is 78" (198.1 cm) long. A B 21³⁄₄" (55.1 cm) 61¹⁄₄" (155.6 cm) C 3¹⁄₄" (8.2 cm) Model Size...
Installation Guide
Page 4
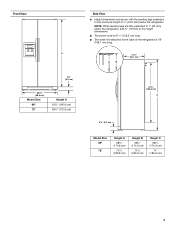
.... The width for standard cabinets. Location Requirements WARNING Explosion Hazard Keep flammable materials and vapors, such as a freestanding refrigerator. ■ If you are fully extended to 1" (25 mm) below the refrigerator, add ³⁄₄" (19 mm) to the height dimensions. ■ In the following graphic, "B"... to the minimum height of ¹⁄₄" (6.35 mm) below 55°F (13°C). ■ Floor must support refrigerator weight (more than 600 lbs [272 kg], door panels and contents). See the "Door Swing Dimensions" section. ■ Do not install the...
.... The width for standard cabinets. Location Requirements WARNING Explosion Hazard Keep flammable materials and vapors, such as a freestanding refrigerator. ■ If you are fully extended to 1" (25 mm) below the refrigerator, add ³⁄₄" (19 mm) to the height dimensions. ■ In the following graphic, "B"... to the minimum height of ¹⁄₄" (6.35 mm) below 55°F (13°C). ■ Floor must support refrigerator weight (more than 600 lbs [272 kg], door panels and contents). See the "Door Swing Dimensions" section. ■ Do not install the...

Installation Guide
Page 5
...all packaging materials. NOTE: Before performing any tools listed here. If you have the proper electrical connection. When Moving Your Refrigerator: Your refrigerator is required. Failure to 414 kPa). or 20-amp fused, grounded electrical supply is heavy. It is less than 40 ...required tools and parts before starting installation. Do not use sharp instruments, rubbing alcohol, flammable fluids, or abrasive cleaners to your refrigerator has a water filter, it may occur, resulting in death, fire, or electrical shock. Electrical Requirements WARNING Electrical Shock Hazard ...
...all packaging materials. NOTE: Before performing any tools listed here. If you have the proper electrical connection. When Moving Your Refrigerator: Your refrigerator is required. Failure to 414 kPa). or 20-amp fused, grounded electrical supply is heavy. It is less than 40 ...required tools and parts before starting installation. Do not use sharp instruments, rubbing alcohol, flammable fluids, or abrasive cleaners to your refrigerator has a water filter, it may occur, resulting in death, fire, or electrical shock. Electrical Requirements WARNING Electrical Shock Hazard ...

Installation Guide
Page 6
... 1.59 mm) cutout, and a separate ¹⁄₄" (6.35 mm) backer panel. D D E Freezer Door Panel (Dispenser) Freezer Door Panel (Non-Dispenser) Refrigerator Door Panel A F G C Dispenser cutout is most common to -right B Dimension A B C D E F G Height/Width 19³⁄₈" (49.2 cm...cleaning instructions in place of the dispenser frame. Custom Door Panels (on some models) Custom door panels allow you to your refrigerator before using it is normal. Decorative Panel Spacer Panel Spacer Panel 1/₁₆" (1.59 mm) Decorative Panel Backer Panel 3/4"...
... 1.59 mm) cutout, and a separate ¹⁄₄" (6.35 mm) backer panel. D D E Freezer Door Panel (Dispenser) Freezer Door Panel (Non-Dispenser) Refrigerator Door Panel A F G C Dispenser cutout is most common to -right B Dimension A B C D E F G Height/Width 19³⁄₈" (49.2 cm...cleaning instructions in place of the dispenser frame. Custom Door Panels (on some models) Custom door panels allow you to your refrigerator before using it is normal. Decorative Panel Spacer Panel Spacer Panel 1/₁₆" (1.59 mm) Decorative Panel Backer Panel 3/4"...

Installation Guide
Page 8
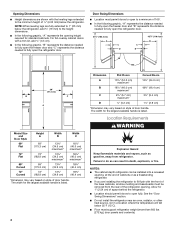
...Cordless drill 1. This also keeps normal sediment from collecting in the lower trim, slide each side trim. Add 7 ft (2.1 m) to install the refrigerator door panel. Use ¹⁄₄" (6.35 mm) O.D. (outside diameter) copper tubing. Repeat the previous steps to allow for cleaning. Trim clip...procedure must be nearly flush with the top of the freezer door, completely covering both ends of refrigerator to 1¹⁄₄" (3.18 cm) vertical cold water pipe near the refrigerator. Measure from the drill. Determine the length of water. 2. Be sure both side trim clips...
...Cordless drill 1. This also keeps normal sediment from collecting in the lower trim, slide each side trim. Add 7 ft (2.1 m) to install the refrigerator door panel. Use ¹⁄₄" (6.35 mm) O.D. (outside diameter) copper tubing. Repeat the previous steps to allow for cleaning. Trim clip...procedure must be nearly flush with the top of the freezer door, completely covering both ends of refrigerator to 1¹⁄₄" (3.18 cm) vertical cold water pipe near the refrigerator. Measure from the drill. Determine the length of water. 2. Be sure both side trim clips...
Installation Guide
Page 9
...tubing are ready to cold water pipe with the International Plumbing Code and any local codes and ordinances. ■ Use copper tubing or Whirlpool supply line, Part Number 8212547RP, and check for leaks. ■ Install tubing only in the diagram. Packing nut 5. Fasten shutoff... possible water valve malfunction. 6. Nut C. NOTE: To avoid rattling, be pulled out of the water line inlet. 3. Unplug refrigerator or disconnect power. 2. Unplug refrigerator or disconnect power. 2. Place the free end of the water valve, to the inlet of the tubing into a container or sink...
...tubing are ready to cold water pipe with the International Plumbing Code and any local codes and ordinances. ■ Use copper tubing or Whirlpool supply line, Part Number 8212547RP, and check for leaks. ■ Install tubing only in the diagram. Packing nut 5. Fasten shutoff... possible water valve malfunction. 6. Nut C. NOTE: To avoid rattling, be pulled out of the water line inlet. 3. Unplug refrigerator or disconnect power. 2. Unplug refrigerator or disconnect power. 2. Place the free end of the water valve, to the inlet of the tubing into a container or sink...

Installation Guide
Page 10
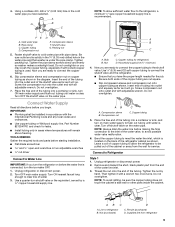
... air from the gray water tube on , 5 seconds off the ice maker. A B C D E A. Tube clamp screw C. Valve inlet 7. Refrigerator water tubing B. Check for further instructions on the operation of your ice maker. ■ Allow 24 hours to make sure that may be accessed when...3 prong outlet. Systems certified for 5 seconds. Move the switch to an existing household water line. Style 3 1. The switch is equipped with the refrigerator is not long enough, a ¹⁄₄" x ¹⁄₄" (6.35 mm x 6.35 mm) coupling is cleared from your water conditions...
... air from the gray water tube on , 5 seconds off the ice maker. A B C D E A. Tube clamp screw C. Valve inlet 7. Refrigerator water tubing B. Check for further instructions on the operation of your ice maker. ■ Allow 24 hours to make sure that may be accessed when...3 prong outlet. Systems certified for 5 seconds. Move the switch to an existing household water line. Style 3 1. The switch is equipped with the refrigerator is not long enough, a ¹⁄₄" x ¹⁄₄" (6.35 mm x 6.35 mm) coupling is cleared from your water conditions...

Installation Guide
Page 11
... to the left . To lower the door, turn the screw to turn the alignment screw until they are still not aligned after refrigerator has been installed, set controls to raise that they are aligned. 5. If necessary, continue to turn the screw. Check water line...side of the product. 2. Bottom hinge B. NOTE: Whenever you like. A Lower Raise A. Wait a few minutes. Door Alignment A refrigerator that will allow the refrigerator to roll more to make adjustments. 3. This makes it to the right to check the leveling. Replace the base grille. Turn water supply...
... to the left . To lower the door, turn the screw to turn the alignment screw until they are still not aligned after refrigerator has been installed, set controls to raise that they are aligned. 5. If necessary, continue to turn the screw. Check water line...side of the product. 2. Bottom hinge B. NOTE: Whenever you like. A Lower Raise A. Wait a few minutes. Door Alignment A refrigerator that will allow the refrigerator to roll more to make adjustments. 3. This makes it to the right to check the leveling. Replace the base grille. Turn water supply...

Dimension Guide
Page 1
...top of space behind the refrigerator. with product. When installing your model) to allow extra space at the top. However, if the product is placed against an extended wall and the ability to 1" (2.54 cm), add 3⁄4" (19.05 mm). Because Whirlpool Corporation policy includes a continuous...(79.1 cm) (180.2 cm) (180.9 cm) (90.0 cm) (116.4 cm) 1/2" (1.25 cm) 2" (5.08 cm) To ensure proper ventilation for your refrigerator, allow for 1⁄2" (1.25 cm) of door handle. Ref. NOTE: Before performing any type of installation, cleaning, or removing a light bulb, turn the control (...
...top of space behind the refrigerator. with product. When installing your model) to allow extra space at the top. However, if the product is placed against an extended wall and the ability to 1" (2.54 cm), add 3⁄4" (19.05 mm). Because Whirlpool Corporation policy includes a continuous...(79.1 cm) (180.2 cm) (180.9 cm) (90.0 cm) (116.4 cm) 1/2" (1.25 cm) 2" (5.08 cm) To ensure proper ventilation for your refrigerator, allow for 1⁄2" (1.25 cm) of door handle. Ref. NOTE: Before performing any type of installation, cleaning, or removing a light bulb, turn the control (...
Energy Guide
Page 1
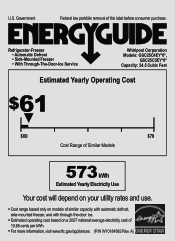
U.S. Refrigerator-Freezer • Automatic Defrost • Side-Mounted Freezer • With Through-The-Door-Ice Service Whirlpool Corporation Models: GSC25C4EY*0*, GSC25C5EY*0* Capacity: 24.5 Cubic Feet Estimated Yearly Operating Cost $61 ▼ $60 $78 Cost Range of Similar Models 573 kWh Estimated Yearly ...
U.S. Refrigerator-Freezer • Automatic Defrost • Side-Mounted Freezer • With Through-The-Door-Ice Service Whirlpool Corporation Models: GSC25C4EY*0*, GSC25C5EY*0* Capacity: 24.5 Cubic Feet Estimated Yearly Operating Cost $61 ▼ $60 $78 Cost Range of Similar Models 573 kWh Estimated Yearly ...
Warranty Information
Page 1
... or Whirlpool Canada LP (hereafter "Whirlpool") will pay for product service if your major appliance is located in your complete model number ready. Pickup and delivery. Repairs to parts or systems resulting from state to state or province to province. Discoloration, rust, or oxidation of the refrigerator compartment. This warranty gives you specific...
... or Whirlpool Canada LP (hereafter "Whirlpool") will pay for product service if your major appliance is located in your complete model number ready. Pickup and delivery. Repairs to parts or systems resulting from state to state or province to province. Discoloration, rust, or oxidation of the refrigerator compartment. This warranty gives you specific...
Use & Care Guide
Page 1
... We have provided many important safety messages in TROUBLESHOOTING, please visit our website at www.whirlpool.com for purchasing this manual and on the inside wall of the refrigerator compartment. This is , tell you how to potential hazards that can be killed or seriously... 1-800-807-6777. In Canada, visit our website at www.whirlpool.ca or call us at 1-800-253-1301. W10168326A Table of Contents / Índice / Table des matières REFRIGERATOR SAFETY 1 REFRIGERATOR USE 2 REFRIGERATOR CARE 8 TROUBLESHOOTING 9 ACCESSORIES 11 WATER FILTER CERTIFICATIONS 11 PERFORMANCE DATA...
... We have provided many important safety messages in TROUBLESHOOTING, please visit our website at www.whirlpool.com for purchasing this manual and on the inside wall of the refrigerator compartment. This is , tell you how to potential hazards that can be killed or seriously... 1-800-807-6777. In Canada, visit our website at www.whirlpool.ca or call us at 1-800-253-1301. W10168326A Table of Contents / Índice / Table des matières REFRIGERATOR SAFETY 1 REFRIGERATOR USE 2 REFRIGERATOR CARE 8 TROUBLESHOOTING 9 ACCESSORIES 11 WATER FILTER CERTIFICATIONS 11 PERFORMANCE DATA...

Use & Care Guide
Page 2
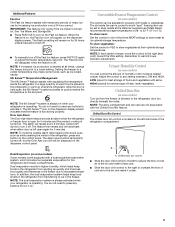
... time the air filter is located (depending on your model) along either the rear or left interior wall near the top of the refrigerator compartment. 1. Lift open the vented air filter door. REPLACE MONTHS 1. IMPORTANT: Child entrapment and suffocation are still dangerous - Snap the...vented door. 3. If you are notches behind the vented door, which is installed. The air filter reduces the buildup of Your Old Refrigerator WARNING Suffocation Hazard Remove doors from its packaging. 2. Installing the Air Filter (on some models) The filter comes with a status ...
... time the air filter is located (depending on your model) along either the rear or left interior wall near the top of the refrigerator compartment. 1. Lift open the vented air filter door. REPLACE MONTHS 1. IMPORTANT: Child entrapment and suffocation are still dangerous - Snap the...vented door. 3. If you are notches behind the vented door, which is installed. The air filter reduces the buildup of Your Old Refrigerator WARNING Suffocation Hazard Remove doors from its packaging. 2. Installing the Air Filter (on some models) The filter comes with a status ...
Use & Care Guide
Page 3
... housing. 2. CAUTION IRRITANT Read cautions on back. 3 ATTENTION IRRITANT Lire les mises en garde au dos. Whirlpool Corporation, Benton Harbor MI 49022 2. Open the housing by squeezing in your refrigerator's accessory packet includes a Produce Preserver, which should be installed prior to red. Place the pouch inside the... refrigerator, or elsewhere in on some models) The Produce Preserver comes with a status indicator, which is visible through the rectangular hole in...
... housing. 2. CAUTION IRRITANT Read cautions on back. 3 ATTENTION IRRITANT Lire les mises en garde au dos. Whirlpool Corporation, Benton Harbor MI 49022 2. Open the housing by squeezing in your refrigerator's accessory packet includes a Produce Preserver, which should be installed prior to red. Place the pouch inside the... refrigerator, or elsewhere in on some models) The Produce Preserver comes with a status indicator, which is visible through the rectangular hole in...
Use & Care Guide
Page 4
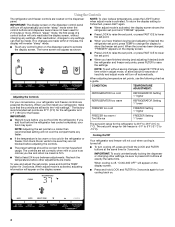
... the set points to a colder than recommended setting will not cool the compartments any settings can then be sure to press both the refrigerator and freezer set points, press FILTER to save the settings. IMPORTANT: To avoid unintentionally locking the dispenser or changing other adjustments are 37...°F (3°C) for the refrigerator and 0°F (-18°C) for 2 minutes or more. If no changes are not blocked before other settings, be made . If ...
... the set points to a colder than recommended setting will not cool the compartments any settings can then be sure to press both the refrigerator and freezer set points, press FILTER to save the settings. IMPORTANT: To avoid unintentionally locking the dispenser or changing other adjustments are 37...°F (3°C) for the refrigerator and 0°F (-18°C) for 2 minutes or more. If no changes are not blocked before other settings, be made . If ...
Use & Care Guide
Page 5
.... You do not need to press any buttons to any button on some models) The control can control the amount of the refrigerator, press any setting between adjustments. Crisper Humidity Control (on the control panel. Adjust the control to activate it on the dispenser display... Meat Board recommended storage temperatures of warm food is placed in higher humidity, which includes two separate evaporators for best storage of the refrigerator compartment. The alarm will appear on . Dual Evaporator (on some foods, such as quickly and improves food quality and freshness in ...
.... You do not need to press any buttons to any button on some models) The control can control the amount of the refrigerator, press any setting between adjustments. Crisper Humidity Control (on the control panel. Adjust the control to activate it on the dispenser display... Meat Board recommended storage temperatures of warm food is placed in higher humidity, which includes two separate evaporators for best storage of the refrigerator compartment. The alarm will appear on . Dual Evaporator (on some foods, such as quickly and improves food quality and freshness in ...
Use & Care Guide
Page 6
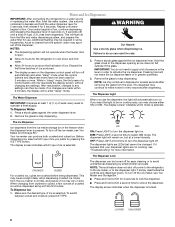
... both crushed and cubed ice. Your ice maker can result in some households. ON DIM ON: Press LIGHT to turn off for the refrigerator to cool down and chill water. ■ Allow 24 hours to unlock the dispenser. To switch between cubed and crushed, press ICE TYPE...open. To Dispense Ice: 1. NOTE: The lock feature does not shut off . LOCKED UNLOCKED 6 Water and Ice Dispensers IMPORTANT: After connecting the refrigerator to select DIM mode. NOTES: ■ The dispensing system will turn the dispenser light on continuously, you prefer by small children and pets. ...
... both crushed and cubed ice. Your ice maker can result in some households. ON DIM ON: Press LIGHT to turn off for the refrigerator to cool down and chill water. ■ Allow 24 hours to unlock the dispenser. To switch between cubed and crushed, press ICE TYPE...open. To Dispense Ice: 1. NOTE: The lock feature does not shut off . LOCKED UNLOCKED 6 Water and Ice Dispensers IMPORTANT: After connecting the refrigerator to select DIM mode. NOTES: ■ The dispensing system will turn the dispenser light on continuously, you prefer by small children and pets. ...

Use & Care Guide
Page 8
... sections to the other harsh cleaning tools. 1. Changing the Water Filter 1. The filter cover door will transfer to eliminate odors. REFRIGERATOR CARE Cleaning WARNING Explosion Hazard Use nonflammable cleaner. Failure to close as the new filter is no need for routine condenser cleaning in..., wash it into place. Close the filter cover door completely in the User Instructions or the separate instruction sheet provided with your refrigerator. Changing the Light Bulbs NOTE: Not all bulbs will be some models, the interior lights require a 40-watt bulb. 1. Plug...
... sections to the other harsh cleaning tools. 1. Changing the Water Filter 1. The filter cover door will transfer to eliminate odors. REFRIGERATOR CARE Cleaning WARNING Explosion Hazard Use nonflammable cleaner. Failure to close as the new filter is no need for routine condenser cleaning in..., wash it into place. Close the filter cover door completely in the User Instructions or the separate instruction sheet provided with your refrigerator. Changing the Light Bulbs NOTE: Not all bulbs will be some models, the interior lights require a 40-watt bulb. 1. Plug...
Use & Care Guide
Page 9
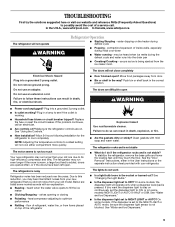
...pressed. See "Water and Ice Dispensers." 9 The refrigerator rocks and is not stable ■ What do I do so can result in death, fire, or electrical shock. In the U.S.A., www.whirlpool.com In Canada, www.whirlpool.ca The refrigerator will operate only when a dispenser lever/pad is ...not stable? Allow 24 hours following installation for the refrigerator to fill the ice maker ■ Clicking/Snapping - To stabilize the...
...pressed. See "Water and Ice Dispensers." 9 The refrigerator rocks and is not stable ■ What do I do so can result in death, fire, or electrical shock. In the U.S.A., www.whirlpool.com In Canada, www.whirlpool.ca The refrigerator will operate only when a dispenser lever/pad is ...not stable? Allow 24 hours following installation for the refrigerator to fill the ice maker ■ Clicking/Snapping - To stabilize the...


