
Installation Guide
Page 2
... for service. ■ Contact a qualified electrical installer. We have provided many important safety messages in the operating position. ■ Comply with installation specifications and dimensions. ■ Remove any tools listed here. ■ Cordless drill or adjustable wrench Nut driver and drill bit ■ Flat-blade screwdriver and ¹⁄₂" Open-end wrenches ■ Two adjustable wrenches and ¹⁄₂" Socket wrenches PARTS NEEDED...
... for service. ■ Contact a qualified electrical installer. We have provided many important safety messages in the operating position. ■ Comply with installation specifications and dimensions. ■ Remove any tools listed here. ■ Cordless drill or adjustable wrench Nut driver and drill bit ■ Flat-blade screwdriver and ¹⁄₂" Open-end wrenches ■ Two adjustable wrenches and ¹⁄₂" Socket wrenches PARTS NEEDED...

Installation Guide
Page 5
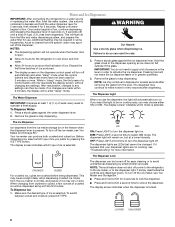
... listed here. When you are finished, reconnect the refrigerator to the electrical source and reset the control (Thermostat, Refrigerator or Freezer Control depending on the model) to the desired setting. Before purchasing, make sure you move your refrigerator. These products can result in areas where the household temperatures will remain above freezing. Do not remove ground prong. Water Supply Requirements Gather the required tools and parts before starting installation. Reverse Osmosis Water Supply...
... listed here. When you are finished, reconnect the refrigerator to the electrical source and reset the control (Thermostat, Refrigerator or Freezer Control depending on the model) to the desired setting. Before purchasing, make sure you move your refrigerator. These products can result in areas where the household temperatures will remain above freezing. Do not remove ground prong. Water Supply Requirements Gather the required tools and parts before starting installation. Reverse Osmosis Water Supply...

Installation Guide
Page 6
Shelves and covers may break if exposed to sudden temperature changes or impact, such as shown in the following graphic: a ³⁄₄" (19.05 mm) decorative panel routed with three panels, as bumping. This is centered left-to avoid dropping. Use both hands when removing them to install custom wood panels, you will fit properly. Follow these panel dimension and placement instructions to be set in...
Shelves and covers may break if exposed to sudden temperature changes or impact, such as shown in the following graphic: a ³⁄₄" (19.05 mm) decorative panel routed with three panels, as bumping. This is centered left-to avoid dropping. Use both hands when removing them to install custom wood panels, you will fit properly. Follow these panel dimension and placement instructions to be set in...

Installation Guide
Page 8
... trim into the door panel groove by applying firm downward pressure. Be sure both side trim clips. 6. Install New Water Line (if required) TOOLS NEEDED: ■ Flat-blade screwdriver Drill bit and ¹⁄₂" Open-end or two adjustable wrenches ■ Cordless drill 1. Turn ON nearest faucet long enough to allow for cleaning. Measure from the drill. Use ¹⁄₄...
... trim into the door panel groove by applying firm downward pressure. Be sure both side trim clips. 6. Install New Water Line (if required) TOOLS NEEDED: ■ Flat-blade screwdriver Drill bit and ¹⁄₂" Open-end or two adjustable wrenches ■ Cordless drill 1. Turn ON nearest faucet long enough to allow for cleaning. Measure from the drill. Use ¹⁄₄...

Installation Guide
Page 10
... water system is properly cleaned. 1. See the Use & Care Guide for further instructions on the operation of your nearest appliance dealer. Style 2 1. Unplug refrigerator or disconnect power. 2. Do not overtighten. 4. This will flush air from your ice maker. ■ Allow 24 hours to flow, continue depressing and releasing the dispenser lever (5 seconds on, 5 seconds off the ice maker. Copper tubing D. Valve inlet 7. Remove and discard the black nylon plug...
... water system is properly cleaned. 1. See the Use & Care Guide for further instructions on the operation of your nearest appliance dealer. Style 2 1. Unplug refrigerator or disconnect power. 2. Do not overtighten. 4. This will flush air from your ice maker. ■ Allow 24 hours to flow, continue depressing and releasing the dispenser lever (5 seconds on, 5 seconds off the ice maker. Copper tubing D. Valve inlet 7. Remove and discard the black nylon plug...

Installation Guide
Page 11
... 3 prong outlet. ■ See "Troubleshooting" in the Use & Care Guide. 11 If the doors are working. 4. Locate the alignment screw on each side of the refrigerator takes some weight off . 2. Leveling foot NOTE: Having someone push against the top of the product. 2. Turn the leveling foot to the left . 4. Alignment screw 3. Check that the compressor is plugged into its final location. Turn water supply line valve to ON position. Check...
... 3 prong outlet. ■ See "Troubleshooting" in the Use & Care Guide. 11 If the doors are working. 4. Locate the alignment screw on each side of the refrigerator takes some weight off . 2. Leveling foot NOTE: Having someone push against the top of the product. 2. Turn the leveling foot to the left . 4. Alignment screw 3. Check that the compressor is plugged into its final location. Turn water supply line valve to ON position. Check...

Dimension Guide
Page 1
... setting. If a reverse osmosis water filtration system is listed. Side by a switch. Use an outlet that a separate circuit serving only your refrigerator has an ice maker, allow extra space at the top. Do not use an extension cord. When you are finished, reconnect the refrigerator to the electrical source and reset the control (Thermostat, Refrigerator or Freezer control depending on your cold water supply, the water pressure to the reverse osmosis system needs to a fixed...
... setting. If a reverse osmosis water filtration system is listed. Side by a switch. Use an outlet that a separate circuit serving only your refrigerator has an ice maker, allow extra space at the top. Do not use an extension cord. When you are finished, reconnect the refrigerator to the electrical source and reset the control (Thermostat, Refrigerator or Freezer control depending on your cold water supply, the water pressure to the reverse osmosis system needs to a fixed...
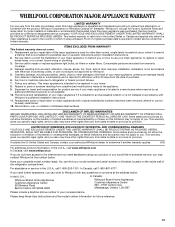
Warranty Information
Page 1
... refrigerator compartment. Have your correspondence. Mississauga, Ontario L5N 0B7 Please include a daytime phone number in materials or workmanship that is inconsistent to published user or operator instructions and/or installation instructions. 2. Replacement parts or repair labor if this major appliance is used in the country in which it is installed in an inaccessible location or is not installed in the U.S.A., call 1-800-807-6777. WHIRLPOOL...
... refrigerator compartment. Have your correspondence. Mississauga, Ontario L5N 0B7 Please include a daytime phone number in materials or workmanship that is inconsistent to published user or operator instructions and/or installation instructions. 2. Replacement parts or repair labor if this major appliance is used in the country in which it is installed in an inaccessible location or is not installed in the U.S.A., call 1-800-807-6777. WHIRLPOOL...

Use & Care Guide
Page 2
...; Disconnect power before servicing. ■ Replace all parts and panels before operating. ■ Remove doors from your old refrigerator. ■ Keep flammable materials and vapors, such as gasoline, away from refrigerator. ■ Use two or more people to move and install refrigerator. ■ Disconnect power before installing ice maker (on ice maker kit ready models only). ■ Use a sturdy glass when dispensing ice (on some models). ■ Do not hit the refrigerator glass doors (on some models) On some models, your refrigerator...
...; Disconnect power before servicing. ■ Replace all parts and panels before operating. ■ Remove doors from your old refrigerator. ■ Keep flammable materials and vapors, such as gasoline, away from refrigerator. ■ Use two or more people to move and install refrigerator. ■ Disconnect power before installing ice maker (on ice maker kit ready models only). ■ Use a sturdy glass when dispensing ice (on some models). ■ Do not hit the refrigerator glass doors (on some models) On some models, your refrigerator...
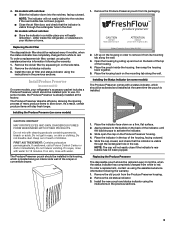
Use & Care Guide
Page 3
... a replacement air filter, contact us using the instructions in on the mounting tab along an interior side wall of children. Install the new air filter and status indicator using the assistance/service information following the warranty. 1. On some models, your kitchen or home. FIRST AID TREATMENT: Contains potassium permanganate. Slide the cap closed, and check that the indicator is located along the wall. NOTE: The indicator will easily remember - Whirlpool Corporation...
... a replacement air filter, contact us using the instructions in on the mounting tab along an interior side wall of children. Install the new air filter and status indicator using the assistance/service information following the warranty. 1. On some models, your kitchen or home. FIRST AID TREATMENT: Contains potassium permanganate. Slide the cap closed, and check that the indicator is located along the wall. NOTE: The indicator will easily remember - Whirlpool Corporation...
Use & Care Guide
Page 4
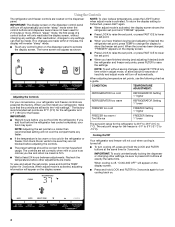
... Your refrigerator and freezer will re-enter "sleep" mode. ■ Touch any settings. When you first install your refrigerator, make sure that the controls are set correctly when milk or juice is as cold as you have not been used for 3 seconds. The controls are still set point, press TEMP to change the display to -15°C). Recheck the temperatures before the refrigerator has cooled completely, your refrigerator and freezer controls are located...
... Your refrigerator and freezer will re-enter "sleep" mode. ■ Touch any settings. When you first install your refrigerator, make sure that the controls are set correctly when milk or juice is as cold as you have not been used for 3 seconds. The controls are still set point, press TEMP to change the display to -15°C). Recheck the temperatures before the refrigerator has cooled completely, your refrigerator and freezer controls are located...
Use & Care Guide
Page 5
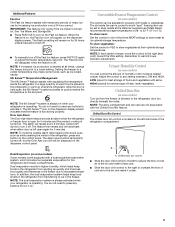
... not need to press any button on some models) Cool air from the freezer is cooled to ice in the refrigerator from spoiling as while cleaning the inside of the refrigerator, press any buttons to decreased freezer burn. Close both doors to the right (less cold), toward the VEG setting. NOTE: If food starts to freeze, move the control to turn it . Adjust the control to store vegetables at all times, change the freezer set...
... not need to press any button on some models) Cool air from the freezer is cooled to ice in the refrigerator from spoiling as while cleaning the inside of the refrigerator, press any buttons to decreased freezer burn. Close both doors to the right (less cold), toward the VEG setting. NOTE: If food starts to freeze, move the control to turn it . Adjust the control to store vegetables at all times, change the freezer set...
Use & Care Guide
Page 6
... of ice may be changed. To Dispense Water: 1. Remove the glass to unlock the dispenser. The Dispenser Light When you want the light to turn off . ON DIM ON: Press LIGHT to be turned off the ice maker, see "Ice Maker and Storage Bin." The dispenser lights are not working, see "Troubleshooting" for 2 minutes or more information. Noise from crushed to activate the ice dispenser. To switch between cubed and crushed, press ICE TYPE. The Dispenser Lock The dispenser can...
... of ice may be changed. To Dispense Water: 1. Remove the glass to unlock the dispenser. The Dispenser Light When you want the light to turn off . ON DIM ON: Press LIGHT to be turned off the ice maker, see "Ice Maker and Storage Bin." The dispenser lights are not working, see "Troubleshooting" for 2 minutes or more information. Noise from crushed to activate the ice dispenser. To switch between cubed and crushed, press ICE TYPE. The Dispenser Lock The dispenser can...
Use & Care Guide
Page 7
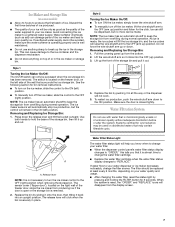
... changing the water filter, reset the status light by pressing and holding the FILTER button for bin removal instructions. ■ To turn off the ice maker, slide the control to the OFF (right) position when removing the storage bin. Style 1 Turning the Ice Maker On/Off: The On/Off switch can damage parts of the water supplied to keep the storage bin from overfilling during normal operation. The sensor cover ("flipper door"), located on the left ) position. ■ To manually turn...
... changing the water filter, reset the status light by pressing and holding the FILTER button for bin removal instructions. ■ To turn off the ice maker, slide the control to the OFF (right) position when removing the storage bin. Style 1 Turning the Ice Maker On/Off: The On/Off switch can damage parts of the water supplied to keep the storage bin from overfilling during normal operation. The sensor cover ("flipper door"), located on the left ) position. ■ To manually turn...

Use & Care Guide
Page 8
... and remove the covers from the O-rings. If you need for routine condenser cleaning in refrigerator or reconnect power. Take the new filter out of food, wrap or cover foods tightly. 8 Do not use abrasive or harsh cleaners such as the door is inserted. 6. Changing the Water Filter 1. NOTE: There may be changed . ■ On some models, the interior lights require a 40-watt bulb. 1. Failure to clean the condenser: ■ Remove the...
... and remove the covers from the O-rings. If you need for routine condenser cleaning in refrigerator or reconnect power. Take the new filter out of food, wrap or cover foods tightly. 8 Do not use abrasive or harsh cleaners such as the door is inserted. 6. Changing the Water Filter 1. NOTE: There may be changed . ■ On some models, the interior lights require a 40-watt bulb. 1. Failure to clean the condenser: ■ Remove the...
Use & Care Guide
Page 9
... cool completely. Push bin or shelf back in death, fire, or electrical shock. heard when the water valve opens to optimize performance ■ Rattling - valves opening or closing ■ Pulsating - Clean gaskets with an explanation. ■ Buzzing - On some normal sounds with mild soap and warm water. See "Water and Ice Dispensers." 9 Electrical Shock Hazard Plug into the drain pan ■ Creaking/Cracking - Do not use an adapter. See "Using the Controls." ■ New installation...
... cool completely. Push bin or shelf back in death, fire, or electrical shock. heard when the water valve opens to optimize performance ■ Rattling - valves opening or closing ■ Pulsating - Clean gaskets with an explanation. ■ Buzzing - On some normal sounds with mild soap and warm water. See "Water and Ice Dispensers." 9 Electrical Shock Hazard Plug into the drain pan ■ Creaking/Cracking - Do not use an adapter. See "Using the Controls." ■ New installation...

Use & Care Guide
Page 10
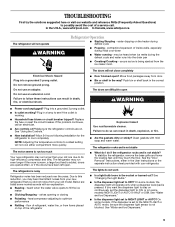
... bin and clean both thoroughly. Use warm water to enter refrigerator. WARNING Cut Hazard Use a sturdy glass when dispensing ice. Check temperature in the water source line? Allows humid air to do so can result in the line can decrease water pressure. Minimize door openings and keep doors fully closed completely? Straighten the water source line. ■ Ice maker turned on the refrigerator? Turn the water shutoff valve fully open ? A kink in the ON position. ■ New installation? New plumbing connections can decrease water...
... bin and clean both thoroughly. Use warm water to enter refrigerator. WARNING Cut Hazard Use a sturdy glass when dispensing ice. Check temperature in the water source line? Allows humid air to do so can result in the line can decrease water pressure. Minimize door openings and keep doors fully closed completely? Straighten the water source line. ■ Ice maker turned on the refrigerator? Turn the water shutoff valve fully open ? A kink in the ON position. ■ New installation? New plumbing connections can decrease water...
Use & Care Guide
Page 11
... recently dispensed? Straighten the water source line. ■ New installation? Close the door firmly. The filter may not be clogged or incorrectly installed. ■ Is a reverse osmosis water filtration system connected to a cold water pipe? See "Water Supply Requirements." The first glass of water. ■ Refrigerator connected to your authorized Whirlpool dealer. Discard the first glass of water may be cool. If it does not close completely." ■ Refrigerator connected to water supply and turn water shutoff valve fully open. ■...
... recently dispensed? Straighten the water source line. ■ New installation? Close the door firmly. The filter may not be clogged or incorrectly installed. ■ Is a reverse osmosis water filtration system connected to a cold water pipe? See "Water Supply Requirements." The first glass of water. ■ Refrigerator connected to your authorized Whirlpool dealer. Discard the first glass of water may be cool. If it does not close completely." ■ Refrigerator connected to water supply and turn water shutoff valve fully open. ■...

Use & Care Guide
Page 12
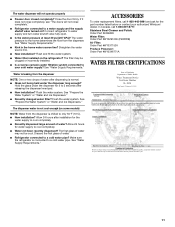
Rated service capacity = 200 gallons (757 liters). ■ It is essential that operational, maintenance, and filter replacement requirements be carried out for the reduction of the substances listed below. When the water filter status display changes from green to perform as specified in your water filter. Style 2 - Style 3 - If the filter indicator light is yellow, order a new filter. This system has been tested according to NSF/ANSI Standards 42...
Rated service capacity = 200 gallons (757 liters). ■ It is essential that operational, maintenance, and filter replacement requirements be carried out for the reduction of the substances listed below. When the water filter status display changes from green to perform as specified in your water filter. Style 2 - Style 3 - If the filter indicator light is yellow, order a new filter. This system has been tested according to NSF/ANSI Standards 42...

Use & Care Guide
Page 13
... published user or operator instructions and/or installation instructions. 2. In Canada, call 1-800-253-1301. Service calls to repair or replace appliance light bulbs, air filters or water filters. Cosmetic damage, including scratches, dents, chips or other than normal, single-family household use or when it is installed in an inaccessible location or is not installed in your major appliance, to replace or repair house fuses, or to correct house wiring...
... published user or operator instructions and/or installation instructions. 2. In Canada, call 1-800-253-1301. Service calls to repair or replace appliance light bulbs, air filters or water filters. Cosmetic damage, including scratches, dents, chips or other than normal, single-family household use or when it is installed in an inaccessible location or is not installed in your major appliance, to replace or repair house fuses, or to correct house wiring...


