

Use and Care Guide
Page 3
... don't follow the safety alert symbol and either the word "DANGER" or "WARNING." Follow the gas supplier's instructions. • If you cannot reach your appliance. RANGE SAFETY Your safety and the safety of potential exposure to potential hazards that can kill or hurt you and others are not followed. We have...
... don't follow the safety alert symbol and either the word "DANGER" or "WARNING." Follow the gas supplier's instructions. • If you cannot reach your appliance. RANGE SAFETY Your safety and the safety of potential exposure to potential hazards that can kill or hurt you and others are not followed. We have...

Use and Care Guide
Page 4
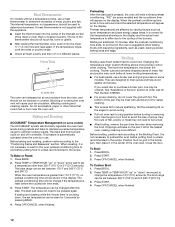
...reach items could be electrically grounded in the absence of a range - s Proper Installation - The range, when installed, must be seriously injured. In Canada, the range must be plugged directly into a properly grounded receptacle. Keep range area clear and free from this appliance as stepping, leaning, ...and should be killed. s Storage in cabinets above a range or on the Range - SAVE THESE INSTRUCTIONS 4 The Anti-Tip Bracket The range will not tip during normal use this plug. Anti-Tip Bracket Range Foot Making sure the anti-tip bracket is equipped with ...
...reach items could be electrically grounded in the absence of a range - s Proper Installation - The range, when installed, must be seriously injured. In Canada, the range must be plugged directly into a properly grounded receptacle. Keep range area clear and free from this appliance as stepping, leaning, ...and should be killed. s Storage in cabinets above a range or on the Range - SAVE THESE INSTRUCTIONS 4 The Anti-Tip Bracket The range will not tip during normal use this plug. Anti-Tip Bracket Range Foot Making sure the anti-tip bracket is equipped with ...
Use and Care Guide
Page 5
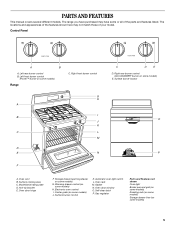
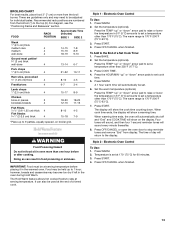
... may not match those of the parts and features listed. Right rear burner control (ACCUSIMMER® burner on some or all of your model. The range you have some models) 5 Left rear burner control B. Self-clean latch P. Oven door window O. Gasket N. Left front burner control (Power™ burner on some models...
... may not match those of the parts and features listed. Right rear burner control (ACCUSIMMER® burner on some or all of your model. The range you have some models) 5 Left rear burner control B. Self-clean latch P. Oven door window O. Gasket N. Left front burner control (Power™ burner on some models...
Use and Care Guide
Page 6
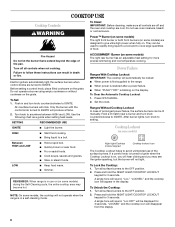
...you will hear clicking and you may become hot. s Keep food warm. To Unlock the Cooktop: 1. "Loc OFF" will not operate when the range is blinking on some models) The right rear burner has an adjustable heat setting for 3 seconds. Do not operate a burner using empty cookware or... near a burner and turn knob to setting. If a control knob is turned to Ignite when the Cooktop Lockout is first supplied to the range. Turn all controls when not cooking. COOKTOP USE Cooktop Controls WARNING To Clean: IMPORTANT: Before cleaning, make sure all controls are off all ...
...you will hear clicking and you may become hot. s Keep food warm. To Unlock the Cooktop: 1. "Loc OFF" will not operate when the range is blinking on some models) The right rear burner has an adjustable heat setting for 3 seconds. Do not operate a burner using empty cookware or... near a burner and turn knob to setting. If a control knob is turned to Ignite when the Cooktop Lockout is first supplied to the range. Turn all controls when not cooking. COOKTOP USE Cooktop Controls WARNING To Clean: IMPORTANT: Before cleaning, make sure all controls are off all ...
Use and Care Guide
Page 8
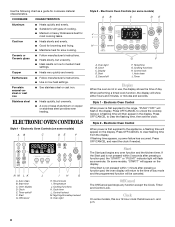
s Ideal results on low to the range, "PUSH"/"OFF" will be canceled. s Use on the display. s A core or base of cooking. Clock E. Timer set the clock. Cook time L. Cancel/off F. Auto clean J. ...
s Ideal results on low to the range, "PUSH"/"OFF" will be canceled. s Use on the display. s A core or base of cooking. Clock E. Timer set the clock. Cook time L. Cancel/off F. Auto clean J. ...
Use and Care Guide
Page 9
The clock display can be turned off . 1. Range Lights Oven light Night light Oven Light While the oven door is counting down, press CLOCK. Tones Tones are off /on (on some models. 4. Volume: ...
The clock display can be turned off . 1. Range Lights Oven light Night light Oven Light While the oven door is counting down, press CLOCK. Tones Tones are off /on (on some models. 4. Volume: ...
Use and Care Guide
Page 12
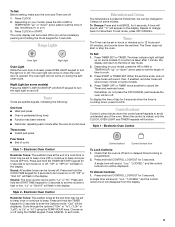
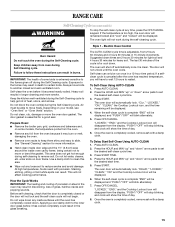
...) The ACCUBAKE® system electronically regulates the oven heat levels during preheat and bake to determine doneness. Press OFF/CANCEL when finished. The broil range can be set between 170°F and 500°F (75°C and 260°C). Oven Vent A A. When roasting, it is counting down..., the set temperature can be used to maintain a precise temperature range for Part Number 4396923. To Bake or Roast: 1. If baking and roasting while the minute timer is not necessary to avoid the loss of ...
...) The ACCUBAKE® system electronically regulates the oven heat levels during preheat and bake to determine doneness. Press OFF/CANCEL when finished. The broil range can be set between 170°F and 500°F (75°C and 260°C). Oven Vent A A. When roasting, it is counting down..., the set temperature can be used to maintain a precise temperature range for Part Number 4396923. To Bake or Roast: 1. If baking and roasting while the minute timer is not necessary to avoid the loss of ...
Use and Care Guide
Page 13
... can also be set a temperature other than 170°F (75°C). Electronic Oven Control To Use: 1. The warm range is 170°F-200°F (75°C-93°C). 7. Press COOK TIME. 4. The warm range is 170°F-200°F (75°C-93°C). 3. Style 2 - Press START. 4. BROILING CHART For best results, place...
... can also be set a temperature other than 170°F (75°C). Electronic Oven Control To Use: 1. The warm range is 170°F-200°F (75°C-93°C). 7. Press COOK TIME. 4. The warm range is 170°F-200°F (75°C-93°C). 3. Style 2 - Press START. 4. BROILING CHART For best results, place...
Use and Care Guide
Page 15
... " arrow pads to clean this area. s Wipe out any inside oven cavity frame, being certain not to move birds to reduce smoke and avoid damage. RANGE CARE Self-Cleaning Cycle (onsomemodels) WARNING To stop the self-clean cycle at any foil from the oven because it becomes heavily soiled. Air must...
... " arrow pads to clean this area. s Wipe out any inside oven cavity frame, being certain not to move birds to reduce smoke and avoid damage. RANGE CARE Self-Cleaning Cycle (onsomemodels) WARNING To stop the self-clean cycle at any foil from the oven because it becomes heavily soiled. Air must...
Use and Care Guide
Page 17
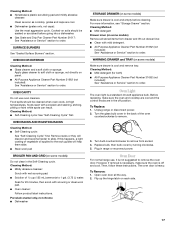
...All-Purpose Appliance Cleaner Part Number 31662 (not included): See "Assistance or Service" section to order. s Clean with wet scouring pad. Unplug range or disconnect power. 2. Turn the glass bulb cover in the off and cool. Then, follow these instructions. Open oven door all stored ... SURFACE BURNERS See "Sealed Surface Burners" section. Porcelain enamel only, not chrome s Dishwasher STORAGE DRAWER (on some models) Do not clean in range or reconnect power. Flip up the hinge latch on panel. OVEN DOOR EXTERIOR Cleaning Method: s Glass cleaner and a soft cloth or sponge: ...
...All-Purpose Appliance Cleaner Part Number 31662 (not included): See "Assistance or Service" section to order. s Clean with wet scouring pad. Unplug range or disconnect power. 2. Turn the glass bulb cover in the off and cool. Then, follow these instructions. Open oven door all stored ... SURFACE BURNERS See "Sealed Surface Burners" section. Porcelain enamel only, not chrome s Dishwasher STORAGE DRAWER (on some models) Do not clean in range or reconnect power. Flip up the hinge latch on panel. OVEN DOOR EXTERIOR Cleaning Method: s Glass cleaner and a soft cloth or sponge: ...
Use and Care Guide
Page 18
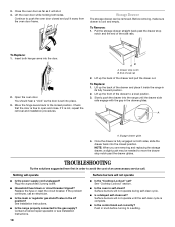
...Is the main or regulator gas shutoff valve in self-clean? s Is a delayed self-clean set into the range until the self-clean cycle is fully engaged on both sides. Storage Drawer The storage drawer can be needed to... sides, slide the drawer back into the closed and pull it inside the range in the drawer glides. Continue to the gas supply? To Replace: 1. Replace the fuse or reset the... circuit breaker. s Is the range properly connected to push the oven door closed position. Lift up the back of an unnecessary ...
...Is the main or regulator gas shutoff valve in self-clean? s Is a delayed self-clean set into the range until the self-clean cycle is fully engaged on both sides. Storage Drawer The storage drawer can be needed to... sides, slide the drawer back into the closed and pull it inside the range in the drawer glides. Continue to the gas supply? To Replace: 1. Replace the fuse or reset the... circuit breaker. s Is the range properly connected to push the oven door closed position. Lift up the back of an unnecessary ...


