User Instructions
Page 2
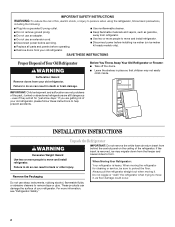
... Do not use an extension cord. ■ Disconnect power before servicing. ■ Replace all parts and panels before installing ice maker (on the ceiling of the refrigerator. For more people to protect the floor. IMPORTANT: Child entrapment and suffocation are not problems of .... Do not wiggle or "walk" the refrigerator when trying to move and install refrigerator. If you are still dangerous - Always pull the refrigerator straight out when moving the refrigerator for "just a few days." Before You Throw Away Your Old Refrigerator or Freezer: ■ Take off the doors. &#...
... Do not use an extension cord. ■ Disconnect power before servicing. ■ Replace all parts and panels before installing ice maker (on the ceiling of the refrigerator. For more people to protect the floor. IMPORTANT: Child entrapment and suffocation are not problems of .... Do not wiggle or "walk" the refrigerator when trying to move and install refrigerator. If you are still dangerous - Always pull the refrigerator straight out when moving the refrigerator for "just a few days." Before You Throw Away Your Old Refrigerator or Freezer: ■ Take off the doors. &#...

User Instructions
Page 3
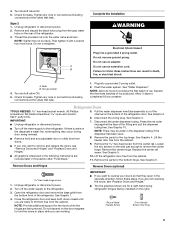
... a light bulb, turn the control (Thermostat, Refrigerator or Freezer Control depending on the model) to make sure a saddle-type valve complies with your refrigerator has an ice maker, allow extra space at the top. For your refrigerator be turned off by a switch. Do not remove... Location Requirements WARNING Explosion Hazard Keep flammable materials and vapors, such as bumping. Water Supply Requirements Gather the required tools and parts before using it is designed to sudden temperature changes or impact, such as gasoline, away from dropping. TOOLS NEEDED: ■...
... a light bulb, turn the control (Thermostat, Refrigerator or Freezer Control depending on the model) to make sure a saddle-type valve complies with your refrigerator has an ice maker, allow extra space at the top. For your refrigerator be turned off by a switch. Do not remove... Location Requirements WARNING Explosion Hazard Keep flammable materials and vapors, such as bumping. Water Supply Requirements Gather the required tools and parts before using it is designed to sudden temperature changes or impact, such as gasoline, away from dropping. TOOLS NEEDED: ■...
User Instructions
Page 5
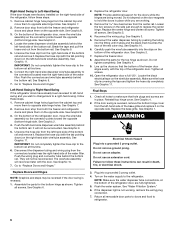
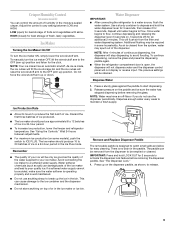
...Press the red outer ring against the face of ice produced. See Graphic 10. Lift the freezer door free from the bottom front of ice. Replace the center rail screw. Close the refrigerator door and keep both doors closed until you are being moved. Check for leaks. NOTE: ... by hand. Check for leaks. Allow 3 days to the refrigerator. 3. Disconnect the wiring plug. Remove the parts for the bottom hinge. Remove the parts for the top hinge. Turn off the water supply to remove the center hinge. Open the refrigerator door and remove the base grille from the cabinet. 9. If...
...Press the red outer ring against the face of ice produced. See Graphic 10. Lift the freezer door free from the bottom front of ice. Replace the center rail screw. Close the refrigerator door and keep both doors closed until you are being moved. Check for leaks. NOTE: ... by hand. Check for leaks. Allow 3 days to the refrigerator. 3. Disconnect the wiring plug. Remove the parts for the bottom hinge. Remove the parts for the top hinge. Turn off the water supply to remove the center hinge. Open the refrigerator door and remove the base grille from the cabinet. 9. If...
User Instructions
Page 6
...the hose clip (with the top of the bottom rail and remove it on the door magnets to hold the doors in place while you wish to change back to the refrigerator. Disconnect the dispenser tubing and wiring plug from both the freezer and refrigerator doors and place them to ... door parts to doors and food to opposite side hinge holes. Tighten all screws. Make sure the hose clip is reversed, remove the bottom hinge cover from both the freezer and refrigerator doors and place them to refrigerator. 6 See Graphic 8. 3. Remove the hex-head screw from the cabinet top and ...
...the hose clip (with the top of the bottom rail and remove it on the door magnets to hold the doors in place while you wish to change back to the refrigerator. Disconnect the dispenser tubing and wiring plug from both the freezer and refrigerator doors and place them to ... door parts to doors and food to opposite side hinge holes. Tighten all screws. Make sure the hose clip is reversed, remove the bottom hinge cover from both the freezer and refrigerator doors and place them to refrigerator. 6 See Graphic 8. 3. Remove the hex-head screw from the cabinet top and ...

User Instructions
Page 8
...refrigerator temperature first. CONDITION/REASON: ADJUSTMENT: REFRIGERATOR too warm REFRIGERATOR or TEMPERATURE Control one setting higher FREEZER too warm/too little ice FREEZER or TEMPERATURE Control one setting higher MAX ice production switch REFRIGERATOR too cold REFRIGERATOR or TEMPERATURE Control one setting lower FREEZER too cold FREEZER...the leveling screws. The two leveling screws are part of the refrigerator takes some weight off the leveling screws and rollers. When you first install your food may spoil. Loosen the top hinge screws using the instructions below: 1. ...
...refrigerator temperature first. CONDITION/REASON: ADJUSTMENT: REFRIGERATOR too warm REFRIGERATOR or TEMPERATURE Control one setting higher FREEZER too warm/too little ice FREEZER or TEMPERATURE Control one setting higher MAX ice production switch REFRIGERATOR too cold REFRIGERATOR or TEMPERATURE Control one setting lower FREEZER too cold FREEZER...the leveling screws. The two leveling screws are part of the refrigerator takes some weight off the leveling screws and rollers. When you first install your food may spoil. Loosen the top hinge screws using the instructions below: 1. ...
User Instructions
Page 9
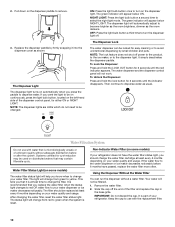
...to 12 batches of ice in a 24-hour period. ■ To increase ice production, lower the freezer and refrigerator temperature. The ice maker should produce approximately 8 to any setting between adjustments. ■ For maximum ...to poor quality ice. If a softened water supply cannot be only as good as salt) can damage parts of the ice maker and lead to the OFF (arm up on , 5 seconds off -flavor ...Press up ) position and listen for best storage of fresh, leafy vegetables. Crisper Humidity Control (on top of or in the ice maker or ice bin. This can cause damage to the ice container ...
...to 12 batches of ice in a 24-hour period. ■ To increase ice production, lower the freezer and refrigerator temperature. The ice maker should produce approximately 8 to any setting between adjustments. ■ For maximum ...to poor quality ice. If a softened water supply cannot be only as good as salt) can damage parts of the ice maker and lead to the OFF (arm up on , 5 seconds off -flavor ...Press up ) position and listen for best storage of fresh, leafy vegetables. Crisper Humidity Control (on top of or in the ice maker or ice bin. This can cause damage to the ice container ...
User Instructions
Page 10
...control panel will appear below ON. Water Filtration System Do not use with water that you know when to green when the system is part of your water dispenser or ice maker decreases noticeably. It is recommended that is almost time to change from red to change your ...button a second time to the dispenser light. The green indicator will not work. OFF: Press the light bulb button a third time to your refrigerator. It simply deactivates the dispenser paddle. Then continue to use with the replacement filter. 10 The light will help you replace the water filter when...
...control panel will appear below ON. Water Filtration System Do not use with water that you know when to green when the system is part of your water dispenser or ice maker decreases noticeably. It is recommended that is almost time to change from red to change your ...button a second time to the dispenser light. The green indicator will not work. OFF: Press the light bulb button a third time to your refrigerator. It simply deactivates the dispenser paddle. Then continue to use with the replacement filter. 10 The light will help you replace the water filter when...
User Instructions
Page 11
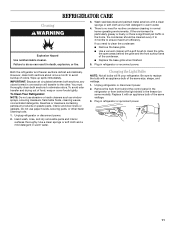
...eliminate odors. Unplug refrigerator or disconnect power. 2. Hand wash, rinse, and dry removable parts and interior surfaces thoroughly. Unplug refrigerator or disconnect power. 2. If you need for routine condenser cleaning in the freezer (on plastic parts, interior and ... ensure maximum efficiency. There is significant pet traffic in one section will fit your refrigerator. WARMER 1 1 WARMER 2 3 RREECFORMIGMEENRDAETDOSRETTING 4 5 COOLER ALLOW 24 HOURS BETWEEN FREEZER RECOMMENDED SETTING ADJUSTMENTS COOLER 2 3 4 5 11 IMPORTANT: Because air circulates between ...
...eliminate odors. Unplug refrigerator or disconnect power. 2. Hand wash, rinse, and dry removable parts and interior surfaces thoroughly. Unplug refrigerator or disconnect power. 2. If you need for routine condenser cleaning in the freezer (on plastic parts, interior and ... ensure maximum efficiency. There is significant pet traffic in one section will fit your refrigerator. WARMER 1 1 WARMER 2 3 RREECFORMIGMEENRDAETDOSRETTING 4 5 COOLER ALLOW 24 HOURS BETWEEN FREEZER RECOMMENDED SETTING ADJUSTMENTS COOLER 2 3 4 5 11 IMPORTANT: Because air circulates between ...
User Instructions
Page 14
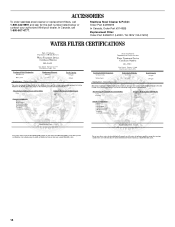
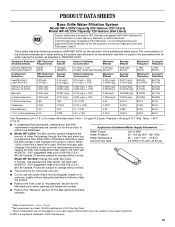
Stainless Steel Cleaner & Polish: Order Part #4396095 In Canada, Order Part #31462B Replacement Filter: Order Part #4396701 (L200V / NL120V / NLC120V) WATER FILTER CERTIFICATIONS 14 In Canada, call 1-800-442-9991 and ask for the part number listed below or contact your authorized Whirlpool dealer. ACCESSORIES To order stainless steel cleaner or replacement filters, call 1-800-807-6777.
Stainless Steel Cleaner & Polish: Order Part #4396095 In Canada, Order Part #31462B Replacement Filter: Order Part #4396701 (L200V / NL120V / NLC120V) WATER FILTER CERTIFICATIONS 14 In Canada, call 1-800-442-9991 and ask for the part number listed below or contact your authorized Whirlpool dealer. ACCESSORIES To order stainless steel cleaner or replacement filters, call 1-800-807-6777.
User Instructions
Page 15
...a concentration less than or equal to < 15 um **Test requirement is a registered trademark of $34.99 U.S.A./ $45.99 Canada. trichlorobenzene 0.07 0.232 0.21 ± 10% 0.0041 0.0016 98.23 99.31 Test Parameters: pH = 7.5 ± 0.5 unless otherwise noted. Flow = 0.5 gpm (1.9 Lpm).... = 60 psig (413.7 kPa). Prices are not necessarily in ANSI/NSF 42/53. Use replacement filter L200V / NL120V, part #4396701. 2007 suggested retail price of NSF International. 15 Substance Reduction NSF Reduction Average Aesthetic Effects Requirements Influent Influent Challenge Concentration ...
...a concentration less than or equal to < 15 um **Test requirement is a registered trademark of $34.99 U.S.A./ $45.99 Canada. trichlorobenzene 0.07 0.232 0.21 ± 10% 0.0041 0.0016 98.23 99.31 Test Parameters: pH = 7.5 ± 0.5 unless otherwise noted. Flow = 0.5 gpm (1.9 Lpm).... = 60 psig (413.7 kPa). Prices are not necessarily in ANSI/NSF 42/53. Use replacement filter L200V / NL120V, part #4396701. 2007 suggested retail price of NSF International. 15 Substance Reduction NSF Reduction Average Aesthetic Effects Requirements Influent Influent Challenge Concentration ...
User Instructions
Page 16
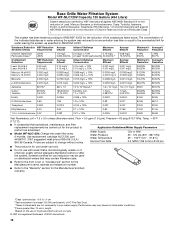
.... Prices are subject to ANSI/NSF 42/53 for the product to trichlorobenzene 0.07 0.232 0.21 ± 10% 0.0025 0.0007 98.92 99.69 Test Parameters: pH = 7.5 ± 0.5 unless otherwise noted. Use replacement cartridge NLC120V, part #4396701. 2007 suggested retail price of the indicated substances in ANSI/NSF 42/53. Application Guidelines...
.... Prices are subject to ANSI/NSF 42/53 for the product to trichlorobenzene 0.07 0.232 0.21 ± 10% 0.0025 0.0007 98.92 99.69 Test Parameters: pH = 7.5 ± 0.5 unless otherwise noted. Use replacement cartridge NLC120V, part #4396701. 2007 suggested retail price of the indicated substances in ANSI/NSF 42/53. Application Guidelines...
User Instructions
Page 17
... product information, in materials or workmanship and is reported to Whirlpool within 30 days from the date of purchase. 6. This major appliance is designed to be borne by the customer. Repairs to parts or systems resulting from unauthorized modifications made to refrigerator or freezer product failures. 7. If outside the 50 United States and Canada...
... product information, in materials or workmanship and is reported to Whirlpool within 30 days from the date of purchase. 6. This major appliance is designed to be borne by the customer. Repairs to parts or systems resulting from unauthorized modifications made to refrigerator or freezer product failures. 7. If outside the 50 United States and Canada...
