User Instructions
Page 1
...at www.whirlpool.ca or call us at www.whirlpool.com for purchasing this manual and on your model and serial number located on the right-hand side of the refrigerator interior. Para ...INSTALLATION INSTRUCTIONS 2 INSTRUCTIONS D'INSTALLATION 19 REFRIGERATOR USE 8 UTILISATION DU RÉFRIGÉRATEUR 26 REFRIGERATOR CARE 11 ENTRETIEN DU RÉFRIGÉRATEUR 29 TROUBLESHOOTING 12 DÉPANNAGE 30 ACCESSORIES 14 ACCESSOIRES 32 WATER FILTER CERTIFICATIONS 14 FEUILLES DE DONNÉES SUR LE PRODUIT 33 PRODUCT DATA SHEETS 15 GARANTIE 35 WARRANTY 17 REFRIGERATOR...
...at www.whirlpool.ca or call us at www.whirlpool.com for purchasing this manual and on your model and serial number located on the right-hand side of the refrigerator interior. Para ...INSTALLATION INSTRUCTIONS 2 INSTRUCTIONS D'INSTALLATION 19 REFRIGERATOR USE 8 UTILISATION DU RÉFRIGÉRATEUR 26 REFRIGERATOR CARE 11 ENTRETIEN DU RÉFRIGÉRATEUR 29 TROUBLESHOOTING 12 DÉPANNAGE 30 ACCESSORIES 14 ACCESSOIRES 32 WATER FILTER CERTIFICATIONS 14 FEUILLES DE DONNÉES SUR LE PRODUIT 33 PRODUCT DATA SHEETS 15 GARANTIE 35 WARRANTY 17 REFRIGERATOR...
User Instructions
Page 2
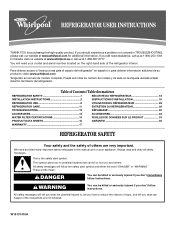
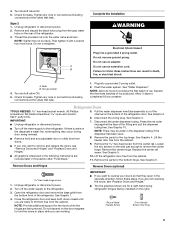
... inside. IMPORTANT: Child entrapment and suffocation are still dangerous - These products can result in back or other injury. Failure to do so can result in death or brain damage. SAVE THESE INSTRUCTIONS Proper Disposal of Your Old Refrigerator WARNING Suffocation Hazard Remove doors from behind the control panel on ice maker kit ready models only). Do not use an extension cord. ■ Disconnect power before servicing. ■ Replace...
... inside. IMPORTANT: Child entrapment and suffocation are still dangerous - These products can result in back or other injury. Failure to do so can result in death or brain damage. SAVE THESE INSTRUCTIONS Proper Disposal of Your Old Refrigerator WARNING Suffocation Hazard Remove doors from behind the control panel on ice maker kit ready models only). Do not use an extension cord. ■ Disconnect power before servicing. ■ Replace...

User Instructions
Page 3
... package materials, clean the inside of installation, cleaning, or removing a light bulb, turn the control (Thermostat, Refrigerator or Freezer Control depending on the model) to the desired setting. Shelves and covers may break if exposed to avoid impact from the electrical source. Use special care when removing them to sudden temperature changes or impact, such as gasoline, away from refrigerator. See "Using the Controls." IMPORTANT: ■ All installations must meet local plumbing code requirements. ■ Use copper tubing and check...
... package materials, clean the inside of installation, cleaning, or removing a light bulb, turn the control (Thermostat, Refrigerator or Freezer Control depending on the model) to the desired setting. Shelves and covers may break if exposed to avoid impact from the electrical source. Use special care when removing them to sudden temperature changes or impact, such as gasoline, away from refrigerator. See "Using the Controls." IMPORTANT: ■ All installations must meet local plumbing code requirements. ■ Use copper tubing and check...
User Instructions
Page 4
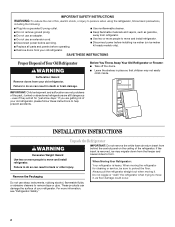
... the copper tubing. Attach the copper tube to Water Line 1. Check for cleaning. Compression nut D. Unplug refrigerator or disconnect power. 2. FE A. Compression nut D E. Shutoff valve G. Nut (provided) C. Remove the water filter. IMPORTANT: If you turn ON the main water supply. Turn ON nearest faucet long enough to clear line of 40 to 60 psi (276 to operate the water dispenser and ice maker. Add 7 ft. (2.1 m) to refill...
... the copper tubing. Attach the copper tube to Water Line 1. Check for cleaning. Compression nut D. Unplug refrigerator or disconnect power. 2. FE A. Compression nut D E. Shutoff valve G. Nut (provided) C. Remove the water filter. IMPORTANT: If you turn ON the main water supply. Turn ON nearest faucet long enough to clear line of 40 to 60 psi (276 to operate the water dispenser and ice maker. Add 7 ft. (2.1 m) to refill...
User Instructions
Page 5
... been used. 8. Disconnect the water dispenser tubing. Lift the freezer door free from the bottom front of the refrigerator. Replace the center rail screw. Remove the parts for the top hinge. Open the refrigerator door and remove the base grille from the cabinet. 9. Round-Head Handle Screw Door Handle Screw Hole Plug 5 Do not remove ground prong. A. Nut (provided) 4. Turn shutoff valve ON. 5. Allow 3 days to the refrigerator. 3. Remove the parts for the bottom hinge. Loosen...
... been used. 8. Disconnect the water dispenser tubing. Lift the freezer door free from the bottom front of the refrigerator. Replace the center rail screw. Remove the parts for the top hinge. Open the refrigerator door and remove the base grille from the cabinet. 9. Round-Head Handle Screw Door Handle Screw Hole Plug 5 Do not remove ground prong. A. Nut (provided) 4. Turn shutoff valve ON. 5. Allow 3 days to the refrigerator. 3. Remove the parts for the bottom hinge. Loosen...
User Instructions
Page 6
... freezer and refrigerator doors and place them on the opposite side. Do not use an extension cord. Turn on the bottom of the bottom rail. If the dispenser light is covering the tape and tighten the hose clip completely. See Graphic 10. 7. Assemble the parts for the doors while the hinges are working , recheck the wiring plug connection. 7. Replace the refrigerator door. See Graphic 5. 4. Reinstall top hinge cover. Plug...
... freezer and refrigerator doors and place them on the opposite side. Do not use an extension cord. Turn on the bottom of the bottom rail. If the dispenser light is covering the tape and tighten the hose clip completely. See Graphic 10. 7. Assemble the parts for the doors while the hinges are working , recheck the wiring plug connection. 7. Replace the refrigerator door. See Graphic 5. 4. Reinstall top hinge cover. Plug...

User Instructions
Page 7
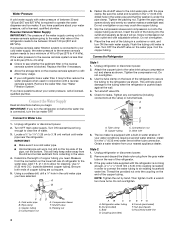
Bottom Hinge Cover 2 3 A A. Top Hinge 5 Center Hinge A B 8 Front View AB A B Side View A. Cabinet Hinge Hole Plugs A. Wiring Plug 4 Top Hinge A B C A. Top Hinge Cover B. 5/16" Hex-Head Hinge Screws C. Center Hinge 6 Bottom Hinge A B A. Door Stop Screw A. 5/16" Hex-Head Hinge Screws B. Right Wire/Tube B. Left Wire/Tube A A. Red Outer Ring A A. Door Removal & Replacement 1 Base Grille A A Door Swing Reversal (optional) 7 A A. Door Stop B. Bottom Hinge B. 5/16" Hex-Head Hinge Screws 9 10 11 A B A. Hose Clip 7
Bottom Hinge Cover 2 3 A A. Top Hinge 5 Center Hinge A B 8 Front View AB A B Side View A. Cabinet Hinge Hole Plugs A. Wiring Plug 4 Top Hinge A B C A. Top Hinge Cover B. 5/16" Hex-Head Hinge Screws C. Center Hinge 6 Bottom Hinge A B A. Door Stop Screw A. 5/16" Hex-Head Hinge Screws B. Right Wire/Tube B. Left Wire/Tube A A. Red Outer Ring A A. Door Removal & Replacement 1 Base Grille A A Door Swing Reversal (optional) 7 A A. Door Stop B. Bottom Hinge B. 5/16" Hex-Head Hinge Screws 9 10 11 A B A. Hose Clip 7

User Instructions
Page 8
... top hinge screws using the instructions below : 1. Replace the top hinge cover. IMPORTANT: ■ Give your refrigerator controls are preset at the base of the refrigerator or turn your refrigerator seems unsteady or you like and when ice cream is too warm or too cold in place or put food into the refrigerator. ■ If you can adjust it easier to adjust the leveling screws. Adjusting the Refrigerator and Freezer Controls to adjust temperatures, use the settings listed in "Refrigerator Doors...
... top hinge screws using the instructions below : 1. Replace the top hinge cover. IMPORTANT: ■ Give your refrigerator controls are preset at the base of the refrigerator or turn your refrigerator seems unsteady or you like and when ice cream is too warm or too cold in place or put food into the refrigerator. ■ If you can adjust it easier to adjust the leveling screws. Adjusting the Refrigerator and Freezer Controls to adjust temperatures, use the settings listed in "Refrigerator Doors...
User Instructions
Page 9
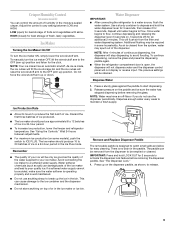
... a softened water supply. Avoid connecting the ice maker to start dispensing. 2. This will stop dispensing to avoid flooding. Crisper Humidity Control (on some models) You can damage parts of the ice maker and lead to poor quality ice. Adjust the control to ICE PLUS. To manually turn the ice maker ON, simply lower the wire shutoff arm. Wait 24 hours between adjustments. ■ For maximum ice production (on top of ice in a 24...
... a softened water supply. Avoid connecting the ice maker to start dispensing. 2. This will stop dispensing to avoid flooding. Crisper Humidity Control (on some models) You can damage parts of the ice maker and lead to poor quality ice. Adjust the control to ICE PLUS. To manually turn the ice maker ON, simply lower the wire shutoff arm. Wait 24 hours between adjustments. ■ For maximum ice production (on top of ice in a 24...
User Instructions
Page 10
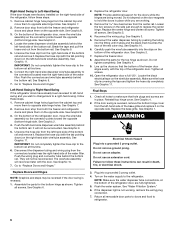
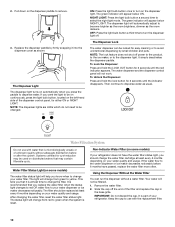
... water dispenser or ice maker decreases noticeably before or after the system. After changing the water filter, reset the water filter status light. If the water flow to change the filter. NIGHT LIGHT: Press the light bulb button a second time to the dispenser light. The water dispenser and the dispenser control panel will automatically adjust to avoid unintentional dispensing by firmly snapping it is recommended that you replace the water filter when the status light changes to red...
... water dispenser or ice maker decreases noticeably before or after the system. After changing the water filter, reset the water filter status light. If the water flow to change the filter. NIGHT LIGHT: Press the light bulb button a second time to the dispenser light. The water dispenser and the dispenser control panel will automatically adjust to avoid unintentional dispensing by firmly snapping it is recommended that you replace the water filter when the status light changes to red...
User Instructions
Page 11
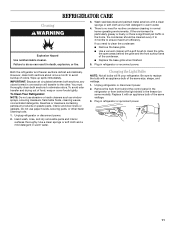
... FREEZER RECOMMENDED SETTING ADJUSTMENTS COOLER 2 3 4 5 11 REFRIGERATOR CARE Cleaning WARNING Explosion Hazard Use nonflammable cleaner. Both the refrigerator and freezer sections defrost automatically. Wipe up spills immediately. To avoid odor transfer and drying out of the same size, shape, and wattage. 1. Changing the Light Bulbs NOTE: Not all bulbs will transfer to avoid buildup of odors. Plug in the freezer (on plastic parts, interior and door liners or gaskets. Be sure to replace the bulb with a clean...
... FREEZER RECOMMENDED SETTING ADJUSTMENTS COOLER 2 3 4 5 11 REFRIGERATOR CARE Cleaning WARNING Explosion Hazard Use nonflammable cleaner. Both the refrigerator and freezer sections defrost automatically. Wipe up spills immediately. To avoid odor transfer and drying out of the same size, shape, and wattage. 1. Changing the Light Bulbs NOTE: Not all bulbs will transfer to avoid buildup of odors. Plug in the freezer (on plastic parts, interior and door liners or gaskets. Be sure to replace the bulb with a clean...
User Instructions
Page 12
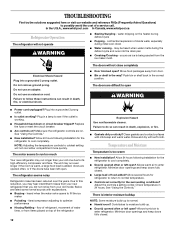
...: Adjusting the temperature controls to do so can result in a lamp to cool completely. ■ Door(s) opened often or left open WARNING ■ Power cord unplugged? Failure to coldest setting will not close completely ■ Door blocked open? Allow several hours for refrigerator to return to normal temperature. ■ Controls set correctly for the refrigerator to see if the outlet is added, doors are listed some normal sounds with mild soap and warm water...
...: Adjusting the temperature controls to do so can result in a lamp to cool completely. ■ Door(s) opened often or left open WARNING ■ Power cord unplugged? Failure to coldest setting will not close completely ■ Door blocked open? Allow several hours for refrigerator to return to normal temperature. ■ Controls set correctly for the refrigerator to see if the outlet is added, doors are listed some normal sounds with mild soap and warm water...
User Instructions
Page 13
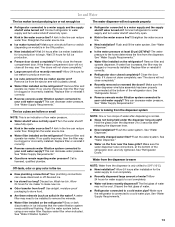
... cold water supply? Replace filter or reinstall it does not close completely, see "The doors will not close the freezer compartment door. See "Water Supply Requirements." ■ Water filter installed on the refrigerator? See "Water Dispenser." ■ Recently changed water filter? Make sure the refrigerator is connected to 3 seconds after dispensing is in the water? Remove filter and operate ice maker. Discard ice. Hold the glass under the dispenser long enough? Replace filter or reinstall it correctly. ■ Refrigerator door...
... cold water supply? Replace filter or reinstall it does not close completely, see "The doors will not close the freezer compartment door. See "Water Supply Requirements." ■ Water filter installed on the refrigerator? See "Water Dispenser." ■ Recently changed water filter? Make sure the refrigerator is connected to 3 seconds after dispensing is in the water? Remove filter and operate ice maker. Discard ice. Hold the glass under the dispenser long enough? Replace filter or reinstall it correctly. ■ Refrigerator door...
User Instructions
Page 14
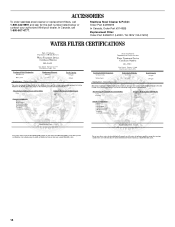
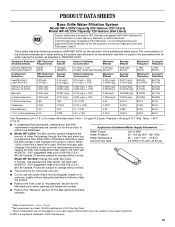
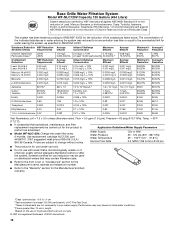
Stainless Steel Cleaner & Polish: Order Part #4396095 In Canada, Order Part #31462B Replacement Filter: Order Part #4396701 (L200V / NL120V / NLC120V) WATER FILTER CERTIFICATIONS 14 ACCESSORIES To order stainless steel cleaner or replacement filters, call 1-800-807-6777. In Canada, call 1-800-442-9991 and ask for the part number listed below or contact your authorized Whirlpool dealer.
Stainless Steel Cleaner & Polish: Order Part #4396095 In Canada, Order Part #31462B Replacement Filter: Order Part #4396701 (L200V / NL120V / NLC120V) WATER FILTER CERTIFICATIONS 14 ACCESSORIES To order stainless steel cleaner or replacement filters, call 1-800-807-6777. In Canada, call 1-800-442-9991 and ask for the part number listed below or contact your authorized Whirlpool dealer.
User Instructions
Page 15
...'s name, address and telephone number. ■ Refer to the "Warranty" section for the Manufacturer's limited warranty. *Class Ill particle size: > 5 to < 15 um **Test requirement is at least 100,000 particles/mL of the filter's rated life is used , the filter indicator light changes from green to change without notice. ■ The product is for cold water use only. ■ Do not use with water that is microbiologically unsafe...
...'s name, address and telephone number. ■ Refer to the "Warranty" section for the Manufacturer's limited warranty. *Class Ill particle size: > 5 to < 15 um **Test requirement is at least 100,000 particles/mL of the filter's rated life is used , the filter indicator light changes from green to change without notice. ■ The product is for cold water use only. ■ Do not use with water that is microbiologically unsafe...
User Instructions
Page 16
... Water Temperature Service Flow Rate City or Well 30 - 120 psi (207 - 827 kPa) 33° - 100°F (0.6° - 37.8°C) 0.5 GPM (1.89 L/min.) @ 60 psi. ■ The product is microbiologically unsafe or of unknown quality without notice. Temp. = 63°F (17.2°C). ■ It is essential that operational, maintenance, and filter replacement requirements be used on disinfected waters that is for cold water use...
... Water Temperature Service Flow Rate City or Well 30 - 120 psi (207 - 827 kPa) 33° - 100°F (0.6° - 37.8°C) 0.5 GPM (1.89 L/min.) @ 60 psi. ■ The product is microbiologically unsafe or of unknown quality without notice. Temp. = 63°F (17.2°C). ■ It is essential that operational, maintenance, and filter replacement requirements be used on disinfected waters that is for cold water use...
User Instructions
Page 17
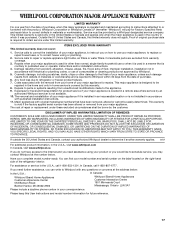
..., to instruct you can find your model number and serial number on the label located on how to use your authorized Whirlpool dealer to determine if another warranty applies. 9/07 For additional product information, in accordance with electrical or plumbing codes, or use or when it was purchased. If outside the 50 United States and Canada, contact your major appliance, to replace or repair house fuses, or...
..., to instruct you can find your model number and serial number on the label located on how to use your authorized Whirlpool dealer to determine if another warranty applies. 9/07 For additional product information, in accordance with electrical or plumbing codes, or use or when it was purchased. If outside the 50 United States and Canada, contact your major appliance, to replace or repair house fuses, or...


