

Installation Instructions
Page 2
... (part of installation. Power supply cord bushing (1) H. See "Electrical Requirements" section. Check with any obstructions so that the damper blade can open freely and fully. Washers (2) D. Toggle nuts (2) E. 1/4" x 2" lag screws (2) F. The location must be sure to Round Transition" illustration in "Venting Design Specifications" section. 2 NOTE: The hardware items listed here are...
... (part of installation. Power supply cord bushing (1) H. See "Electrical Requirements" section. Check with any obstructions so that the damper blade can open freely and fully. Washers (2) D. Toggle nuts (2) E. 1/4" x 2" lag screws (2) F. The location must be sure to Round Transition" illustration in "Venting Design Specifications" section. 2 NOTE: The hardware items listed here are...
Installation Instructions
Page 9
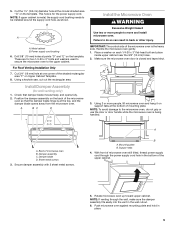
Metal cabinet B. Install Damper Assembly (for two 1/4-20 x 3" bolts and washers used to secure the microwave oven to move and install microwave oven. Check that the damper blade hinge is the heavy side. Handle the microwave ..., lift microwave oven and hang it on support tabs at the bottom of the shaded rectangular area "F" on the back of the upper cabinet. 5. Place a washer on the template. Damper assembly C. Secure damper assembly with 2 sheet metal screws. Support tabs 4. Drill 3/8" (10 mm) holes at the circular shaded area "G" on each...
Metal cabinet B. Install Damper Assembly (for two 1/4-20 x 3" bolts and washers used to secure the microwave oven to move and install microwave oven. Check that the damper blade hinge is the heavy side. Handle the microwave ..., lift microwave oven and hang it on support tabs at the bottom of the shaded rectangular area "F" on the back of the upper cabinet. 5. Place a washer on the template. Damper assembly C. Secure damper assembly with 2 sheet metal screws. Support tabs 4. Drill 3/8" (10 mm) holes at the circular shaded area "G" on each...