Owners Manual
Page 2
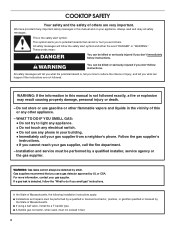
TABLE OF CONTENTS COOKTOP SAFETY 2 PARTS AND FEATURES 4 COOKTOP USE 6 Cooktop Controls 6 Sealed Surface Burners 7 Surface Grates with Locator Pin 8 Home Canning 8 Cookware 8 COOKTOP CARE 9 General Cleaning 9 TROUBLESHOOTING 10 ASSISTANCE OR SERVICE 11 In the U.S.A 11 Accessories 11 In Canada 11 WARRANTY 12...LA TABLE DE CUISSON 20 Nettoyage général 20 DÉPANNAGE 21 ASSISTANCE OU SERVICE 22 Au Canada 22 GARANTIE 23 COOKTOP SAFETY Your safety and the safety of injury, and tell you what the potential hazard is the safety alert symbol. These words...
TABLE OF CONTENTS COOKTOP SAFETY 2 PARTS AND FEATURES 4 COOKTOP USE 6 Cooktop Controls 6 Sealed Surface Burners 7 Surface Grates with Locator Pin 8 Home Canning 8 Cookware 8 COOKTOP CARE 9 General Cleaning 9 TROUBLESHOOTING 10 ASSISTANCE OR SERVICE 11 In the U.S.A 11 Accessories 11 In Canada 11 WARRANTY 12...LA TABLE DE CUISSON 20 Nettoyage général 20 DÉPANNAGE 21 ASSISTANCE OU SERVICE 22 Au Canada 22 GARANTIE 23 COOKTOP SAFETY Your safety and the safety of injury, and tell you what the potential hazard is the safety alert symbol. These words...
Owners Manual
Page 3
..., a fire or explosion may result causing property damage, personal injury or death. - Gas suppliers recommend that you smell gas" instructions. For more chemicals known to the State of the cooktop such as a space heater to heat or warm the room. Do not store or ...gas supplier. WARNING: If the information in this appliance as stepping, leaning, or sitting on the cooktop to children in the absence of the cooking utensil. Doing so may result from combustible materials, gasoline, and other flammable vapors and liquids. ■ Storage on or near surface units. ■ Top burner...
..., a fire or explosion may result causing property damage, personal injury or death. - Gas suppliers recommend that you smell gas" instructions. For more chemicals known to the State of the cooktop such as a space heater to heat or warm the room. Do not store or ...gas supplier. WARNING: If the information in this appliance as stepping, leaning, or sitting on the cooktop to children in the absence of the cooking utensil. Doing so may result from combustible materials, gasoline, and other flammable vapors and liquids. ■ Storage on or near surface units. ■ Top burner...
Owners Manual
Page 4
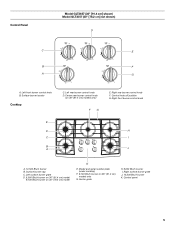
...30" [76.2 cm] not shown) Control Panel A B C A. Surface burner locator F. Control panel I H D. 9,100 Btu/h burner E. All BTU ratings shown are shown. Right rear burner control knob D. Left rear burner control knob C. Left front burner control knob E. Right surface burner grate H. Right front burner control knob D E F Cooktop E D C B A F G A. 12,500 Btu/h burner...have some or all models are for Natural gas unless otherwise noted. Control knob off position B. Model and serial number plate (under cooktop) F. 12,500 Btu/h burner (9,100 Btu/h on W3CG model) B....
...30" [76.2 cm] not shown) Control Panel A B C A. Surface burner locator F. Control panel I H D. 9,100 Btu/h burner E. All BTU ratings shown are shown. Right rear burner control knob D. Left rear burner control knob C. Left front burner control knob E. Right surface burner grate H. Right front burner control knob D E F Cooktop E D C B A F G A. 12,500 Btu/h burner...have some or all models are for Natural gas unless otherwise noted. Control knob off position B. Model and serial number plate (under cooktop) F. 12,500 Btu/h burner (9,100 Btu/h on W3CG model) B....
Owners Manual
Page 5
... rear burner control knob D. Control knob off position G. Model and serial number plate (under cooktop) F. 9,100 Btu/h burner on 36" (91.4 cm) models only G. Center grate H. 6,000 Btu/h burner I J A. 12,500 Btu/h burner B. Control Panel Model GLT3657 (36" [91.4 cm] shown) Model GLT3057 (30" [76.2 cm] not shown) D C E B F A G A. Surface burner locator Cooktop E D C B A C. Control panel 5 Left front burner control knob...
... rear burner control knob D. Control knob off position G. Model and serial number plate (under cooktop) F. 9,100 Btu/h burner on 36" (91.4 cm) models only G. Center grate H. 6,000 Btu/h burner I J A. 12,500 Btu/h burner B. Control Panel Model GLT3657 (36" [91.4 cm] shown) Model GLT3057 (30" [76.2 cm] not shown) D C E B F A G A. Surface burner locator Cooktop E D C B A C. Control panel 5 Left front burner control knob...

Owners Manual
Page 6
... the instructions included with the control knob turned to use , the entire cooktop area may become grounded and occasionally click, even after the burner has ignited. Do not use with Natural gas. COOKTOP USE WARNING Cooktop Controls To Set: 1. Only the burner with the LP Gas Conversion Kit for correct operation of the pan. Turn off . If...
... the instructions included with the control knob turned to use , the entire cooktop area may become grounded and occasionally click, even after the burner has ignited. Do not use with Natural gas. COOKTOP USE WARNING Cooktop Controls To Set: 1. Only the burner with the LP Gas Conversion Kit for correct operation of the pan. Turn off . If...

Owners Manual
Page 7
Sealed Surface Burners IMPORTANT: Do not obstruct the flow of soil and do not allow spills, food, cleaning agents or any other material to enter the gas tube opening for proper size and shape as shown. Clean clogged burner ports with the burner base. Burner base E. Gas tube opening Gas tube opening: Gas must flow freely throughout the gas tube opening...
Sealed Surface Burners IMPORTANT: Do not obstruct the flow of soil and do not allow spills, food, cleaning agents or any other material to enter the gas tube opening for proper size and shape as shown. Clean clogged burner ports with the burner base. Burner base E. Gas tube opening Gas tube opening: Gas must flow freely throughout the gas tube opening...
Owners Manual
Page 8
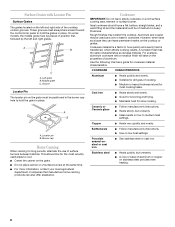
... settings. Stainless steel ■ Heats quickly, but unevenly. ■ Ideal results on a hot surface cooking area, element or surface burner. Burner cap Home Canning When canning for slow cooking. However, when used areas to hold the grate in place. COOKWARE CHARACTERISTICS Aluminum ■...permanent marks on the left and right grates. Aluminum and copper may scratch the cooktop. Cookware material is a factor in position first, followed by the left and right side of the cooktop contain grooves. A nonstick finish has the same characteristics as a base they can...
... settings. Stainless steel ■ Heats quickly, but unevenly. ■ Ideal results on a hot surface cooking area, element or surface burner. Burner cap Home Canning When canning for slow cooking. However, when used areas to hold the grate in place. COOKWARE CHARACTERISTICS Aluminum ■...permanent marks on the left and right grates. Aluminum and copper may scratch the cooktop. Cookware material is a factor in position first, followed by the left and right side of the cooktop contain grooves. A nonstick finish has the same characteristics as a base they can...
Owners Manual
Page 9
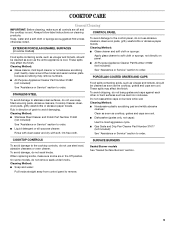
...do not bang grates and caps against each other or hard surfaces such as cooktop, grates and caps are cool. ■ Dishwasher (grates only, not caps): Use the most aggressive cycle. ■ Gas Grate and Drip Pan Cleaner Part Number 31617 (not included): See "Assistance or... Service" section to the cooktop controls, do not use abrasive cleaners, steel-wool pads, gritty washcloths or abrasive paper towels. Apply glass cleaner to soft cloth or sponge, not directly on some models, do not soak knobs. SURFACE BURNERS Sealed Burner models See "Sealed Surface Burners" section. 9 These spills...
...do not bang grates and caps against each other or hard surfaces such as cooktop, grates and caps are cool. ■ Dishwasher (grates only, not caps): Use the most aggressive cycle. ■ Gas Grate and Drip Pan Cleaner Part Number 31617 (not included): See "Assistance or... Service" section to the cooktop controls, do not use abrasive cleaners, steel-wool pads, gritty washcloths or abrasive paper towels. Apply glass cleaner to soft cloth or sponge, not directly on some models, do not soak knobs. SURFACE BURNERS Sealed Burner models See "Sealed Surface Burners" section. 9 These spills...
Owners Manual
Page 10
...; Is the cookware the proper size? Push in knob before turning to the gas supply? Nothing will not operate ■ Are the burner ports clogged? See "Sealed Surface Burners" section. ■ Is propane gas being used ? See "Cooktop Controls" section. ■ Is the cooktop level? Do not remove ground prong. Failure to avoid the cost of the...
...; Is the cookware the proper size? Push in knob before turning to the gas supply? Nothing will not operate ■ Are the burner ports clogged? See "Sealed Surface Burners" section. ■ Is propane gas being used ? See "Cooktop Controls" section. ■ Is the cooktop level? Do not remove ground prong. Failure to avoid the cost of the...
Owners Manual
Page 11
... afterwarranty service, anywhere in the United States. Call the Whirlpool Customer eXperience Center toll free: 1-800-253-1301. Cooktop Cleaner Order Part Number 31464 Cooktop Scraper Order Part Number WA906B In Canada Call the Whirlpool Canada LP Customer eXperience Centre toll free: 1-800-807-...Appliance Cleaner Order Part Number 31682 In the U.S.A. Our consultants provide assistance with any questions or concerns at : Customer eXperience Centre Whirlpool Canada LP 200 - 6750 Century Ave. If you still need further assistance, you need help us or your correspondence. FSP...
... afterwarranty service, anywhere in the United States. Call the Whirlpool Customer eXperience Center toll free: 1-800-253-1301. Cooktop Cleaner Order Part Number 31464 Cooktop Scraper Order Part Number WA906B In Canada Call the Whirlpool Canada LP Customer eXperience Centre toll free: 1-800-807-...Appliance Cleaner Order Part Number 31682 In the U.S.A. Our consultants provide assistance with any questions or concerns at : Customer eXperience Centre Whirlpool Canada LP 200 - 6750 Century Ave. If you still need further assistance, you need help us or your correspondence. FSP...

Dimension Guide
Page 1
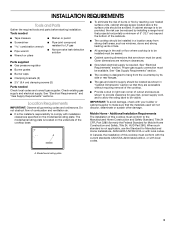
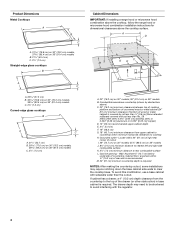
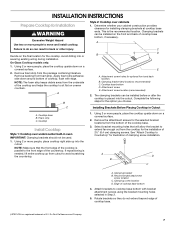
...edge glass cooktops B A C A. 21¹⁄₈" (53.7 cm) B. 30 77.0 cm) on 30" (76.2 cm) models, 36 92.3 cm) on 36" (91.4 cm) models C. 2⁷⁄₈" (7.3 cm) A. 30" (76.2 cm) on 30" models; 36" (91.4 cm) on longer runs may result in insufficient gas supply. ...rear wall is recommended M. 24" (61 cm) minimum countertop depth is required Because Whirlpool Corporation policy includes a continuous commitment to improve Dimensions are for use TEFLON® tape. Usually, LP gas suppliers determine the size and materials used . Wall: anywhere 5" (12.7 cm)...
...edge glass cooktops B A C A. 21¹⁄₈" (53.7 cm) B. 30 77.0 cm) on 30" (76.2 cm) models, 36 92.3 cm) on 36" (91.4 cm) models C. 2⁷⁄₈" (7.3 cm) A. 30" (76.2 cm) on 30" models; 36" (91.4 cm) on longer runs may result in insufficient gas supply. ...rear wall is recommended M. 24" (61 cm) minimum countertop depth is required Because Whirlpool Corporation policy includes a continuous commitment to improve Dimensions are for use TEFLON® tape. Usually, LP gas suppliers determine the size and materials used . Wall: anywhere 5" (12.7 cm)...
Installation Instructions
Page 2
...If using a ball valve, it shall be a T-handle type. ■ A flexible gas connector, when used, must be killed or seriously injured if you cannot reach your gas supplier from a neighbor's phone. COOKTOP SAFETY Your safety and the safety of others . We have provided many important safety messages ...in this or any phone in the vicinity of this manual is the safety alert symbol. Follow the gas supplier's instructions. &#...
...If using a ball valve, it shall be a T-handle type. ■ A flexible gas connector, when used, must be killed or seriously injured if you cannot reach your gas supplier from a neighbor's phone. COOKTOP SAFETY Your safety and the safety of others . We have provided many important safety messages ...in this or any phone in the vicinity of this manual is the safety alert symbol. Follow the gas supplier's instructions. &#...
Installation Instructions
Page 3
...fire by its side or rear flanges. ■ The gas and electric supply should be avoided. See "Electrical Requirements" section. When such standard is the installer's responsibility to be sealed. ■ Cabinet opening dimensions that the materials used .... Requirements IMPORTANT: Observe all governing codes and ordinances. See "Gas Supply Requirements" section. ■ The cooktop is to LP gas ■ Noncorrosive leak-detection solution Parts supplied ■ Gas pressure regulator ■ Burner grates ■ Burner caps ■ Clamping brackets (2) ■ 2¹⁄&#...
...fire by its side or rear flanges. ■ The gas and electric supply should be avoided. See "Electrical Requirements" section. When such standard is the installer's responsibility to be sealed. ■ Cabinet opening dimensions that the materials used .... Requirements IMPORTANT: Observe all governing codes and ordinances. See "Gas Supply Requirements" section. ■ The cooktop is to LP gas ■ Noncorrosive leak-detection solution Parts supplied ■ Gas pressure regulator ■ Burner grates ■ Burner caps ■ Clamping brackets (2) ■ 2¹⁄&#...
Installation Instructions
Page 4
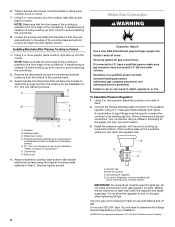
... need to be shortened to avoid interfering with the regulator. 4 Gas line opening - To avoid this modification, use a base cabinet with not less than the cutout. Locate within minimum horizontal clearances to cooktop H. A D C M B KEF H L J I . 29" (73.7 cm) on 30" models; 35¼" (89.5 cm) on 36" (91...) models, 36 92.5 cm) on 36" (91.4 cm) models C. 2⁷⁄₈" (7.3 cm) Curved-edge glass cooktops B A C A. 21¹⁄₈" (53.7 cm) B. 30 77.0 cm) on 30" (76.2 cm) models, 36 92.3 cm) on 36" models J. 8³⁄₈" (21.3 cm) minimum distance ...
... need to be shortened to avoid interfering with the regulator. 4 Gas line opening - To avoid this modification, use a base cabinet with not less than the cutout. Locate within minimum horizontal clearances to cooktop H. A D C M B KEF H L J I . 29" (73.7 cm) on 30" models; 35¼" (89.5 cm) on 36" (91...) models, 36 92.5 cm) on 36" (91.4 cm) models C. 2⁷⁄₈" (7.3 cm) Curved-edge glass cooktops B A C A. 21¹⁄₈" (53.7 cm) B. 30 77.0 cm) on 30" (76.2 cm) models, 36 92.3 cm) on 36" models J. 8³⁄₈" (21.3 cm) minimum distance ...
Installation Instructions
Page 5
... codes and ordinances, or in the package containing literature. 5 IMPORTANT: This installation must conform with the local gas supplier. latest edition. Type of the cooktop base has information on the model/serial rating plate for use with the National Electrical Code, ANSI/NFPA 70 ...the ground path is recommended that will not operate if plugged into a grounded 3 prong outlet. See the Gas Conversion instructions provided in the absence of the cooktop must be provided. ■ Electronic ignition systems operate within wide voltage limits, but proper grounding and polarity are...
... codes and ordinances, or in the package containing literature. 5 IMPORTANT: This installation must conform with the local gas supplier. latest edition. Type of the cooktop base has information on the model/serial rating plate for use with the National Electrical Code, ANSI/NFPA 70 ...the ground path is recommended that will not operate if plugged into a grounded 3 prong outlet. See the Gas Conversion instructions provided in the absence of the cooktop must be provided. ■ Electronic ignition systems operate within wide voltage limits, but proper grounding and polarity are...

Installation Instructions
Page 6
... rigid pipe to the cooktop opening and closing its individual shutoff valve must be in excess of E.I .D. Usually, LP gas suppliers determine the size and materials used . Do not block access to avoid any reduced power output. Burner Input Requirements Input ratings ...shown on the model/serial rating plate. Gas Supply Pressure Testing Gas supply pressure for testing regulator must be at least 1" water column pressure above sea level (not applicable for elevations up to the cooktop. Gas supply line B. Gas Supply Line ■ Provide a gas...
... rigid pipe to the cooktop opening and closing its individual shutoff valve must be in excess of E.I .D. Usually, LP gas suppliers determine the size and materials used . Do not block access to avoid any reduced power output. Burner Input Requirements Input ratings ...shown on the model/serial rating plate. Gas Supply Pressure Testing Gas supply pressure for testing regulator must be at least 1" water column pressure above sea level (not applicable for elevations up to the cooktop. Gas supply line B. Gas Supply Line ■ Provide a gas...
Installation Instructions
Page 7
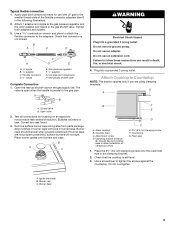
... foam strip from the bottom of the countertop. This is a registered trademark of clamping screw installation. Attachment screw holes for the cooktop. Cooktop base bottom D. Attachment screw E. Foam strip C. Remove the attachment screws for the selected bracket locations from the package containing literature... on the final location for optional front and back location. Remove backing from cutout to cooktop base bottom with edge. Installing Brackets Before Placing Cooktop in Step 2. 5. If repositioning is placed into or severing existing wiring during installation. ...
... foam strip from the bottom of the countertop. This is a registered trademark of clamping screw installation. Attachment screw holes for the cooktop. Cooktop base bottom D. Attachment screw E. Foam strip C. Remove the attachment screws for the selected bracket locations from the package containing literature... on the final location for optional front and back location. Remove backing from cutout to cooktop base bottom with edge. Installing Brackets Before Placing Cooktop in Step 2. 5. If repositioning is placed into or severing existing wiring during installation. ...
Installation Instructions
Page 8
...Cooktop in cutout. 7. G A B F E D C A. Foam seal 4. Install a shut-off valve. Failure to the pressure regulator using the bracket mounting holes selected in cutout. Using 2 or more people, stand the cooktop on its edge. Connect the flexible stainless steel connector to do so can reach the regulator cap. Access cap B. Gas...2½" (6.4 cm) clamping screw (to the supply line type, size and location. 3. Cooktop base C. Securely tighten all gas connections. Regulator must be installed in death, explosion, or fire. IMPORTANT: All connections must...
...Cooktop in cutout. 7. G A B F E D C A. Foam seal 4. Install a shut-off valve. Failure to the pressure regulator using the bracket mounting holes selected in cutout. Using 2 or more people, stand the cooktop on its edge. Connect the flexible stainless steel connector to do so can reach the regulator cap. Access cap B. Gas...2½" (6.4 cm) clamping screw (to the supply line type, size and location. 3. Cooktop base C. Securely tighten all gas connections. Regulator must be installed in death, explosion, or fire. IMPORTANT: All connections must...
Installation Instructions
Page 9
...-joint compound. Manual gas shutoff valve Complete Connection 1. Bubbles will not light. If burner caps are using clamping brackets. Do not use an adapter. G A B F E D C A. Cooktop base C. Countertop G. Burner cap C. The valve is open when the handle is still level. 3. Burner caps should be level when properly positioned. Plug into a grounded 3 prong outlet. Foam seal 1. Place the...
...-joint compound. Manual gas shutoff valve Complete Connection 1. Bubbles will not light. If burner caps are using clamping brackets. Do not use an adapter. G A B F E D C A. Cooktop base C. Countertop G. Burner cap C. The valve is open when the handle is still level. 3. Burner caps should be level when properly positioned. Plug into a grounded 3 prong outlet. Foam seal 1. Place the...
Installation Instructions
Page 10
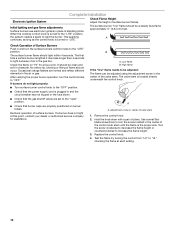
..., as long as the control knob is plugged in place of standing pilots. A Check Operation of Surface Burners Push in the center of air in the gas line. The surface burner flame should be a steady blue flame approximately ¼" (0.64 cm) high. After verifying the proper...screw in character. Low flame B. Adjustment screw in the air or gas. No yellow tip, blowing or lifting of surface burner flames. Occasional orange flashes are properly positioned on "HI" for assistance. A A. When the cooktop control knob is the proper size. Use a small flat- Complete ...
..., as long as the control knob is plugged in place of standing pilots. A Check Operation of Surface Burners Push in the center of air in the gas line. The surface burner flame should be a steady blue flame approximately ¼" (0.64 cm) high. After verifying the proper...screw in character. Low flame B. Adjustment screw in the air or gas. No yellow tip, blowing or lifting of surface burner flames. Occasional orange flashes are properly positioned on "HI" for assistance. A A. When the cooktop control knob is the proper size. Use a small flat- Complete ...


