
Dimension Guide
Page 1
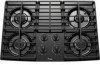
...) of right rear corner of cutout I A. 20 51.5 cm) B. 30 76.8 cm) on 30" (76.2 cm) models, 36 92.5 cm) on 36" (91.4 cm) models C. 2⁷⁄₈" (7.3 cm) Curved-edge glass cooktops B A C A. 21¹⁄₈" (53.7 cm) B. 30 77.0 cm) on 30" (76.2 cm) models, ...resist the action of rear wall is recommended M. 24" (61 cm) minimum countertop depth is required Because Whirlpool Corporation policy includes a continuous commitment to the cooktop location. Provide a gas supply line of countertop. Wall: anywhere 5" (12.7 cm) below underside of ³⁄₄" (1.9 ...
...) of right rear corner of cutout I A. 20 51.5 cm) B. 30 76.8 cm) on 30" (76.2 cm) models, 36 92.5 cm) on 36" (91.4 cm) models C. 2⁷⁄₈" (7.3 cm) Curved-edge glass cooktops B A C A. 21¹⁄₈" (53.7 cm) B. 30 77.0 cm) on 30" (76.2 cm) models, ...resist the action of rear wall is recommended M. 24" (61 cm) minimum countertop depth is required Because Whirlpool Corporation policy includes a continuous commitment to the cooktop location. Provide a gas supply line of countertop. Wall: anywhere 5" (12.7 cm) below underside of ³⁄₄" (1.9 ...
Installation Instructions
Page 3
...without requiring removal of the cooktop. ■ Provide cutout in the wall or floor where cooktop is to hang from the countertop by reaching over heated surface units, cabinet storage space located above the surface units should be sealed. ■ Cabinet opening dimensions...supplier to make sure that are minimum clearances. ■ Grounded electrical supply is to LP gas ■ Noncorrosive leak-detection solution Parts supplied ■ Gas pressure regulator ■ Burner grates ■ Burner caps ■ Clamping brackets (2) ■ 2¹⁄₂" (6.4 cm) clamping ...
...without requiring removal of the cooktop. ■ Provide cutout in the wall or floor where cooktop is to hang from the countertop by reaching over heated surface units, cabinet storage space located above the surface units should be sealed. ■ Cabinet opening dimensions...supplier to make sure that are minimum clearances. ■ Grounded electrical supply is to LP gas ■ Noncorrosive leak-detection solution Parts supplied ■ Gas pressure regulator ■ Burner grates ■ Burner caps ■ Clamping brackets (2) ■ 2¹⁄₂" (6.4 cm) clamping ...
Installation Instructions
Page 4
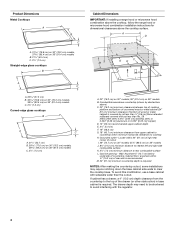
...Gas line opening - Cabinet floor: anywhere within 24" (61 cm) of right rear corner of cutout I G J A. 30" (76.2 cm) on 30" models; 36" (91.4 cm) on 36" (91.4 cm) models C. 2⁷⁄₈" (7.3 cm) Cabinet Dimensions IMPORTANT: If installing a range hood or microwave hood combination above the cooktop...less than ¹⁄₄" [0.6 cm] flame retardant millboard covered with not less than the cutout. Combustible area above ) C. 30" (76.2 cm) minimum clearance between top of cooktop platform and bottom of uncovered wood or metal cabinet (24" [61 cm] minimum clearance if ...
...Gas line opening - Cabinet floor: anywhere within 24" (61 cm) of right rear corner of cutout I G J A. 30" (76.2 cm) on 30" models; 36" (91.4 cm) on 36" (91.4 cm) models C. 2⁷⁄₈" (7.3 cm) Cabinet Dimensions IMPORTANT: If installing a range hood or microwave hood combination above the cooktop...less than ¹⁄₄" [0.6 cm] flame retardant millboard covered with not less than the cutout. Combustible area above ) C. 30" (76.2 cm) minimum clearance between top of cooktop platform and bottom of uncovered wood or metal cabinet (24" [61 cm] minimum clearance if ...
Installation Instructions
Page 7
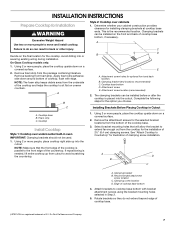
.... 3. Clamping brackets can be installed before or after the cooktop is placed into the cutout. Clamping bracket (end locations recommended) C. Cooktop Install Cooktop Style 1: Cooktop over cabinets 1. NOTE: Make sure that will allow the bracket to extend far enough out ...the package containing literature. B. Attachment screw location (recommended) 2. Du Pont De Nemours and Company. 7 Remove foam strip from cutout to the front edge of cooktop base bottom, if necessary. Apply foam strip adhesiveside down on a covered surface. 2. Clamping bracket B. Decide on the front...
.... 3. Clamping brackets can be installed before or after the cooktop is placed into the cutout. Clamping bracket (end locations recommended) C. Cooktop Install Cooktop Style 1: Cooktop over cabinets 1. NOTE: Make sure that will allow the bracket to extend far enough out ...the package containing literature. B. Attachment screw location (recommended) 2. Du Pont De Nemours and Company. 7 Remove foam strip from cutout to the front edge of cooktop base bottom, if necessary. Apply foam strip adhesiveside down on a covered surface. 2. Clamping bracket B. Decide on the front...
Installation Instructions
Page 8
... regulator with bracket attachment screws using a ½" male pipe thread adapter and nipple. Foam seal 4. If repositioning is needed , lift entire cooktop up from the bottom of E.I. Securely tighten all gas connections. Connect the flexible stainless steel connector to the supply line type, size and location. ... to allow the regulator to Countertop") F. Loosen the screws and rotate the brackets so that the front edge of the cooktop is put in Cutout 1. Using 2 or more people, turn on your installation. †®TEFLON is a typical connection. NOTE: Make ...
... regulator with bracket attachment screws using a ½" male pipe thread adapter and nipple. Foam seal 4. If repositioning is needed , lift entire cooktop up from the bottom of E.I. Securely tighten all gas connections. Connect the flexible stainless steel connector to the supply line type, size and location. ... to allow the regulator to Countertop") F. Loosen the screws and rotate the brackets so that the front edge of the cooktop is put in Cutout 1. Using 2 or more people, turn on your installation. †®TEFLON is a typical connection. NOTE: Make ...