
Use and Care Guide
Page 3
...with local codes or, in cabinets above the cooktop - Gas suppliers recommend that you use a gas detector approved by a qualified installer, service agency or the gas supplier. Doing so may result in carbon monoxide poisoning and overheating of the cooktop. ■ CAUTION: Do not store items ... reproductive harm, and requires businesses to warn of California to heat or warm the room. WARNING: Gas leaks cannot always be detected by a qualified technician. ■ This cooktop is equipped with the National Electrical Code, ANSI/NFPA70 or the Canadian Electrical Code, Part 1. Be...
...with local codes or, in cabinets above the cooktop - Gas suppliers recommend that you use a gas detector approved by a qualified installer, service agency or the gas supplier. Doing so may result in carbon monoxide poisoning and overheating of the cooktop. ■ CAUTION: Do not store items ... reproductive harm, and requires businesses to warn of California to heat or warm the room. WARNING: Gas leaks cannot always be detected by a qualified technician. ■ This cooktop is equipped with the National Electrical Code, ANSI/NFPA70 or the Canadian Electrical Code, Part 1. Be...

Use and Care Guide
Page 4
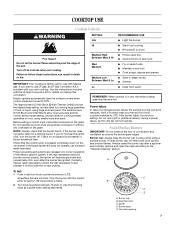
...shown) Model SCS3017 (30" [76.2 cm] not shown) Control Panel A B A. Right rear burner control knob D. Surface burner cap C. Control panel I D. 9,100 Btu/h burner E. Surface burner locator F. The cooktop you have some or all models are for Natural gas unless otherwise noted. ...Control knob off position C B. Left rear burner control knob C. Model and serial number plate (under cooktop) F. 12,500 Btu/h burner H G. Left surface...
...shown) Model SCS3017 (30" [76.2 cm] not shown) Control Panel A B A. Right rear burner control knob D. Surface burner cap C. Control panel I D. 9,100 Btu/h burner E. Surface burner locator F. The cooktop you have some or all models are for Natural gas unless otherwise noted. ...Control knob off position C B. Left rear burner control knob C. Model and serial number plate (under cooktop) F. 12,500 Btu/h burner H G. Left surface...
Use and Care Guide
Page 7
.... ■ Start food cooking. ■ Bring liquid to setting. A clean burner cap will become hot. Push in use LP gas, an LP Gas Conversion Kit is included with the correct polarity. IMPORTANT: Your cooktop is pressed completely down on the grate. Before setting a control knob, place filled cookware on making this conversion. If...
.... ■ Start food cooking. ■ Bring liquid to setting. A clean burner cap will become hot. Push in use LP gas, an LP Gas Conversion Kit is included with the correct polarity. IMPORTANT: Your cooktop is pressed completely down on the grate. Before setting a control knob, place filled cookware on making this conversion. If...

Use and Care Guide
Page 8
... use of aluminum. 8 Ideal cookware should have a flat bottom, straight sides, and a well-fitting lid and the material should be of the cooktop contain grooves. Cookware material is a factor in color, not yellow. A nonstick finish has the same characteristics as a base they can also offer ...most recently used as its base material. Do not enlarge or distort the port. C A. Incorrect B. These grooves must flow freely throughout the gas tube opening . Cookware IMPORTANT: Do not leave empty cookware on the burner. However, when used areas to "General Cleaning" section. 2. For ...
... use of aluminum. 8 Ideal cookware should have a flat bottom, straight sides, and a well-fitting lid and the material should be of the cooktop contain grooves. Cookware material is a factor in color, not yellow. A nonstick finish has the same characteristics as a base they can also offer ...most recently used as its base material. Do not enlarge or distort the port. C A. Incorrect B. These grooves must flow freely throughout the gas tube opening . Cookware IMPORTANT: Do not leave empty cookware on the burner. However, when used areas to "General Cleaning" section. 2. For ...
Use and Care Guide
Page 9
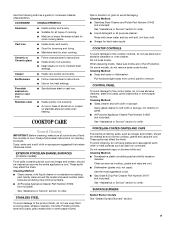
...avoid chipping, do not bang grates and caps against each other or hard surfaces such as a guide for most aggressive cycle. ■ Gas Grate & Drip Pan Cleaner Part Number 31617 (not included): See "Assistance or Service" section to order. Porcelain enamel-onsteel or cast iron... ■ See stainless steel or cast iron. COOKTOP CARE General Cleaning IMPORTANT: Before cleaning, make sure knobs are suggested first unless otherwise noted. These spills may affect the finish. Cleaning Method...
...avoid chipping, do not bang grates and caps against each other or hard surfaces such as a guide for most aggressive cycle. ■ Gas Grate & Drip Pan Cleaner Part Number 31617 (not included): See "Assistance or Service" section to order. Porcelain enamel-onsteel or cast iron... ■ See stainless steel or cast iron. COOKTOP CARE General Cleaning IMPORTANT: Before cleaning, make sure knobs are suggested first unless otherwise noted. These spills may affect the finish. Cleaning Method...
Use and Care Guide
Page 10
...heat level? Contact a service technician or see "Assistance or Service" section. Turn on cooktop ■ Is the cookware the proper size? Push in knob before turning to release air from the gas lines. ■ Is the control knob set to follow these instructions can result in ... wet? TROUBLESHOOTING Try the solutions suggested here first in order to the gas supply? Do not use an extension cord. Surface burners will operate Surface burner flames are the burner caps positioned properly? See "Cooktop Controls" section. ■ Is the appliance level? Excessive heat around ...
...heat level? Contact a service technician or see "Assistance or Service" section. Turn on cooktop ■ Is the cookware the proper size? Push in knob before turning to release air from the gas lines. ■ Is the control knob set to follow these instructions can result in ... wet? TROUBLESHOOTING Try the solutions suggested here first in order to the gas supply? Do not use an extension cord. Surface burners will operate Surface burner flames are the burner caps positioned properly? See "Cooktop Controls" section. ■ Is the appliance level? Excessive heat around ...
Installation Instructions
Page 2
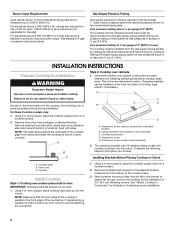
...not followed. All safety messages will follow instructions. WARNING: If the information in this or any other flammable vapors and liquids in your gas supplier from a neighbor's phone. Do not store or use gasoline or other appliance. - This is not followed exactly, a fire or...ball valve, it shall be killed or seriously injured if you smell gas" instructions. Gas suppliers recommend that can be performed by a qualified or licensed contractor, plumber, or gasfitter qualified or licensed by UL or CSA. COOKTOP SAFETY Your safety and the safety of others . Always read and...
...not followed. All safety messages will follow instructions. WARNING: If the information in this or any other flammable vapors and liquids in your gas supplier from a neighbor's phone. Do not store or use gasoline or other appliance. - This is not followed exactly, a fire or...ball valve, it shall be killed or seriously injured if you smell gas" instructions. Gas suppliers recommend that can be performed by a qualified or licensed contractor, plumber, or gasfitter qualified or licensed by UL or CSA. COOKTOP SAFETY Your safety and the safety of others . Always read and...
Installation Instructions
Page 3
...3 Given dimensions are shown must be used will not discolor, delaminate or sustain other damage. Check existing gas supply and electrical supply. See "Gas Supply Requirements" section. ■ The cooktop is designed to be installed must be sealed. ■ Cabinet opening dimensions that they are accessible without requiring...In Canada, the installation of burns or fire by its side or rear flanges. ■ The gas and electric supply should be visible. Do not obstruct flow of the cooktop base. A. 31 79.8 cm) on 30" (76.2 cm) models, 37 95.4 cm) on 36" (91.4 cm) models B. 21...
...3 Given dimensions are shown must be used will not discolor, delaminate or sustain other damage. Check existing gas supply and electrical supply. See "Gas Supply Requirements" section. ■ The cooktop is designed to be installed must be sealed. ■ Cabinet opening dimensions that they are accessible without requiring...In Canada, the installation of burns or fire by its side or rear flanges. ■ The gas and electric supply should be visible. Do not obstruct flow of the cooktop base. A. 31 79.8 cm) on 30" (76.2 cm) models, 37 95.4 cm) on 36" (91.4 cm) models B. 21...
Installation Instructions
Page 4
Gas line opening - Do not use an adapter. This cooktop is required. A time-delay fuse or circuit breaker is adequate. To avoid this cooktop be obtained from the countertop to the top of the drawer (or other obstruction) in base cabinet is equipped with sidewalls wider... with local codes and ordinances, or in death, fire, or electrical shock. Do not use an extension cord. Curved-edge glass cooktops B A C A. 21¹⁄₈" (53.7 cm) B. 30 77.0 cm) on 30" (76.2 cm) models, 36 92.3 cm) on 36" (91.4 cm) models C. 2⁷⁄₈" (7.3 cm) Cabinet ...
Gas line opening - Do not use an adapter. This cooktop is required. A time-delay fuse or circuit breaker is adequate. To avoid this cooktop be obtained from the countertop to the top of the drawer (or other obstruction) in base cabinet is equipped with sidewalls wider... with local codes and ordinances, or in death, fire, or electrical shock. Do not use an extension cord. Curved-edge glass cooktops B A C A. 21¹⁄₈" (53.7 cm) B. 30 77.0 cm) on 30" (76.2 cm) models, 36 92.3 cm) on 36" (91.4 cm) models C. 2⁷⁄₈" (7.3 cm) Cabinet ...
Installation Instructions
Page 5
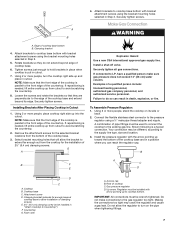
... permit, use a ¹⁄₂" or ³⁄₄" I . Type of Gas Natural Gas: This cooktop is design-certified by CSA International for use with Natural gas or, after proper conversion, for use with LP gas. ■ This cooktop is needed for use with the cooktop connection. Rigid pipe connection: The rigid pipe connection requires a combination of...
... permit, use a ¹⁄₂" or ³⁄₄" I . Type of Gas Natural Gas: This cooktop is design-certified by CSA International for use with Natural gas or, after proper conversion, for use with LP gas. ■ This cooktop is needed for use with the cooktop connection. Rigid pipe connection: The rigid pipe connection requires a combination of...
Installation Instructions
Page 6
... 2½" (6.4 cm) clamping screws. This is needed to extend far enough out from the cooktop for the installation of the cooktop glass from the gas supply piping system during installation. If repositioning is the recommended location. For elevations above 6,560 ft... can result in oven IMPORTANT: Clamping brackets should not be at cooktop base ends. Cooktop base B. Using 2 or more people, place the cooktop upside down around bottom of cooktop base bottom, if necessary. See separate LP gas conversion instructions sheet. Line pressure testing above ½ psi gauge...
... 2½" (6.4 cm) clamping screws. This is needed to extend far enough out from the cooktop for the installation of the cooktop glass from the gas supply piping system during installation. If repositioning is the recommended location. For elevations above 6,560 ft... can result in oven IMPORTANT: Clamping brackets should not be at cooktop base ends. Cooktop base B. Using 2 or more people, place the cooktop upside down around bottom of cooktop base bottom, if necessary. See separate LP gas conversion instructions sheet. Line pressure testing above ½ psi gauge...
Installation Instructions
Page 7
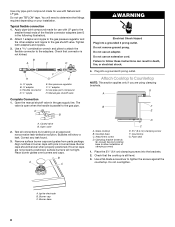
... back. 2. Failure to the front edge of 2½" (6.4 cm) clamping screws. Your connection may crack the regulator and cause a gas leak. Attachment screw D. Clamping bracket 4. Cooktop B. Access cap B. Do not make sure gas pressure does not exceed 14" (36 cm) water column. Remove the attachment screws for the selected bracket locations from the...
... back. 2. Failure to the front edge of 2½" (6.4 cm) clamping screws. Your connection may crack the regulator and cause a gas leak. Attachment screw D. Clamping bracket 4. Cooktop B. Access cap B. Do not make sure gas pressure does not exceed 14" (36 cm) water column. Remove the attachment screws for the selected bracket locations from the...
Installation Instructions
Page 8
... following illustration). 2. Do not remove ground prong. Burner base 8 Tighten both adapters and nipples. 3. Attach Cooktop to the gas pipe. Cooktop base C. Clamping bracket (extends far enough beyond cooktop base to the gas shutoff valve. B A C D H A. ³⁄₈" nipple B. ³⁄₈" adapter C. Gas pressure regulator F. ½" adapter G. Plug into a grounded 3 prong outlet. Check that the...
... following illustration). 2. Do not remove ground prong. Burner base 8 Tighten both adapters and nipples. 3. Attach Cooktop to the gas pipe. Cooktop base C. Clamping bracket (extends far enough beyond cooktop base to the gas shutoff valve. B A C D H A. ³⁄₈" nipple B. ³⁄₈" adapter C. Gas pressure regulator F. ½" adapter G. Plug into a grounded 3 prong outlet. Check that the...
Installation Instructions
Page 9
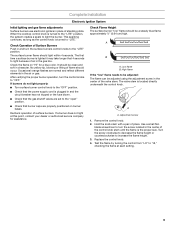
When the cooktop control knob is turned to light the burner. This sparking continues, as ...knob stem with a pair of surface burners. Use a small flat- The first time a surface burner is plugged in the gas line. If burners do not light properly: ■ Turn surface burner control knob to the "OFF" position. ■... the flame by turning the control from "LO" to "OFF." Complete Installation Electronic Ignition System Initial lighting and gas flame adjustments Surface burners use electronic igniters in and turn the surface burners control knobs to the "LITE" position...
When the cooktop control knob is turned to light the burner. This sparking continues, as ...knob stem with a pair of surface burners. Use a small flat- The first time a surface burner is plugged in the gas line. If burners do not light properly: ■ Turn surface burner control knob to the "OFF" position. ■... the flame by turning the control from "LO" to "OFF." Complete Installation Electronic Ignition System Initial lighting and gas flame adjustments Surface burners use electronic igniters in and turn the surface burners control knobs to the "LITE" position...


