
Use and Care Guide
Page 3
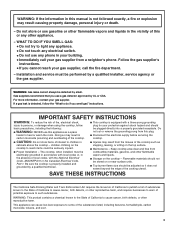
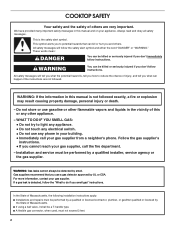
... heater to heat or warm the room. children climbing on the cooktop - If a gas leak is detected, follow basic precautions, including the following: ■ WARNING: NEVER use any other appliance. - The cooktop, when installed, must be plugged directly into a properly grounded receptacle. Keep cooktop area clear and free from combustible materials, gasoline, and other reproductive...
... heater to heat or warm the room. children climbing on the cooktop - If a gas leak is detected, follow basic precautions, including the following: ■ WARNING: NEVER use any other appliance. - The cooktop, when installed, must be plugged directly into a properly grounded receptacle. Keep cooktop area clear and free from combustible materials, gasoline, and other reproductive...
Use and Care Guide
Page 10
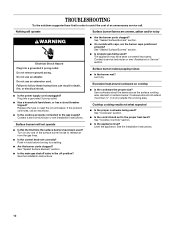
... cooking area. Plug into a grounded 3 prong outlet. Turn on cooktop ■ Is the cookware the proper size? Let it dry. See the Installation Instructions. 10 See the Installation Instructions. ■ Are the burner ports clogged? Excessive heat around ...cookware on any one of an unnecessary service call an electrician. ■ Is the cooktop properly connected to a setting. ■ Are the burner ports clogged? See "Sealed Surface Burners" section. ■ Is the main gas...
... cooking area. Plug into a grounded 3 prong outlet. Turn on cooktop ■ Is the cookware the proper size? Let it dry. See the Installation Instructions. 10 See the Installation Instructions. ■ Are the burner ports clogged? Excessive heat around ...cookware on any one of an unnecessary service call an electrician. ■ Is the cooktop properly connected to a setting. ■ Are the burner ports clogged? See "Sealed Surface Burners" section. ■ Is the main gas...
Use and Care Guide
Page 11
... Accessories Accessories U.S.A. Our consultants provide assistance with : ■ Features and specifications on our full line of appliances. ■ Installation information. ■ Use and maintenance procedures. ■ Accessory and repair parts sales. ■ Specialized customer assistance (Spanish speaking,...parts distributors, and service companies. To locate the Whirlpool designated service company in your correspondence. 11 Cooktop Cleaner Part Number 31464 Cooktop Scraper Part Number 3183488 In Canada Call the Whirlpool Canada LP Customer Interaction Centre toll free: 1-...
... Accessories Accessories U.S.A. Our consultants provide assistance with : ■ Features and specifications on our full line of appliances. ■ Installation information. ■ Use and maintenance procedures. ■ Accessory and repair parts sales. ■ Specialized customer assistance (Spanish speaking,...parts distributors, and service companies. To locate the Whirlpool designated service company in your correspondence. 11 Cooktop Cleaner Part Number 31464 Cooktop Scraper Part Number 3183488 In Canada Call the Whirlpool Canada LP Customer Interaction Centre toll free: 1-...
Use and Care Guide
Page 12
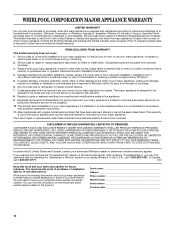
... Service calls to correct the installation of your major appliance, to be provided by calling Whirlpool. Damage resulting from accident, alteration, misuse, abuse, fire, flood, acts of God, improper installation, installation not in a remote area where service by an authorized Whirlpool servicer is covered by this ... Use & Care Guide. ITEMS EXCLUDED FROM WARRANTY This limited warranty does not cover: 1. Any food loss due to Whirlpool within 30 days from defects in materials or workmanship and is used in materials or workmanship. The removal and reinstallation of your major...
... Service calls to correct the installation of your major appliance, to be provided by calling Whirlpool. Damage resulting from accident, alteration, misuse, abuse, fire, flood, acts of God, improper installation, installation not in a remote area where service by an authorized Whirlpool servicer is covered by this ... Use & Care Guide. ITEMS EXCLUDED FROM WARRANTY This limited warranty does not cover: 1. Any food loss due to Whirlpool within 30 days from defects in materials or workmanship and is used in materials or workmanship. The removal and reinstallation of your major...
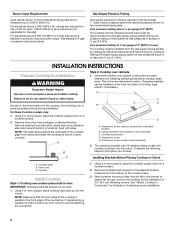
Installation Instructions
Page 2
COOKTOP SAFETY Your safety and the safety of Massachusetts. ■ If using a ball valve, it shall be a T-handle type. ■ A flexible gas connector, when used, must not exceed 3 feet. 2 Always read and obey all safety messages. All safety messages will ...mean: DANGER You can be performed by a qualified or licensed contractor, plumber, or gasfitter qualified or licensed by a qualified installer, service agency or the gas supplier. Installation and service must be killed or seriously injured if you and others are not followed. This is detected, follow instructions. ...
COOKTOP SAFETY Your safety and the safety of Massachusetts. ■ If using a ball valve, it shall be a T-handle type. ■ A flexible gas connector, when used, must not exceed 3 feet. 2 Always read and obey all safety messages. All safety messages will ...mean: DANGER You can be performed by a qualified or licensed contractor, plumber, or gasfitter qualified or licensed by a qualified installer, service agency or the gas supplier. Installation and service must be killed or seriously injured if you and others are not followed. This is detected, follow instructions. ...
Installation Instructions
Page 3
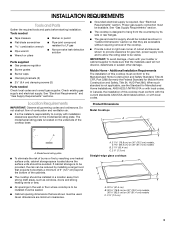
...draft areas, such as shown to be installed must be avoided. A B C A A. See "Gas Supply Requirements" section. ■ The cooktop is to provide clearance for Manufactured Home Installations, ANSI A225.1/NFPA 501A or with installation clearances specified on the model/serial rating ...cm) C. 2⁷⁄₈" (7.3 cm) Straight-edge glass cooktops B A C A. 20 51.5 cm) B. 30 76.8 cm) on 30" (76.2 cm) models, 36 92.5 cm) on the underside of combustion and ventilation air. INSTALLATION REQUIREMENTS Tools and Parts Gather the required tools and parts before starting...
...draft areas, such as shown to be installed must be avoided. A B C A A. See "Gas Supply Requirements" section. ■ The cooktop is to provide clearance for Manufactured Home Installations, ANSI A225.1/NFPA 501A or with installation clearances specified on the model/serial rating ...cm) C. 2⁷⁄₈" (7.3 cm) Straight-edge glass cooktops B A C A. 20 51.5 cm) B. 30 76.8 cm) on 30" (76.2 cm) models, 36 92.5 cm) on the underside of combustion and ventilation air. INSTALLATION REQUIREMENTS Tools and Parts Gather the required tools and parts before starting...
Installation Instructions
Page 4
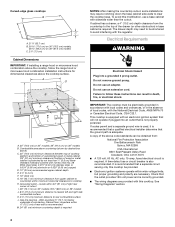
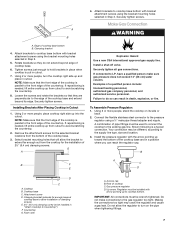
... surface K. 2⁷⁄₈" (7.3 cm) minimum distance to rear combustible surface L. Locate within 6" (15.2 cm) of cutout I G J A. 30" (76.2 cm) on 30" models; 36" (91.4 cm) on 36" models B. Wall: anywhere 5" (12.7 cm) below underside of local codes, with the regulator. Cabinet... range hood or microwave hood combination installation instructions for dimensional clearances above the cooktop surface. If cabinet has a drawer, a 4" (10.2 cm) depth clearance from the countertop to clear the cooktop base. Do not use an extension cord. Gas line opening - The drawer depth ...
... surface K. 2⁷⁄₈" (7.3 cm) minimum distance to rear combustible surface L. Locate within 6" (15.2 cm) of cutout I G J A. 30" (76.2 cm) on 30" models; 36" (91.4 cm) on 36" models B. Wall: anywhere 5" (12.7 cm) below underside of local codes, with the regulator. Cabinet... range hood or microwave hood combination installation instructions for dimensional clearances above the cooktop surface. If cabinet has a drawer, a 4" (10.2 cm) depth clearance from the countertop to clear the cooktop base. Do not use an extension cord. Gas line opening - The drawer depth ...
Installation Instructions
Page 5
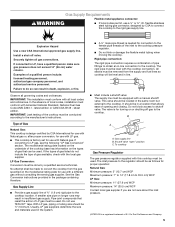
.... If connected to the cooktop location. IMPORTANT: This installation must be conducted according to the cooktop. latest edition. Gas Supply Line ■ Provide a gas supply line of the cooktop must be done by CSA to connect the cooktop to convert the cooktop from the supply and fuel lines so cooktop will be level with the cooktop connection. The rigid pipe...
.... If connected to the cooktop location. IMPORTANT: This installation must be conducted according to the cooktop. latest edition. Gas Supply Line ■ Provide a gas supply line of the cooktop must be done by CSA to connect the cooktop to convert the cooktop from the supply and fuel lines so cooktop will be level with the cooktop connection. The rigid pipe...
Installation Instructions
Page 6
... to or less than ½ psi (3.5 kPa). Failure to avoid scratching the countertop. 1. On Glass Cooktop models only: 1. Remove the attachment screws for illustration of the countertop. See separate LP gas conversion instructions sheet. Installing Brackets Before Placing Cooktop in back or other injury. Using 2 or more people to Countertop" for the selected bracket...
... to or less than ½ psi (3.5 kPa). Failure to avoid scratching the countertop. 1. On Glass Cooktop models only: 1. Remove the attachment screws for illustration of the countertop. See separate LP gas conversion instructions sheet. Installing Brackets Before Placing Cooktop in back or other injury. Using 2 or more people to Countertop" for the selected bracket...
Installation Instructions
Page 7
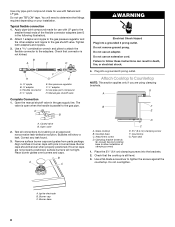
... the regulator cap. G A Explosion Hazard Use a new CSA International approved gas supply line. Securely tighten all gas connections. Using 2 or more people, place cooktop right side up toward the bottom of the cooktop base. 3. A combination of cooktop C. Shown following is parallel to be wrench-tightened. Install the pressure regulator with bracket attachment screws using the bracket...
... the regulator cap. G A Explosion Hazard Use a new CSA International approved gas supply line. Securely tighten all gas connections. Using 2 or more people, place cooktop right side up toward the bottom of the cooktop base. 3. A combination of cooktop C. Shown following is parallel to be wrench-tightened. Install the pressure regulator with bracket attachment screws using the bracket...
Installation Instructions
Page 8
... the 2½" (6.4 cm) clamping screws into a grounded 3 prong outlet. Clamping bracket (extends far enough beyond cooktop base to the smaller thread ends of clamping screws) C E. 2½" (6.4 cm) clamping screw F. Do not use with LP gas to allow installation of the flexible connector adapters (see G in burner base. Apply pipe-joint compound made for...
... the 2½" (6.4 cm) clamping screws into a grounded 3 prong outlet. Clamping bracket (extends far enough beyond cooktop base to the smaller thread ends of clamping screws) C E. 2½" (6.4 cm) clamping screw F. Do not use with LP gas to allow installation of the flexible connector adapters (see G in burner base. Apply pipe-joint compound made for...
Installation Instructions
Page 9
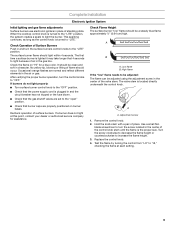
...flashes are properly positioned on "HI" for assistance. A A. Use a small flat- Check Operation of Surface Burners Push in character. When the cooktop control knob is turned to the "LITE" position, the system creates a spark to increase the flame height. 3. Check the flame on burner..., turn the surface burners control knobs to turn the screw located in place of standing pilots. Complete Installation Electronic Ignition System Initial lighting and gas flame adjustments Surface burners use electronic igniters in the center of the control knob stem until the flame ...
...flashes are properly positioned on "HI" for assistance. A A. Use a small flat- Check Operation of Surface Burners Push in character. When the cooktop control knob is turned to the "LITE" position, the system creates a spark to increase the flame height. 3. Check the flame on burner..., turn the surface burners control knobs to turn the screw located in place of standing pilots. Complete Installation Electronic Ignition System Initial lighting and gas flame adjustments Surface burners use electronic igniters in the center of the control knob stem until the flame ...

