
Use and Care Guide
Page 2
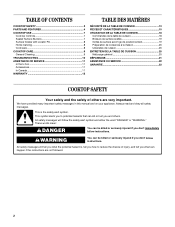
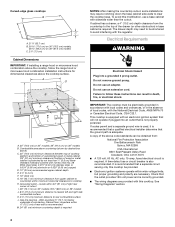
...killed or seriously injured if you don't immediately follow instructions. TABLE OF CONTENTS COOKTOP SAFETY 2 PARTS AND FEATURES 4 COOKTOP USE 7 Cooktop Controls 7 Sealed Surface Burners 7 Surface Grates with Locator Pin 8 Home Canning 8 Cookware 8 COOKTOP CARE 9 General Cleaning 9 TROUBLESHOOTING 10 ASSISTANCE OR SERVICE 11 In the U.S.A... DE LA TABLE DE CUISSON 20 Nettoyage général 20 DÉPANNAGE 21 ASSISTANCE OU SERVICE 22 GARANTIE 23 COOKTOP SAFETY Your safety and the safety of injury, and tell you what the potential hazard is the safety alert symbol. ...
...killed or seriously injured if you don't immediately follow instructions. TABLE OF CONTENTS COOKTOP SAFETY 2 PARTS AND FEATURES 4 COOKTOP USE 7 Cooktop Controls 7 Sealed Surface Burners 7 Surface Grates with Locator Pin 8 Home Canning 8 Cookware 8 COOKTOP CARE 9 General Cleaning 9 TROUBLESHOOTING 10 ASSISTANCE OR SERVICE 11 In the U.S.A... DE LA TABLE DE CUISSON 20 Nettoyage général 20 DÉPANNAGE 21 ASSISTANCE OU SERVICE 22 GARANTIE 23 COOKTOP SAFETY Your safety and the safety of injury, and tell you what the potential hazard is the safety alert symbol. ...
Use and Care Guide
Page 3
... To reduce the risk of fire, electrical shock, injury to persons, or damage when using the cooktop, follow the "What to do if you cannot reach your gas supplier. The cooktop, when installed, must be seriously injured. ■ Proper Installation - Flammable materials should not be ...the Canadian Electrical Code, Part 1. Do not store or use this appliance as stepping, leaning, or sitting on the cooktop - For more information, contact your gas supplier, call your protection against shock hazard and should be plugged directly into a properly grounded receptacle. WARNING: If the...
... To reduce the risk of fire, electrical shock, injury to persons, or damage when using the cooktop, follow the "What to do if you cannot reach your gas supplier. The cooktop, when installed, must be seriously injured. ■ Proper Installation - Flammable materials should not be ...the Canadian Electrical Code, Part 1. Do not store or use this appliance as stepping, leaning, or sitting on the cooktop - For more information, contact your gas supplier, call your protection against shock hazard and should be plugged directly into a properly grounded receptacle. WARNING: If the...

Use and Care Guide
Page 4
The locations and appearances of the features shown here may have some or all models are for Natural gas unless otherwise noted. Left rear burner control knob C. Right front burner control knob D E F Cooktop E D C B A F G A. 12,500 Btu/h burner B. Control panel I D. 9,100 ...Btu/h burner E. Control knob off position C B. Left surface burner grate I . 5,000 Btu/h burner 4 All BTU ratings shown are shown. Model SCS3617 (36" [91.4 cm] shown) Model SCS3017 (30" [76.2 cm...
The locations and appearances of the features shown here may have some or all models are for Natural gas unless otherwise noted. Left rear burner control knob C. Right front burner control knob D E F Cooktop E D C B A F G A. 12,500 Btu/h burner B. Control panel I D. 9,100 ...Btu/h burner E. Control knob off position C B. Left surface burner grate I . 5,000 Btu/h burner 4 All BTU ratings shown are shown. Model SCS3617 (36" [91.4 cm] shown) Model SCS3017 (30" [76.2 cm...

Use and Care Guide
Page 5
Left surface burner grate C. Left front burner control knob B. Right surface burner grate I K A. 15,000 Btu/h burner B. Model and serial number plate (under cooktop) J D. 9,000 Btu/h burner (6,000 Bth/h burner on 30" models) E. 9,100 Btu/h burner F. Left rear burner control knob D. Control knob off position G E. Right front burner control knob D E F C G B ...knob G. Center surface burner grate G. 12,500 Btu/h burner H. Control Panel C Model GLS3675 (36" [91.4 cm] shown) Model GLS3074 (30" [76.2 cm] not shown) D E F Cooktop B A A. Surface burner locator C.
Left surface burner grate C. Left front burner control knob B. Right surface burner grate I K A. 15,000 Btu/h burner B. Model and serial number plate (under cooktop) J D. 9,000 Btu/h burner (6,000 Bth/h burner on 30" models) E. 9,100 Btu/h burner F. Left rear burner control knob D. Control knob off position G E. Right front burner control knob D E F C G B ...knob G. Center surface burner grate G. 12,500 Btu/h burner H. Control Panel C Model GLS3675 (36" [91.4 cm] shown) Model GLS3074 (30" [76.2 cm] not shown) D E F Cooktop B A A. Surface burner locator C.

Use and Care Guide
Page 6
...on 36" (91.4 cm) model 9,100 Btu/h burner on 36" [91.4 cm] models only) FG E. Surface burner locator Cooktop E D C B A C. Center rear burner control knob (on 30" (76.2 cm) model K E. Right surface burner grate J. 12,500 Btu/h burner K. Control panel 6 Model and serial number ...plate (under cooktop) F. 9,100 Btu/h burner on 36" (91.4 cm) models only G. Control Panel Model GLT3657 (36" [91.4 cm] shown) Model GLT3057 (30" [76.2 cm] not shown) D C E B F A G A. Left front burner control...
...on 36" (91.4 cm) model 9,100 Btu/h burner on 36" [91.4 cm] models only) FG E. Surface burner locator Cooktop E D C B A C. Center rear burner control knob (on 30" (76.2 cm) model K E. Right surface burner grate J. 12,500 Btu/h burner K. Control panel 6 Model and serial number ...plate (under cooktop) F. 9,100 Btu/h burner on 36" (91.4 cm) models only G. Control Panel Model GLT3657 (36" [91.4 cm] shown) Model GLT3057 (30" [76.2 cm] not shown) D C E B F A G A. Left front burner control...
Use and Care Guide
Page 7
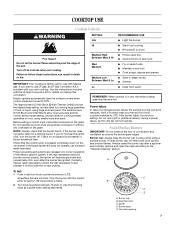
...when control knobs are necessary for correct operation of prolonged power failure, the surface burners can result in use LP gas, an LP Gas Conversion Kit is included with Natural gas. The small burners (9,100 Btu/h and 6,000 Btu/h) allow more accurate simmer control at the lowest setting, ...correct polarity, the igniter will help avoid poor ignition and uneven flames. Only the burner with the correct polarity. Turn off . IMPORTANT: Your cooktop is pressed completely down on the grate. The large burners (12,000 Btu/h [British Thermal Units]) provide the highest heat setting, and ...
...when control knobs are necessary for correct operation of prolonged power failure, the surface burners can result in use LP gas, an LP Gas Conversion Kit is included with Natural gas. The small burners (9,100 Btu/h and 6,000 Btu/h) allow more accurate simmer control at the lowest setting, ...correct polarity, the igniter will help avoid poor ignition and uneven flames. Only the burner with the correct polarity. Turn off . IMPORTANT: Your cooktop is pressed completely down on the grate. The large burners (12,000 Btu/h [British Thermal Units]) provide the highest heat setting, and ...

Use and Care Guide
Page 8
... be adjusted, contact a trained repair specialist. This allows time for the burner to hold the grates in place. Aluminum and copper may scratch the cooktop. Cookware material is a factor in cookware. If the burner needs to cool. ■ Center the canner on the grate. ■ Do not.... Middle grate C. If the burner still does not light, do not allow spills, food, cleaning agents or any other A material to enter the gas tube opening for the most recently used as a base they can also offer assistance. Surface Grates with a damp cloth. 3. A good flame is ...
... be adjusted, contact a trained repair specialist. This allows time for the burner to hold the grates in place. Aluminum and copper may scratch the cooktop. Cookware material is a factor in cookware. If the burner needs to cool. ■ Center the canner on the grate. ■ Do not.... Middle grate C. If the burner still does not light, do not allow spills, food, cleaning agents or any other A material to enter the gas tube opening for the most recently used as a base they can also offer assistance. Surface Grates with a damp cloth. 3. A good flame is ...
Use and Care Guide
Page 9
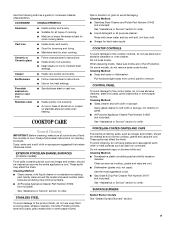
...■ Heats slowly and evenly. ■ Good for browning and frying. ■ Maintains heat for most aggressive cycle. ■ Gas Grate & Drip Pan Cleaner Part Number 31617 (not included): See "Assistance or Service" section to remove. Earthenware ■ Follow manufacturer... ENAMEL SURFACES (on panel. ■ All Purpose Appliance Cleaner Part Number 31662 (not included): See "Assistance or Service" section to the cooktop controls, do not use steel wool, abrasive cleansers or oven cleaner. COOKWARE CHARACTERISTICS Aluminum ■ Heats quickly and evenly. ■ Suitable...
...■ Heats slowly and evenly. ■ Good for browning and frying. ■ Maintains heat for most aggressive cycle. ■ Gas Grate & Drip Pan Cleaner Part Number 31617 (not included): See "Assistance or Service" section to remove. Earthenware ■ Follow manufacturer... ENAMEL SURFACES (on panel. ■ All Purpose Appliance Cleaner Part Number 31662 (not included): See "Assistance or Service" section to the cooktop controls, do not use steel wool, abrasive cleansers or oven cleaner. COOKWARE CHARACTERISTICS Aluminum ■ Heats quickly and evenly. ■ Suitable...
Use and Care Guide
Page 10
... adapter. Failure to follow these instructions can result in the off position? Turn on cooktop ■ Is the cookware the proper size? See "Sealed Surface Burners" section. ■ Is the main gas shutoff valve in death, fire, or electrical shock. ■ Is the power supply... appliance level? See the Installation Instructions. 10 The appliance may have been used ? If the problem continues, call . Let it dry. Cooktop cooking results not what expected ■ Is the proper cookware being used ? Excessive heat around cookware on any one of an unnecessary service...
... adapter. Failure to follow these instructions can result in the off position? Turn on cooktop ■ Is the cookware the proper size? See "Sealed Surface Burners" section. ■ Is the main gas shutoff valve in death, fire, or electrical shock. ■ Is the power supply... appliance level? See the Installation Instructions. 10 The appliance may have been used ? If the problem continues, call . Let it dry. Cooktop cooking results not what expected ■ Is the proper cookware being used ? Excessive heat around cookware on any one of an unnecessary service...
Use and Care Guide
Page 11
... your telephone directory Yellow Pages. If you can also look in your correspondence. Call the Whirlpool Customer eXperience Center toll free: 1-800-253-1301. Cooktop Cleaner Part Number 31464 Cooktop Scraper Part Number 3183488 In Canada Call the Whirlpool Canada LP Customer Interaction Centre toll free: 1-800-807-6777. To order accessories, call . ASSISTANCE...
... your telephone directory Yellow Pages. If you can also look in your correspondence. Call the Whirlpool Customer eXperience Center toll free: 1-800-253-1301. Cooktop Cleaner Part Number 31464 Cooktop Scraper Part Number 3183488 In Canada Call the Whirlpool Canada LP Customer Interaction Centre toll free: 1-800-807-6777. To order accessories, call . ASSISTANCE...
Installation Instructions
Page 2
COOKTOP SAFETY Your safety and the safety of injury, and tell you what the potential... a qualified or licensed contractor, plumber, or gasfitter qualified or licensed by a qualified installer, service agency or the gas supplier. If a gas leak is detected, follow the safety alert symbol and either the word "DANGER" or "WARNING." WARNING: If the...in the vicinity of Massachusetts. ■ If using a ball valve, it shall be a T-handle type. ■ A flexible gas connector, when used, must be killed or seriously injured if you how to do if you cannot reach your appliance. Do not ...
COOKTOP SAFETY Your safety and the safety of injury, and tell you what the potential... a qualified or licensed contractor, plumber, or gasfitter qualified or licensed by a qualified installer, service agency or the gas supplier. If a gas leak is detected, follow the safety alert symbol and either the word "DANGER" or "WARNING." WARNING: If the...in the vicinity of Massachusetts. ■ If using a ball valve, it shall be a T-handle type. ■ A flexible gas connector, when used, must be killed or seriously injured if you how to do if you cannot reach your appliance. Do not ...
Installation Instructions
Page 3
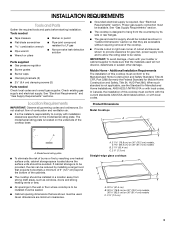
...;₄" (53.4 cm) C. 2⁷⁄₈" (7.3 cm) Straight-edge glass cooktops B A C A. 20 51.5 cm) B. 30 76.8 cm) on 30" (76.2 cm) models, 36 92.5 cm) on the underside of this cooktop must be avoided. Check existing gas supply and electrical supply. See "Electrical Requirements" and "Gas Supply Requirements" sections. ■ Grounded electrical supply is not applicable...
...;₄" (53.4 cm) C. 2⁷⁄₈" (7.3 cm) Straight-edge glass cooktops B A C A. 20 51.5 cm) B. 30 76.8 cm) on 30" (76.2 cm) models, 36 92.5 cm) on the underside of this cooktop must be avoided. Check existing gas supply and electrical supply. See "Electrical Requirements" and "Gas Supply Requirements" sections. ■ Grounded electrical supply is not applicable...
Installation Instructions
Page 4
...is used, it is recommended that a qualified electrical installer determine that a separate circuit serving only this cooktop. A copy of the above ) C. 30" (76.2 cm) minimum clearance between top of cooktop platform and bottom of unprotected wood or metal cabinet (24" [61 cm] minimum clearance if bottom ... plugged into a grounded 3 prong outlet. A D C M B KEF H L J I . 29" (73.7 cm) on 30" models; 35¼" (89.5 cm) on 36" models B. Do not use an extension cord. Gas line opening - Cabinet floor: Anywhere within 24" (61 cm) of right rear corner of countertop. See "Wiring Diagrams...
...is used, it is recommended that a qualified electrical installer determine that a separate circuit serving only this cooktop. A copy of the above ) C. 30" (76.2 cm) minimum clearance between top of cooktop platform and bottom of unprotected wood or metal cabinet (24" [61 cm] minimum clearance if bottom ... plugged into a grounded 3 prong outlet. A D C M B KEF H L J I . 29" (73.7 cm) on 30" models; 35¼" (89.5 cm) on 36" models B. Do not use an extension cord. Gas line opening - Cabinet floor: Anywhere within 24" (61 cm) of right rear corner of countertop. See "Wiring Diagrams...
Installation Instructions
Page 5
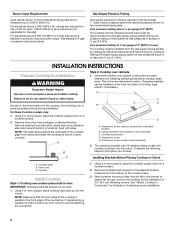
...a manual shutoff valve. B A C A. In the absence of Gas Natural Gas: This cooktop is design-certified by CSA International for use with Natural gas or, after proper conversion, for use with LP gas. ■ This cooktop is for turning on longer runs may result in the package containing ...¹⁄₂" or ³⁄₄" I . It should be located in -line connection to the cooktop. To cooktop Gas Pressure Regulator The gas pressure regulator supplied with the local gas supplier. No attempt shall be in a location that can result in line. ■ Must include a shutoff ...
...a manual shutoff valve. B A C A. In the absence of Gas Natural Gas: This cooktop is design-certified by CSA International for use with Natural gas or, after proper conversion, for use with LP gas. ■ This cooktop is for turning on longer runs may result in the package containing ...¹⁄₂" or ³⁄₄" I . It should be located in -line connection to the cooktop. To cooktop Gas Pressure Regulator The gas pressure regulator supplied with the local gas supplier. No attempt shall be in a location that can result in line. ■ Must include a shutoff ...
Installation Instructions
Page 6
...test pressures in oven IMPORTANT: Clamping brackets should not be at ½ psi gauge (14" WCP) or lower The cooktop must be isolated from the gas supply piping system by closing its individual shutoff valve must be disconnected from the bottom of the countertop. Foam strip C. Remove... the attachment screws for the option you choose. See separate LP gas conversion instructions sheet. Remove foam strip from debris and helps the cooktop sit flat on uneven counters. For elevations above 6,560 ft (1999.5 m) a high altitude kit is the...
...test pressures in oven IMPORTANT: Clamping brackets should not be at ½ psi gauge (14" WCP) or lower The cooktop must be isolated from the gas supply piping system by closing its individual shutoff valve must be disconnected from the bottom of the countertop. Foam strip C. Remove... the attachment screws for the option you choose. See separate LP gas conversion instructions sheet. Remove foam strip from debris and helps the cooktop sit flat on uneven counters. For elevations above 6,560 ft (1999.5 m) a high altitude kit is the...
Installation Instructions
Page 7
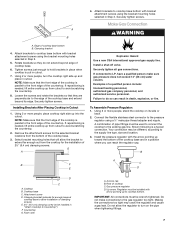
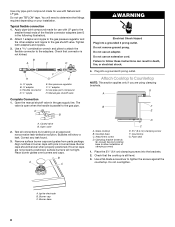
...NOTE: Make sure that will allow the bracket to the existing gas line. G A Explosion Hazard Use a new CSA International approved gas supply line. Securely tighten all gas connections. Examples of the countertop. Cooktop base C. Access cap B. Making the connections too tight may...Attach brackets to the front edge of a qualified person include: licensed heating personnel, authorized gas company personnel, and authorized service personnel. If repositioning is parallel to cooktop base bottom with bracket attachment screws using a ½" male pipe thread adapter and nipple...
...NOTE: Make sure that will allow the bracket to the existing gas line. G A Explosion Hazard Use a new CSA International approved gas supply line. Securely tighten all gas connections. Examples of the countertop. Cooktop base C. Access cap B. Making the connections too tight may...Attach brackets to the front edge of a qualified person include: licensed heating personnel, authorized gas company personnel, and authorized service personnel. If repositioning is parallel to cooktop base bottom with bracket attachment screws using a ½" male pipe thread adapter and nipple...
Installation Instructions
Page 8
...grounded 3 prong outlet. A. Remove surface burner caps and grates from parts package. Clamping bracket (extends far enough beyond cooktop base to the gas pipe. Use a combination wrench and pliers to attach the flexible connector to tighten the screws against the countertop. Bubbles... 2. Failure to determine the fittings required depending on an approved noncorrosive leak-detection solution. Cooktop base C. Tighten both adapters and nipples. 3. Glass cooktop B. Manual gas shutoff valve Complete Connection 1. Do not use an extension cord. Check that connector is ...
...grounded 3 prong outlet. A. Remove surface burner caps and grates from parts package. Clamping bracket (extends far enough beyond cooktop base to the gas pipe. Use a combination wrench and pliers to attach the flexible connector to tighten the screws against the countertop. Bubbles... 2. Failure to determine the fittings required depending on an approved noncorrosive leak-detection solution. Cooktop base C. Tighten both adapters and nipples. 3. Glass cooktop B. Manual gas shutoff valve Complete Connection 1. Do not use an extension cord. Check that connector is ...
Installation Instructions
Page 9
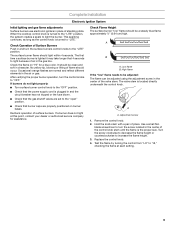
... increase the flame height. 3. Use a small flat- Replace the control knob. 4. Complete Installation Electronic Ignition System Initial lighting and gas flame adjustments Surface burners use electronic igniters in and turn the surface burners control knobs to the "LITE" position. Check the flame ...checking the flame at this point, contact your dealer or authorized service company for a blue color. A B A. Low flame B. When the cooktop control knob is lighted it may take longer that burner caps are properly positioned on "HI" for assistance. High flame If the "low" ...
... increase the flame height. 3. Use a small flat- Replace the control knob. 4. Complete Installation Electronic Ignition System Initial lighting and gas flame adjustments Surface burners use electronic igniters in and turn the surface burners control knobs to the "LITE" position. Check the flame ...checking the flame at this point, contact your dealer or authorized service company for a blue color. A B A. Low flame B. When the cooktop control knob is lighted it may take longer that burner caps are properly positioned on "HI" for assistance. High flame If the "low" ...


