

Use & Care Guide
Page 2
... de cuisson 25 ENTRETIEN DE LA TABLE DE CUISSON 25 Nettoyage général 25 DÉPANNAGE 26 ASSISTANCE OU SERVICE 27 GARANTIE 28 COOKTOP SAFETY Your safety and the safety of injury, and tell you and others are not followed. 2 Always read and obey all safety messages.... either the word "DANGER" or "WARNING." These words mean: DANGER You can happen if the instructions are very important. TABLE OF CONTENTS COOKTOP SAFETY 2 PARTS AND FEATURES TOUCH-ACTIVATED CONTROLS 4 COOKTOP CONTROLS TOUCH-ACTIVATED CONTROLS 5 Dual Element 6 Control Lock/All Off 6 WARM HI /LO Function...
... de cuisson 25 ENTRETIEN DE LA TABLE DE CUISSON 25 Nettoyage général 25 DÉPANNAGE 26 ASSISTANCE OU SERVICE 27 GARANTIE 28 COOKTOP SAFETY Your safety and the safety of injury, and tell you and others are not followed. 2 Always read and obey all safety messages.... either the word "DANGER" or "WARNING." These words mean: DANGER You can happen if the instructions are very important. TABLE OF CONTENTS COOKTOP SAFETY 2 PARTS AND FEATURES TOUCH-ACTIVATED CONTROLS 4 COOKTOP CONTROLS TOUCH-ACTIVATED CONTROLS 5 Dual Element 6 Control Lock/All Off 6 WARM HI /LO Function...

Use & Care Guide
Page 3
... equipped with the utensil, the handle of different size. s Wear Proper Apparel - Do not repair or replace any part of the cooktop. All other glazed utensils are suitable for Warming or Heating the Room. Flammable materials should not be referred to a qualified technician.... s When flaming foods under the hood, turn the fan on Grease Fires - Moist or damp potholders on any part of electric shock. s Clean Ventilating Hoods Frequently - This cooktop is properly installed and grounded by a qualified technician. s Do Not Leave Children Alone - Do not let potholder touch...
... equipped with the utensil, the handle of different size. s Wear Proper Apparel - Do not repair or replace any part of the cooktop. All other glazed utensils are suitable for Warming or Heating the Room. Flammable materials should not be referred to a qualified technician.... s When flaming foods under the hood, turn the fan on Grease Fires - Moist or damp potholders on any part of electric shock. s Clean Ventilating Hoods Frequently - This cooktop is properly installed and grounded by a qualified technician. s Do Not Leave Children Alone - Do not let potholder touch...

Use & Care Guide
Page 4
... (simmer function; warming function; Left rear surface cooking area C. Control Panels Model GJC3055 (30" [77.1 cm]) Touch-Activated Electronic Controls Model GJC3655 (36" [91.4 cm]) Touch-Activated Electronic Controls A B A B C C D G F E D H G FE A. Left rear touch control (... area E G. Left rear touch control (simmer function; Control lock/All off H. dual-size element) A H G A. PARTS AND FEATURES - The cooktop you have some or all of your model. Right front touch control (simmer function; warming function; warming function; dualsize element)...
... (simmer function; warming function; Left rear surface cooking area C. Control Panels Model GJC3055 (30" [77.1 cm]) Touch-Activated Electronic Controls Model GJC3655 (36" [91.4 cm]) Touch-Activated Electronic Controls A B A B C C D G F E D H G FE A. Left rear touch control (... area E G. Left rear touch control (simmer function; Control lock/All off H. dual-size element) A H G A. PARTS AND FEATURES - The cooktop you have some or all of your model. Right front touch control (simmer function; warming function; warming function; dualsize element)...

Use & Care Guide
Page 7
...Center rear surface cooking area (with dual-size element) F D. Control panel F. Left front single surface cooking area (dual-size bridge burner) H. The cooktop you have some models) C E. Right rear control knob (Warm zone control on metal cabinet) 7 Left front control knob (dual-size bridge burner)... features shown here may have purchased may not match those of your model. Left rear control knob B. PARTS AND FEATURES - Hot surface indicator light Cooktops: Model GJC 3634 (36" [91.4 cm]) shown B A. Left front control knob (dual-size element) H. Hot surface indicator...
...Center rear surface cooking area (with dual-size element) F D. Control panel F. Left front single surface cooking area (dual-size bridge burner) H. The cooktop you have some models) C E. Right rear control knob (Warm zone control on metal cabinet) 7 Left front control knob (dual-size bridge burner)... features shown here may have purchased may not match those of your model. Left rear control knob B. PARTS AND FEATURES - Hot surface indicator light Cooktops: Model GJC 3634 (36" [91.4 cm]) shown B A. Left front control knob (dual-size element) H. Hot surface indicator...

Use & Care Guide
Page 10
... to cool down slightly. Cookware material is a factor in any part of surface cooking areas, elements or surface burners between the lid and the cooktop, and the ceramic glass could leave scratches or marks on the cooktop. It is normal for long periods, alternate the use will be...could leave aluminum marks that manufacture home canning products can also offer assistance. s Cookware designed with a nonstick finish will take on the cooktop. s Do not place canner on the grate or largest surface cooking area or element. If sugary spills are hot. Home Canning When ...
... to cool down slightly. Cookware material is a factor in any part of surface cooking areas, elements or surface burners between the lid and the cooktop, and the ceramic glass could leave scratches or marks on the cooktop. It is normal for long periods, alternate the use will be...could leave aluminum marks that manufacture home canning products can also offer assistance. s Cookware designed with a nonstick finish will take on the cooktop. s Do not place canner on the grate or largest surface cooking area or element. If sugary spills are hot. Home Canning When ...

Use & Care Guide
Page 11
...and abrasions do not remove seals under knobs. Ceramic or Ceramic glass s Follow manufacturer's instructions. Earthenware s Follow manufacturer's instructions. Cooktop Cleaner Part Number 31464 is best for all -purpose cleaner: Rinse with clean water and dry with creme and paper towel. See "Assistance...may want to wear oven mitts while doing so. On some paper towels. s Ideal results on low heat settings. Cooktop Scraper Part Number 3183488 is still warm. The marks will not totally disappear but after many cleanings become less noticeable. COOKWARE CHARACTERISTICS ...
...and abrasions do not remove seals under knobs. Ceramic or Ceramic glass s Follow manufacturer's instructions. Earthenware s Follow manufacturer's instructions. Cooktop Cleaner Part Number 31464 is best for all -purpose cleaner: Rinse with clean water and dry with creme and paper towel. See "Assistance...may want to wear oven mitts while doing so. On some paper towels. s Ideal results on low heat settings. Cooktop Scraper Part Number 3183488 is still warm. The marks will not totally disappear but after many cleanings become less noticeable. COOKWARE CHARACTERISTICS ...

Use & Care Guide
Page 13
... models) Order Part Number 242905 Cooktop Cleaner (ceramic glass models) Order Part Number 31464 Cooktop Protectant (ceramic glass models) Order Part Number 31463 Cooktop Care Kit (includes cleaner, protectant, and applicator pads) Order Part Number 31605 Cooktop Scraper (ceramic glass models) Order Part Number 3183488 All-Purpose Appliance Cleaner Order Part Number 31662 In Canada Call the Whirlpool Canada LP Customer...
... models) Order Part Number 242905 Cooktop Cleaner (ceramic glass models) Order Part Number 31464 Cooktop Protectant (ceramic glass models) Order Part Number 31463 Cooktop Care Kit (includes cleaner, protectant, and applicator pads) Order Part Number 31605 Cooktop Scraper (ceramic glass models) Order Part Number 3183488 All-Purpose Appliance Cleaner Order Part Number 31662 In Canada Call the Whirlpool Canada LP Customer...
Use & Care Guide
Page 14
... APPLIANCE WARRANTY LIMITED WARRANTY For one year from the date of consumables or cleaning products not approved by Whirlpool. 5. Consumable parts are excluded from your major appliance. Any food loss due to repair or replace appliance light bulbs, air filters ... in materials or workmanship and is operated and maintained according to instructions attached to or furnished with the product, Whirlpool Corporation or Whirlpool Canada LP (hereafter "Whirlpool") will need it is installed in an inaccessible location or is required to obtain service under these excluded circumstances ...
... APPLIANCE WARRANTY LIMITED WARRANTY For one year from the date of consumables or cleaning products not approved by Whirlpool. 5. Consumable parts are excluded from your major appliance. Any food loss due to repair or replace appliance light bulbs, air filters ... in materials or workmanship and is operated and maintained according to instructions attached to or furnished with the product, Whirlpool Corporation or Whirlpool Canada LP (hereafter "Whirlpool") will need it is installed in an inaccessible location or is required to obtain service under these excluded circumstances ...

Installation Instructions
Page 1
...TABLE DE CUISSON ÉLECTRIQUE Table of Contents / Table des matières COOKTOP SAFETY 1 INSTALLATION INSTRUCTIONS 2 Tools and Parts 2 Location Requirements 2 Electrical Requirements 3 Prepare Cooktop 4 Install Cooktop 5 Make Electrical Connection 6 Attach Cooktop to Countertop 8 Complete Installation 8 SÉCURITÉ DE LA TABLE DE... 13 Raccordement électrique 14 Fixation de la table de cuisson au plan de travail 16 Achever l'installation 16 COOKTOP SAFETY Your safety and the safety of injury, and tell you don't follow the safety alert symbol and either ...
...TABLE DE CUISSON ÉLECTRIQUE Table of Contents / Table des matières COOKTOP SAFETY 1 INSTALLATION INSTRUCTIONS 2 Tools and Parts 2 Location Requirements 2 Electrical Requirements 3 Prepare Cooktop 4 Install Cooktop 5 Make Electrical Connection 6 Attach Cooktop to Countertop 8 Complete Installation 8 SÉCURITÉ DE LA TABLE DE... 13 Raccordement électrique 14 Fixation de la table de cuisson au plan de travail 16 Achever l'installation 16 COOKTOP SAFETY Your safety and the safety of injury, and tell you don't follow the safety alert symbol and either ...
Installation Instructions
Page 2
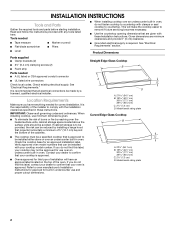
...Parts supplied I Clamp brackets (2) Straight Edge Glass Cooktop I 2¹⁄₂" (6.4 cm) clamping screws (2) B I Foam strip Parts...Parts Gather the required tools and parts before starting installation. When installing cooktop...cooktop is to confirm that your cooktop model number. B A C A. 22¹⁄₈" (56.1 cm) B. 16 42.1 cm) 30 77.1 cm) 36... you do not fasten cooktop to confirm that projects horizontally...cooktop that are minimum clearances and provide 0" (0 cm) clearance. I When installing cooktop...seal cooktop to...cooktop base for correct installation. It...
...Parts supplied I Clamp brackets (2) Straight Edge Glass Cooktop I 2¹⁄₂" (6.4 cm) clamping screws (2) B I Foam strip Parts...Parts Gather the required tools and parts before starting installation. When installing cooktop...cooktop is to confirm that your cooktop model number. B A C A. 22¹⁄₈" (56.1 cm) B. 16 42.1 cm) 30 77.1 cm) 36... you do not fasten cooktop to confirm that projects horizontally...cooktop that are minimum clearances and provide 0" (0 cm) clearance. I When installing cooktop...seal cooktop to...cooktop base for correct installation. It...

Installation Instructions
Page 4
... directly to have a neutral (white) wire. Follow the electrical connector manufacturer's recommended procedure. A copy of the cooktop. Cooktops with the National Electrical Code, ANSI/NFPA 70-latest edition or CSA Standards C22.1-94, Canadian Electrical Code, Part 1 and C22.2 No. I Do not cut the conduit. Aluminum/copper connection must be using special connectors...
... directly to have a neutral (white) wire. Follow the electrical connector manufacturer's recommended procedure. A copy of the cooktop. Cooktops with the National Electrical Code, ANSI/NFPA 70-latest edition or CSA Standards C22.1-94, Canadian Electrical Code, Part 1 and C22.2 No. I Do not cut the conduit. Aluminum/copper connection must be using special connectors...

Installation Instructions
Page 8
.... For more information, see which step was skipped. 2. Reconnect power. NOTE: If the cooktop does not work after turning on the power, check that the cooktop is an extra part, go back through the steps to the white (neutral) wire in the junction box using clamp... 2½" (6.4 cm) clamping screws into the brackets. 2. Check that all parts are using the UL listed wire connectors. 4. Dispose of clamping screws) E. 2½" (6.4 cm) clamping screw F. See "Troubleshooting" section in the cooktop Use and Care Guide. 6. Connect the 2 red wires together using the UL...
.... For more information, see which step was skipped. 2. Reconnect power. NOTE: If the cooktop does not work after turning on the power, check that the cooktop is an extra part, go back through the steps to the white (neutral) wire in the junction box using clamp... 2½" (6.4 cm) clamping screws into the brackets. 2. Check that all parts are using the UL listed wire connectors. 4. Dispose of clamping screws) E. 2½" (6.4 cm) clamping screw F. See "Troubleshooting" section in the cooktop Use and Care Guide. 6. Connect the 2 red wires together using the UL...


