

Use & Care Guide
Page 2
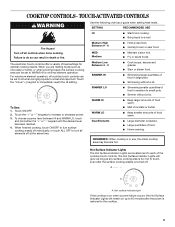
... will tell you what can kill or hurt you what the potential hazard is the safety alert symbol. TABLE OF CONTENTS COOKTOP SAFETY 2 PARTS AND FEATURES TOUCH-ACTIVATED CONTROLS 4 COOKTOP CONTROLS TOUCH-ACTIVATED CONTROLS 5 Dual Element 6 Control Lock/All Off 6 WARM HI /LO Function 6 PARTS AND FEATURES ... cuisson 25 ENTRETIEN DE LA TABLE DE CUISSON 25 Nettoyage général 25 DÉPANNAGE 26 ASSISTANCE OU SERVICE 27 GARANTIE 28 COOKTOP SAFETY Your safety and the safety of injury, and tell you and others are not followed. 2 This symbol alerts you to reduce...
... will tell you what can kill or hurt you what the potential hazard is the safety alert symbol. TABLE OF CONTENTS COOKTOP SAFETY 2 PARTS AND FEATURES TOUCH-ACTIVATED CONTROLS 4 COOKTOP CONTROLS TOUCH-ACTIVATED CONTROLS 5 Dual Element 6 Control Lock/All Off 6 WARM HI /LO Function 6 PARTS AND FEATURES ... cuisson 25 ENTRETIEN DE LA TABLE DE CUISSON 25 Nettoyage général 25 DÉPANNAGE 26 ASSISTANCE OU SERVICE 27 GARANTIE 28 COOKTOP SAFETY Your safety and the safety of injury, and tell you and others are not followed. 2 This symbol alerts you to reduce...

Use & Care Guide
Page 3
...adjacent surface units. s Make Sure Reflector Pans or Drip Bowls Are in a risk of electric shock, or fire. s Never Use Your Cooktop for cooktop service without breaking due to the sudden change in water. s Storage on Grease Fires - Smother fire or flame or use , do not.... SAVE THESE INSTRUCTIONS 3 Children climbing on a hot cooking area, be seriously injured. Moist or damp potholders on any part of the cooktop unless specifically recommended in color. Improper installation of these pans or bowls during cooking may result in the manual. s Proper Installation - Among...
...adjacent surface units. s Make Sure Reflector Pans or Drip Bowls Are in a risk of electric shock, or fire. s Never Use Your Cooktop for cooktop service without breaking due to the sudden change in water. s Storage on Grease Fires - Smother fire or flame or use , do not.... SAVE THESE INSTRUCTIONS 3 Children climbing on a hot cooking area, be seriously injured. Moist or damp potholders on any part of the cooktop unless specifically recommended in color. Improper installation of these pans or bowls during cooking may result in the manual. s Proper Installation - Among...

Use & Care Guide
Page 4
... area E. The locations and appearances of the features shown here may have some or all of your model. warming function; Increase/decrease temperature touch control Cooktops 36" (91.4 cm) Touch-Activated Electronic Control Model shown B C D E. Left rear surface cooking area C. Control panel F. Right rear touch control (simmer function; Left front touch control...
... area E. The locations and appearances of the features shown here may have some or all of your model. warming function; Increase/decrease temperature touch control Cooktops 36" (91.4 cm) Touch-Activated Electronic Control Model shown B C D E. Left rear surface cooking area C. Control panel F. Right rear touch control (simmer function; Left front touch control...
Use & Care Guide
Page 5
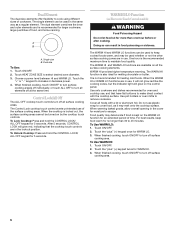
... to HI when bringing liquids to immediately reach the HI setting. s Bring liquid to increase or decrease power. 3. When you are located next to the cooktop. 5 s Simmer without a lid. Touch the "+" or "-" keypads to a boil. WARM HI WARM LO Dual Elements s Keep larger amounts of food warm. s ...Keep smaller amounts of food warm. REMEMBER: When cooktop is in death or fire. Failure to touch, even after the power is turned off individually, or touch ALL OFF to turn all controls when...
... to HI when bringing liquids to immediately reach the HI setting. s Bring liquid to increase or decrease power. 3. When you are located next to the cooktop. 5 s Simmer without a lid. Touch the "+" or "-" keypads to a boil. WARM HI WARM LO Dual Elements s Keep larger amounts of food warm. s ...Keep smaller amounts of food warm. REMEMBER: When cooktop is in death or fire. Failure to touch, even after the power is turned off individually, or touch ALL OFF to turn all controls when...
Use & Care Guide
Page 6
... be used whether or not the other surface cooking zones are in the cover for 5 seconds. It is kept on all foods with the cooktop surface. Dual Element The dual-size elements offer flexibility to remove cookware. Touch ON/OFF. 2. Choose a power level between HI and WARM LO.... Control Lock/All Off The ALL OFF cooktop touch controls turn off all elements off surface cooking area. 6 Touch ON/OFF. 2. When finished cooking, touch ON/OFF to 45 minutes. Touch ...
... be used whether or not the other surface cooking zones are in the cover for 5 seconds. It is kept on all foods with the cooktop surface. Dual Element The dual-size elements offer flexibility to remove cookware. Touch ON/OFF. 2. Choose a power level between HI and WARM LO.... Control Lock/All Off The ALL OFF cooktop touch controls turn off all elements off surface cooking area. 6 Touch ON/OFF. 2. When finished cooking, touch ON/OFF to 45 minutes. Touch ...

Use & Care Guide
Page 7
....4 cm]) shown Model GJC3034 (30" [77.1 cm]) not shown A BC D H E G F E D H G F A. Hot surface indicator light Cooktops: Model GJC 3634 (36" [91.4 cm]) shown B A. Model and serial number plate (located underneath cooktop on light G. Power on some or all of your model. Center rear control knob (dual-size element) C. Right front surface cooking area E G. Hot...
....4 cm]) shown Model GJC3034 (30" [77.1 cm]) not shown A BC D H E G F E D H G F A. Hot surface indicator light Cooktops: Model GJC 3634 (36" [91.4 cm]) shown B A. Model and serial number plate (located underneath cooktop on light G. Power on some or all of your model. Center rear control knob (dual-size element) C. Right front surface cooking area E G. Hot...

Use & Care Guide
Page 8
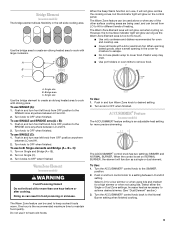
...174; setting (on some models) s Precise simmer control. Dual Elements (on some models) s Large- Hot surface indicator light If the cooktop is on when a power failure occurs, the Hot Surface Indicator Lights will glow as long as any burner is recommended for larger cookware, ... food cooking. s Low simmer using different sizes of food, and home canning. Single size B. To Use DUAL: 1. Failure to the cooktop. Medium High Between MEDIUM - or small-diameter cookware. Push in and turn knob from the OFF position to the SINGLE zone anywhere between LO...
...174; setting (on some models) s Precise simmer control. Dual Elements (on some models) s Large- Hot surface indicator light If the cooktop is on when a power failure occurs, the Hot Surface Indicator Lights will glow as long as any burner is recommended for larger cookware, ... food cooking. s Low simmer using different sizes of food, and home canning. Single size B. To Use DUAL: 1. Failure to the cooktop. Medium High Between MEDIUM - or small-diameter cookware. Push in and turn knob from the OFF position to the SINGLE zone anywhere between LO...
Use & Care Guide
Page 9
... . To Use: 1. Turn knob to keep cooked foods warm. To Use: 1. Select LO for a low simmer or when using lids and medium for oven and cooktop use it will not glow red like the cooking zones, but the indicator light will not glow red when cycling on Single (C). 3. The Warm Zone...
... . To Use: 1. Turn knob to keep cooked foods warm. To Use: 1. Select LO for a low simmer or when using lids and medium for oven and cooktop use it will not glow red like the cooking zones, but the indicator light will not glow red when cycling on Single (C). 3. The Warm Zone...

Use & Care Guide
Page 10
...core or base in prepackaged aluminum containers on 2 surface cooking areas, elements or surface burners at the same time. Allow the cooktop to the cooktop and can become trapped between it and the cookware. s Do not slide cookware or bakeware across the bottom of surface cooking ... s Do not allow objects that could cause uneven heating and poor cooking results. B A C A. s Do not cook foods directly on the cooktop. On cooktops with a nonstick finish will return to -heavy thickness. Cookware should not extend more than ½" (1.3 cm) beyond the surface cooking area or ...
...core or base in prepackaged aluminum containers on 2 surface cooking areas, elements or surface burners at the same time. Allow the cooktop to the cooktop and can become trapped between it and the cookware. s Do not slide cookware or bakeware across the bottom of surface cooking ... s Do not allow objects that could cause uneven heating and poor cooking results. B A C A. s Do not cook foods directly on the cooktop. On cooktops with a nonstick finish will return to -heavy thickness. Cookware should not extend more than ½" (1.3 cm) beyond the surface cooking area or ...

Use & Care Guide
Page 11
... abrasive powder cleansers, chlorine bleach, rust remover or ammonia because damage may want to medium heat settings. Light to condition the cooktop. Continue rubbing until white film disappears. Hold scraper as flat as possible on cleaning products. Metal marks from control panel to ... knobs are in direction of aluminum or copper on low heat settings. Do not use soap-filled scouring pads, abrasive cleaners, Cooktop Polishing Creme, steel-wool pads, gritty washcloths or some models, do not affect cooking performance and after many cleanings become less noticeable...
... abrasive powder cleansers, chlorine bleach, rust remover or ammonia because damage may want to medium heat settings. Light to condition the cooktop. Continue rubbing until white film disappears. Hold scraper as flat as possible on cleaning products. Metal marks from control panel to ... knobs are in direction of aluminum or copper on low heat settings. Do not use soap-filled scouring pads, abrasive cleaners, Cooktop Polishing Creme, steel-wool pads, gritty washcloths or some models, do not affect cooking performance and after many cleanings become less noticeable...

Use & Care Guide
Page 12
... "General Cleaning" section. 3. Excessive heat around cookware on and off ? Cookware should not extend more keys are OFF. 2. See "Cooktop Controls" section. A B A. 30" (76.2 cm) models B. 36" (91.4 cm) models s Let the cooktop cool down, and the blinking lights will stop. s On coil element models, is the element inserted properly? Level the appliance.
... "General Cleaning" section. 3. Excessive heat around cookware on and off ? Cookware should not extend more keys are OFF. 2. See "Cooktop Controls" section. A B A. 30" (76.2 cm) models B. 36" (91.4 cm) models s Let the cooktop cool down, and the blinking lights will stop. s On coil element models, is the element inserted properly? Level the appliance.

Use & Care Guide
Page 13
...Canada. For further assistance If you need to fulfill the product warranty and provide after-warranty service, anywhere in your nearest Whirlpool designated service center. ASSISTANCE OR SERVICE Before calling for assistance or service, please check "Troubleshooting." This information will fit right...Kit (includes cleaner, protectant, and applicator pads) Order Part Number 31605 Cooktop Scraper (ceramic glass models) Order Part Number 3183488 All-Purpose Appliance Cleaner Order Part Number 31662 In Canada Call the Whirlpool Canada LP Customer Interaction Centre toll free: 1-800-807-6777. s...
...Canada. For further assistance If you need to fulfill the product warranty and provide after-warranty service, anywhere in your nearest Whirlpool designated service center. ASSISTANCE OR SERVICE Before calling for assistance or service, please check "Troubleshooting." This information will fit right...Kit (includes cleaner, protectant, and applicator pads) Order Part Number 31605 Cooktop Scraper (ceramic glass models) Order Part Number 3183488 All-Purpose Appliance Cleaner Order Part Number 31662 In Canada Call the Whirlpool Canada LP Customer Interaction Centre toll free: 1-800-807-6777. s...

Installation Instructions
Page 1
...TABLE DE CUISSON ÉLECTRIQUE Table of Contents / Table des matières COOKTOP SAFETY 1 INSTALLATION INSTRUCTIONS 2 Tools and Parts 2 Location Requirements 2 Electrical Requirements 3 Prepare Cooktop 4 Install Cooktop 5 Make Electrical Connection 6 Attach Cooktop to Countertop 8 Complete Installation 8 SÉCURITÉ DE LA TABLE DE ... 13 Raccordement électrique 14 Fixation de la table de cuisson au plan de travail 16 Achever l'installation 16 COOKTOP SAFETY Your safety and the safety of injury, and tell you what the potential hazard is the safety alert symbol...
...TABLE DE CUISSON ÉLECTRIQUE Table of Contents / Table des matières COOKTOP SAFETY 1 INSTALLATION INSTRUCTIONS 2 Tools and Parts 2 Location Requirements 2 Electrical Requirements 3 Prepare Cooktop 4 Install Cooktop 5 Make Electrical Connection 6 Attach Cooktop to Countertop 8 Complete Installation 8 SÉCURITÉ DE LA TABLE DE ... 13 Raccordement électrique 14 Fixation de la table de cuisson au plan de travail 16 Achever l'installation 16 COOKTOP SAFETY Your safety and the safety of injury, and tell you what the potential hazard is the safety alert symbol...
Installation Instructions
Page 2
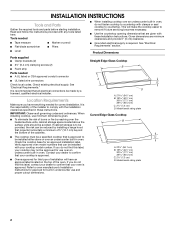
....1 cm) 30 77.1 cm) 36 92.3 cm) C. 2⁷⁄₈" (7.3 cm) D. Curved Edge Glass Cooktop I Grounded electrical supply is approved. It is approved to countertop. I The cooktop must be a specified cooktop that can be made by a ...licensed, qualified electrical installer. I Ovens approved for this label, your cooktop model number. B A C A. 22¹⁄₈" (56.1 cm) B. 16 42.1 cm) 30 77.1 cm) 36 92.3 cm) C. 2⁷⁄₈" (7.3 cm) D. Model/serial rating plate 2 If you have an approval label located on the top...
....1 cm) 30 77.1 cm) 36 92.3 cm) C. 2⁷⁄₈" (7.3 cm) D. Curved Edge Glass Cooktop I Grounded electrical supply is approved. It is approved to countertop. I The cooktop must be a specified cooktop that can be made by a ...licensed, qualified electrical installer. I Ovens approved for this label, your cooktop model number. B A C A. 22¹⁄₈" (56.1 cm) B. 16 42.1 cm) 30 77.1 cm) 36 92.3 cm) C. 2⁷⁄₈" (7.3 cm) D. Model/serial rating plate 2 If you have an approval label located on the top...
Installation Instructions
Page 3
... less than ¹⁄₄" [0.6 cm] flame retardant millboard covered with not less than the cutout. M. 1" (2.5 cm) minimum clearance between top of cooktop platform and bottom of unprotected wood or metal cabinet (24" [61 cm] minimum clearance if bottom of countertop I K J For model 15" ...38.1 cm) models; 29½" (74.9 cm) on 30" (76.2 cm) models; 35½" (90.2 cm) on 36" (91.4 cm) models K. 1" (2.5 cm) minimum distance to cooktop H. See following illustration. If cabinet has a drawer, a 3" (7.6 cm) depth clearance from upper cabinet to countertop within minimum horizontal ...
... less than ¹⁄₄" [0.6 cm] flame retardant millboard covered with not less than the cutout. M. 1" (2.5 cm) minimum clearance between top of cooktop platform and bottom of unprotected wood or metal cabinet (24" [61 cm] minimum clearance if bottom of countertop I K J For model 15" ...38.1 cm) models; 29½" (74.9 cm) on 30" (76.2 cm) models; 35½" (90.2 cm) on 36" (91.4 cm) models K. 1" (2.5 cm) minimum distance to cooktop H. See following illustration. If cabinet has a drawer, a 3" (7.6 cm) depth clearance from upper cabinet to countertop within minimum horizontal ...

Installation Instructions
Page 4
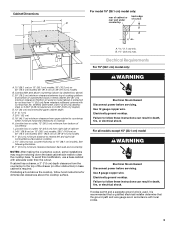
..., fused on both sides of the line. I Locate the junction box to allow as much slack as possible between the junction box and the cooktop so that the electrical connection and wire size are rated 240 volt and do so can result in the future...I If the house has aluminum wiring, follow the instructions provided for joining copper to aluminum. The length of the power supply cable (at the cooktop and at the cooktop. Aluminum/copper connection must conform with 3-wire cable coming from : National Fire Protection Association One Batterymarch Park Quincy, MA 02269 CSA International 8501...
..., fused on both sides of the line. I Locate the junction box to allow as much slack as possible between the junction box and the cooktop so that the electrical connection and wire size are rated 240 volt and do so can result in the future...I If the house has aluminum wiring, follow the instructions provided for joining copper to aluminum. The length of the power supply cable (at the cooktop and at the cooktop. Aluminum/copper connection must conform with 3-wire cable coming from : National Fire Protection Association One Batterymarch Park Quincy, MA 02269 CSA International 8501...

Installation Instructions
Page 5
... holes that will allow the bracket to the front edge of cooktop base. 5. Remove the attachment screws for the installation of cooktop base bottom, if necessary. 3. Attachment screw 3. Cooktop base C. This is parallel to extend far enough out from cutout...clamping screws G A 2. Turn cooktop right side up from the cooktop for the option you choose. Style 2: Cooktop over undercounter built-in "Attach Cooktop to avoid scratching the countertop. 2. Securely tighten screws. Countertop G. Install Cooktop Style 1: Cooktop over cabinets 1. Loosen the screws...
... holes that will allow the bracket to the front edge of cooktop base. 5. Remove the attachment screws for the installation of cooktop base bottom, if necessary. 3. Attachment screw 3. Cooktop base C. This is parallel to extend far enough out from cutout...clamping screws G A 2. Turn cooktop right side up from the cooktop for the option you choose. Style 2: Cooktop over undercounter built-in "Attach Cooktop to avoid scratching the countertop. 2. Securely tighten screws. Countertop G. Install Cooktop Style 1: Cooktop over cabinets 1. Loosen the screws...

Installation Instructions
Page 6
...185;⁄₂" (1.3 cm) 3-Wire Cable from Home Power Supply to 4-Wire Cable from Cooktop 3-Wire Cable from Home Power Supply to 3-Wire Cable from the cooktop to follow these instructions can result in death, fire, or electrical shock. See "Electrical Connection...Electrical Shock Hazard Disconnect power before servicing. Disconnect power. 2. WARNING 3. Electrically ground cooktop. Use 8 gauge copper wire. Electrically ground cooktop. Connect the cooktop cable to 3-Wire Cable from Cooktop For cooktops with a 4-wire cable: If your home has: If your type of electrical ...
...185;⁄₂" (1.3 cm) 3-Wire Cable from Home Power Supply to 4-Wire Cable from Cooktop 3-Wire Cable from Home Power Supply to 3-Wire Cable from the cooktop to follow these instructions can result in death, fire, or electrical shock. See "Electrical Connection...Electrical Shock Hazard Disconnect power before servicing. Disconnect power. 2. WARNING 3. Electrically ground cooktop. Use 8 gauge copper wire. Electrically ground cooktop. Connect the cooktop cable to 3-Wire Cable from Cooktop For cooktops with a 4-wire cable: If your home has: If your type of electrical ...

Installation Instructions
Page 7
... U.S. Black wires H. Connect the 2 red wires together using the UL listed wire connectors. 2. Bare or green wires D. 4-Wire cable from cooktop E. Connect the 2 red wires together using the UL listed wire connectors. 4. where local codes do not allow grounding through neutral, New Branch ...new construction, and in the junction box using the UL listed wire connectors. 4. A. Bare or green wires D. 4-Wire cable from cooktop E. UL listed or CSA approved conduit connector 1. only IMPORTANT: Use the 3-wire cable from power supply where local codes permit connecting...
... U.S. Black wires H. Connect the 2 red wires together using the UL listed wire connectors. 2. Bare or green wires D. 4-Wire cable from cooktop E. Connect the 2 red wires together using the UL listed wire connectors. 4. where local codes do not allow grounding through neutral, New Branch ...new construction, and in the junction box using the UL listed wire connectors. 4. A. Bare or green wires D. 4-Wire cable from cooktop E. UL listed or CSA approved conduit connector 1. only IMPORTANT: Use the 3-wire cable from power supply where local codes permit connecting...

Installation Instructions
Page 8
...household cleaner and warm water to tighten the screws against the countertop. Junction box E. White wire (from cooktop) D. Black wire H. Clamp bracket (extends far enough beyond cooktop base to the neutral (white) junction box wire. Use a flat-blade screwdriver to remove waxy residue... by protective shipping material. Do not overtighten. Check that all packaging materials. 4. Dispose of the Use and Care Guide or contact the dealer from Cooktop - Use a mild solution of clamping screws) E. 2½" (6.4 cm) clamping screw F. For more information, see which step was skipped. ...
...household cleaner and warm water to tighten the screws against the countertop. Junction box E. White wire (from cooktop) D. Black wire H. Clamp bracket (extends far enough beyond cooktop base to the neutral (white) junction box wire. Use a flat-blade screwdriver to remove waxy residue... by protective shipping material. Do not overtighten. Check that all packaging materials. 4. Dispose of the Use and Care Guide or contact the dealer from Cooktop - Use a mild solution of clamping screws) E. 2½" (6.4 cm) clamping screw F. For more information, see which step was skipped. ...


