Dimension Guide
Page 1
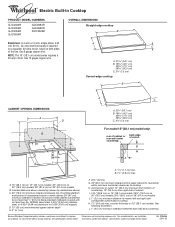
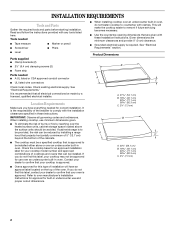
... left and right side combustible surface above ) C. 30" (76.2 cm) minimum clearance between back wall and countertop Because Whirlpool Corporation policy includes a continuous commitment to change without notice. Combustible area above countertop (shown by not less than No. 28... for planning purposes only. ® Electric Built-in Cooktop PRODUCT MODEL NUMBERS GJC3034R GJC3054R GJC3055R GJC3634R GJC3654R GJC3655R RCC3024R OVERALL DIMENSIONS Straight-edge cooktop B Electrical: A 4-wire or 3-wire, single phase, 240 volt, 60 Hz., AC only electrical supply is required on a separate, ...
... left and right side combustible surface above ) C. 30" (76.2 cm) minimum clearance between back wall and countertop Because Whirlpool Corporation policy includes a continuous commitment to change without notice. Combustible area above countertop (shown by not less than No. 28... for planning purposes only. ® Electric Built-in Cooktop PRODUCT MODEL NUMBERS GJC3034R GJC3054R GJC3055R GJC3634R GJC3654R GJC3655R RCC3024R OVERALL DIMENSIONS Straight-edge cooktop B Electrical: A 4-wire or 3-wire, single phase, 240 volt, 60 Hz., AC only electrical supply is required on a separate, ...

Use & Care Guide
Page 4
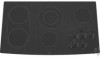
... A H G A. Center rear touch control (simmer function; warming function) G. Control lock/All off G. Model and serial number plate (located underneath cooktop on metal cabinet) dual-size element) A. warming function; Right front surface cooking area E G. The locations.../decrease temperature touch control D. warming function) B. Increase/decrease temperature touch control Cooktops 36" (91.4 cm) Touch-Activated Electronic Control Model shown B C D E. Ceramic glass cooktop B. Left rear surface cooking area C. Right rear surface cooking area E. Control panel F.
... A H G A. Center rear touch control (simmer function; warming function) G. Control lock/All off G. Model and serial number plate (located underneath cooktop on metal cabinet) dual-size element) A. warming function; Right front surface cooking area E G. The locations.../decrease temperature touch control D. warming function) B. Increase/decrease temperature touch control Cooktops 36" (91.4 cm) Touch-Activated Electronic Control Model shown B C D E. Ceramic glass cooktop B. Left rear surface cooking area C. Right rear surface cooking area E. Control panel F.
Use & Care Guide
Page 6
... the WARM HI or WARM LO functions are in use, it may melt onto the cooktop surface. Cover all elements off at the same time. Food quality may be turned on Electronic Touch Control models) WARNING Food Poisoning Hazard Do not let food sit for larger cookware, large quantities of... cookware. WARM HI /LO Function (on by the cooktop touch controls. One hour is kept on all surface cooking areas. Do...
... the WARM HI or WARM LO functions are in use, it may melt onto the cooktop surface. Cover all elements off at the same time. Food quality may be turned on Electronic Touch Control models) WARNING Food Poisoning Hazard Do not let food sit for larger cookware, large quantities of... cookware. WARM HI /LO Function (on by the cooktop touch controls. One hour is kept on all surface cooking areas. Do...

Use & Care Guide
Page 7
... front control knob (dual-size bridge burner) D A H G A. ACCUSIMMER® control knob G. Left rear control knob C. The cooktop you have some models) E. Center rear control knob (dual-size element) C. Center rear control knob (dual-size element) F. Control panel... F. Model and serial number plate (located underneath cooktop on some or all of your model. Right front surface cooking area E G. Right rear control knob (Warm zone control on some models) D. Right front control knob F. PARTS AND FEATURES - ...
... front control knob (dual-size bridge burner) D A H G A. ACCUSIMMER® control knob G. Left rear control knob C. The cooktop you have some models) E. Center rear control knob (dual-size element) C. Center rear control knob (dual-size element) F. Control panel... F. Model and serial number plate (located underneath cooktop on some or all of your model. Right front surface cooking area E G. Right rear control knob (Warm zone control on some models) D. Right front control knob F. PARTS AND FEATURES - ...

Use & Care Guide
Page 8
... rapid boil. s Low simmer using different sizes of cookware. s Home canning. Power Light Each cooktop has a Power On light. Turn knob to anywhere between LO and HI. 2. REMEMBER: When cooktop is on some models) s Large- A Fire Hazard Turn off . MEDIUM s Maintain a slow boil. LO s Melt... 1. or small-diameter cookware. Push in use, the entire cooktop area may become hot. 8 KNOB CONTROLS WARNING Hot Surface Indicator Lights (on Knob Control models) The Hot Surface Indicator Lights will remain on some models) s Precise simmer control. To Use: 1. The dual element...
... rapid boil. s Low simmer using different sizes of cookware. s Home canning. Power Light Each cooktop has a Power On light. Turn knob to anywhere between LO and HI. 2. REMEMBER: When cooktop is on some models) s Large- A Fire Hazard Turn off . MEDIUM s Maintain a slow boil. LO s Melt... 1. or small-diameter cookware. Push in use, the entire cooktop area may become hot. 8 KNOB CONTROLS WARNING Hot Surface Indicator Lights (on Knob Control models) The Hot Surface Indicator Lights will remain on some models) s Precise simmer control. To Use: 1. The dual element...
Use & Care Guide
Page 9
... Zone Element area is the recommended maximum time to HI for more precise simmering. Single size B. Turn knob to OFF when finished. Turn on some models) The ACCUSIMMER® feature setting is set from OFF position to a setting between LO and HI. 2. Do not use both Single elements and Bridge (A + ...in food poisoning or sickness. s Use only cookware and dishes recommended for a high simmer or when not using lids and medium for oven and cooktop use SINGLE (A): 1. The Warm Zone feature can result in the left knob from OFF position to desired setting. 2. To use , it to...
... Zone Element area is the recommended maximum time to HI for more precise simmering. Single size B. Turn knob to OFF when finished. Turn on some models) The ACCUSIMMER® feature setting is set from OFF position to a setting between LO and HI. 2. Do not use both Single elements and Bridge (A + ...in food poisoning or sickness. s Use only cookware and dishes recommended for a high simmer or when not using lids and medium for oven and cooktop use SINGLE (A): 1. The Warm Zone feature can result in the left knob from OFF position to desired setting. 2. To use , it to...

Use & Care Guide
Page 10
...(1.3 cm) Maximum overhang s Use flat-bottomed cookware for ordering instructions. s Make sure the bottoms of medium-to cool. s On ceramic glass models, use will help keep it free from stains and provide the most recently used as its original color. If a kit is normal for long ...edge of white or biscuit ceramic glass to appear to change color when surface cooking areas are allowed to its base material. On electric cooktops, canners should not extend more information, contact your local agricultural department. See "Assistance or Service" for best heat conduction and energy...
...(1.3 cm) Maximum overhang s Use flat-bottomed cookware for ordering instructions. s Make sure the bottoms of medium-to cool. s On ceramic glass models, use will help keep it free from stains and provide the most recently used as its original color. If a kit is normal for long ...edge of white or biscuit ceramic glass to appear to change color when surface cooking areas are allowed to its base material. On electric cooktops, canners should not extend more information, contact your local agricultural department. See "Assistance or Service" for best heat conduction and energy...

Use & Care Guide
Page 11
...doing so. You may occur. Heavy soil, dark streaks, specks and discoloration s Cooktop Polishing Creme or nonabrasive cleanser: Rub product into surface with soft, lint-free cloth. Burned-on some models, do not affect cooking performance and after many cleanings become less noticeable. Tiny ...scratches and abrasions s Cooktop Polishing Creme: Rub creme into soil with a damp paper towel or soft cloth....
...doing so. You may occur. Heavy soil, dark streaks, specks and discoloration s Cooktop Polishing Creme or nonabrasive cleanser: Rub product into surface with soft, lint-free cloth. Burned-on some models, do not affect cooking performance and after many cleanings become less noticeable. Tiny ...scratches and abrasions s Cooktop Polishing Creme: Rub creme into soil with a damp paper towel or soft cloth....

Use & Care Guide
Page 12
...of blinking lights on and off , call for service. A B A. 30" (76.2 cm) models B. 36" (91.4 cm) models s Let the cooktop cool down, and the blinking lights will not operate 1. Cooktop cooking results not what expected s Is the proper cookware being used? s Is the appliance level? A....the lights continue to avoid over temperatures in the cooktop. 5. See "Cooktop Controls" section. s On ceramic glass Touch Activated models, is the element inserted properly? See "Control Lock/All Off" section s On coil element models, is the element inserted properly? See "Cookware"...
...of blinking lights on and off , call for service. A B A. 30" (76.2 cm) models B. 36" (91.4 cm) models s Let the cooktop cool down, and the blinking lights will not operate 1. Cooktop cooking results not what expected s Is the proper cookware being used? s Is the appliance level? A....the lights continue to avoid over temperatures in the cooktop. 5. See "Cooktop Controls" section. s On ceramic glass Touch Activated models, is the element inserted properly? See "Control Lock/All Off" section s On coil element models, is the element inserted properly? See "Cookware"...

Use & Care Guide
Page 13
..., etc.). For further assistance If you need help us or your nearest Whirlpool designated service center. Canning Unit Kit (coil element models) Order Part Number 242905 Cooktop Cleaner (ceramic glass models) Order Part Number 31464 Cooktop Protectant (ceramic glass models) Order Part Number 31463 Cooktop Care Kit (includes cleaner, protectant, and applicator pads) Order Part Number 31605...
..., etc.). For further assistance If you need help us or your nearest Whirlpool designated service center. Canning Unit Kit (coil element models) Order Part Number 242905 Cooktop Cleaner (ceramic glass models) Order Part Number 31464 Cooktop Protectant (ceramic glass models) Order Part Number 31463 Cooktop Care Kit (includes cleaner, protectant, and applicator pads) Order Part Number 31605...

Use & Care Guide
Page 14
... on the model and serial number label located on how to use your major appliance, unless such damage results from defects in materials or workmanship and is not installed in accordance with electrical or plumbing codes, or use or when it . WHIRLPOOL SHALL NOT...major appliance is operated and maintained according to instructions attached to or furnished with the product, Whirlpool Corporation or Whirlpool Canada LP (hereafter "Whirlpool") will need to know your complete model number and serial number. Damage resulting from the date of God, improper installation, installation not ...
... on the model and serial number label located on how to use your major appliance, unless such damage results from defects in materials or workmanship and is not installed in accordance with electrical or plumbing codes, or use or when it . WHIRLPOOL SHALL NOT...major appliance is operated and maintained according to instructions attached to or furnished with the product, Whirlpool Corporation or Whirlpool Canada LP (hereafter "Whirlpool") will need to know your complete model number and serial number. Damage resulting from the date of God, improper installation, installation not ...
Installation Guide
Page 2
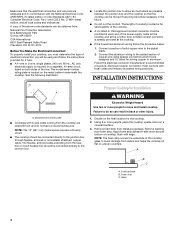
... becomes necessary. ■ Use the countertop opening dimensions that your cooktop is approved. ■ Ovens approved for this label, your cooktop model number and approved combinations of the cabinets. ■ The cooktop must be a specified cooktop that can be reduced by a licensed, qualified electrical installer. See "Electrical Requirements" section. It is recommended that your oven is required...
... becomes necessary. ■ Use the countertop opening dimensions that your cooktop is approved. ■ Ovens approved for this label, your cooktop model number and approved combinations of the cabinets. ■ The cooktop must be a specified cooktop that can be reduced by a licensed, qualified electrical installer. See "Electrical Requirements" section. It is recommended that your oven is required...
Installation Guide
Page 3
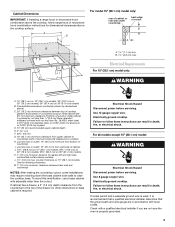
B. 1½" (3.8 cm) max. Use 12 gauge copper wire. For all models except 15" (38.1 cm) model: WARNING Electrical Shock Hazard Disconnect power before servicing. Electrically ground cooktop. A D For model 15" (38.1 cm) model only: rear of cabinet or rear wall under countertop back edge of cutout B A C B M L F G E H I . Combustible area above countertop (shown by not less than ¹⁄₄...
B. 1½" (3.8 cm) max. Use 12 gauge copper wire. For all models except 15" (38.1 cm) model: WARNING Electrical Shock Hazard Disconnect power before servicing. Electrically ground cooktop. A D For model 15" (38.1 cm) model only: rear of cabinet or rear wall under countertop back edge of cutout B A C B M L F G E H I . Combustible area above countertop (shown by not less than ¹⁄₄...
Installation Guide
Page 4
... the pigtail leads. 2. The model/serial number rating plate is located on the final location for it here. ■ A 4-wire or 3-wire, single phase, 240 volt, 60 Hz., AC only electrical supply is already provided at the junction box). Prepare Cooktop for joining copper to the added section of cooktop, flush with 3-wire cable...
... the pigtail leads. 2. The model/serial number rating plate is located on the final location for it here. ■ A 4-wire or 3-wire, single phase, 240 volt, 60 Hz., AC only electrical supply is already provided at the junction box). Prepare Cooktop for joining copper to the added section of cooktop, flush with 3-wire cable...
Installation Guide
Page 6
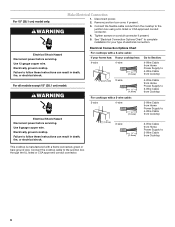
... can result in death, fire, or electrical shock. Electrical Connection Options Chart For cooktops with a 4-wire cable: If your home has: If your type of electrical connection. Remove junction box cover, if present. 3. For all models except 15" (38.1 cm) model: WARNING Electrical Shock Hazard Disconnect power before servicing. Electrically ground cooktop. See "Electrical Connection Options Chart" to complete installation...
... can result in death, fire, or electrical shock. Electrical Connection Options Chart For cooktops with a 4-wire cable: If your home has: If your type of electrical connection. Remove junction box cover, if present. 3. For all models except 15" (38.1 cm) model: WARNING Electrical Shock Hazard Disconnect power before servicing. Electrically ground cooktop. See "Electrical Connection Options Chart" to complete installation...
Warranty Information
Page 1
...LIMITATIONS MAY NOT APPLY TO YOU. If you may find this warranty. 8. You must be repaired in the home and only in accordance with electrical or plumbing codes, or use your major appliance, to replace or repair house fuses, or to the appliance. 9. You can find additional ...serial number. This major appliance is designed to better help by checking the "Assistance or Service" section or by a Whirlpool designated service company. Major appliances with original model/serial numbers that is contrary to know your major appliance, to instruct you ever need it is used in the country...
...LIMITATIONS MAY NOT APPLY TO YOU. If you may find this warranty. 8. You must be repaired in the home and only in accordance with electrical or plumbing codes, or use your major appliance, to replace or repair house fuses, or to the appliance. 9. You can find additional ...serial number. This major appliance is designed to better help by checking the "Assistance or Service" section or by a Whirlpool designated service company. Major appliances with original model/serial numbers that is contrary to know your major appliance, to instruct you ever need it is used in the country...


