

Use & Care Guide
Page 2
... ENTRETIEN DE LA TABLE DE CUISSON 25 Nettoyage général 25 DÉPANNAGE 26 ASSISTANCE OU SERVICE 27 GARANTIE 28 COOKTOP SAFETY Your safety and the safety of injury, and tell you what can be killed or seriously injured if you don't ...follow instructions. TABLE OF CONTENTS COOKTOP SAFETY 2 PARTS AND FEATURES TOUCH-ACTIVATED CONTROLS 4 COOKTOP CONTROLS TOUCH-ACTIVATED CONTROLS 5 Dual Element 6 Control Lock/All Off 6 WARM HI /LO Function 6 PARTS AND FEATURES - KNOB CONTROLS 7 COOKTOP CONTROLS -
... ENTRETIEN DE LA TABLE DE CUISSON 25 Nettoyage général 25 DÉPANNAGE 26 ASSISTANCE OU SERVICE 27 GARANTIE 28 COOKTOP SAFETY Your safety and the safety of injury, and tell you what can be killed or seriously injured if you don't ...follow instructions. TABLE OF CONTENTS COOKTOP SAFETY 2 PARTS AND FEATURES TOUCH-ACTIVATED CONTROLS 4 COOKTOP CONTROLS TOUCH-ACTIVATED CONTROLS 5 Dual Element 6 Control Lock/All Off 6 WARM HI /LO Function 6 PARTS AND FEATURES - KNOB CONTROLS 7 COOKTOP CONTROLS -

Use & Care Guide
Page 3
... relationship of utensil to burner will expose a portion of the heating element to direct contact and may penetrate the broken cooktop and create a risk of electric shock. Boilover causes smoking and greasy spillovers that it is used to wipe spills on a hot cooking area, be hot...bulky cloth. Among those areas are suitable for Warming or Heating the Room. s Proper Installation - Do not repair or replace any part of the cooktop. Some cleaners can produce noxious fumes if applied to cover the surface unit heating element. s Clean Ventilating Hoods Frequently - For units...
... relationship of utensil to burner will expose a portion of the heating element to direct contact and may penetrate the broken cooktop and create a risk of electric shock. Boilover causes smoking and greasy spillovers that it is used to wipe spills on a hot cooking area, be hot...bulky cloth. Among those areas are suitable for Warming or Heating the Room. s Proper Installation - Do not repair or replace any part of the cooktop. Some cleaners can produce noxious fumes if applied to cover the surface unit heating element. s Clean Ventilating Hoods Frequently - For units...

Use & Care Guide
Page 4
... surface indicator light E. Hot surface indicator lights F. Center rear surface cooking area (with dual-size element) H. warming function) F. dualsize element) C. Increase/decrease temperature touch control Cooktops 36" (91.4 cm) Touch-Activated Electronic Control Model shown B C D E. Control lock/All off G. warming function; Model and serial number plate (located underneath...
... surface indicator light E. Hot surface indicator lights F. Center rear surface cooking area (with dual-size element) H. warming function) F. dualsize element) C. Increase/decrease temperature touch control Cooktops 36" (91.4 cm) Touch-Activated Electronic Control Model shown B C D E. Control lock/All off G. warming function; Model and serial number plate (located underneath...

Use & Care Guide
Page 7
...® control knob G. Left front control knob (dual-size element) H. Center rear control knob (dual-size element) F. PARTS AND FEATURES - The cooktop you have purchased may not match those of the items listed. Right front control knob F. Hot surface indicator lights B. Power ..." [91.4 cm]) shown Model GJC3034 (30" [77.1 cm]) not shown A BC D H E G F E D H G F A. Left rear control knob C. Hot surface indicator light Cooktops: Model GJC 3634 (36" [91.4 cm]) shown B A. Left front single surface cooking area (dual-size bridge burner) H. Control panel F.
...® control knob G. Left front control knob (dual-size element) H. Center rear control knob (dual-size element) F. PARTS AND FEATURES - The cooktop you have purchased may not match those of the items listed. Right front control knob F. Hot surface indicator lights B. Power ..." [91.4 cm]) shown Model GJC3034 (30" [77.1 cm]) not shown A BC D H E G F E D H G F A. Left rear control knob C. Hot surface indicator light Cooktops: Model GJC 3634 (36" [91.4 cm]) shown B A. Left front single surface cooking area (dual-size bridge burner) H. Control panel F.

Use & Care Guide
Page 10
... size as a cutting board. s Do not cook foods directly on the cooktop or grates. On electric cooktops, canners should be of medium-to-heavy thickness. s Do not store jars or cans above the cooktop. Allow the cooktop to its base material. Then, while wearing oven mitts, remove the spills... help keep it free from stains and provide the most recently used as a core or base in any part of the entire cooktop. However, when used areas to the cooktop and can become trapped between batches. A nonstick finish has the same characteristics as possible. s Do not ...
... size as a cutting board. s Do not cook foods directly on the cooktop or grates. On electric cooktops, canners should be of medium-to-heavy thickness. s Do not store jars or cans above the cooktop. Allow the cooktop to its base material. Then, while wearing oven mitts, remove the spills... help keep it free from stains and provide the most recently used as a core or base in any part of the entire cooktop. However, when used areas to the cooktop and can become trapped between batches. A nonstick finish has the same characteristics as possible. s Do not ...

Use & Care Guide
Page 11
...help avert scratches, pitting and abrasions, and to order. On some paper towels. Cooktop Cleaner Part Number 31464 is recommended for regular use soap-filled scouring pads, abrasive cleaners, Cooktop Polishing Creme, steel-wool pads, gritty washcloths or some models, do not affect ... s Heats very quickly and evenly. s Use on cleaning products. Cooktop Scraper Part Number 3183488 is still warm. Continue rubbing until white film disappears. Use the following chart as cooktop has cooled down . COOKTOP CONTROLS Cleaning Method: When replacing knobs, make sure all controls are off...
...help avert scratches, pitting and abrasions, and to order. On some paper towels. Cooktop Cleaner Part Number 31464 is recommended for regular use soap-filled scouring pads, abrasive cleaners, Cooktop Polishing Creme, steel-wool pads, gritty washcloths or some models, do not affect ... s Heats very quickly and evenly. s Use on cleaning products. Cooktop Scraper Part Number 3183488 is still warm. Continue rubbing until white film disappears. Use the following chart as cooktop has cooled down . COOKTOP CONTROLS Cleaning Method: When replacing knobs, make sure all controls are off...

Use & Care Guide
Page 13
... models) Order Part Number 242905 Cooktop Cleaner (ceramic glass models) Order Part Number 31464 Cooktop Protectant (ceramic glass models) Order Part Number 31463 Cooktop Care Kit (includes cleaner, protectant, and applicator pads) Order Part Number 31605 Cooktop Scraper (ceramic glass models) Order Part Number 3183488 All-Purpose Appliance Cleaner Order Part Number 31662 In Canada Call the Whirlpool Canada LP Customer...
... models) Order Part Number 242905 Cooktop Cleaner (ceramic glass models) Order Part Number 31464 Cooktop Protectant (ceramic glass models) Order Part Number 31463 Cooktop Care Kit (includes cleaner, protectant, and applicator pads) Order Part Number 31605 Cooktop Scraper (ceramic glass models) Order Part Number 3183488 All-Purpose Appliance Cleaner Order Part Number 31662 In Canada Call the Whirlpool Canada LP Customer...
Use & Care Guide
Page 14
...ever need it is installed in an inaccessible location or is located in accordance with electrical or plumbing codes, or use your major appliance is not installed in a remote...flood, acts of God, improper installation, installation not in materials or workmanship. Repairs to parts or systems resulting from unauthorized modifications made to correct defects in accordance with published installation ...11. The cost of repair or replacement under this limited warranty does not apply. WHIRLPOOL SHALL NOT BE LIABLE FOR INCIDENTAL OR CONSEQUENTIAL DAMAGES. If you on the product....
...ever need it is installed in an inaccessible location or is located in accordance with electrical or plumbing codes, or use your major appliance is not installed in a remote...flood, acts of God, improper installation, installation not in materials or workmanship. Repairs to parts or systems resulting from unauthorized modifications made to correct defects in accordance with published installation ...11. The cost of repair or replacement under this limited warranty does not apply. WHIRLPOOL SHALL NOT BE LIABLE FOR INCIDENTAL OR CONSEQUENTIAL DAMAGES. If you on the product....

Installation Instructions
Page 1
...electrical inspector's use. ELECTRIC COOKTOP INSTALLATION INSTRUCTIONS INSTRUCTIONS D'INSTALLATION DE LA TABLE DE CUISSON ÉLECTRIQUE Table of Contents / Table des matières COOKTOP SAFETY 1 INSTALLATION INSTRUCTIONS 2 Tools and Parts 2 Location Requirements 2 Electrical Requirements 3 Prepare Cooktop 4 Install Cooktop 5 Make Electrical Connection 6 Attach Cooktop ...;lectrique 14 Fixation de la table de cuisson au plan de travail 16 Achever l'installation 16 COOKTOP SAFETY Your safety and the safety of injury, and tell you don't follow instructions. IMPORTANT ...
...electrical inspector's use. ELECTRIC COOKTOP INSTALLATION INSTRUCTIONS INSTRUCTIONS D'INSTALLATION DE LA TABLE DE CUISSON ÉLECTRIQUE Table of Contents / Table des matières COOKTOP SAFETY 1 INSTALLATION INSTRUCTIONS 2 Tools and Parts 2 Location Requirements 2 Electrical Requirements 3 Prepare Cooktop 4 Install Cooktop 5 Make Electrical Connection 6 Attach Cooktop ...;lectrique 14 Fixation de la table de cuisson au plan de travail 16 Achever l'installation 16 COOKTOP SAFETY Your safety and the safety of injury, and tell you don't follow instructions. IMPORTANT ...
Installation Instructions
Page 2
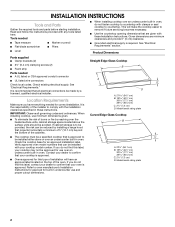
... in oven. I When installing cooktop over an undercounter built-in these Installation Instructions. I Use the countertop opening dimensions that can be avoided. See "Electrical Requirements" section. Verify approved oven...Parts supplied I Clamp brackets (2) Straight Edge Glass Cooktop I 2¹⁄₂" (6.4 cm) clamping screws (2) B I Foam strip Parts needed for this label, contact your oven is recommended that your dealer to countertop. Read and follow the instructions provided with any tools listed here. Check existing electrical supply. See "Electrical...
... in oven. I When installing cooktop over an undercounter built-in these Installation Instructions. I Use the countertop opening dimensions that can be avoided. See "Electrical Requirements" section. Verify approved oven...Parts supplied I Clamp brackets (2) Straight Edge Glass Cooktop I 2¹⁄₂" (6.4 cm) clamping screws (2) B I Foam strip Parts needed for this label, contact your oven is recommended that your dealer to countertop. Read and follow the instructions provided with any tools listed here. Check existing electrical supply. See "Electrical...

Installation Instructions
Page 4
... a fuse in the future. Apply foam strip adhesive-side down around bottom of electrical connection you must determine the type of cooktop, flush with the National Electrical Code, ANSI/NFPA 70-latest edition or CSA Standards C22.1-94, Canadian Electrical Code, Part 1 and C22.2 No. I A UL listed or CSA approved conduit connector must conform with...
... a fuse in the future. Apply foam strip adhesive-side down around bottom of electrical connection you must determine the type of cooktop, flush with the National Electrical Code, ANSI/NFPA 70-latest edition or CSA Standards C22.1-94, Canadian Electrical Code, Part 1 and C22.2 No. I A UL listed or CSA approved conduit connector must conform with...

Installation Instructions
Page 8
... UL listed wire connector G. Clamp bracket (extends far enough beyond cooktop base to the white (neutral) wire in the junction box using the UL listed wire connectors. 4. Check that you have all parts are using clamp brackets. Check that a circuit breaker has not tripped... only if you are now installed. D A E F Attach Cooktop to 3-Wire Cable from Cooktop - Bare or green wire from cooktop C. 3-wire cable (from power supply) F. D C A. Glass cooktop B. Check that the cooktop is an extra part, go back through the steps to tighten the screws against the countertop...
... UL listed wire connector G. Clamp bracket (extends far enough beyond cooktop base to the white (neutral) wire in the junction box using the UL listed wire connectors. 4. Check that you have all parts are using clamp brackets. Check that a circuit breaker has not tripped... only if you are now installed. D A E F Attach Cooktop to 3-Wire Cable from Cooktop - Bare or green wire from cooktop C. 3-wire cable (from power supply) F. D C A. Glass cooktop B. Check that the cooktop is an extra part, go back through the steps to tighten the screws against the countertop...


