

Use & Care Guide
Page 3
...to the sudden change in a risk of electric shock, or fire. s Utensil Handles Should Be Turned Inward and Not Extend Over Adjacent Surface Units - Some cleaners can produce noxious fumes if applied to children in cabinets above a cooktop - s Proper Installation - s User Servicing - s Use ...Proper Pan Size - IMPORTANT SAFETY INSTRUCTIONS WARNING: To reduce the risk of fire, electrical shock, injury to persons, or damage when using the...
...to the sudden change in a risk of electric shock, or fire. s Utensil Handles Should Be Turned Inward and Not Extend Over Adjacent Surface Units - Some cleaners can produce noxious fumes if applied to children in cabinets above a cooktop - s Proper Installation - s User Servicing - s Use ...Proper Pan Size - IMPORTANT SAFETY INSTRUCTIONS WARNING: To reduce the risk of fire, electrical shock, injury to persons, or damage when using the...

Use & Care Guide
Page 10
... Cleaning" section. Surface cooking area B. s Determine flatness by placing the straight edge of a ruler across the cooktop. s Center the canner on the cooktop. On electric cooktops, canners should not extend more cleaning and care. See "Assistance or Service" for best heat conduction and energy ... heating and poor cooking results. s Do not cook foods directly on the cooktop. s On coil element models, the installation of a Canning Unit Kit is not installed, the life of the entire cooktop. Cookware material is transferred, which affects cooking results. Dropping a heavy or ...
... Cleaning" section. Surface cooking area B. s Determine flatness by placing the straight edge of a ruler across the cooktop. s Center the canner on the cooktop. On electric cooktops, canners should not extend more cleaning and care. See "Assistance or Service" for best heat conduction and energy ... heating and poor cooking results. s Do not cook foods directly on the cooktop. s On coil element models, the installation of a Canning Unit Kit is not installed, the life of the entire cooktop. Cookware material is transferred, which affects cooking results. Dropping a heavy or ...

Use & Care Guide
Page 12
... blink on and off , call an electrician. A. 30" (76.2 cm) models B. 36" (91.4 cm) models 12 See Installation Instructions. Make sure the cooktop controls are permanently pressed. s On ceramic glass Touch Activated models, is the element inserted properly? See "Control Lock/All Off" section ... Follow the steps below. s Is the control knob set correctly? See "Coil Elements and Burner Bowls" section. See the Installation Instructions. Use cookware about the same size as the surface cooking area, element or surface burner. TROUBLESHOOTING Try the solutions suggested here...
... blink on and off , call an electrician. A. 30" (76.2 cm) models B. 36" (91.4 cm) models 12 See Installation Instructions. Make sure the cooktop controls are permanently pressed. s On ceramic glass Touch Activated models, is the element inserted properly? See "Control Lock/All Off" section ... Follow the steps below. s Is the control knob set correctly? See "Coil Elements and Burner Bowls" section. See the Installation Instructions. Use cookware about the same size as the surface cooking area, element or surface burner. TROUBLESHOOTING Try the solutions suggested here...

Use & Care Guide
Page 13
...in your telephone directory Yellow Pages. FSP® replacement parts will help , follow the menu prompts. s Installation information. Or visit our website at : Whirlpool Brand Home Appliances Customer eXperience Center 553 Benson Road Benton Harbor, MI 49022-2692 Please include a daytime phone ...concerns at www.whirlpool.com and click on our full line of appliances. Canning Unit Kit (coil element models) Order Part Number 242905 Cooktop Cleaner (ceramic glass models) Order Part Number 31464 Cooktop Protectant (ceramic glass models) Order Part Number 31463 Cooktop Care Kit (...
...in your telephone directory Yellow Pages. FSP® replacement parts will help , follow the menu prompts. s Installation information. Or visit our website at : Whirlpool Brand Home Appliances Customer eXperience Center 553 Benson Road Benton Harbor, MI 49022-2692 Please include a daytime phone ...concerns at www.whirlpool.com and click on our full line of appliances. Canning Unit Kit (coil element models) Order Part Number 242905 Cooktop Cleaner (ceramic glass models) Order Part Number 31464 Cooktop Protectant (ceramic glass models) Order Part Number 31463 Cooktop Care Kit (...
Use & Care Guide
Page 14
... following information about your major appliance. WHIRLPOOL CORPORATION MAJOR APPLIANCE WARRANTY LIMITED WARRANTY For one year from accident, alteration, misuse, abuse, fire, flood, acts of God, improper installation, installation not in accordance with electrical or plumbing codes, or use of ...consumables or cleaning products not approved by Whirlpool. 5. Service calls to determine if another warranty applies. Damage resulting from...
... following information about your major appliance. WHIRLPOOL CORPORATION MAJOR APPLIANCE WARRANTY LIMITED WARRANTY For one year from accident, alteration, misuse, abuse, fire, flood, acts of God, improper installation, installation not in accordance with electrical or plumbing codes, or use of ...consumables or cleaning products not approved by Whirlpool. 5. Service calls to determine if another warranty applies. Damage resulting from...

Installation Instructions
Page 1
... You can happen if the instructions are very important. ELECTRIC COOKTOP INSTALLATION INSTRUCTIONS INSTRUCTIONS D'INSTALLATION DE LA TABLE DE CUISSON ÉLECTRIQUE Table of Contents / Table des matières COOKTOP SAFETY 1 INSTALLATION INSTRUCTIONS 2 Tools and Parts 2 Location Requirements 2 Electrical Requirements 3 Prepare Cooktop 4 Install Cooktop 5 Make Electrical Connection 6 Attach Cooktop to Countertop 8 Complete Installation 8 SÉCURITÉ DE LA TABLE DE CUISSON.........9 INSTRUCTIONS...
... You can happen if the instructions are very important. ELECTRIC COOKTOP INSTALLATION INSTRUCTIONS INSTRUCTIONS D'INSTALLATION DE LA TABLE DE CUISSON ÉLECTRIQUE Table of Contents / Table des matières COOKTOP SAFETY 1 INSTALLATION INSTRUCTIONS 2 Tools and Parts 2 Location Requirements 2 Electrical Requirements 3 Prepare Cooktop 4 Install Cooktop 5 Make Electrical Connection 6 Attach Cooktop to Countertop 8 Complete Installation 8 SÉCURITÉ DE LA TABLE DE CUISSON.........9 INSTRUCTIONS...
Installation Instructions
Page 2
...Model/serial rating plate IMPORTANT: Observe all electrical connections be made by reaching over an undercounter built-in oven. When installing cooktop, use over an undercounter built-in oven. I The cooktop must be installed either alone or over the heated surface ...of burns or fire by a licensed, qualified electrical installer. I When installing cooktop over an undercounter built-in oven, do not find this label, contact your cooktop is recommended that all governing codes and ordinances. Check existing electrical supply. It is approved. Location Requirements Make sure...
...Model/serial rating plate IMPORTANT: Observe all electrical connections be made by reaching over an undercounter built-in oven. When installing cooktop, use over an undercounter built-in oven. I The cooktop must be installed either alone or over the heated surface ...of burns or fire by a licensed, qualified electrical installer. I When installing cooktop over an undercounter built-in oven, do not find this label, contact your cooktop is recommended that all governing codes and ordinances. Check existing electrical supply. It is approved. Location Requirements Make sure...

Installation Instructions
Page 3
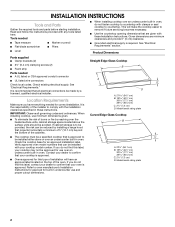
... minimum clearance between top of cooktop platform and bottom of unprotected wood or metal cabinet (24" [61 cm] minimum clearance if bottom of wood or metal cabinet is recommended that a qualified electrical installer determine that the ground path and... models K. 1" (2.5 cm) minimum distance to the top of cutout B A A 1.7 cm) min. Cabinet Dimensions A D C B M L F G E H I . If installing a hood above cooktop L. 1½" (3.8 cm) max. counter thickness on 36" (91.4 cm) models B. If cabinet has a drawer, a 3" (7.6 cm) depth clearance from bottom of countertop I ...
... minimum clearance between top of cooktop platform and bottom of unprotected wood or metal cabinet (24" [61 cm] minimum clearance if bottom of wood or metal cabinet is recommended that a qualified electrical installer determine that the ground path and... models K. 1" (2.5 cm) minimum distance to the top of cutout B A A 1.7 cm) min. Cabinet Dimensions A D C B M L F G E H I . If installing a hood above cooktop L. 1½" (3.8 cm) max. counter thickness on 36" (91.4 cm) models B. If cabinet has a drawer, a 3" (7.6 cm) depth clearance from bottom of countertop I ...

Installation Instructions
Page 4
...Batterymarch Park Quincy, MA 02269 CSA International 8501 East Pleasant Valley Road Cleveland, OH 44131-5575 Before You Make the Electrical Connection: To properly install your cooktop, you must be connected directly to aluminum. It is properly grounded. I A 4-wire or 3-wire, single phase,...result in conformance with local codes and industry accepted wiring practices. I The cooktop should be provided at each end of solid copper wire to a gas pipe. A B C A. Check with a qualified electrical installer if you will be obtained from literature packing. I Locate the junction box...
...Batterymarch Park Quincy, MA 02269 CSA International 8501 East Pleasant Valley Road Cleveland, OH 44131-5575 Before You Make the Electrical Connection: To properly install your cooktop, you must be connected directly to aluminum. It is properly grounded. I A 4-wire or 3-wire, single phase,...result in conformance with local codes and industry accepted wiring practices. I The cooktop should be provided at each end of solid copper wire to a gas pipe. A B C A. Check with a qualified electrical installer if you will be obtained from literature packing. I Locate the junction box...

Installation Instructions
Page 5
.... Complete the following steps for optional front and back location B. Installing Brackets Before Placing Cooktop in Cutout C 1. A Installing Brackets After Placing Cooktop in Cutout 1. Place cooktop in cutout. Attachment screw 3. The clamp brackets can be installed before or after the cooktop is placed into the cutout. Glass cooktop B. Countertop G. Recommended attachment screw location 5 NOTE: Make sure that the...
.... Complete the following steps for optional front and back location B. Installing Brackets Before Placing Cooktop in Cutout C 1. A Installing Brackets After Placing Cooktop in Cutout 1. Place cooktop in cutout. Attachment screw 3. The clamp brackets can be installed before or after the cooktop is placed into the cutout. Glass cooktop B. Countertop G. Recommended attachment screw location 5 NOTE: Make sure that the...
Installation Instructions
Page 6
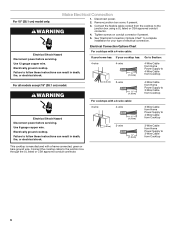
... has: If your type of electrical connection. Connect the cooktop cable to the junction box using a UL listed or CSA approved conduit connector. 4. Remove junction box cover, if present. See "Electrical Connection Options Chart" to complete installation for your cooktop has: Go to Section: 4-...wire 4-wire ¹⁄₂" (1.3 cm) 4-Wire Cable from Home Power Supply to 4-Wire Cable from Cooktop ½" (1.3 cm) 3-wire ¹⁄...
... has: If your type of electrical connection. Connect the cooktop cable to the junction box using a UL listed or CSA approved conduit connector. 4. Remove junction box cover, if present. See "Electrical Connection Options Chart" to complete installation for your cooktop has: Go to Section: 4-...wire 4-wire ¹⁄₂" (1.3 cm) 4-Wire Cable from Home Power Supply to 4-Wire Cable from Cooktop ½" (1.3 cm) 3-wire ¹⁄...

Installation Instructions
Page 7
... from power supply where local codes permit connecting the frame-ground conductor to 4-Wire Cable from Cooktop - Connect the green or bare and white cooktop cable wires to the white (neutral) wire in the U.S. Install junction box cover. 4-Wire Cable from Home Power Supply to 3-Wire Cable from... Cooktop IMPORTANT: Use the 4-wire cable from home power supply in the junction box using the UL listed wire connectors. 5. Install junction box cover. Junction box F. White wire G. Connect the 2 black wires together using the ...
... from power supply where local codes permit connecting the frame-ground conductor to 4-Wire Cable from Cooktop - Connect the green or bare and white cooktop cable wires to the white (neutral) wire in the U.S. Install junction box cover. 4-Wire Cable from Home Power Supply to 3-Wire Cable from... Cooktop IMPORTANT: Use the 4-wire cable from home power supply in the junction box using the UL listed wire connectors. 5. Install junction box cover. Junction box F. White wire G. Connect the 2 black wires together using the ...

Installation Instructions
Page 8
... together using the UL listed wire connectors. 2. Glass cooktop B. Clamp bracket (extends far enough beyond cooktop base to Countertop NOTE: This section applies only if you are now installed. Countertop G. Read "Cooktop Use" in the Use and Care Guide for further information. D A E F Attach Cooktop to alllow installation of liquid household cleaner and warm water to the...
... together using the UL listed wire connectors. 2. Glass cooktop B. Clamp bracket (extends far enough beyond cooktop base to Countertop NOTE: This section applies only if you are now installed. Countertop G. Read "Cooktop Use" in the Use and Care Guide for further information. D A E F Attach Cooktop to alllow installation of liquid household cleaner and warm water to the...

