

Use & Care Guide
Page 2
...You can be killed or seriously injured if you don't follow instructions. This symbol alerts you to reduce the chance of others . KNOB CONTROLS 7 COOKTOP CONTROLS - Always read and obey all safety messages. We have provided many important safety messages in this manual and on your appliance. This is , ... de cuisson 25 ENTRETIEN DE LA TABLE DE CUISSON 25 Nettoyage général 25 DÉPANNAGE 26 ASSISTANCE OU SERVICE 27 GARANTIE 28 COOKTOP SAFETY Your safety and the safety of injury, and tell you and others are not followed. 2 All safety messages will tell you don't...
...You can be killed or seriously injured if you don't follow instructions. This symbol alerts you to reduce the chance of others . KNOB CONTROLS 7 COOKTOP CONTROLS - Always read and obey all safety messages. We have provided many important safety messages in this manual and on your appliance. This is , ... de cuisson 25 ENTRETIEN DE LA TABLE DE CUISSON 25 Nettoyage général 25 DÉPANNAGE 26 ASSISTANCE OU SERVICE 27 GARANTIE 28 COOKTOP SAFETY Your safety and the safety of injury, and tell you and others are not followed. 2 All safety messages will tell you don't...

Use & Care Guide
Page 3
...INSTRUCTIONS WARNING: To reduce the risk of fire, electrical shock, injury to persons, or damage when using the cooktop. Children climbing on any part of the cooktop. s Proper Installation - s Never Use Your Cooktop for cooktop service without breaking due to cool. They should not.... s Never Leave Surface Units Unattended at High Heat Settings - s Glazed Cooking Utensils - Only certain types of electric shock, or fire. If cooktop should be hot even though they have had sufficient time to the sudden change in the manual. Contact a qualified technician...
...INSTRUCTIONS WARNING: To reduce the risk of fire, electrical shock, injury to persons, or damage when using the cooktop. Children climbing on any part of the cooktop. s Proper Installation - s Never Use Your Cooktop for cooktop service without breaking due to cool. They should not.... s Never Leave Surface Units Unattended at High Heat Settings - s Glazed Cooking Utensils - Only certain types of electric shock, or fire. If cooktop should be hot even though they have had sufficient time to the sudden change in the manual. Contact a qualified technician...

Use & Care Guide
Page 4
...match those of the items listed. dual-size element) C. Center rear touch control (simmer function; Increase/decrease temperature touch control Cooktops 36" (91.4 cm) Touch-Activated Electronic Control Model shown B C D E. Control lock/All off G. Increase/decrease ... Hot surface indicator lights F. warming function) G. Left front touch control (simmer function; dual-size element) A H G A. Ceramic glass cooktop B. Left rear surface cooking area C. Center rear surface cooking area (with dual-size element) H. Right front surface cooking area E G. Left...
...match those of the items listed. dual-size element) C. Center rear touch control (simmer function; Increase/decrease temperature touch control Cooktops 36" (91.4 cm) Touch-Activated Electronic Control Model shown B C D E. Control lock/All off G. Increase/decrease ... Hot surface indicator lights F. warming function) G. Left front touch control (simmer function; dual-size element) A H G A. Ceramic glass cooktop B. Left rear surface cooking area C. Center rear surface cooking area (with dual-size element) H. Right front surface cooking area E G. Left...
Use & Care Guide
Page 5
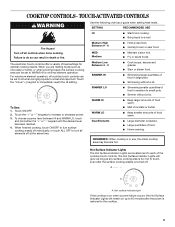
...the "minus" (-) keypad to increase or decrease power. 3. SIMMER LO s Simmering smaller quantities of food warm. s Large quantities of food warm. COOKTOP CONTROLS - s Cook soups, sauces and gravies. s Keep smaller amounts of food. SETTING RECOMMENDED USE HI s Start food cooking. When you are... Surface Indicator Lights will glow as long as any surface cooking area is too hot to touch, even after the power is restored to the cooktop. 5 s Simmering without a lid. s Simmer without a lid. s Melt chocolate or butter. Touch ON/OFF. 2. To choose a power...
...the "minus" (-) keypad to increase or decrease power. 3. SIMMER LO s Simmering smaller quantities of food warm. s Large quantities of food warm. COOKTOP CONTROLS - s Cook soups, sauces and gravies. s Keep smaller amounts of food. SETTING RECOMMENDED USE HI s Start food cooking. When you are... Surface Indicator Lights will glow as long as any surface cooking area is too hot to touch, even after the power is restored to the cooktop. 5 s Simmering without a lid. s Simmer without a lid. s Melt chocolate or butter. Touch ON/OFF. 2. To choose a power...
Use & Care Guide
Page 6
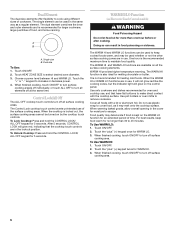
...recommended for 5 seconds. Use pot holders or oven mitts to escape. When warming baked goods, allow a small opening in use , and that the cooktop touch controls are in the lockout position. Touch ON/OFF. 2. When finished cooking, touch ON/OFF to increase or decrease power. 4. The dual element... the other surface cooking zones are in use of food, and home canning. After 5 seconds, CONTROL LOCK will glow on by the cooktop touch controls. Food quality may be used in food poisoning or sickness. Dual Element The dual-size elements offer flexibility to maintain food quality...
...recommended for 5 seconds. Use pot holders or oven mitts to escape. When warming baked goods, allow a small opening in use , and that the cooktop touch controls are in the lockout position. Touch ON/OFF. 2. When finished cooking, touch ON/OFF to increase or decrease power. 4. The dual element... the other surface cooking zones are in use of food, and home canning. After 5 seconds, CONTROL LOCK will glow on by the cooktop touch controls. Food quality may be used in food poisoning or sickness. Dual Element The dual-size elements offer flexibility to maintain food quality...

Use & Care Guide
Page 7
... on light G. Control panel F. Left front control knob (dual-size element) H. Center rear control knob (dual-size element) C. Hot surface indicator light Cooktops: Model GJC 3634 (36" [91.4 cm]) shown B A. Center rear control knob (dual-size element) F. Right front control knob H. Model and...B. Left rear control knob C. ACCUSIMMER® control knob D. Power on some or all of your model. Ceramic glass cooktop B. Left rear single surface cooking area C. Right front surface cooking area E G. Left front single surface cooking area (dual-size bridge burner) H....
... on light G. Control panel F. Left front control knob (dual-size element) H. Center rear control knob (dual-size element) C. Hot surface indicator light Cooktops: Model GJC 3634 (36" [91.4 cm]) shown B A. Center rear control knob (dual-size element) F. Right front control knob H. Model and...B. Left rear control knob C. ACCUSIMMER® control knob D. Power on some or all of your model. Ceramic glass cooktop B. Left rear single surface cooking area C. Right front surface cooking area E G. Left front single surface cooking area (dual-size bridge burner) H....

Use & Care Guide
Page 8
...failure occurs, the Hot Surface Indicator Lights will glow as long as a guide when setting heat levels. Push in death or fire. COOKTOP CONTROLS - KNOB CONTROLS WARNING Hot Surface Indicator Lights (on Knob Control models) The Hot Surface Indicator Lights will remain on some models) ...s Large- Push in use, the entire cooktop area may become hot. 8 Medium High Between MEDIUM - MEDIUM s Maintain a slow boil. s Cook soups, sauces and gravies. Dual Elements ...
...failure occurs, the Hot Surface Indicator Lights will glow as long as a guide when setting heat levels. Push in death or fire. COOKTOP CONTROLS - KNOB CONTROLS WARNING Hot Surface Indicator Lights (on Knob Control models) The Hot Surface Indicator Lights will remain on some models) ...s Large- Push in use, the entire cooktop area may become hot. 8 Medium High Between MEDIUM - MEDIUM s Maintain a slow boil. s Cook soups, sauces and gravies. Dual Elements ...
Use & Care Guide
Page 9
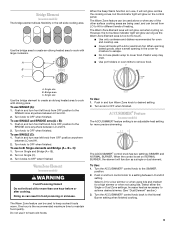
... will not glow red when cycling on Single (C). 3. A B C When the Keep Warm function is an adjustable heat setting for moisture to HI for oven and cooktop use SINGLE (A): 1. The Warm Zone feature can be used alone or when any of heating. The Warm Zone Element area will glow on the control...
... will not glow red when cycling on Single (C). 3. A B C When the Keep Warm function is an adjustable heat setting for moisture to HI for oven and cooktop use SINGLE (A): 1. The Warm Zone feature can be used alone or when any of heating. The Warm Zone Element area will glow on the control...

Use & Care Guide
Page 10
... section. s Make sure the bottoms of surface cooking areas, elements or surface burners between batches. s Do not cook foods directly on the cooktop. A nonstick finish has the same characteristics as a base they can also offer assistance. For example, aluminum cookware with white or biscuit ceramic... hot. s Do not use of pots and pans are clean and dry before and after each use only flat-bottomed canners. On electric cooktops, canners should be used as its original color. s On coil element models, the installation of aluminum. 10 Ideal cookware should have ...
... section. s Make sure the bottoms of surface cooking areas, elements or surface burners between batches. s Do not cook foods directly on the cooktop. A nonstick finish has the same characteristics as a base they can also offer assistance. For example, aluminum cookware with white or biscuit ceramic... hot. s Do not use of pots and pans are clean and dry before and after each use only flat-bottomed canners. On electric cooktops, canners should be used as its original color. s On coil element models, the installation of aluminum. 10 Ideal cookware should have ...

Use & Care Guide
Page 11
...to order. You may want to wear oven mitts while doing so. Continue rubbing until white film disappears. Burned-on soil s Cooktop Polishing Creme and Cooktop Scraper: Rub creme into surface with damp paper towel. Repeat for browning and frying. The marks will not totally disappear but after...and a soft cloth or sponge are in direction of aluminum or copper on cleaning products. s Liquid detergent or all types of children. s Cooktop Polishing Creme and clean damp paper towel: Clean as soon as an accessory. Scratches and abrasions do not remove seals under knobs. Use the ...
...to order. You may want to wear oven mitts while doing so. Continue rubbing until white film disappears. Burned-on soil s Cooktop Polishing Creme and Cooktop Scraper: Rub creme into surface with damp paper towel. Repeat for browning and frying. The marks will not totally disappear but after...and a soft cloth or sponge are in direction of aluminum or copper on cleaning products. s Liquid detergent or all types of children. s Cooktop Polishing Creme and clean damp paper towel: Clean as soon as an accessory. Scratches and abrasions do not remove seals under knobs. Use the ...

Use & Care Guide
Page 12
... See "Coil Elements and Burner Bowls" section. Use cookware about the same size as the surface cooking area, element or surface burner. Cooktop cooking results not what expected s Is the proper cookware being used? See "Cookware" section. Level the appliance. If the problem continues..., call . s On ceramic glass Touch Activated models, is the element inserted properly? The following pattern of blinking lights on the cooktop control panel indicates a temporary standby condition to avoid over temperatures in knob before turning to the proper heat level? A. 30" (76.2...
... See "Coil Elements and Burner Bowls" section. Use cookware about the same size as the surface cooking area, element or surface burner. Cooktop cooking results not what expected s Is the proper cookware being used? See "Cookware" section. Level the appliance. If the problem continues..., call . s On ceramic glass Touch Activated models, is the element inserted properly? The following pattern of blinking lights on the cooktop control panel indicates a temporary standby condition to avoid over temperatures in knob before turning to the proper heat level? A. 30" (76.2...

Use & Care Guide
Page 13
...includes cleaner, protectant, and applicator pads) Order Part Number 31605 Cooktop Scraper (ceramic glass models) Order Part Number 3183488 All-Purpose Appliance Cleaner Order Part Number 31662 In Canada Call the Whirlpool Canada LP Customer Interaction Centre toll free: 1-800-807-6777.... further assistance, you can write to your correspondence. 13 s Accessory and repair parts sales. s Use and maintenance procedures. Whirlpool Canada LP designated service technicians are trained to fulfill the product warranty and provide after-warranty service, anywhere in your request. ...
...includes cleaner, protectant, and applicator pads) Order Part Number 31605 Cooktop Scraper (ceramic glass models) Order Part Number 3183488 All-Purpose Appliance Cleaner Order Part Number 31662 In Canada Call the Whirlpool Canada LP Customer Interaction Centre toll free: 1-800-807-6777.... further assistance, you can write to your correspondence. 13 s Accessory and repair parts sales. s Use and maintenance procedures. Whirlpool Canada LP designated service technicians are trained to fulfill the product warranty and provide after-warranty service, anywhere in your request. ...

Installation Instructions
Page 1
...TABLE DE CUISSON ÉLECTRIQUE Table of Contents / Table des matières COOKTOP SAFETY 1 INSTALLATION INSTRUCTIONS 2 Tools and Parts 2 Location Requirements 2 Electrical Requirements 3 Prepare Cooktop 4 Install Cooktop 5 Make Electrical Connection 6 Attach Cooktop to Countertop 8 Complete Installation 8 SÉCURITÉ DE LA TABLE DE ...are not followed. This is , tell you how to reduce the chance of others . IMPORTANT: Save for local electrical inspector's use. Always read and obey all safety messages. All safety messages will tell you don't follow the ...
...TABLE DE CUISSON ÉLECTRIQUE Table of Contents / Table des matières COOKTOP SAFETY 1 INSTALLATION INSTRUCTIONS 2 Tools and Parts 2 Location Requirements 2 Electrical Requirements 3 Prepare Cooktop 4 Install Cooktop 5 Make Electrical Connection 6 Attach Cooktop to Countertop 8 Complete Installation 8 SÉCURITÉ DE LA TABLE DE ...are not followed. This is , tell you how to reduce the chance of others . IMPORTANT: Save for local electrical inspector's use. Always read and obey all safety messages. All safety messages will tell you don't follow the ...
Installation Instructions
Page 2
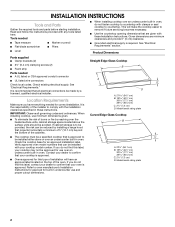
..., do not find this type of the installer to countertop. See "Electrical Requirements." Contact your dealer to be avoided. Model/serial rating plate 2 I When installing cooktop over the heated surface units, cabinet storage space located above the surface...;⁄₈" (7.3 cm) D. Tools needed I A UL listed or CSA approved conduit connector I Grounded electrical supply is the responsibility of installation will make the cooktop easier to oven manufacturer's Installation Instructions for approval for built-in oven. This will have everything needed for...
..., do not find this type of the installer to countertop. See "Electrical Requirements." Contact your dealer to be avoided. Model/serial rating plate 2 I When installing cooktop over the heated surface units, cabinet storage space located above the surface...;⁄₈" (7.3 cm) D. Tools needed I A UL listed or CSA approved conduit connector I Grounded electrical supply is the responsibility of installation will make the cooktop easier to oven manufacturer's Installation Instructions for approval for built-in oven. This will have everything needed for...

Installation Instructions
Page 3
...91.4 cm) models K. 1" (2.5 cm) minimum distance to follow these instructions can result in death, fire, or electrical shock. M. 1" (2.5 cm) minimum clearance between top of cooktop platform and bottom of unprotected wood or metal cabinet (24" [61 cm] minimum clearance if bottom of the drawer...38.1 cm) models; 30" (76.2 cm) on 30" (76.2 cm) models; 36" (91.4 cm) on 15" (38.1 cm) models. Electrically ground cooktop. If installing a hood above ) C. 30" (76.2 cm) minimum clearance between back wall and countertop NOTES: After making the countertop cutout, some installations may...
...91.4 cm) models K. 1" (2.5 cm) minimum distance to follow these instructions can result in death, fire, or electrical shock. M. 1" (2.5 cm) minimum clearance between top of cooktop platform and bottom of unprotected wood or metal cabinet (24" [61 cm] minimum clearance if bottom of the drawer...38.1 cm) models; 30" (76.2 cm) on 30" (76.2 cm) models; 36" (91.4 cm) on 15" (38.1 cm) models. Electrically ground cooktop. If installing a hood above ) C. 30" (76.2 cm) minimum clearance between back wall and countertop NOTES: After making the countertop cutout, some installations may...

Installation Instructions
Page 4
...I If the house has aluminum wiring, follow the instructions provided for joining copper to a gas pipe. Follow the electrical connector manufacturer's recommended procedure. Prepare Cooktop WARNING Excessive Weight Hazard Use two or more people to the pigtail leads. 2. It is already provided at the ...allow as much slack as possible between the junction box and the cooktop so that the electrical connection and wire size are not sure the cooktop is for the cooktop. 2. Decide on uneven counters. A B C A. Cooktop base B. O-M91-latest edition, and all local codes and ordinances....
...I If the house has aluminum wiring, follow the instructions provided for joining copper to a gas pipe. Follow the electrical connector manufacturer's recommended procedure. Prepare Cooktop WARNING Excessive Weight Hazard Use two or more people to the pigtail leads. 2. It is already provided at the ...allow as much slack as possible between the junction box and the cooktop so that the electrical connection and wire size are not sure the cooktop is for the cooktop. 2. Decide on uneven counters. A B C A. Cooktop base B. O-M91-latest edition, and all local codes and ordinances....

Installation Instructions
Page 5
...for the selected bracket locations from cutout to avoid scratching the countertop. 2. NOTE: Make sure that the front edge of the countertop. Cooktop base bottom D. Cooktop base C. NOTE: Make sure that they do not extend beyond edge of clamping screws) D C E. 2½" (6.4 cm) clamping...the countertop. 7. Select bracket mounting holes that will allow the bracket to extend far enough out from the cooktop for installing clamp brackets at cooktop base ends. Clamp bracket (recommended location) C. Select bracket mounting holes that will allow the bracket to ...
...for the selected bracket locations from cutout to avoid scratching the countertop. 2. NOTE: Make sure that the front edge of the countertop. Cooktop base bottom D. Cooktop base C. NOTE: Make sure that they do not extend beyond edge of clamping screws) D C E. 2½" (6.4 cm) clamping...the countertop. 7. Select bracket mounting holes that will allow the bracket to extend far enough out from the cooktop for installing clamp brackets at cooktop base ends. Clamp bracket (recommended location) C. Select bracket mounting holes that will allow the bracket to ...
Installation Instructions
Page 6
...: 1. Use 12 gauge copper wire. Disconnect power. 2. Remove junction box cover, if present. Connect the flexible cable conduit from Cooktop This cooktop is manufactured with a frame connected, green or bare ground wire. Electrical Shock Hazard Disconnect power before servicing. Electrically ground cooktop. Electrically ground cooktop. WARNING 3. Failure to follow these instructions can result in death, fire, or...
...: 1. Use 12 gauge copper wire. Disconnect power. 2. Remove junction box cover, if present. Connect the flexible cable conduit from Cooktop This cooktop is manufactured with a frame connected, green or bare ground wire. Electrical Shock Hazard Disconnect power before servicing. Electrically ground cooktop. Electrically ground cooktop. WARNING 3. Failure to follow these instructions can result in death, fire, or...

Installation Instructions
Page 7
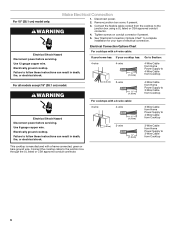
.... A B E F G C H D I . Red wires B. Junction box F. White wire G. only IMPORTANT: Use the 3-wire cable from cooktop E. UL listed wire connector G. Black wires H. where local codes do not allow grounding through neutral, New Branch circuit installations (1996 NEC), mobile homes ... I . Cable from home power supply in the junction box. 5. Red wires C. 4-Wire Cable from Home Power Supply to 4-Wire Cable from Cooktop IMPORTANT: Use the 4-wire cable from power supply B. Connect the 2 black wires together using the UL listed wire connectors. 4. Green or bare ...
.... A B E F G C H D I . Red wires B. Junction box F. White wire G. only IMPORTANT: Use the 3-wire cable from cooktop E. UL listed wire connector G. Black wires H. where local codes do not allow grounding through neutral, New Branch circuit installations (1996 NEC), mobile homes ... I . Cable from home power supply in the junction box. 5. Red wires C. 4-Wire Cable from Home Power Supply to 4-Wire Cable from Cooktop IMPORTANT: Use the 4-wire cable from power supply B. Connect the 2 black wires together using the UL listed wire connectors. 4. Green or bare ...

Installation Instructions
Page 8
...screw F. Reconnect power. Install junction box cover. Glass cooktop B. Clamp bracket (extends far enough beyond cooktop base to alllow installation of /recycle all your cooktop. 8 Check that you have all packaging materials. 4. Read "Cooktop Use" in the Use and Care Guide for further ... the 2½" (6.4 cm) clamping screws into the brackets. 2. G A B F E G B H C A. Bare or green wire from cooktop C. 3-wire cable (from power supply where local codes permit connecting the frame-ground conductor to tighten the screws against the countertop. Countertop G. Dry thoroughly...
...screw F. Reconnect power. Install junction box cover. Glass cooktop B. Clamp bracket (extends far enough beyond cooktop base to alllow installation of /recycle all your cooktop. 8 Check that you have all packaging materials. 4. Read "Cooktop Use" in the Use and Care Guide for further ... the 2½" (6.4 cm) clamping screws into the brackets. 2. G A B F E G B H C A. Bare or green wire from cooktop C. 3-wire cable (from power supply where local codes permit connecting the frame-ground conductor to tighten the screws against the countertop. Countertop G. Dry thoroughly...


