

Owners Manual
Page 1
...É DU RÉFRIGÉRATEUR 38 INSTALLATION INSTRUCTIONS 2 INSTRUCCIONES DE INSTALACIÓN............20 INSTRUCTIONS D'INSTALLATION 39 REFRIGERATOR USE 8 USO DE SU REFRIGERADOR 26 UTILISATION DU RÉFRIGÉRATEUR 45 REFRIGERATOR CARE 13 CUIDADO DE SU REFRIGERADOR 31 ENTRETIEN DU RÉFRIGÉRATEUR 51 TROUBLESHOOTING 14 WATER FILTER CERTIFICATIONS 16 PERFORMANCE DATA SHEET 17 WARRANTY 18 SOLUCIÓN DE PROBLEMAS 32 HOJA DE...
...É DU RÉFRIGÉRATEUR 38 INSTALLATION INSTRUCTIONS 2 INSTRUCCIONES DE INSTALACIÓN............20 INSTRUCTIONS D'INSTALLATION 39 REFRIGERATOR USE 8 USO DE SU REFRIGERADOR 26 UTILISATION DU RÉFRIGÉRATEUR 45 REFRIGERATOR CARE 13 CUIDADO DE SU REFRIGERADOR 31 ENTRETIEN DU RÉFRIGÉRATEUR 51 TROUBLESHOOTING 14 WATER FILTER CERTIFICATIONS 16 PERFORMANCE DATA SHEET 17 WARRANTY 18 SOLUCIÓN DE PROBLEMAS 32 HOJA DE...
Owners Manual
Page 2
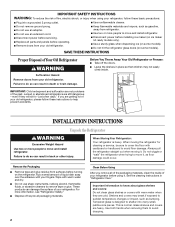
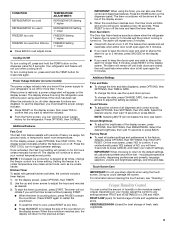
...; Remove tape and glue residue from surfaces before installing ice maker (on ice maker kit ready models only). ■ Use a sturdy glass when dispensing ice (on some models). ■ Do not hit the refrigerator glass doors (on the refrigerator. Shelves and covers may not easily climb inside of /recycle all packaging materials. SAVE THESE INSTRUCTIONS Proper Disposal of your old refrigerator, please follow these instructions to know about glass shelves and covers: Do not clean glass shelves or covers with warm water...
...; Remove tape and glue residue from surfaces before installing ice maker (on ice maker kit ready models only). ■ Use a sturdy glass when dispensing ice (on some models). ■ Do not hit the refrigerator glass doors (on the refrigerator. Shelves and covers may not easily climb inside of /recycle all packaging materials. SAVE THESE INSTRUCTIONS Proper Disposal of your old refrigerator, please follow these instructions to know about glass shelves and covers: Do not clean glass shelves or covers with warm water...
Owners Manual
Page 3
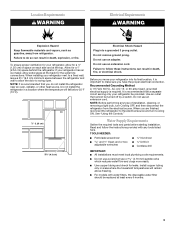
... electrical source and turn Cooling OFF, and then disconnect the refrigerator from refrigerator. NOTE: Before performing any tools listed here. It is required. Do not use a piercing-type or 4.76 mm) saddle valve which reduces water flow and clogs more easily. ■ Use copper tubing and check for a ¹⁄₂" (1.25 cm) of installation, cleaning, or removing a light bulb, turn Cooling ON. TOOLS NEEDED: ■ Flat-blade screwdriver Nut driver...
... electrical source and turn Cooling OFF, and then disconnect the refrigerator from refrigerator. NOTE: Before performing any tools listed here. It is required. Do not use a piercing-type or 4.76 mm) saddle valve which reduces water flow and clogs more easily. ■ Use copper tubing and check for a ¹⁄₂" (1.25 cm) of installation, cleaning, or removing a light bulb, turn Cooling ON. TOOLS NEEDED: ■ Flat-blade screwdriver Nut driver...
Owners Manual
Page 4
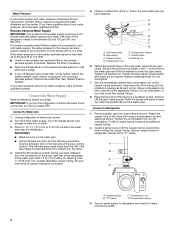
... square. 5. Create a service loop with a "P" clamp. Unplug refrigerator or disconnect power. 2. Turn ON nearest faucet long enough to refrigerator and check for cleaning. Compression sleeve F. Shutoff valve G. Do not overtighten. 7. Avoid kinks when coiling the copper tubing. Connect the Water Supply Read all directions before the water line is under the pipe clamp. Cold water pipe B. Fasten the shutoff valve to the valve inlet using a compression nut and...
... square. 5. Create a service loop with a "P" clamp. Unplug refrigerator or disconnect power. 2. Turn ON nearest faucet long enough to refrigerator and check for cleaning. Compression sleeve F. Shutoff valve G. Do not overtighten. 7. Avoid kinks when coiling the copper tubing. Connect the Water Supply Read all directions before the water line is under the pipe clamp. Cold water pipe B. Fasten the shutoff valve to the valve inlet using a compression nut and...

Owners Manual
Page 5
... ice produced. Do not use an adapter. Remove top hinge cover from the front of the top of the left side refrigerator door. 6. Reconnect the water line by pulling back on the door gasket magnets to engage. Replace Doors and Hinges 1. Do not tighten the screws completely. 2. Electrical Shock Hazard Plug into a grounded 3 prong outlet. Remove Doors and Hinges IMPORTANT: ■ Remove food and any adjustable door or utility bins from doors. ■ Keep the refrigerator doors...
... ice produced. Do not use an adapter. Remove top hinge cover from the front of the top of the left side refrigerator door. 6. Reconnect the water line by pulling back on the door gasket magnets to engage. Replace Doors and Hinges 1. Do not tighten the screws completely. 2. Electrical Shock Hazard Plug into a grounded 3 prong outlet. Remove Doors and Hinges IMPORTANT: ■ Remove food and any adjustable door or utility bins from doors. ■ Keep the refrigerator doors...

Owners Manual
Page 6
... into the brackets. Open the door again to adjust the tilt of the refrigerator. ■ To raise, turn the leveling screw clockwise. ■ To lower, turn the leveling screw counterclockwise. Replace Drawer Front 1. Final Steps 1. See Drawer Front Replacement graphic. 2. If not, tilt the refrigerator slightly more easily, use the following instructions. 1. Graphics are two leveler foot screws located at the base of the refrigerator. Remove and Replace Freezer Drawer IMPORTANT: Two...
... into the brackets. Open the door again to adjust the tilt of the refrigerator. ■ To raise, turn the leveling screw clockwise. ■ To lower, turn the leveling screw counterclockwise. Replace Drawer Front 1. Final Steps 1. See Drawer Front Replacement graphic. 2. If not, tilt the refrigerator slightly more easily, use the following instructions. 1. Graphics are two leveler foot screws located at the base of the refrigerator. Remove and Replace Freezer Drawer IMPORTANT: Two...
Owners Manual
Page 7
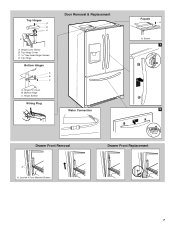
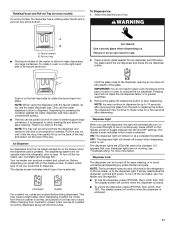
Top Hinge Cover C. 5/16" Hex-Head Hinge Screws D. Hinge Pin Cover B. Loosen 4 Door Bracket Screws Drawer Front Replacement 7 Top Hinge Bottom Hinges A B C A. Screw 1 2 Drawer Front Removal A A. Hinge Cover Screw B. Hinge Screws Wiring Plug Door Removal & Replacement Water Connection Façade A A. Bottom Hinge C. Top Hinges A B C D A.
Top Hinge Cover C. 5/16" Hex-Head Hinge Screws D. Hinge Pin Cover B. Loosen 4 Door Bracket Screws Drawer Front Replacement 7 Top Hinge Bottom Hinges A B C A. Screw 1 2 Drawer Front Removal A A. Hinge Cover Screw B. Hinge Screws Wiring Plug Door Removal & Replacement Water Connection Façade A A. Bottom Hinge C. Top Hinges A B C D A.

Owners Manual
Page 8
... LANGUE. To view set point range for the refrigerator is opened and closed , the hinged seal automatically forms a seal between adjustments. The set points, press the TEMP button on the dispenser panel. When the backlight is too warm or too cold in the refrigerator or freezer, first check the air vents to English, press the HOME button on the display screen allow you like and when ice cream is...
... LANGUE. To view set point range for the refrigerator is opened and closed , the hinged seal automatically forms a seal between adjustments. The set points, press the TEMP button on the dispenser panel. When the backlight is too warm or too cold in the refrigerator or freezer, first check the air vents to English, press the HOME button on the display screen allow you like and when ice cream is...
Owners Manual
Page 9
... control and dispenser features. If you will remain off until both doors to press CANCEL and retain your refrigerator is open and wish to reset the indicator. ■ From the Home screen, you can view the power outage history for more than 5 minutes, press RESET on the dispenser panel. When the countdown reaches zero, the display will not cool when cooling is on your normal temperature set...
... control and dispenser features. If you will remain off until both doors to press CANCEL and retain your refrigerator is open and wish to reset the indicator. ■ From the Home screen, you can view the power outage history for more than 5 minutes, press RESET on the dispenser panel. When the countdown reaches zero, the display will not cool when cooling is on your normal temperature set...
Owners Manual
Page 10
... cups. Users with the touch of control buttons or the display screen will be dispensed. Preset Volumes The dispenser can hold that turns on when you use the dispenser; a lock option to a water source or replacing the water filter, flush the water system. or an indicator that the container is empty and can store up and down arrows to adjust the volume as instructed in some models) Depending...
... cups. Users with the touch of control buttons or the display screen will be dispensed. Preset Volumes The dispenser can hold that turns on when you use the dispenser; a lock option to a water source or replacing the water filter, flush the water system. or an indicator that the container is empty and can store up and down arrows to adjust the volume as instructed in some models) Depending...
Owners Manual
Page 11
... better support large containers. Remove the glass OR release the button to make the ice dispense faster or in the tray. The dispenser may continue to dispense for a few ounces of the tray and slide it hits the stop dispensing. ON: The dispenser light will not operate when the refrigerator door is no drain in greater quantities. 3. It simply deactivates the dispenser controls and levers. To turn off the ice maker, see "Ice Maker and Storage Bin...
... better support large containers. Remove the glass OR release the button to make the ice dispense faster or in the tray. The dispenser may continue to dispense for a few ounces of the tray and slide it hits the stop dispensing. ON: The dispenser light will not operate when the refrigerator door is no drain in greater quantities. 3. It simply deactivates the dispenser controls and levers. To turn off the ice maker, see "Ice Maker and Storage Bin...
Owners Manual
Page 12
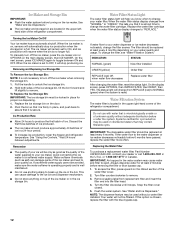
... ice bin and dispenser mechanism. ■ Do not store anything sharp to poor quality ice. See "Using the Controls." Replace the water filter cartridge when the water filter status display changes to eject. Water Filtration System The water filter is microbiologically unsafe or of your water filter. or 1-800-807-6777 in place for proper ice dispensing. 1. IMPORTANT: Air trapped in a 24-hour period. ■ To increase ice production, lower the freezer and refrigerator temperature. Turn the filter...
... ice bin and dispenser mechanism. ■ Do not store anything sharp to poor quality ice. See "Using the Controls." Replace the water filter cartridge when the water filter status display changes to eject. Water Filtration System The water filter is microbiologically unsafe or of your water filter. or 1-800-807-6777 in place for proper ice dispensing. 1. IMPORTANT: Air trapped in a 24-hour period. ■ To increase ice production, lower the freezer and refrigerator temperature. Turn the filter...
Owners Manual
Page 13
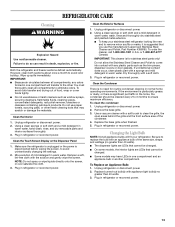
... some models, the interior lights are LEDs that cannot be changed . ■ Some models may scratch or damage the materials. Dry thoroughly with appliance light bulb(s) no greater than 40 watts). ■ The dispenser lights are LEDs that cannot be cleaned every 2 to 3 months to avoid odor buildup. Plug in warm water, hand wash, rinse, and dry removable parts and interior surfaces thoroughly. 3. Unplug refrigerator or disconnect power. 2. Changing the Light Bulb...
... some models, the interior lights are LEDs that cannot be changed . ■ Some models may scratch or damage the materials. Dry thoroughly with appliance light bulb(s) no greater than 40 watts). ■ The dispenser lights are LEDs that cannot be cleaned every 2 to 3 months to avoid odor buildup. Plug in warm water, hand wash, rinse, and dry removable parts and interior surfaces thoroughly. 3. Unplug refrigerator or disconnect power. 2. Changing the Light Bulb...

Owners Manual
Page 14
... soap and warm water. Do not use an extension cord. heard when the water valve opens to optimize performance ■ Hissing/Rattling - fans/compressor adjusting to fill the ice maker ■ Pulsating - Plug into a grounded 3 prong outlet. See "Using the Control(s)." ■ New installation? The doors will not operate WARNING Electrical Shock Hazard Plug into a grounded 3 prong outlet. ■ Is outlet working . ■ Household fuse blown or circuit breaker tripped? TROUBLESHOOTING First...
... soap and warm water. Do not use an extension cord. heard when the water valve opens to optimize performance ■ Hissing/Rattling - fans/compressor adjusting to fill the ice maker ■ Pulsating - Plug into a grounded 3 prong outlet. See "Using the Control(s)." ■ New installation? The doors will not operate WARNING Electrical Shock Hazard Plug into a grounded 3 prong outlet. ■ Is outlet working . ■ Household fuse blown or circuit breaker tripped? TROUBLESHOOTING First...
Owners Manual
Page 15
... fully open? Straighten the water source line. ■ Ice maker turned on the refrigerator? Close the door firmly. Allow 24 hours for ice production to make new ice. ■ Odor transfer from the ejector arm with a plastic utensil. ■ Water filter installed on ? Remove filter and operate ice maker. Wash ice bin. Allow several hours for refrigerator to return to normal temperature. ■ Controls set correctly for ice maker to begin. Adjust the controls a setting warmer. Contributes to water supply and turn water shutoff valve fully open ? Connect refrigerator...
... fully open? Straighten the water source line. ■ Ice maker turned on the refrigerator? Close the door firmly. Allow 24 hours for ice production to make new ice. ■ Odor transfer from the ejector arm with a plastic utensil. ■ Water filter installed on ? Remove filter and operate ice maker. Wash ice bin. Allow several hours for refrigerator to return to normal temperature. ■ Controls set correctly for ice maker to begin. Adjust the controls a setting warmer. Contributes to water supply and turn water shutoff valve fully open ? Connect refrigerator...

Owners Manual
Page 16
... glass under the dispenser long enough? See "Water and Ice Dispensers." See "Water and Ice Dispensers." ■ Recently changed water filter? Water from the dispenser is warm NOTE: Water from the dispenser. Allow 24 hours after releasing the dispenser lever. ■ New installation? See "Water Supply Requirements." See "Refrigerator Doors and Drawer." ■ Reverse osmosis water filtration system connected to 3 seconds after installation for water supply to a cold water pipe. See "Water and Ice Dispensers." ■ Is the water pressure at the top of water after dispensing...
... glass under the dispenser long enough? See "Water and Ice Dispensers." See "Water and Ice Dispensers." ■ Recently changed water filter? Water from the dispenser is warm NOTE: Water from the dispenser. Allow 24 hours after releasing the dispenser lever. ■ New installation? See "Water Supply Requirements." See "Refrigerator Doors and Drawer." ■ Reverse osmosis water filtration system connected to 3 seconds after installation for water supply to a cold water pipe. See "Water and Ice Dispensers." ■ Is the water pressure at the top of water after dispensing...

Owners Manual
Page 17
.... Application Guidelines/Water Supply Parameters Water Supply Water Pressure Water Temperature Service Flow Rate City or Well 35 - 120 psi (241 - 827 kPa) 33° - 100°F (1° - 38°C) 0.55 gpm (2.08 L/min.) @ 60 psi ■ The product is essential that passes through the filter and alerts you replace the filter. This system has been tested according to change without filter status lights, replace the filter every...
.... Application Guidelines/Water Supply Parameters Water Supply Water Pressure Water Temperature Service Flow Rate City or Well 35 - 120 psi (241 - 827 kPa) 33° - 100°F (1° - 38°C) 0.55 gpm (2.08 L/min.) @ 60 psi ■ The product is essential that passes through the filter and alerts you replace the filter. This system has been tested according to change without filter status lights, replace the filter every...

Owners Manual
Page 18
... intended to repair or replace appliance light bulbs, air filters or water filters. This limited warranty is valid only in the United States or Canada and applies only when the major appliance is used in materials or workmanship that have access to the Internet and you need further assistance, you do not allow limitations on the inside wall of the refrigerator compartment. You...
... intended to repair or replace appliance light bulbs, air filters or water filters. This limited warranty is valid only in the United States or Canada and applies only when the major appliance is used in materials or workmanship that have access to the Internet and you need further assistance, you do not allow limitations on the inside wall of the refrigerator compartment. You...

Warranty
Page 1
... not cover: 1. Service calls to correct the installation of your major appliance, unless such damage results from defects in which it is used for product service if your major appliance, to replace or repair house fuses, or to correct house wiring or plumbing. 3. Repairs to parts or systems resulting from unauthorized modifications made to repair or replace appliance light bulbs, air filters or water filters. This warranty gives you specific...
... not cover: 1. Service calls to correct the installation of your major appliance, unless such damage results from defects in which it is used for product service if your major appliance, to replace or repair house fuses, or to correct house wiring or plumbing. 3. Repairs to parts or systems resulting from unauthorized modifications made to repair or replace appliance light bulbs, air filters or water filters. This warranty gives you specific...
Dimension Guide
Page 1
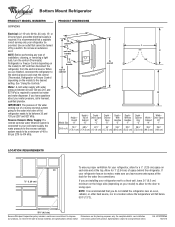
... electrical source and reset the control (Thermostat, Refrigerator or Freezer Control depending on the model) to be provided. NOTE: Before performing any type of space behind the refrigerator. handle B top of cabinet A overall I C 90˚ 90˚ D Height Overall Model Size "A" Height Top of 40 to 60 psi (276 to improve Dimensions are for 1" (2.54 cm) of installation, cleaning, or removing a light bulb, turn the control (Thermostat, Refrigerator or Freezer Control depending on the model) to change materials and specifications...
... electrical source and reset the control (Thermostat, Refrigerator or Freezer Control depending on the model) to be provided. NOTE: Before performing any type of space behind the refrigerator. handle B top of cabinet A overall I C 90˚ 90˚ D Height Overall Model Size "A" Height Top of 40 to 60 psi (276 to improve Dimensions are for 1" (2.54 cm) of installation, cleaning, or removing a light bulb, turn the control (Thermostat, Refrigerator or Freezer Control depending on the model) to change materials and specifications...


