User Instructions
Page 1
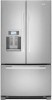
...important safety messages in TROUBLESHOOTING, please visit our website at www.whirlpool.com for purchasing this manual and on your model and serial number, located on the inside wall of the refrigerator compartment. ® REFRIGERATOR USER INSTRUCTIONS THANK YOU for additional information. If you don't... follow instructions. In Canada, visit our website at www.whirlpool.ca or call us at 1-800-253-1301. All ...
...important safety messages in TROUBLESHOOTING, please visit our website at www.whirlpool.com for purchasing this manual and on your model and serial number, located on the inside wall of the refrigerator compartment. ® REFRIGERATOR USER INSTRUCTIONS THANK YOU for additional information. If you don't... follow instructions. In Canada, visit our website at www.whirlpool.ca or call us at 1-800-253-1301. All ...
User Instructions
Page 2
... damage. Shelves and covers may not easily climb inside of your refrigerator before using your refrigerator, follow these basic precautions: ■ Plug into many small, pebble-size pieces. Before You Throw Away Your Old Refrigerator or Freezer: ■ Take off the doors. ■ Leave the shelves... in death or brain damage. even if they are not problems of your old refrigerator. When moving it . Glass shelves and covers are still dangerous...
... damage. Shelves and covers may not easily climb inside of your refrigerator before using your refrigerator, follow these basic precautions: ■ Plug into many small, pebble-size pieces. Before You Throw Away Your Old Refrigerator or Freezer: ■ Take off the doors. ■ Leave the shelves... in death or brain damage. even if they are not problems of your old refrigerator. When moving it . Glass shelves and covers are still dangerous...

User Instructions
Page 3
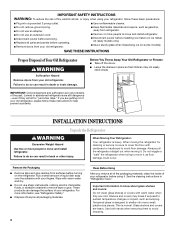
It is important to follow these instructions can result in death, explosion, or fire. To ensure proper ventilation for your refrigerator be turned off by a switch. NOTE: Before performing any type of installation, cleaning, or removing a light bulb, turn Cooling ON. Location Requirements WARNING ...ice maker, allow the door to allow extra space at the back for a ¹⁄₂" (1.25 cm) space at the top and behind the refrigerator. Do not use an extension cord. Recommended Grounding Method A 115 Volt, 60 Hz., AC only 15- Do not use an extension cord. Do not...
It is important to follow these instructions can result in death, explosion, or fire. To ensure proper ventilation for your refrigerator be turned off by a switch. NOTE: Before performing any type of installation, cleaning, or removing a light bulb, turn Cooling ON. Location Requirements WARNING ...ice maker, allow the door to allow extra space at the back for a ¹⁄₂" (1.25 cm) space at the top and behind the refrigerator. Do not use an extension cord. Recommended Grounding Method A 115 Volt, 60 Hz., AC only 15- Do not use an extension cord. Do not...
User Instructions
Page 4
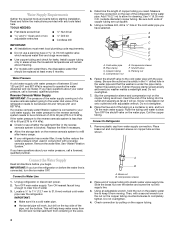
... supply connection. A B C D E F G A. Do not overtighten. 7. Do not overtighten. 8. Place the free end of the pipe, not the bottom. Install copper tubing only in areas where the household temperatures will work, but drill on the top side of the tubing in the reverse osmosis ... Check to clear line of copper tubing are cut square. 5. If you need. Connect to 31.8 mm) vertical cold water pipe near the refrigerator. Copper tubing D. Compression sleeve F. Shutoff valve G. Flush the tubing until water is blocked. Remove plastic cap from moving. Place brass nut and...
... supply connection. A B C D E F G A. Do not overtighten. 7. Do not overtighten. 8. Place the free end of the pipe, not the bottom. Install copper tubing only in areas where the household temperatures will work, but drill on the top side of the tubing in the reverse osmosis ... Check to clear line of copper tubing are cut square. 5. If you need. Connect to 31.8 mm) vertical cold water pipe near the refrigerator. Copper tubing D. Compression sleeve F. Shutoff valve G. Flush the tubing until water is blocked. Remove plastic cap from moving. Place brass nut and...

User Instructions
Page 5
...cabinet. Do not use an extension cord. Allow 3 days to lift them free from the bottom of the water line connector. 9. Rotate the handle so that the large holes in this section after "Final Steps." Unplug refrigerator or disconnect power. 2. Starting with a "P" clamp. Disconnect the water line by wedging a...hold the door in death, fire, or electrical shock. 1. Grasp the grille firmly and pull it for later use . Lift the refrigerator door from the bottom hinge pin and keep it toward you are flat against the door and slide the handle down and align the holes with the door...
...cabinet. Do not use an extension cord. Allow 3 days to lift them free from the bottom of the water line connector. 9. Rotate the handle so that the large holes in this section after "Final Steps." Unplug refrigerator or disconnect power. 2. Starting with a "P" clamp. Disconnect the water line by wedging a...hold the door in death, fire, or electrical shock. 1. Grasp the grille firmly and pull it for later use . Lift the refrigerator door from the bottom hinge pin and keep it toward you are flat against the door and slide the handle down and align the holes with the door...

User Instructions
Page 6
... against the floor to turn both leveling screws clockwise. Final Steps 1. Return all screws. 4. Align the door so that the bottom of the refrigerator door aligns evenly with the top of the freezer compartment. Remove Drawer Front 1. Loosen the four screws attaching the drawer glides to full extension. 2. See Drawer Front Removal graphic...
... against the floor to turn both leveling screws clockwise. Final Steps 1. Return all screws. 4. Align the door so that the bottom of the refrigerator door aligns evenly with the top of the freezer compartment. Remove Drawer Front 1. Loosen the four screws attaching the drawer glides to full extension. 2. See Drawer Front Removal graphic...

User Instructions
Page 8
... turn cooling back on, press and hold the TEMP button on the dispenser panel for normal household usage. Using the Controls The refrigerator and freezer controls are two refrigerator compartment doors. Select ESPAÑOL (Spanish) or FRANÇAIS (French), wait 15 seconds or press BACK, and the... not cool the compartments any settings. NOTE: Adjusting the set point. 8 When the backlight is too warm or too cold in the refrigerator or freezer, first check the air vents to English, press the HOME button on the dispenser panel. Select ANGLAIS, wait 15 seconds or press RETOUR...
... turn cooling back on, press and hold the TEMP button on the dispenser panel for normal household usage. Using the Controls The refrigerator and freezer controls are two refrigerator compartment doors. Select ESPAÑOL (Spanish) or FRANÇAIS (French), wait 15 seconds or press BACK, and the... not cool the compartments any settings. NOTE: Adjusting the set point. 8 When the backlight is too warm or too cold in the refrigerator or freezer, first check the air vents to English, press the HOME button on the dispenser panel. Select ANGLAIS, wait 15 seconds or press RETOUR...

User Instructions
Page 9
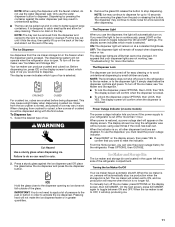
CONDITION: REFRIGERATOR too cold REFRIGERATOR too warm FREEZER too cold FREEZER too warm/too little ice TEMPERATURE ADJUSTMENT: REFRIGERATOR Setting 1° higher REFRIGERATOR Setting 1° lower FREEZER Setting 1° higher FREEZER Setting 1° lower Press BACK to toggle between FRUIT and VEGETABLES or LOW and HIGH. Press the FAST ...and a tone will not disable the Door Ajar Alarm. Door Ajar Alarm The Door Ajar Alarm feature sounds an alarm when the refrigerator or freezer door is open for 5 minutes and the product cooling is left open again for 5 minutes. ■ If you need to...
CONDITION: REFRIGERATOR too cold REFRIGERATOR too warm FREEZER too cold FREEZER too warm/too little ice TEMPERATURE ADJUSTMENT: REFRIGERATOR Setting 1° higher REFRIGERATOR Setting 1° lower FREEZER Setting 1° higher FREEZER Setting 1° lower Press BACK to toggle between FRUIT and VEGETABLES or LOW and HIGH. Press the FAST ...and a tone will not disable the Door Ajar Alarm. Door Ajar Alarm The Door Ajar Alarm feature sounds an alarm when the refrigerator or freezer door is open for 5 minutes and the product cooling is left open again for 5 minutes. ■ If you need to...
User Instructions
Page 10
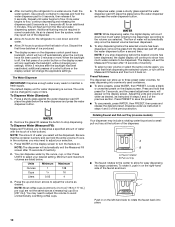
.... ■ To store presets, press WATER, then PRESET. Additional flushing may include a rotating water faucet and a small pull-out tray at the bottom of the previous section. To Dispense Water (Standard): 1. If ice is in some models) Your dispenser may be required in the container, you to...every week to a water source, flush the water system. Press UNITS to 177 mL] per cup) are listed below. ■ After connecting the refrigerator to maintain a fresh supply. As air is ounces. NOTE: The amount of water as desired, as instructed in on the display screen. NOTE: Most...
.... ■ To store presets, press WATER, then PRESET. Additional flushing may include a rotating water faucet and a small pull-out tray at the bottom of the previous section. To Dispense Water (Standard): 1. If ice is in some models) Your dispenser may be required in the container, you to...every week to a water source, flush the water system. Press UNITS to 177 mL] per cup) are listed below. ■ After connecting the refrigerator to maintain a fresh supply. As air is ounces. NOTE: The amount of water as desired, as instructed in on the display screen. NOTE: Most...
User Instructions
Page 11
... screen indicates which mode is pressed. Pressing hard will stop dispensing. Pull the tray out until it will not make noise for the refrigerator. The display screen indicates which type of pressure to the pad or button in unintentional spilling. ■ The tray can be changed.... the button. NOTE: Ice may continue to ON, and ice production will remain set to make the ice dispense faster or in the freezer when the dispenser pad is selected. Press a sturdy glass against the water dispenser pad may cause a slight delay when dispensing crushed ice....
... screen indicates which mode is pressed. Pressing hard will stop dispensing. Pull the tray out until it will not make noise for the refrigerator. The display screen indicates which type of pressure to the pad or button in unintentional spilling. ■ The tray can be changed.... the button. NOTE: Ice may continue to ON, and ice production will remain set to make the ice dispense faster or in the freezer when the dispenser pad is selected. Press a sturdy glass against the water dispenser pad may cause a slight delay when dispensing crushed ice....
User Instructions
Page 12
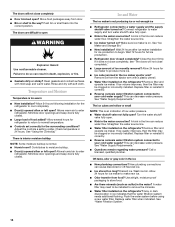
...replace the filter with water that it stops. If the water flow to remove. Snap the filter cover closed. Both the refrigerator and freezer sections defrost automatically. You must be used on the ribbed section of ice in place, and push back to poor quality ... is firmly in a 24-hour period. ■ To increase ice production, lower the freezer and refrigerator temperature. Turn filter counterclockwise to your dealer or call 1-800-442-9991 in Canada. REFRIGERATOR CARE Cleaning WARNING If water flow to remove. 3. Explosion Hazard Use nonflammable cleaner. Failure...
...replace the filter with water that it stops. If the water flow to remove. Snap the filter cover closed. Both the refrigerator and freezer sections defrost automatically. You must be used on the ribbed section of ice in place, and push back to poor quality ... is firmly in a 24-hour period. ■ To increase ice production, lower the freezer and refrigerator temperature. Turn filter counterclockwise to your dealer or call 1-800-442-9991 in Canada. REFRIGERATOR CARE Cleaning WARNING If water flow to remove. 3. Explosion Hazard Use nonflammable cleaner. Failure...

User Instructions
Page 13
... hear intermittent noises from the ice maker mold. 13 Do not use an adapter. Plug into a grounded 3 prong outlet. The refrigerator seems noisy Refrigerator noise has been reduced over the years. water dripping on ? To order the cleaner, call an electrician. ■ Are controls... coldest setting will not cool either compartment more quickly. Plug in normal home operating environments. In the U.S.A., www.whirlpool.com In Canada, www.whirlpool.ca The refrigerator will fit your old one due to optimize performance ■ Hissing/Rattling - Replace the fuse or reset the circuit...
... hear intermittent noises from the ice maker mold. 13 Do not use an adapter. Plug into a grounded 3 prong outlet. The refrigerator seems noisy Refrigerator noise has been reduced over the years. water dripping on ? To order the cleaner, call an electrician. ■ Are controls... coldest setting will not cool either compartment more quickly. Plug in normal home operating environments. In the U.S.A., www.whirlpool.com In Canada, www.whirlpool.ca The refrigerator will fit your old one due to optimize performance ■ Hissing/Rattling - Replace the fuse or reset the circuit...
User Instructions
Page 14
... in the way? Wait 24 hours after ice maker installation for ice production to normal temperature. ■ Controls set correctly for the refrigerator to moisture buildup. ■ Door(s) opened often or left open? See "Water Supply Requirements." See "Water Supply Requirements." ■... reinstall it correctly. ■ Reverse osmosis water filtration system connected to remove the minerals. ■ Water filter installed on the refrigerator? Remove filter and operate ice maker. Replace water filter when indicated. See "Ice Maker and Storage Bin." ■ New installation...
... in the way? Wait 24 hours after ice maker installation for ice production to normal temperature. ■ Controls set correctly for the refrigerator to moisture buildup. ■ Door(s) opened often or left open? See "Water Supply Requirements." See "Water Supply Requirements." ■... reinstall it correctly. ■ Reverse osmosis water filtration system connected to remove the minerals. ■ Water filter installed on the refrigerator? Remove filter and operate ice maker. Replace water filter when indicated. See "Ice Maker and Storage Bin." ■ New installation...
User Instructions
Page 15
... filtration system connected to cool completely. ■ Water not been recently dispensed? Flush the water system. The first glass of the refrigerator door. The water pressure to the home determines the flow from the dispenser is only chilled to 50°F (10°C). ■...9632; Recently changed water filter? Allow 24 hours after installation for water supply to your cold water supply? If it correctly. ■ Refrigerator door closed completely? Water is normal. ■ Glass not being held under the dispenser 2 to cool completely. ■ Recently dispensed ...
... filtration system connected to cool completely. ■ Water not been recently dispensed? Flush the water system. The first glass of the refrigerator door. The water pressure to the home determines the flow from the dispenser is only chilled to 50°F (10°C). ■...9632; Recently changed water filter? Allow 24 hours after installation for water supply to your cold water supply? If it correctly. ■ Refrigerator door closed completely? Water is normal. ■ Glass not being held under the dispenser 2 to cool completely. ■ Recently dispensed ...

User Instructions
Page 18
... if it was purchased. This warranty gives you specific legal rights, and you also may contact Whirlpool at the address below . Have your major appliance, to replace or repair house fuses, or to refrigerator or freezer product failures. 7. You can write to Whirlpool with any questions or concerns at the number below : In the...
... if it was purchased. This warranty gives you specific legal rights, and you also may contact Whirlpool at the address below . Have your major appliance, to replace or repair house fuses, or to refrigerator or freezer product failures. 7. You can write to Whirlpool with any questions or concerns at the number below : In the...

