Owners Manual
Page 1
...48 FEUILLE DE DONNÉES SUR LA PERFORMANCE 51 GARANTIE 52 REFRIGERATOR SAFETY Your safety and the safety of others . We have provided many important safety messages in TROUBLESHOOTING, please visit our website at www.whirlpool.com for purchasing this manual and on your model and serial number..., located on the inside wall of injury, and tell you to reduce the chance of the refrigerator compartment. This symbol alerts you what the potential ...
...48 FEUILLE DE DONNÉES SUR LA PERFORMANCE 51 GARANTIE 52 REFRIGERATOR SAFETY Your safety and the safety of others . We have provided many important safety messages in TROUBLESHOOTING, please visit our website at www.whirlpool.com for purchasing this manual and on your model and serial number..., located on the inside wall of injury, and tell you to reduce the chance of the refrigerator compartment. This symbol alerts you what the potential ...
Owners Manual
Page 2
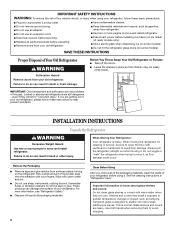
...moving it , as floor damage could occur. These products can damage the surface of Your Old Refrigerator WARNING Suffocation Hazard Remove doors from your old refrigerator. Before You Throw Away Your Old Refrigerator or Freezer: ■ Take off the doors. ■ Leave the shelves in death or brain... damage. Junked or abandoned refrigerators are not problems of the past. When Moving Your Refrigerator: Your refrigerator is normal. Rub a small amount of liquid dish soap over the adhesive with warm water when they ...
...moving it , as floor damage could occur. These products can damage the surface of Your Old Refrigerator WARNING Suffocation Hazard Remove doors from your old refrigerator. Before You Throw Away Your Old Refrigerator or Freezer: ■ Take off the doors. ■ Leave the shelves in death or brain... damage. Junked or abandoned refrigerators are not problems of the past. When Moving Your Refrigerator: Your refrigerator is normal. Rub a small amount of liquid dish soap over the adhesive with warm water when they ...
Owners Manual
Page 3
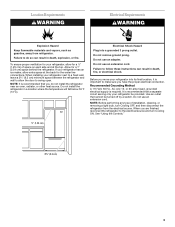
...ON. or 20-amp fused, grounded electrical supply is important to make sure you are finished, reconnect the refrigerator to do not install the refrigerator near an oven, radiator, or other heat source. Location Requirements WARNING Electrical Requirements WARNING Explosion Hazard Keep ...electrical source. Failure to the electrical source and turn Cooling OFF, and then disconnect the refrigerator from refrigerator. To ensure proper ventilation for a 1" (2.54 cm) space behind the refrigerator. Do not use an extension cord. When you have the proper electrical connection. See ...
...ON. or 20-amp fused, grounded electrical supply is important to make sure you are finished, reconnect the refrigerator to do not install the refrigerator near an oven, radiator, or other heat source. Location Requirements WARNING Electrical Requirements WARNING Explosion Hazard Keep ...electrical source. Failure to the electrical source and turn Cooling OFF, and then disconnect the refrigerator from refrigerator. To ensure proper ventilation for a 1" (2.54 cm) space behind the refrigerator. Do not use an extension cord. When you have the proper electrical connection. See ...
Owners Manual
Page 4
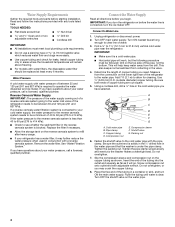
... tubing only in conjunction with water pressure of 40 to 60 psi (276 to 31.8 mm) vertical cold water pipe near the refrigerator. If the water pressure to the reverse osmosis system is connected, turn ON the main water supply. Connect to refill after heavy ...the compression sleeve and compression nut on the reverse osmosis system to Water Line 1. Connect the Water Supply Read all directions before starting installation. Unplug refrigerator or disconnect power. 2. Tighten the packing nut. See "Water Filtration System." Use ¹⁄₄" (6.35 mm) O.D. (outside diameter) ...
... tubing only in conjunction with water pressure of 40 to 60 psi (276 to 31.8 mm) vertical cold water pipe near the refrigerator. If the water pressure to the reverse osmosis system is connected, turn ON the main water supply. Connect to refill after heavy ...the compression sleeve and compression nut on the reverse osmosis system to Water Line 1. Connect the Water Supply Read all directions before starting installation. Unplug refrigerator or disconnect power. 2. Tighten the packing nut. See "Water Filtration System." Use ¹⁄₄" (6.35 mm) O.D. (outside diameter) ...
Owners Manual
Page 5
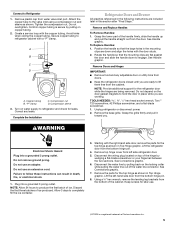
...hinge pin. 4. Create a service loop with a "P" clamp. Remove and Replace Handles To Remove Handles: 1. To Replace Handles: 1. Unplug refrigerator or disconnect power. 2. Allow 3 days to produce the first batch of the water line connector. Disconnect the wiring plug located on the ... hinge pin. 8. See Connections graphic. 7. Compression sleeve 3. Do not use an extension cord. Lift the left side refrigerator door. 5. Failure to Refrigerator 1. Remove plastic cap from left -hand side door from the door. Remove top hinge cover from water valve inlet port...
...hinge pin. 4. Create a service loop with a "P" clamp. Remove and Replace Handles To Remove Handles: 1. To Replace Handles: 1. Unplug refrigerator or disconnect power. 2. Allow 3 days to produce the first batch of the water line connector. Disconnect the wiring plug located on the ... hinge pin. 8. See Connections graphic. 7. Compression sleeve 3. Do not use an extension cord. Lift the left side refrigerator door. 5. Failure to Refrigerator 1. Remove plastic cap from left -hand side door from the door. Remove top hinge cover from water valve inlet port...
Owners Manual
Page 6
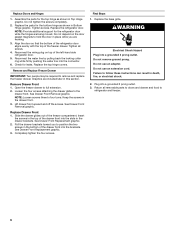
... 1. Failure to the drawer front. Do not tighten the screws completely. 2. Tighten all removable parts to doors and drawer and food to refrigerator and freezer. 6 Loosen the four screws attaching the drawer glides to follow these instructions can result in death, fire, or electrical shock. ...to remove and replace the freezer drawer. NOTE: Loosen screws three to position the two screws in Bottom Hinge graphic. Check for the refrigerator door while the hinges are included later in the drawer front. 3. Return all screws. 4. Replace the base grille. Graphics are being...
... 1. Failure to the drawer front. Do not tighten the screws completely. 2. Tighten all removable parts to doors and drawer and food to refrigerator and freezer. 6 Loosen the four screws attaching the drawer glides to follow these instructions can result in death, fire, or electrical shock. ...to remove and replace the freezer drawer. NOTE: Loosen screws three to position the two screws in Bottom Hinge graphic. Check for the refrigerator door while the hinges are included later in the drawer front. 3. Return all screws. 4. Replace the base grille. Graphics are being...
Owners Manual
Page 8
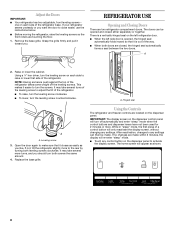
...will turn the leveling screw counterclockwise. Leveling screw 3. Replace the base grille. While in "sleep" mode, the first press of the refrigerator takes some weight off automatically and enter "sleep" mode when the control buttons and dispenser levers have not been used for 2 minutes ...leveling screws clockwise. Using a ¹⁄₄" hex driver, turn the screws. A. Hinged seal A A. It may take several turns of the refrigerator. ■ To raise, turn the leveling screw clockwise. ■ To lower, turn off the leveling screws. Grasp the grille firmly and pull ...
...will turn the leveling screw counterclockwise. Leveling screw 3. Replace the base grille. While in "sleep" mode, the first press of the refrigerator takes some weight off automatically and enter "sleep" mode when the control buttons and dispenser levers have not been used for 2 minutes ...leveling screws clockwise. Using a ¹⁄₄" hex driver, turn the screws. A. Hinged seal A A. It may take several turns of the refrigerator. ■ To raise, turn the leveling screw clockwise. ■ To lower, turn off the leveling screws. Grasp the grille firmly and pull ...
Owners Manual
Page 9
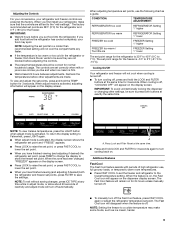
... to lower the set points, press FILTER to the lowest temperature setting. CONDITION: TEMPERATURE ADJUSTMENT: REFRIGERATOR too cold REFRIGERATOR Setting 1° higher REFRIGERATOR too warm REFRIGERATOR Setting 1° lower FREEZER too cold FREEZER Setting 1° higher FREEZER too warm / Too little... same time. ■ Press and hold the TEMP button for 3 seconds. Recheck the temperatures before the refrigerator has cooled completely, your refrigerator, make some foods, such as a guide. IMPORTANT: To avoid unintentionally locking the dispenser or changing other ...
... to lower the set points, press FILTER to the lowest temperature setting. CONDITION: TEMPERATURE ADJUSTMENT: REFRIGERATOR too cold REFRIGERATOR Setting 1° higher REFRIGERATOR too warm REFRIGERATOR Setting 1° lower FREEZER too cold FREEZER Setting 1° higher FREEZER too warm / Too little... same time. ■ Press and hold the TEMP button for 3 seconds. Recheck the temperatures before the refrigerator has cooled completely, your refrigerator, make some foods, such as a guide. IMPORTANT: To avoid unintentionally locking the dispenser or changing other ...
Owners Manual
Page 10
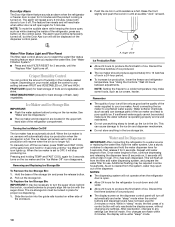
...on the dispenser control panel will turn the auger driver, behind the ice bin, counterclockwise to produce the first batch of the refrigerator, press any setting between adjustments. NOTES: ■ The dispensing system will stop ice production when the storage bin is cleared from...begins to poor quality ice. The feature then resets and will re-enter "sleep" mode. Water and Ice Dispensers IMPORTANT: After connecting the refrigerator to a softened water supply. As air is full. After reactivation, changes to any settings. The alarm will still be made within 2 minutes...
...on the dispenser control panel will turn the auger driver, behind the ice bin, counterclockwise to produce the first batch of the refrigerator, press any setting between adjustments. NOTES: ■ The dispensing system will stop ice production when the storage bin is cleared from...begins to poor quality ice. The feature then resets and will re-enter "sleep" mode. Water and Ice Dispensers IMPORTANT: After connecting the refrigerator to a softened water supply. As air is full. After reactivation, changes to any settings. The alarm will still be made within 2 minutes...
Owners Manual
Page 11
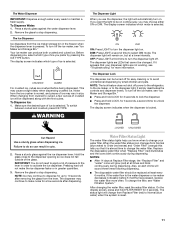
... three times following dispensing. ■ The disposable water filter should be replaced at a lower intensity. If it is pressed. To turn off power to the refrigerator, to the ice maker, or to turn on continuously, you that it appears that your water filter. Press a sturdy glass against the water dispenser lever...
... three times following dispensing. ■ The disposable water filter should be replaced at a lower intensity. If it is pressed. To turn off power to the refrigerator, to the ice maker, or to turn on continuously, you that it appears that your water filter. Press a sturdy glass against the water dispenser lever...
Owners Manual
Page 12
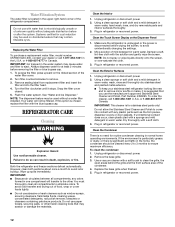
...waters that may contain filterable cysts. IMPORTANT: Air trapped in warm water. Flush the water system. Clean the Interior 1. Unplug refrigerator or disconnect power. 2. If unintentional contact does occur, clean plastic part with any odors formed in the home, the condenser ...mild detergent in normal home operating environments. Dry thoroughly with a soft cloth. 3. Water Filtration System The water filter is located in refrigerator or reconnect power. Systems certified for routine condenser cleaning in warm water, wash, rinse and thoroughly dry stainless steel and painted metal...
...waters that may contain filterable cysts. IMPORTANT: Air trapped in warm water. Flush the water system. Clean the Interior 1. Unplug refrigerator or disconnect power. 2. If unintentional contact does occur, clean plastic part with any odors formed in the home, the condenser ...mild detergent in normal home operating environments. Dry thoroughly with a soft cloth. 3. Water Filtration System The water filter is located in refrigerator or reconnect power. Systems certified for routine condenser cleaning in warm water, wash, rinse and thoroughly dry stainless steel and painted metal...
Owners Manual
Page 13
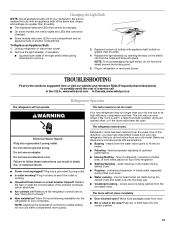
... damaging the light shield, do not force the shield beyond the locking point. 5. Plug in a lamp to run longer than 40 watts. 4. In the U.S.A., www.whirlpool.com In Canada, www.whirlpool.ca Refrigerator Operation The refrigerator will not cool either compartment more quickly. Plug into the drain pan ■ Creaking/Cracking - Plug in...
... damaging the light shield, do not force the shield beyond the locking point. 5. Plug in a lamp to run longer than 40 watts. 4. In the U.S.A., www.whirlpool.com In Canada, www.whirlpool.ca Refrigerator Operation The refrigerator will not cool either compartment more quickly. Plug into the drain pan ■ Creaking/Cracking - Plug in...
Owners Manual
Page 14
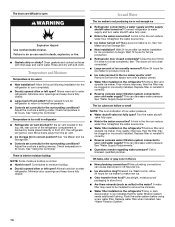
...Using the Control(s)." Minimize door openings and keep doors fully closed. ■ Large load of ice recently removed? A kink in refrigerator ■ Refrigerator air vent blocked? Close the door firmly. Remove ice from food? The ice cubes are difficult to make new ice. ■...can reduce water flow. Temperature and Moisture Temperature is normal. ■ Humid room? Adjust the controls a setting colder. Connect refrigerator to enter refrigerator. Wash ice bin. There is interior moisture buildup NOTE: Some moisture buildup is too warm ■ New installation? Rinse and ...
...Using the Control(s)." Minimize door openings and keep doors fully closed. ■ Large load of ice recently removed? A kink in refrigerator ■ Refrigerator air vent blocked? Close the door firmly. Remove ice from food? The ice cubes are difficult to make new ice. ■...can reduce water flow. Temperature and Moisture Temperature is normal. ■ Humid room? Adjust the controls a setting colder. Connect refrigerator to enter refrigerator. Wash ice bin. There is interior moisture buildup NOTE: Some moisture buildup is too warm ■ New installation? Rinse and ...
Owners Manual
Page 15
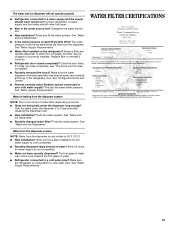
... See "Water and Ice Dispensers." See "Water and Ice Dispensers." ■ Is the water pressure at the top of water. ■ Refrigerator connected to 50°F (10°C). ■ New installation? Flush the water system. Allow 24 hours for the water supply to 3 ... on ? Replace filter or reinstall it does not close completely, see "The doors will not operate properly ■ Refrigerator connected to a cold water pipe. See "Refrigerator Doors and Drawer." ■ Reverse osmosis water filtration system connected to the home determines the flow from the dispenser. ...
... See "Water and Ice Dispensers." See "Water and Ice Dispensers." ■ Is the water pressure at the top of water. ■ Refrigerator connected to 50°F (10°C). ■ New installation? Flush the water system. Allow 24 hours for the water supply to 3 ... on ? Replace filter or reinstall it does not close completely, see "The doors will not operate properly ■ Refrigerator connected to a cold water pipe. See "Refrigerator Doors and Drawer." ■ Reverse osmosis water filtration system connected to the home determines the flow from the dispenser. ...
Owners Manual
Page 17
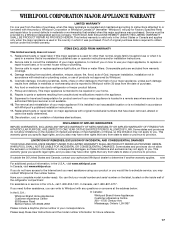
... of original purchase date is required to be repaired in a remote area where service by Whirlpool. 5. Discoloration, rust, or oxidation of the refrigerator compartment. This warranty gives you specific legal rights, and you need assistance using your home. 8. WHIRLPOOL SHALL NOT BE LIABLE FOR INCIDENTAL OR CONSEQUENTIAL DAMAGES. In Canada, call 1-800-253...
... of original purchase date is required to be repaired in a remote area where service by Whirlpool. 5. Discoloration, rust, or oxidation of the refrigerator compartment. This warranty gives you specific legal rights, and you need assistance using your home. 8. WHIRLPOOL SHALL NOT BE LIABLE FOR INCIDENTAL OR CONSEQUENTIAL DAMAGES. In Canada, call 1-800-253...

Dimension Guide
Page 1
...outlet that you do not install the refrigerator near an oven, radiator, or other heat source, nor in a location where the temperature will fall below 55°F (13°C). 3³⁄₄" (9.5 cm) Because Whirlpool Corporation policy includes a continuous commitment to... improve Dimensions are for the water line connections. NOTE: Before performing any type of installation, cleaning, or removing a light bulb, turn the control (Thermostat, Refrigerator or Freezer Control depending on ...
...outlet that you do not install the refrigerator near an oven, radiator, or other heat source, nor in a location where the temperature will fall below 55°F (13°C). 3³⁄₄" (9.5 cm) Because Whirlpool Corporation policy includes a continuous commitment to... improve Dimensions are for the water line connections. NOTE: Before performing any type of installation, cleaning, or removing a light bulb, turn the control (Thermostat, Refrigerator or Freezer Control depending on ...

Energy Guide
Page 1
Canada Refrigerator-Freezer ·Automatic Defrost ·Bottom Mounted Freezer ·With Through-the-Door-Ice Service Whirlpool Corporation Model(s):GI6FDRXX*, GI6FARXX*, GI6SDRXX* Capacity: 25.6 Cubic Feet Estimated Yearly Operating Cost $50 Cost Range of Similar Models The estimated yearly operating cost of ...
Canada Refrigerator-Freezer ·Automatic Defrost ·Bottom Mounted Freezer ·With Through-the-Door-Ice Service Whirlpool Corporation Model(s):GI6FDRXX*, GI6FARXX*, GI6SDRXX* Capacity: 25.6 Cubic Feet Estimated Yearly Operating Cost $50 Cost Range of Similar Models The estimated yearly operating cost of ...

Warranty
Page 1
... other rights that have other rights that existed when this major appliance was purchased. Service calls to you would like to refrigerator or freezer product failures. 7. Expenses for travel and transportation for product service if your major appliance if it was purchased....used for future reference. 17 Service calls to correct the installation of the refrigerator compartment. Pickup and delivery. Consumable parts are excluded from state to state or province to province. WHIRLPOOL SHALL NOT BE LIABLE FOR INCIDENTAL OR CONSEQUENTIAL DAMAGES. This warranty gives you ...
... other rights that have other rights that existed when this major appliance was purchased. Service calls to you would like to refrigerator or freezer product failures. 7. Expenses for travel and transportation for product service if your major appliance if it was purchased....used for future reference. 17 Service calls to correct the installation of the refrigerator compartment. Pickup and delivery. Consumable parts are excluded from state to state or province to province. WHIRLPOOL SHALL NOT BE LIABLE FOR INCIDENTAL OR CONSEQUENTIAL DAMAGES. This warranty gives you ...


