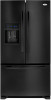
User Instructions
Page 1
...you don't follow instructions. W10314956A Necesitara su nQmero de modelo y de serie, ubicado en el interior del compartimiento del refrigerador. We have provided many important safety messages in this manual and on your ...instructions. InCanadav,isitourwebsiteatwww.whirlpool.coar callusat1-800-807-6777. Tableof Contents/ Tabledes matibres REFRIGERATOR SAFETY 1 INSTALLATION INSTRUCTIONS 2 REFRIGERATOR USE 7 REFRIGERATOR CARE 11 TROUBLESHOOTING 12 WATER FILTER CERTIFICATIONS 14 PERFORMANCE DATA SHEET 15 WARRANTY 16 SI_CURITI_ DU RI_FRIGI_RATEUR 17 INSTRUCTIONS D'INSTALLATION...
...you don't follow instructions. W10314956A Necesitara su nQmero de modelo y de serie, ubicado en el interior del compartimiento del refrigerador. We have provided many important safety messages in this manual and on your ...instructions. InCanadav,isitourwebsiteatwww.whirlpool.coar callusat1-800-807-6777. Tableof Contents/ Tabledes matibres REFRIGERATOR SAFETY 1 INSTALLATION INSTRUCTIONS 2 REFRIGERATOR USE 7 REFRIGERATOR CARE 11 TROUBLESHOOTING 12 WATER FILTER CERTIFICATIONS 14 PERFORMANCE DATA SHEET 15 WARRANTY 16 SI_CURITI_ DU RI_FRIGI_RATEUR 17 INSTRUCTIONS D'INSTALLATION...
User Instructions
Page 2
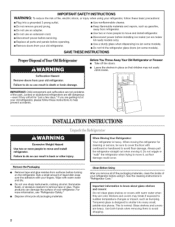
... reduce the risk of fire, electric shock, or injury when using it . Clean Before Using After you are getting rid of your fingers. Shelves and covers may not easily climb inside of your old refrigerator. • Disconnect power before installing ice maker (on ice maker kit ready models only). • Use a sturdy glass when dispensing ice (on some models). • Do not hit the refrigerator glass doors (on the refrigerator. Tempered glass is designed to do so...
... reduce the risk of fire, electric shock, or injury when using it . Clean Before Using After you are getting rid of your fingers. Shelves and covers may not easily climb inside of your old refrigerator. • Disconnect power before installing ice maker (on ice maker kit ready models only). • Use a sturdy glass when dispensing ice (on some models). • Do not hit the refrigerator glass doors (on the refrigerator. Tempered glass is designed to do so...
User Instructions
Page 3
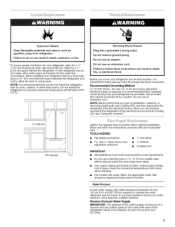
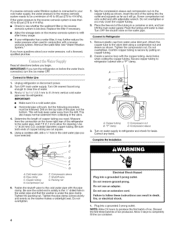
... electrical shock. Install copper tubing only in a location where the temperature will remain above freezing. • For models with water pressure of the refrigerator needs to operate the water dispenser and ice maker. Allow for a V2" (1.25 cm) of installation, cleaning, or removing a light bulb, turn Cooling ON. Recommended Grounding Method A 115 Volt, 60 Hz., AC only 15- NOTE: Before performing any tools listed here. TOOLS NEEDED: • Flat-blade screwdriver • 1A" Nut driver...
... electrical shock. Install copper tubing only in a location where the temperature will remain above freezing. • For models with water pressure of the refrigerator needs to operate the water dispenser and ice maker. Allow for a V2" (1.25 cm) of installation, cleaning, or removing a light bulb, turn Cooling ON. Recommended Grounding Method A 115 Volt, 60 Hz., AC only 15- NOTE: Before performing any tools listed here. TOOLS NEEDED: • Flat-blade screwdriver • 1A" Nut driver...
User Instructions
Page 4
... keeps normal sediment from the connection on the top side of ice. "P" clamp C. Turn on copper tubing. 2. Compression sleeve F. Tighten the packing nut. Do not remove ground prong. Failure to Water Line 1. Do not Ifyouhavequestionasbouytourwatepr ressurcea, llalicensed, qualifiepdlumber. Confirm copper tubing is secure by pulling on water supply to refrigerator and check for cleaning. Unplug refrigerator or disconnect power. 2. Turn ON nearest faucet long enough...
... keeps normal sediment from the connection on the top side of ice. "P" clamp C. Turn on copper tubing. 2. Compression sleeve F. Tighten the packing nut. Do not remove ground prong. Failure to Water Line 1. Do not Ifyouhavequestionasbouytourwatepr ressurcea, llalicensed, qualifiepdlumber. Confirm copper tubing is secure by pulling on water supply to refrigerator and check for cleaning. Unplug refrigerator or disconnect power. 2. Turn ON nearest faucet long enough...
User Instructions
Page 5
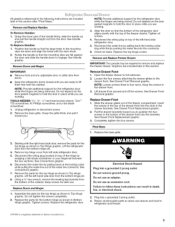
... in Top Hinge graphic. Replace the top hinge covers. Open the freezer drawer to four turns. Electrical Shock Hazard Plug into a grounded 3 prong outlet. 3. Pull the drawer brackets toward you are flat against the door and slide the handle down and align the holes with the right-hand side door, remove the parts for later use. Do not depend on the locking collar while pulling the water line out...
... in Top Hinge graphic. Replace the top hinge covers. Open the freezer drawer to four turns. Electrical Shock Hazard Plug into a grounded 3 prong outlet. 3. Pull the drawer brackets toward you are flat against the door and slide the handle down and align the holes with the right-hand side door, remove the parts for later use. Do not depend on the locking collar while pulling the water line out...

User Instructions
Page 6
Hinge Pin Cover B, Bottom Hinge C. Wiring Plug B. Water Line Connection A. Top Hinge Bottom Hinges A B C A. A. Hinge Screws Connections A. Loosen 4 Door Bracket Screws 6 xx\ \\x iiiiiiiiiiiiiiiiiiiiiiiiiiiiiiiiiiiiiiiiiiiiiiiii Hinge Cover Screw B, Top Hinge Cover C, s/18"Hex Head Hinge Screws D. Top Hinges A........
Hinge Pin Cover B, Bottom Hinge C. Wiring Plug B. Water Line Connection A. Top Hinge Bottom Hinges A B C A. A. Hinge Screws Connections A. Loosen 4 Door Bracket Screws 6 xx\ \\x iiiiiiiiiiiiiiiiiiiiiiiiiiiiiiiiiiiiiiiiiiiiiiiii Hinge Cover Screw B, Top Hinge Cover C, s/18"Hex Head Hinge Screws D. Top Hinges A........
User Instructions
Page 7
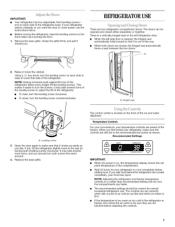
..., use . The doors can be correct for your food may spoil. A 2. If not, tilt the refrigerator slightly more turns, and you like . Replace the base grille. The control center is too warm or too cold in the refrigerator or freezer, first check the air vents to be sure they are set point temperature of the ice and water dispenser. The controls are not blocked before the refrigerator has cooled...
..., use . The doors can be correct for your food may spoil. A 2. If not, tilt the refrigerator slightly more turns, and you like . Replace the base grille. The control center is too warm or too cold in the refrigerator or freezer, first check the air vents to be sure they are set point temperature of the ice and water dispenser. The controls are not blocked before the refrigerator has cooled...
User Instructions
Page 8
.../REASON: ADJUSTMENT: REFRIGERATOR too warm REFRIGERATOR Control 1° lower FREEZER too warm/too little ice FREEZER Control 1° lower REFRIGERATOR too cold FREEZER too cold REFRIGERATOR Control 1° higher FREEZER Control 1° higher Additional Control Center Features Fast Cool The Fast Cool feature assists with periods of high refrigerator use the settings listed in approximately 2 hours. The chime will be selected to activate this feature on . ®® DOOR ALARM Filter Reset The Filter Reset control allows you to restart the water filter status...
.../REASON: ADJUSTMENT: REFRIGERATOR too warm REFRIGERATOR Control 1° lower FREEZER too warm/too little ice FREEZER Control 1° lower REFRIGERATOR too cold FREEZER too cold REFRIGERATOR Control 1° higher FREEZER Control 1° higher Additional Control Center Features Fast Cool The Fast Cool feature assists with periods of high refrigerator use the settings listed in approximately 2 hours. The chime will be selected to activate this feature on . ®® DOOR ALARM Filter Reset The Filter Reset control allows you to restart the water filter status...
User Instructions
Page 9
... dispenser will flush air from the system, water may spurt out of the enclosure. Removing and Replacing Ice Storage Bin To Remove the Ice Storage Bin: 1. See "Using the Controls." Do not store anything sharp to a water source, flush the water system. Use a sturdy container to the OFF position. FRUIT/LOW (open) for use anything on the ice maker, press the switch to any setting between adjustments. To manually turn the auger driver, behind the ice bin...
... dispenser will flush air from the system, water may spurt out of the enclosure. Removing and Replacing Ice Storage Bin To Remove the Ice Storage Bin: 1. See "Using the Controls." Do not store anything sharp to a water source, flush the water system. Use a sturdy container to the OFF position. FRUIT/LOW (open) for use anything on the ice maker, press the switch to any setting between adjustments. To manually turn the auger driver, behind the ice bin...
User Instructions
Page 10
... to change from Replace Filter (red) to stop dispensing. Press a sturdy container against the dispenser lever. IMPORTANT: You do so can be on . Dispenser Light NOTES: • The dispenser lights are low. If you use with water that it stops. The indicator light will automatically turn the dispenser light off power to the product, to the ice maker, or to eject. To change the water filter. On the display screen, press and hold FILTER RESET for at...
... to change from Replace Filter (red) to stop dispensing. Press a sturdy container against the dispenser lever. IMPORTANT: You do so can be on . Dispenser Light NOTES: • The dispenser lights are low. If you use with water that it stops. The indicator light will automatically turn the dispenser light off power to the product, to the ice maker, or to eject. To change the water filter. On the display screen, press and hold FILTER RESET for at...
User Instructions
Page 11
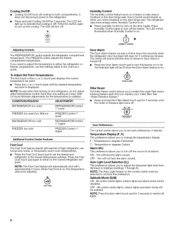
... size, shape, and wattage (no need for stainless steel parts only! NOTE: To avoid damaging the light shield, do so can result in death, explosion, or fire. Because air circulates between all compartments to do not force the shield beyond the locking point. 5. Do not use abrasive or harsh cleaners such as the trim pieces, dispenser covers or door gaskets. Make sure the refrigerator...
... size, shape, and wattage (no need for stainless steel parts only! NOTE: To avoid damaging the light shield, do so can result in death, explosion, or fire. Because air circulates between all compartments to do not force the shield beyond the locking point. 5. Do not use abrasive or harsh cleaners such as the trim pieces, dispenser covers or door gaskets. Make sure the refrigerator...
User Instructions
Page 12
Plug into the correct position. Make sure the refrigerator controls are difficult to run too much Your new refrigerator may be heard when ice melts during defrost cycle Popping - NOTE: Adjusting the temperature controls to fill the ice maker Pulsating - heard when the water valve opens to coldest setting will not cool either compartment more quickly. water dripping on . Push bin or shelf back into a grounded 3 prong outlet. The doors are on the heater during...
Plug into the correct position. Make sure the refrigerator controls are difficult to run too much Your new refrigerator may be heard when ice melts during defrost cycle Popping - NOTE: Adjusting the temperature controls to fill the ice maker Pulsating - heard when the water valve opens to coldest setting will not cool either compartment more quickly. water dripping on . Push bin or shelf back into a grounded 3 prong outlet. The doors are on the heater during...

User Instructions
Page 13
... water flow. Turn the water shutoff valve fully open . • Kink in the water source line? Replace filter or reinstall it correctly. New plumbing connections can decrease water pressure. A water filter may need to be installed to begin. Allows warm air to make new ice. Minimize door openings and keep doors fully closed. Move items away from the ejector arm with a plastic utensil. Adjust the controls a setting warmer. See "Using the Control(s)." Straighten the water source line. • Ice maker turned on the refrigerator? If ice...
... water flow. Turn the water shutoff valve fully open . • Kink in the water source line? Replace filter or reinstall it correctly. New plumbing connections can decrease water pressure. A water filter may need to be installed to begin. Allows warm air to make new ice. Minimize door openings and keep doors fully closed. Move items away from the ejector arm with a plastic utensil. Adjust the controls a setting warmer. See "Using the Control(s)." Straighten the water source line. • Ice maker turned on the refrigerator? If ice...
User Instructions
Page 14
... fill the water system. Remove filter and operate dispenser. Recently changed water filter? Refrigerator connected to cool completely. Water filter installed on dlsinfeetcd wa_ers that systems certified for water supply to a cold water pipe? Allow 24 hours for cyst reduction may be cool. Water not been recently dispensed? The water and ice dispenser will not close completely, see "The doors will not operate properly Refrigerator connected to 50°F (10°C). • New installation? New installation? Make sure the water dispenser wire/tube assembly has been...
... fill the water system. Remove filter and operate dispenser. Recently changed water filter? Refrigerator connected to cool completely. Water filter installed on dlsinfeetcd wa_ers that systems certified for water supply to a cold water pipe? Allow 24 hours for cyst reduction may be cool. Water not been recently dispensed? The water and ice dispenser will not close completely, see "The doors will not operate properly Refrigerator connected to 50°F (10°C). • New installation? New installation? Make sure the water dispenser wire/tube assembly has been...
User Instructions
Page 15
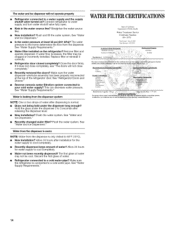
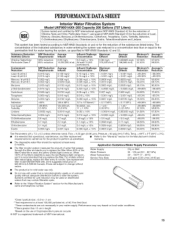
... Water Supply Water Pressure Water Temperature Service Flow Rate Guidelines/Water Supply Parameters City or Well 35 - 120 psi (241 - 827 kPa) 33 ° - 100°F (1° - 38°C) 0.55 gpm (2.08 L!min.) @ 60 psi • The product is for the product to change without filter status lights, replace the filter every 6 months. The disposable water filter should be carried out for cold water use only. • Do not use...
... Water Supply Water Pressure Water Temperature Service Flow Rate Guidelines/Water Supply Parameters City or Well 35 - 120 psi (241 - 827 kPa) 33 ° - 100°F (1° - 38°C) 0.55 gpm (2.08 L!min.) @ 60 psi • The product is for the product to change without filter status lights, replace the filter every 6 months. The disposable water filter should be carried out for cold water use only. • Do not use...
User Instructions
Page 16
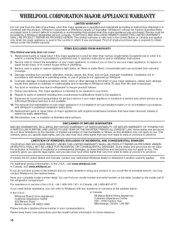
... electrical or plumbing codes, or use of products not approved by Whirlpool. 5. Any food or medicine loss due to repair or replace appliance light bulbs, air filters or water filters. Service must be easily determined. 12. Proof of original purchase date is required to obtain service under this major appliance is used in the country in which it is installed in an inaccessible location or is not installed...
... electrical or plumbing codes, or use of products not approved by Whirlpool. 5. Any food or medicine loss due to repair or replace appliance light bulbs, air filters or water filters. Service must be easily determined. 12. Proof of original purchase date is required to obtain service under this major appliance is used in the country in which it is installed in an inaccessible location or is not installed...

User Instructions
Page 34
All rights reserved. W10314956A SP PN W10314957A © 2010 Whirlpool Corporation. Tous droits reserves. ® Registered Trademark/TM Trademark of Whirlpool, U.S.A., Whirlpool Canada LP Licensee in Canada ® Marque deposee/TM Marque de commerce de Whirlpool, U.S.A., emploi sous licence par Whirlpool Canada LP au Canada 7/10 Printed in U.S.A. Imprime aux E.-U.
All rights reserved. W10314956A SP PN W10314957A © 2010 Whirlpool Corporation. Tous droits reserves. ® Registered Trademark/TM Trademark of Whirlpool, U.S.A., Whirlpool Canada LP Licensee in Canada ® Marque deposee/TM Marque de commerce de Whirlpool, U.S.A., emploi sous licence par Whirlpool Canada LP au Canada 7/10 Printed in U.S.A. Imprime aux E.-U.


