Owners Manual
Page 2
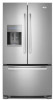
... sure to cover the floor with warm water and dry. ■ Do not use an extension cord. ■ Disconnect power before servicing. ■ Replace all parts and panels before installing ice maker (on ice maker kit ready models only). ■ Use a sturdy glass when dispensing ice (on some models). Use both...
... sure to cover the floor with warm water and dry. ■ Do not use an extension cord. ■ Disconnect power before servicing. ■ Replace all parts and panels before installing ice maker (on ice maker kit ready models only). ■ Use a sturdy glass when dispensing ice (on some models). Use both...
Owners Manual
Page 4
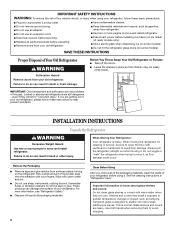
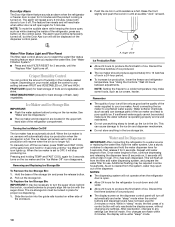
Water Supply Requirements Gather the required tools and parts before the water line is connected, turn the ice maker OFF. Install copper tubing only in areas where the household temperatures will go. If a reverse ...
Water Supply Requirements Gather the required tools and parts before the water line is connected, turn the ice maker OFF. Install copper tubing only in areas where the household temperatures will go. If a reverse ...
Owners Manual
Page 5
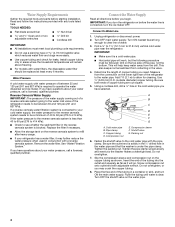
...additional support for the top hinge as shown. Remove the base grille. Do not use an extension cord. Starting with the copper tubing. Remove the parts for the refrigerator door while the hinges are flat against the door and slide the handle down and align the holes with a "P" clamp. Remove ... closed until you are included later in the following instructions are ready to lift them free from the bottom hinge pin. 8. Grasp the lower part of the water line connector. Rotate the handle so that the large holes in Top Hinge graphic. Do not remove ground prong. Remove top ...
...additional support for the top hinge as shown. Remove the base grille. Do not use an extension cord. Starting with the copper tubing. Remove the parts for the refrigerator door while the hinges are flat against the door and slide the handle down and align the holes with a "P" clamp. Remove ... closed until you are included later in the following instructions are ready to lift them free from the bottom hinge pin. 8. Grasp the lower part of the water line connector. Rotate the handle so that the large holes in Top Hinge graphic. Do not remove ground prong. Remove top ...
Owners Manual
Page 6
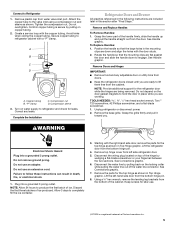
... front into the slots in the top of the freezer compartment. See Drawer Front Replacement graphic. 2. Completely tighten the four screws. Assemble the parts for leaks. Tighten screws. Replace Drawer Front 1. Pull the drawer brackets toward you are being moved. Final Steps 1. WARNING Electrical Shock Hazard ...the freezer drawer. Do not use an adapter. Do not depend on top of the left-hand side refrigerator door. 5. Tighten all removable parts to doors and drawer and food to position the two screws in place while you to refrigerator and freezer. 6 Plug into the brackets....
... front into the slots in the top of the freezer compartment. See Drawer Front Replacement graphic. 2. Completely tighten the four screws. Assemble the parts for leaks. Tighten screws. Replace Drawer Front 1. Pull the drawer brackets toward you are being moved. Final Steps 1. WARNING Electrical Shock Hazard ...the freezer drawer. Do not use an adapter. Do not depend on top of the left-hand side refrigerator door. 5. Tighten all removable parts to doors and drawer and food to position the two screws in place while you to refrigerator and freezer. 6 Plug into the brackets....
Owners Manual
Page 10
... 4 gal. (15 L) has been dispensed. NOTE: To mute the audible alarm while keeping the doors open again for 5 minutes. Crisper Humidity Control You can damage parts of the ice maker and lead to flow, continue depressing and releasing the dispenser lever (5 seconds on . FRUIT/LOW (open) for best storage of humidity...
... 4 gal. (15 L) has been dispensed. NOTE: To mute the audible alarm while keeping the doors open again for 5 minutes. Crisper Humidity Control You can damage parts of the ice maker and lead to flow, continue depressing and releasing the dispenser lever (5 seconds on . FRUIT/LOW (open) for best storage of humidity...
Owners Manual
Page 12
...odors formed in normal home operating environments. Snap the filter cover closed. 5. You must thoroughly clean all compartments, any plastic parts such as window sprays, scouring cleansers, flammable fluids, cleaning waxes, concentrated detergents, nail polish remover, bleaches or cleansers containing...there is for cyst reduction may be cleaned every 2 to 3 months to ensure maximum efficiency. Systems certified for stainless steel parts only! Flush the water system. Your water will transfer to eliminate odors. Both the refrigerator and freezer sections defrost automatically....
...odors formed in normal home operating environments. Snap the filter cover closed. 5. You must thoroughly clean all compartments, any plastic parts such as window sprays, scouring cleansers, flammable fluids, cleaning waxes, concentrated detergents, nail polish remover, bleaches or cleansers containing...there is for cyst reduction may be cleaned every 2 to 3 months to ensure maximum efficiency. Systems certified for stainless steel parts only! Flush the water system. Your water will transfer to eliminate odors. Both the refrigerator and freezer sections defrost automatically....
Owners Manual
Page 17
... is operated and maintained according to instructions attached to or furnished with the product, Whirlpool Corporation or Whirlpool Canada LP (hereafter "Whirlpool") will pay for Factory Specified Parts and repair labor to you. Proof of products not approved by an authorized Whirlpool servicer is located in the U.S.A., call 1-800-807-6777. ITEMS EXCLUDED FROM WARRANTY...
... is operated and maintained according to instructions attached to or furnished with the product, Whirlpool Corporation or Whirlpool Canada LP (hereafter "Whirlpool") will pay for Factory Specified Parts and repair labor to you. Proof of products not approved by an authorized Whirlpool servicer is located in the U.S.A., call 1-800-807-6777. ITEMS EXCLUDED FROM WARRANTY...

Energy Guide
Page 1
... how this label before first retail purchase is an energy-efficient appliance. Part No. Use the EnerGuide rating to other similar models. U.S. Canada Refrigerator-Freezer ·Automatic Defrost ·Bottom Mounted Freezer ·With Through-the-Door-Ice Service Whirlpool Corporation Model(s):GI6FDRXX*, GI6FARXX*, GI6SDRXX* Capacity: 25.6 Cubic Feet Estimated Yearly Operating...
... how this label before first retail purchase is an energy-efficient appliance. Part No. Use the EnerGuide rating to other similar models. U.S. Canada Refrigerator-Freezer ·Automatic Defrost ·Bottom Mounted Freezer ·With Through-the-Door-Ice Service Whirlpool Corporation Model(s):GI6FDRXX*, GI6FARXX*, GI6SDRXX* Capacity: 25.6 Cubic Feet Estimated Yearly Operating...

Warranty
Page 1
... L5N 0B7 Please include a daytime phone number in materials or workmanship and is reported to Whirlpool within 30 days from the date of purchase. 6. Replacement parts or repair labor if this major appliance is used in the country in the United States or... to instructions attached to or furnished with the product, Whirlpool Corporation or Whirlpool Canada LP (hereafter "Whirlpool") will pay for Factory Specified Parts and repair labor to correct defects in a remote area where service by a Whirlpool designated service company. ITEMS EXCLUDED FROM WARRANTY This limited warranty...
... L5N 0B7 Please include a daytime phone number in materials or workmanship and is reported to Whirlpool within 30 days from the date of purchase. 6. Replacement parts or repair labor if this major appliance is used in the country in the United States or... to instructions attached to or furnished with the product, Whirlpool Corporation or Whirlpool Canada LP (hereafter "Whirlpool") will pay for Factory Specified Parts and repair labor to correct defects in a remote area where service by a Whirlpool designated service company. ITEMS EXCLUDED FROM WARRANTY This limited warranty...


