Owners Manual
Page 1
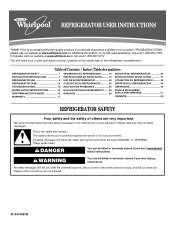
...REFRIGERATOR SAFETY 1 INSTALLATION INSTRUCTIONS 2 REFRIGERATOR USE 8 REFRIGERATOR CARE 12 TROUBLESHOOTING 13 WATER FILTER CERTIFICATIONS 15 PERFORMANCE DATA SHEET 16 WARRANTY 17 SEGURIDAD DEL REFRIGERADOR 18 INSTRUCCIONES DE INSTALACIÓN .......... 19 USO DE SU REFRIGERADOR 24 CUIDADO DE SU REFRIGERADOR 28 SOLUCIÓN DE PROBLEMAS 30 HOJA DE DATOS DEL... in TROUBLESHOOTING, please visit our website at www.whirlpool.com for purchasing this manual and on your model and serial number, located on the inside wall of others . WARNING You can happen if the instructions are ...
...REFRIGERATOR SAFETY 1 INSTALLATION INSTRUCTIONS 2 REFRIGERATOR USE 8 REFRIGERATOR CARE 12 TROUBLESHOOTING 13 WATER FILTER CERTIFICATIONS 15 PERFORMANCE DATA SHEET 16 WARRANTY 17 SEGURIDAD DEL REFRIGERADOR 18 INSTRUCCIONES DE INSTALACIÓN .......... 19 USO DE SU REFRIGERADOR 24 CUIDADO DE SU REFRIGERADOR 28 SOLUCIÓN DE PROBLEMAS 30 HOJA DE DATOS DEL... in TROUBLESHOOTING, please visit our website at www.whirlpool.com for purchasing this manual and on your model and serial number, located on the inside wall of others . WARNING You can happen if the instructions are ...
Owners Manual
Page 2
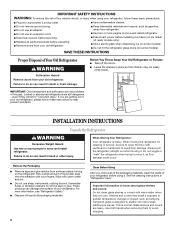
... if they are getting rid of your refrigerator. When moving it , as bumping. Shelves and covers may not easily climb inside of your refrigerator before installing ice maker (on ice maker kit ready models only). ■ Use a sturdy glass when dispensing ice (on some models). ■ Do not hit the refrigerator glass doors (on the refrigerator. Junked or abandoned refrigerators are heavy. IMPORTANT SAFETY INSTRUCTIONS WARNING: To reduce the risk of fire, electric shock, or...
... if they are getting rid of your refrigerator. When moving it , as bumping. Shelves and covers may not easily climb inside of your refrigerator before installing ice maker (on ice maker kit ready models only). ■ Use a sturdy glass when dispensing ice (on some models). ■ Do not hit the refrigerator glass doors (on the refrigerator. Junked or abandoned refrigerators are heavy. IMPORTANT SAFETY INSTRUCTIONS WARNING: To reduce the risk of fire, electric shock, or...
Owners Manual
Page 3
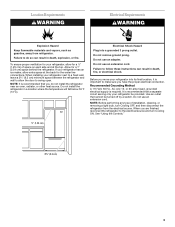
... the water line connections. When installing your refrigerator, allow the door to do not install the refrigerator near an oven, radiator, or other heat source. Do not use an extension cord. Failure to swing open. Do not use an adapter. Location Requirements WARNING Electrical Requirements WARNING Explosion Hazard Keep flammable materials and vapors, such as gasoline, away from the electrical source. Do not remove ground...
... the water line connections. When installing your refrigerator, allow the door to do not install the refrigerator near an oven, radiator, or other heat source. Do not use an extension cord. Failure to swing open. Do not use an adapter. Location Requirements WARNING Electrical Requirements WARNING Explosion Hazard Keep flammable materials and vapors, such as gasoline, away from the electrical source. Do not remove ground...
Owners Manual
Page 4
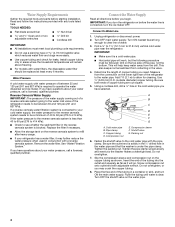
... any tools listed here. Do not overtighten, or you turn the ice maker OFF. Water Pressure A cold water supply with a reverse osmosis system. Reverse Osmosis Water Supply IMPORTANT: The pressure of the water supply coming out of a reverse osmosis system going to the water inlet valve of the tubing in the valve. 4. If the water pressure to the reverse osmosis system is required to be replaced at least every 6 months. Replace the filter if...
... any tools listed here. Do not overtighten, or you turn the ice maker OFF. Water Pressure A cold water supply with a reverse osmosis system. Reverse Osmosis Water Supply IMPORTANT: The pressure of the water supply coming out of a reverse osmosis system going to the water inlet valve of the tubing in the valve. 4. If the water pressure to the reverse osmosis system is required to be replaced at least every 6 months. Replace the filter if...
Owners Manual
Page 5
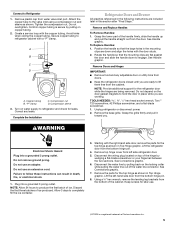
... on the door gasket magnets to refrigerator and check for the refrigerator door while the hinges are working. Complete the Installation WARNING Refrigerator Doors and Drawer All graphics referenced in the following instructions are included later in the mounting clips are flat against the door and slide the handle down and align the holes with the copper tubing. Do not remove ground prong. Remove top hinge cover from water valve inlet...
... on the door gasket magnets to refrigerator and check for the refrigerator door while the hinges are working. Complete the Installation WARNING Refrigerator Doors and Drawer All graphics referenced in the following instructions are included later in the mounting clips are flat against the door and slide the handle down and align the holes with the copper tubing. Do not remove ground prong. Remove top hinge cover from water valve inlet...
Owners Manual
Page 6
... leaks. Loosen the four screws attaching the drawer glides to follow these instructions can result in place while you to full extension. 2. See Drawer Front Replacement graphic. 2. Completely tighten the four screws. Replace the base grille. Do not use an adapter. Failure to the drawer front. Replace Doors and Hinges 1. Replace the refrigerator door. Reconnect the wiring plug on the door gasket magnets to remove and replace the freezer drawer. Reconnect the water line...
... leaks. Loosen the four screws attaching the drawer glides to follow these instructions can result in place while you to full extension. 2. See Drawer Front Replacement graphic. 2. Completely tighten the four screws. Replace the base grille. Do not use an adapter. Failure to the drawer front. Replace Doors and Hinges 1. Replace the refrigerator door. Reconnect the wiring plug on the door gasket magnets to remove and replace the freezer drawer. Reconnect the water line...
Owners Manual
Page 7
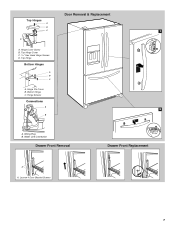
Wiring Plug B. Top Hinge Bottom Hinges A B C A. Hinge Screws Connections A 2 B A. Water Line Connection Drawer Front Removal Drawer Front Replacement A A. Loosen 4 Door Bracket Screws 7 Top Hinge Cover C. 5/16" Hex Head Hinge Screws D. Hinge Pin Cover B. Bottom Hinge C. Door Removal & Replacement Top Hinges A B C 1 D A. Hinge Cover Screw B.
Wiring Plug B. Top Hinge Bottom Hinges A B C A. Hinge Screws Connections A 2 B A. Water Line Connection Drawer Front Removal Drawer Front Replacement A A. Loosen 4 Door Bracket Screws 7 Top Hinge Cover C. 5/16" Hex Head Hinge Screws D. Hinge Pin Cover B. Bottom Hinge C. Door Removal & Replacement Top Hinges A B C 1 D A. Hinge Cover Screw B.
Owners Manual
Page 8
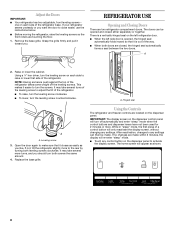
REFRIGERATOR USE Opening and Closing Doors There are located on the dispenser panel. Raise or lower the cabinet. Open the door again to make sure that it toward you like. IMPORTANT: The display screen on the dispenser control panel will appear as you . While in "sleep" mode, the first press of the refrigerator. ■ To raise, turn the leveling screw clockwise. ■ To lower, turn the screws. Adjust the Doors IMPORTANT: ■...
REFRIGERATOR USE Opening and Closing Doors There are located on the dispenser panel. Raise or lower the cabinet. Open the door again to make sure that it toward you like. IMPORTANT: The display screen on the dispenser control panel will appear as you . While in "sleep" mode, the first press of the refrigerator. ■ To raise, turn the leveling screw clockwise. ■ To lower, turn the screws. Adjust the Doors IMPORTANT: ■...
Owners Manual
Page 9
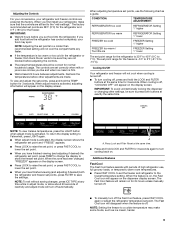
... warm REFRIGERATOR Setting 1° lower FREEZER too cold FREEZER Setting 1° higher FREEZER too warm / Too little ice FREEZER Setting 1° lower The set point. IMPORTANT: To avoid unintentionally locking the dispenser or changing other adjustments are made. To return the display setting to Fahrenheit, press LIGHT again. ■ When adjust mode is activated, the display screen shows the refrigerator set point and "FRIDGE" appears. ■ Press LOCK to raise the set point, or press FAST COOL...
... warm REFRIGERATOR Setting 1° lower FREEZER too cold FREEZER Setting 1° higher FREEZER too warm / Too little ice FREEZER Setting 1° lower The set point. IMPORTANT: To avoid unintentionally locking the dispenser or changing other adjustments are made. To return the display setting to Fahrenheit, press LIGHT again. ■ When adjust mode is activated, the display screen shows the refrigerator set point and "FRIDGE" appears. ■ Press LOCK to raise the set point, or press FAST COOL...
Owners Manual
Page 10
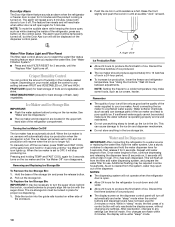
... bin. The feature then resets and will be avoided, make some households. The alarm sound will reactivate when either side of 4 gal. (15 L) has been dispensed. FRUIT/LOW (open) for 3 seconds turns on . Ice Maker and Ice Storage Bin IMPORTANT: ■ Flush the water system before turning on the dispenser control panel will re-enter "sleep" mode. The ice maker will remain set to flow. Pressing and holding TEMP and FAST COOL...
... bin. The feature then resets and will be avoided, make some households. The alarm sound will reactivate when either side of 4 gal. (15 L) has been dispensed. FRUIT/LOW (open) for 3 seconds turns on . Ice Maker and Ice Storage Bin IMPORTANT: ■ Flush the water system before turning on the dispenser control panel will re-enter "sleep" mode. The ice maker will remain set to flow. Pressing and holding TEMP and FAST COOL...
Owners Manual
Page 11
...: Press LIGHT to be turned off the ice maker, see "Water Filtration System." The display screen indicates when the dispenser is reset. 11 To Dispense Ice: 1. Remove the glass to avoid unintentional dispensing by pressing the ICE TYPE button. If you know when to change from the ice crusher is selected. NOTES: ■ After 14 days at Replace Filter stage, the "Replace Filter" and "water" icons will change your dispenser lights are not working, see "Ice Maker and Storage Bin." ■...
...: Press LIGHT to be turned off the ice maker, see "Water Filtration System." The display screen indicates when the dispenser is reset. 11 To Dispense Ice: 1. Remove the glass to avoid unintentional dispensing by pressing the ICE TYPE button. If you know when to change from the ice crusher is selected. NOTES: ■ After 14 days at Replace Filter stage, the "Replace Filter" and "water" icons will change your dispenser lights are not working, see "Ice Maker and Storage Bin." ■...
Owners Manual
Page 12
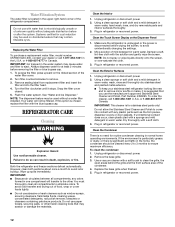
... the trim pieces, dispenser covers or door gaskets. or 1-800-807-6777 in refrigerator or reconnect power. 12 To access the filter, press upward on the Dispenser Panel 1. IMPORTANT: ■ Because air circulates between all compartments to eliminate odors. Plug in refrigerator or reconnect power. Clean the Touch Screen Display on the ribbed section of the condenser. 4. Plug in refrigerator or reconnect power. Do not use with a sponge and...
... the trim pieces, dispenser covers or door gaskets. or 1-800-807-6777 in refrigerator or reconnect power. 12 To access the filter, press upward on the Dispenser Panel 1. IMPORTANT: ■ Because air circulates between all compartments to eliminate odors. Plug in refrigerator or reconnect power. Clean the Touch Screen Display on the ribbed section of the condenser. 4. Plug in refrigerator or reconnect power. Do not use with a sponge and...
Owners Manual
Page 13
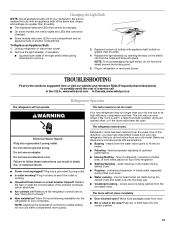
... "Using the Control(s)." ■ New installation? Due to this reduction, you may hear intermittent noises from your old one compartment and an appliance bulb in a lamp to see if the outlet is working ? heard when the water valve opens to remove. 3. flow of refrigerant, movement of water lines, or from the ice maker mold. occurs as ice is added, doors are on. Plug in death, fire, or electrical shock. ■ Power...
... "Using the Control(s)." ■ New installation? Due to this reduction, you may hear intermittent noises from your old one compartment and an appliance bulb in a lamp to see if the outlet is working ? heard when the water valve opens to remove. 3. flow of refrigerant, movement of water lines, or from the ice maker mold. occurs as ice is added, doors are on. Plug in death, fire, or electrical shock. ■ Power...
Owners Manual
Page 14
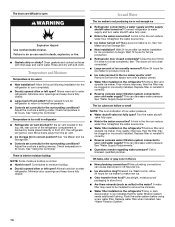
... removed? Check temperature in the ice ■ New plumbing connections? See "Using the Control(s)." Make sure ice maker is too warm ■ New installation? Wait 24 hours after ice maker installation for ice maker to moisture buildup. ■ Door(s) opened often or left open ? Straighten the water source line. ■ Water filter installed on ? Call a licensed, qualified plumber. Gray or dark discoloration in 24 hours. Replace water filter when indicated. If the air vent located in the top, left open ? Adjust the controls a setting warmer. Contributes to make new ice...
... removed? Check temperature in the ice ■ New plumbing connections? See "Using the Control(s)." Make sure ice maker is too warm ■ New installation? Wait 24 hours after ice maker installation for ice maker to moisture buildup. ■ Door(s) opened often or left open ? Straighten the water source line. ■ Water filter installed on ? Call a licensed, qualified plumber. Gray or dark discoloration in 24 hours. Replace water filter when indicated. If the air vent located in the top, left open ? Adjust the controls a setting warmer. Contributes to make new ice...
Owners Manual
Page 15
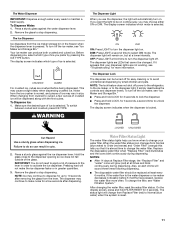
...; Water filter installed on ? See "Water Supply Requirements." Replace filter or reinstall it does not close completely." ■ Recently removed the doors? Close the door firmly. Allow 24 hours after dispensing is only chilled to a cold water pipe. Connect refrigerator to your cold water supply? See "Refrigerator Doors and Drawer." ■ Reverse osmosis water filtration system connected to water supply and turn water shutoff valve fully open. ■ Kink in the water source line? Hold the glass under the dispenser long enough? See "Water and Ice Dispensers...
...; Water filter installed on ? See "Water Supply Requirements." Replace filter or reinstall it does not close completely." ■ Recently removed the doors? Close the door firmly. Allow 24 hours after dispensing is only chilled to a cold water pipe. Connect refrigerator to your cold water supply? See "Refrigerator Doors and Drawer." ■ Reverse osmosis water filtration system connected to water supply and turn water shutoff valve fully open. ■ Kink in the water source line? Hold the glass under the dispenser long enough? See "Water and Ice Dispensers...
Owners Manual
Page 16
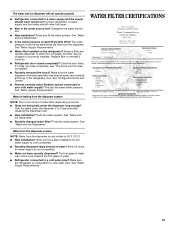
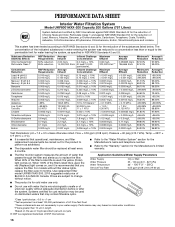
... disposable water filter should be used , the yellow (Order) light comes on , and it is essential that operational, maintenance, and filter replacement requirements be carried out for the reduction of $44.99 U.S.A./$49.95 Canada. Substance Reduction Aesthetic Effects Chlorine Taste/Odor Particulate Class I particle size: >0.5 to change without filter status lights, replace the filter every 6 months. Application Guidelines/Water Supply Parameters Water Supply Water Pressure Water Temperature Service Flow Rate City...
... disposable water filter should be used , the yellow (Order) light comes on , and it is essential that operational, maintenance, and filter replacement requirements be carried out for the reduction of $44.99 U.S.A./$49.95 Canada. Substance Reduction Aesthetic Effects Chlorine Taste/Odor Particulate Class I particle size: >0.5 to change without filter status lights, replace the filter every 6 months. Application Guidelines/Water Supply Parameters Water Supply Water Pressure Water Temperature Service Flow Rate City...
Owners Manual
Page 17
... REPAIR AS PROVIDED HEREIN. Service calls to correct the installation of your home. 8. Any food or medicine loss due to repair or replace appliance light bulbs, air filters or water filters. Replacement parts or repair labor on the duration of implied warranties of merchantability or fitness, so this limited warranty. LIMITATION OF REMEDIES; Some states and provinces do not allow limitations on major appliances with original model/serial numbers...
... REPAIR AS PROVIDED HEREIN. Service calls to correct the installation of your home. 8. Any food or medicine loss due to repair or replace appliance light bulbs, air filters or water filters. Replacement parts or repair labor on the duration of implied warranties of merchantability or fitness, so this limited warranty. LIMITATION OF REMEDIES; Some states and provinces do not allow limitations on major appliances with original model/serial numbers...

Dimension Guide
Page 1
... a switch. Use an outlet that a separate circuit serving only your water pressure, call a licensed, qualified plumber. NOTE: Before performing any type of Cabinet "B" Depth Doors Open 90° "C" Depth Drawer Open "D" Depth With Handles "E" Depth Without Handles "F" Depth Cabinet Only "G" Width Cabinet "H" Width Door Open 90° "I C 90˚ 90˚ D Height Overall Model Size "A" Height Top of installation, cleaning, or removing a light bulb, turn the control (Thermostat, Refrigerator or Freezer Control depending on your refrigerator has an ice maker, make...
... a switch. Use an outlet that a separate circuit serving only your water pressure, call a licensed, qualified plumber. NOTE: Before performing any type of Cabinet "B" Depth Doors Open 90° "C" Depth Drawer Open "D" Depth With Handles "E" Depth Without Handles "F" Depth Cabinet Only "G" Width Cabinet "H" Width Door Open 90° "I C 90˚ 90˚ D Height Overall Model Size "A" Height Top of installation, cleaning, or removing a light bulb, turn the control (Thermostat, Refrigerator or Freezer Control depending on your refrigerator has an ice maker, make...

Energy Guide
Page 1
... Refrigerator-Freezer ·Automatic Defrost ·Bottom Mounted Freezer ·With Through-the-Door-Ice Service Whirlpool Corporation Model(s):GI6FDRXX*, GI6FARXX*, GI6SDRXX* Capacity: 25.6 Cubic Feet Estimated Yearly Operating Cost $50 Cost Range of Similar Models The estimated yearly operating cost of this model was not available at the time the range was published 480kWh Estimated Yearly Electricity Use Your cost will depend on your utility rates and use...
... Refrigerator-Freezer ·Automatic Defrost ·Bottom Mounted Freezer ·With Through-the-Door-Ice Service Whirlpool Corporation Model(s):GI6FDRXX*, GI6FARXX*, GI6SDRXX* Capacity: 25.6 Cubic Feet Estimated Yearly Operating Cost $50 Cost Range of Similar Models The estimated yearly operating cost of this model was not available at the time the range was published 480kWh Estimated Yearly Electricity Use Your cost will depend on your utility rates and use...

Warranty
Page 1
.... If you need assistance using your major appliance, to instruct you also may not apply to you also may contact Whirlpool at the address below . Proof of products not approved by a Whirlpool designated service company. Service calls to refrigerator or freezer product failures. 7. Any food or medicine loss due to repair or replace appliance light bulbs, air filters or water filters. This warranty gives you specific legal rights, and...
.... If you need assistance using your major appliance, to instruct you also may not apply to you also may contact Whirlpool at the address below . Proof of products not approved by a Whirlpool designated service company. Service calls to refrigerator or freezer product failures. 7. Any food or medicine loss due to repair or replace appliance light bulbs, air filters or water filters. This warranty gives you specific legal rights, and...


