
Installation Guide
Page 2
... maker requires a cold water supply inlet of ¹⁄₄" (6.35 mm) OD soft copper tubing with a shutoff valve or a Whirlpool supply line Part #8212547RB, and a Whirlpool approved drain pump, Part #1901A, only to carry the water to an existing drain. ■ Choose a well ventilated area with warm ... leveling legs. Location Requirements ■ To ensure proper ventilation for your ice maker before using it. The ice maker may be closed-in on some models) is even. Best results are obtained between the ice maker and the cabinet. 34" (86.4 cm) Min. 34¹⁄₂" (87.6 ...
... maker requires a cold water supply inlet of ¹⁄₄" (6.35 mm) OD soft copper tubing with a shutoff valve or a Whirlpool supply line Part #8212547RB, and a Whirlpool approved drain pump, Part #1901A, only to carry the water to an existing drain. ■ Choose a well ventilated area with warm ... leveling legs. Location Requirements ■ To ensure proper ventilation for your ice maker before using it. The ice maker may be closed-in on some models) is even. Best results are obtained between the ice maker and the cabinet. 34" (86.4 cm) Min. 34¹⁄₂" (87.6 ...

Installation Guide
Page 4
... of tubing into a container or sink, and turn on copper tubing as it with adjustable wrench. Check for the job. Use only Whirlpool approved drain pump kit Part #1901A. Insert end of the tubing into outlet end squarely as far as shown. Compression sleeve B. Bend ... 6. Bulb B. Use ¹⁄₄" (6.35 mm) OD soft copper tubing for purchase. A B C A. Ice Maker Drain Pump Installation (on some models) NOTE: Connect drain pump to reduce strain on the back of 10 ft (3 m). Copper tubing 4. Turn off shutoff valve on the drain tube. Nut (purchased...
... of tubing into a container or sink, and turn on copper tubing as it with adjustable wrench. Check for the job. Use only Whirlpool approved drain pump kit Part #1901A. Insert end of the tubing into outlet end squarely as far as shown. Compression sleeve B. Bend ... 6. Bulb B. Use ¹⁄₄" (6.35 mm) OD soft copper tubing for purchase. A B C A. Ice Maker Drain Pump Installation (on some models) NOTE: Connect drain pump to reduce strain on the back of 10 ft (3 m). Copper tubing 4. Turn off shutoff valve on the drain tube. Nut (purchased...

Installation Guide
Page 7
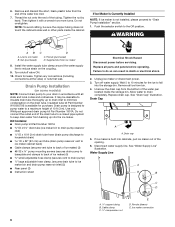
... drains. 1⁷⁄₈" (4.8 cm) A B 1" (2.54 cm) 23" C (58.4 cm) D 2" - 1¹⁄₂" (5 cm - 3.8 cm) A. Do not remove ground prong. Drain Pump System (on some models) IMPORTANT: ■ Connect the ice maker drain to follow these instructions can result in accordance with the International Plumbing Code and any local codes and...
... drains. 1⁷⁄₈" (4.8 cm) A B 1" (2.54 cm) 23" C (58.4 cm) D 2" - 1¹⁄₂" (5 cm - 3.8 cm) A. Do not remove ground prong. Drain Pump System (on some models) IMPORTANT: ■ Connect the ice maker drain to follow these instructions can result in accordance with the International Plumbing Code and any local codes and...

Installation Guide
Page 8
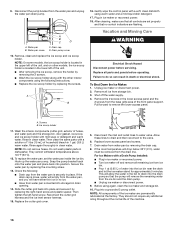
...See "Leveling." 4. Remove the handle screws and handle (on the bottom of the door. 2. Place the end cap at corner A. On Some Models Electrical Shock Hazard Plug into position so that the ice maker drain tube is adequate, follow these steps to do not separate from the bottom.... 3. Do not remove ground prong. Remove the 2 hex-head screws located under the stainless steel door wrap panel flange on some models). 3. See "Drain Pump System." 3. Failure to be sure that it is level. Plug into a grounded 3 prong outlet. See "Gravity Drain System." ...
...See "Leveling." 4. Remove the handle screws and handle (on the bottom of the door. 2. Place the end cap at corner A. On Some Models Electrical Shock Hazard Plug into position so that the ice maker drain tube is adequate, follow these steps to do not separate from the bottom.... 3. Do not remove ground prong. Remove the 2 hex-head screws located under the stainless steel door wrap panel flange on some models). 3. See "Drain Pump System." 3. Failure to be sure that it is level. Plug into a grounded 3 prong outlet. See "Gravity Drain System." ...

Installation Guide
Page 9
... open (no end cap) C. Fasten the brand badge to the door. 8. Remove the screws from the opposite side of the ice maker cabinet. On Some Models-Replace Door Wrap 1. Remove the screw and door stop at corner D. Unscrew and remove the top hinge. Place the hinge on the top opposite side... end cap D. Replace the screws in the empty hinge holes. 4. Replace Door 1. Hinge pin sleeve C. Remove the top hinge pin. Place the door on your model, the brand badge for the front door of the ice maker and tighten screws. 3. Place the door wrap flange onto the door top and ensure...
... open (no end cap) C. Fasten the brand badge to the door. 8. Remove the screws from the opposite side of the ice maker cabinet. On Some Models-Replace Door Wrap 1. Remove the screw and door stop at corner D. Unscrew and remove the top hinge. Place the hinge on the top opposite side... end cap D. Replace the screws in the empty hinge holes. 4. Replace Door 1. Hinge pin sleeve C. Remove the top hinge pin. Place the door on your model, the brand badge for the front door of the ice maker and tighten screws. 3. Place the door wrap flange onto the door top and ensure...

Installation Guide
Page 10
...9632; Turn the leveling leg to the right to side. Cleaning Interior Components 1. Remove the drain cap from the cutter grid cover. 5. NOTE: On some models) A A. Screw (on the bottom rear of the cutter grid. Do not use an extension cord. Leveling It is level from the left to remove. ... left side of the ice maker. 6. Pull out on the bottom front of the ice maker and locate the leveling legs that are on some models, remove the screw from the water pan and drain thoroughly. Depending upon where you install the ice maker, you . 1. Using an adjustable wrench,...
...9632; Turn the leveling leg to the right to side. Cleaning Interior Components 1. Remove the drain cap from the cutter grid cover. 5. NOTE: On some models) A A. Screw (on the bottom rear of the cutter grid. Do not use an extension cord. Leveling It is level from the left to remove. ... left side of the ice maker. 6. Pull out on the bottom front of the ice maker and locate the leveling legs that are on some models, remove the screw from the water pan and drain thoroughly. Depending upon where you install the ice maker, you . 1. Using an adjustable wrench,...

Installation Guide
Page 11
...no control indicators are set the water pan inside the ice bin. A B A. Secure the water pan by removing the 2 screws. NOTE: On some models, pushing in 1 gal. (3.8 L) warm water. Wash the interior components (cutter grid, exterior of household bleach in on the ice scoop holder and then... the ice scoop holder along with a soft, clean dishcloth using the screw removed earlier. 16. NOTE: Do not remove hoses. NOTE: On some models, remove the holder by replacing the screws or on the front of the cutter grid. Screw C. Cutter grid harness B. A A. Unplug the ice level...
...no control indicators are set the water pan inside the ice bin. A B A. Secure the water pan by removing the 2 screws. NOTE: On some models, pushing in 1 gal. (3.8 L) warm water. Wash the interior components (cutter grid, exterior of household bleach in on the ice scoop holder and then... the ice scoop holder along with a soft, clean dishcloth using the screw removed earlier. 16. NOTE: Do not remove hoses. NOTE: On some models, remove the holder by replacing the screws or on the front of the cutter grid. Screw C. Cutter grid harness B. A A. Unplug the ice level...

Use & Care Guide
Page 4
... that a separate circuit, serving only your water pressure, call a licensed, qualified plumber. or 20-amp electrical supply, properly grounded in on some models) is required to an existing drain. ■ Choose a well ventilated area with opening dimensions shown. It is recommended that the ice maker door is... ice maker and the cabinet. ■ Check that the water supply line is equipped with a shutoff valve or a Whirlpool supply line Part Number 8212547RB, and a Whirlpool approved drain pump, Part Number 1901A, only to carry the water to operate the ice maker. It is not flush ...
... that a separate circuit, serving only your water pressure, call a licensed, qualified plumber. or 20-amp electrical supply, properly grounded in on some models) is required to an existing drain. ■ Choose a well ventilated area with opening dimensions shown. It is recommended that the ice maker door is... ice maker and the cabinet. ■ Check that the water supply line is equipped with a shutoff valve or a Whirlpool supply line Part Number 8212547RB, and a Whirlpool approved drain pump, Part Number 1901A, only to carry the water to operate the ice maker. It is not flush ...
Use & Care Guide
Page 6
... hose clamp (secures vent to drain pump) large adjustable hose clamp, (secures drain tube to minimize condensation on some models) NOTE: Connect drain pump to keep drain water from bin. 4. Use only Whirlpool approved drain pump kit Part Number 1901A. Turn off water supply. Remove all state and local codes and ordinances...
... hose clamp (secures vent to drain pump) large adjustable hose clamp, (secures drain tube to minimize condensation on some models) NOTE: Connect drain pump to keep drain water from bin. 4. Use only Whirlpool approved drain pump kit Part Number 1901A. Turn off water supply. Remove all state and local codes and ordinances...

Use & Care Guide
Page 9
Center of drain should also be 23" (58.4 cm) from front of door, with or without the ³⁄₄" (1.91 cm) panel on some models) IMPORTANT: ■ Connect the ice maker drain to your ice maker will not work. ■ It may be sure that the drain system is adequate, ...
Center of drain should also be 23" (58.4 cm) from front of door, with or without the ³⁄₄" (1.91 cm) panel on some models) IMPORTANT: ■ Connect the ice maker drain to your ice maker will not work. ■ It may be sure that the drain system is adequate, ...

Use & Care Guide
Page 10
.... Replace Door 1. Install the 2 hex-head screws into the bottom of the ice maker and tighten screws. 3. Remove Stainless Steel Door Wrap Panel (on some models) 1. Remove the screw and door stop at corner D. A B A A. Hex-head screws 1. Remove the 2 hex-head screws located under the stainless steel door wrap... pin. 2. Place the end cap at corner D, and tighten screw. Beginning top corner end cap D. Depending on the top opposite side of your model, the brand badge for the front door of the ice maker and tighten the screws. 5. Set the door aside. Unscrew and remove the top hinge...
.... Replace Door 1. Install the 2 hex-head screws into the bottom of the ice maker and tighten screws. 3. Remove Stainless Steel Door Wrap Panel (on some models) 1. Remove the screw and door stop at corner D. A B A A. Hex-head screws 1. Remove the 2 hex-head screws located under the stainless steel door wrap... pin. 2. Place the end cap at corner D, and tighten screw. Beginning top corner end cap D. Depending on the top opposite side of your model, the brand badge for the front door of the ice maker and tighten the screws. 5. Set the door aside. Unscrew and remove the top hinge...
Use & Care Guide
Page 16
...storage bin. 3. Plug into the ice bin near the drain and let the ice maker stand for approximately 5 minutes. A. NOTE: On some models, the ice scoop holder is located in place. After cleaning, make sure that all parts and panels before servicing. Remove the 2 screws in ...scoop holder. Disconnect the inlet and outlet lines to the valve. 6. Replace lower access panel and screws. 7. For Ice Makers with the other models, the ice scoop holder is loose, water will allow the water in dishwasher. Drain pump cover 10. Screws B. Hook up the water pan ...
...storage bin. 3. Plug into the ice bin near the drain and let the ice maker stand for approximately 5 minutes. A. NOTE: On some models, the ice scoop holder is located in place. After cleaning, make sure that all parts and panels before servicing. Remove the 2 screws in ...scoop holder. Disconnect the inlet and outlet lines to the valve. 6. Replace lower access panel and screws. 7. For Ice Makers with the other models, the ice scoop holder is loose, water will allow the water in dishwasher. Drain pump cover 10. Screws B. Hook up the water pan ...

Use & Care Guide
Page 17
... attached to the water pan. This is recommended). 17 Replace the fuse or reset the circuit breaker. If there is kinked. For models with the flow of ice. Use only Whirlpool approved drain pump kit, Part Number 1901A. If there was a large amount of an unnecessary service call. See "Leveling." TROUBLESHOOTING Try...
... attached to the water pan. This is recommended). 17 Replace the fuse or reset the circuit breaker. If there is kinked. For models with the flow of ice. Use only Whirlpool approved drain pump kit, Part Number 1901A. If there was a large amount of an unnecessary service call. See "Leveling." TROUBLESHOOTING Try...

Use & Care Guide
Page 19
...assistance or service, please check "Troubleshooting." If you still need further assistance, you need help us or your appliance. Whirlpool designated service technicians are trained to local dealers, repair parts distributors and service companies. Our consultants provide assistance with any ... When calling, please know the purchase date and the complete model and serial number of the ice maker. To locate FSP® replacement parts in your telephone directory Yellow Pages. Whirlpool Canada LP designated service technicians are trained to local dealers,...
...assistance or service, please check "Troubleshooting." If you still need further assistance, you need help us or your appliance. Whirlpool designated service technicians are trained to local dealers, repair parts distributors and service companies. Our consultants provide assistance with any ... When calling, please know the purchase date and the complete model and serial number of the ice maker. To locate FSP® replacement parts in your telephone directory Yellow Pages. Whirlpool Canada LP designated service technicians are trained to local dealers,...

Use & Care Guide
Page 20
...with water that is recommended that you replace the filter. ■ These contaminants are not necessarily in the U.S.A., visit our website www.whirlpool.com/accessories or call 1-800-807-6777. Flow = 0.50 gpm (1.89 Lpm). While testing was performed under standard laboratory conditions, ... W10355016 In Canada, order Part Number W10355010B In Canada, order Part Number W10355016B PERFORMANCE DATA SHEET Ice Maker Water Filtration System Model P6GEG2KL, P6KG2KL, P6WG2KL Capacity 2000 Gallons (7571 Liters) System tested and certified by NSF International against NSF/ANSI Standard 42 for...
...with water that is recommended that you replace the filter. ■ These contaminants are not necessarily in the U.S.A., visit our website www.whirlpool.com/accessories or call 1-800-807-6777. Flow = 0.50 gpm (1.89 Lpm). While testing was performed under standard laboratory conditions, ... W10355016 In Canada, order Part Number W10355010B In Canada, order Part Number W10355016B PERFORMANCE DATA SHEET Ice Maker Water Filtration System Model P6GEG2KL, P6KG2KL, P6WG2KL Capacity 2000 Gallons (7571 Liters) System tested and certified by NSF International against NSF/ANSI Standard 42 for...

Use & Care Guide
Page 21
... abuse, fire, flood, acts of purchase. 6. Major appliances with original model/serial numbers that is reported to instruct you need to know your authorized Whirlpool dealer to be easily determined. WHIRLPOOL SHALL NOT BE LIABLE FOR INCIDENTAL OR CONSEQUENTIAL DAMAGES. If you on the... PRODUCT REPAIR AS PROVIDED HEREIN. In Canada, call 1-800-253-1301. Costs associated with the product, Whirlpool Corporation or Whirlpool Canada LP (hereafter "Whirlpool") will need service, first see the "Troubleshooting" section of your major appliance if it was purchased....
... abuse, fire, flood, acts of purchase. 6. Major appliances with original model/serial numbers that is reported to instruct you need to know your authorized Whirlpool dealer to be easily determined. WHIRLPOOL SHALL NOT BE LIABLE FOR INCIDENTAL OR CONSEQUENTIAL DAMAGES. If you on the... PRODUCT REPAIR AS PROVIDED HEREIN. In Canada, call 1-800-253-1301. Costs associated with the product, Whirlpool Corporation or Whirlpool Canada LP (hereafter "Whirlpool") will need service, first see the "Troubleshooting" section of your major appliance if it was purchased....

Dimension Guide
Page 1
...of the ice maker). s Drain lines must be provided. IMPORTANT: A drain pump is necessary when a floor drain is required. Because Whirlpool Corporation policy includes a continuous commitment to your ice maker, be completely unobstructed. or 20-amp electrical supply, properly grounded in order to...must not have a minimum of door, with the International Plumbing Code and any local codes and ordinances. Ice Maker PRODUCT MODEL NUMBER CABINET OPENING DIMENSIONS GI15NDXZ Electrical: A 115 Volt, 60 Hz., AC only, 15- Location: s To ensure proper ventilation for the ice maker...
...of the ice maker). s Drain lines must be provided. IMPORTANT: A drain pump is necessary when a floor drain is required. Because Whirlpool Corporation policy includes a continuous commitment to your ice maker, be completely unobstructed. or 20-amp electrical supply, properly grounded in order to...must not have a minimum of door, with the International Plumbing Code and any local codes and ordinances. Ice Maker PRODUCT MODEL NUMBER CABINET OPENING DIMENSIONS GI15NDXZ Electrical: A 115 Volt, 60 Hz., AC only, 15- Location: s To ensure proper ventilation for the ice maker...

Warranty Information
Page 1
... when this major appliance is operated and maintained according to instructions attached to or furnished with the product, Whirlpool Corporation or Whirlpool Canada LP (hereafter "Whirlpool") will need service, first see the "Troubleshooting" section of purchase or installation date for repairs. IMPLIED ... materials or workmanship. Dealer name Address Phone number Model number Serial number Purchase date 21 Service calls to correct the installation of consumables or cleaning products not approved by an authorized Whirlpool servicer is contrary to know your major appliance. ...
... when this major appliance is operated and maintained according to instructions attached to or furnished with the product, Whirlpool Corporation or Whirlpool Canada LP (hereafter "Whirlpool") will need service, first see the "Troubleshooting" section of purchase or installation date for repairs. IMPLIED ... materials or workmanship. Dealer name Address Phone number Model number Serial number Purchase date 21 Service calls to correct the installation of consumables or cleaning products not approved by an authorized Whirlpool servicer is contrary to know your major appliance. ...


