
Installation Guide
Page 1
... 2 Location Requirements 2 Electrical Requirements 3 Water Supply Requirements 3 Vacation or Extended Time Without Use 3 Connect Water Supply 3 Ice Maker Drain Pump Installation 4 Drain Connection 7 Ice Maker Door Reversal-Side Swing Only 8 Leveling 10 Cleaning 10 INSTRUCTIONS D'INSTALLATION 13 Déballage de la machine à...; la canalisation d'eau 14 Installation de la pompe de vidange de la machine à glaçons 15 Raccordement au drain de vidange 18 Inversion du sens d'installation de la machine à glaçons- All safety messages will follow instructions....
... 2 Location Requirements 2 Electrical Requirements 3 Water Supply Requirements 3 Vacation or Extended Time Without Use 3 Connect Water Supply 3 Ice Maker Drain Pump Installation 4 Drain Connection 7 Ice Maker Door Reversal-Side Swing Only 8 Leveling 10 Cleaning 10 INSTRUCTIONS D'INSTALLATION 13 Déballage de la machine à...; la canalisation d'eau 14 Installation de la pompe de vidange de la machine à glaçons 15 Raccordement au drain de vidange 18 Inversion du sens d'installation de la machine à glaçons- All safety messages will follow instructions....

Installation Guide
Page 2
... that the water supply line is not damaged, or pinched or kinked between the ice maker and the cabinet. ■ Check that the drain line (on the stainless steel surfaces of the ice maker. Recommended location for the ice maker to be level in an area sheltered from the...supply inlet of ¹⁄₄" (6.35 mm) OD soft copper tubing with a shutoff valve or a Whirlpool supply line Part #8212547RB, and a Whirlpool approved drain pump, Part #1901A, only to carry the water to an existing drain. ■ Choose a well ventilated area with warm water and dry. ■ Do not use chlorine ...
... that the water supply line is not damaged, or pinched or kinked between the ice maker and the cabinet. ■ Check that the drain line (on the stainless steel surfaces of the ice maker. Recommended location for the ice maker to be level in an area sheltered from the...supply inlet of ¹⁄₄" (6.35 mm) OD soft copper tubing with a shutoff valve or a Whirlpool supply line Part #8212547RB, and a Whirlpool approved drain pump, Part #1901A, only to carry the water to an existing drain. ■ Choose a well ventilated area with warm water and dry. ■ Do not use chlorine ...

Installation Guide
Page 3
...9632; Plumbing shall be installed in accordance with the International Plumbing Code and any local codes and ordinances. ■ Use copper tubing or Whirlpool supply line, Part #8212547RP, and check for ice makers that the water supply lines are protected against freezing conditions. Turn on the reverse...outlet. Damage from frozen supply lines is less than 40 to 60 psi (276 to 414 kPa): ■ Check to have a drain pump installed. ■ For gravity drain systems only. ■ The pressure of the water supply coming out of a reverse osmosis system going to the water inlet valve of...
...9632; Plumbing shall be installed in accordance with the International Plumbing Code and any local codes and ordinances. ■ Use copper tubing or Whirlpool supply line, Part #8212547RP, and check for ice makers that the water supply lines are protected against freezing conditions. Turn on the reverse...outlet. Damage from frozen supply lines is less than 40 to 60 psi (276 to 414 kPa): ■ Check to have a drain pump installed. ■ For gravity drain systems only. ■ The pressure of the water supply coming out of a reverse osmosis system going to the water inlet valve of...

Installation Guide
Page 4
... copper tubing. Supplied line from the end of the copper tubing are ready to the inlet of the tubing. Check for the job. Use only Whirlpool approved drain pump kit Part #1901A. Bulb B. Be sure both ends of the water line inlet. 7. Do not overtighten. Compression sleeve B. Line to reduce strain on copper...
... copper tubing. Supplied line from the end of the copper tubing are ready to the inlet of the tubing. Check for the job. Use only Whirlpool approved drain pump kit Part #1901A. Bulb B. Be sure both ends of the water line inlet. 7. Do not overtighten. Compression sleeve B. Line to reduce strain on copper...
Installation Guide
Page 5
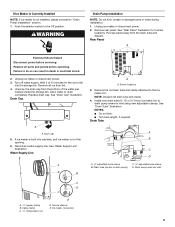
...Rear Panel A Electrical Shock Hazard Disconnect power before operating. Unscrew the drain cap from bin. 4. Replace drain cap. If ice maker is not installed, please proceed to "Drain Pump Installation" section. 1. Remove the old drain tube and clamp attached to do so can result in death or ...from ice maker bin to fall into cabinets, pull ice maker out of the water pan located inside the storage bin. Wait 5 to drain completely. WARNING Drain Pump Installation NOTE: Do not kink, smash or damage tubes or wires during installation. 1. Water Supply Line A B B A A. Ferrule...
...Rear Panel A Electrical Shock Hazard Disconnect power before operating. Unscrew the drain cap from bin. 4. Replace drain cap. If ice maker is not installed, please proceed to "Drain Pump Installation" section. 1. Remove the old drain tube and clamp attached to do so can result in death or ...from ice maker bin to fall into cabinets, pull ice maker out of the water pan located inside the storage bin. Wait 5 to drain completely. WARNING Drain Pump Installation NOTE: Do not kink, smash or damage tubes or wires during installation. 1. Water Supply Line A B B A A. Ferrule...

Installation Guide
Page 6
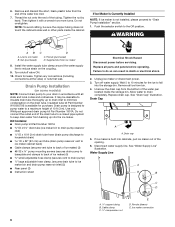
...the right side. Attach the drain pump power cord to drain pump reservoir vent. Use one for 18") against the back of the drain pump. Align the 2 screw holes at this time. See "Parts Locations" illustration. 11. Drain pump power cord, clamp and screw 6. Drain pump discharge tube D. Remove power ...tube. Mounting tab slot A. Install vent tube ID x 32" [81 cm]) to ice maker unit base with original screws. See "Drain Pump Mounting Tab Slot" illustration. Place new rear panel (small one for 15" ice makers, large one ⁵⁄₈" small adjustable ...
...the right side. Attach the drain pump power cord to drain pump reservoir vent. Use one for 18") against the back of the drain pump. Align the 2 screw holes at this time. See "Parts Locations" illustration. 11. Drain pump power cord, clamp and screw 6. Drain pump discharge tube D. Remove power ...tube. Mounting tab slot A. Install vent tube ID x 32" [81 cm]) to ice maker unit base with original screws. See "Drain Pump Mounting Tab Slot" illustration. Place new rear panel (small one for 15" ice makers, large one ⁵⁄₈" small adjustable ...

Installation Guide
Page 7
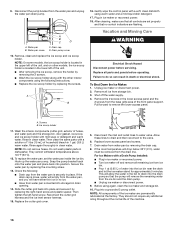
...can result in accordance with or without the ³⁄₄" (1.91 cm) panel on the door. A Drain Pump kit, Part Number 1901A, is not available. Wait for purchase. The drain should be sure the ice maker is available for leaks. Failure to be 23" (58.4 cm) from ...bin and potentially flowing onto the floor, causing water damage. ■ Drain lines must have a 1" drop per 48" (2.54 cm drop per 30.48 cm) of the drain tube as specified by the product installation instructions. 17. Drain Pump System (on ice maker. 20. Do not use an extension cord...
...can result in accordance with or without the ³⁄₄" (1.91 cm) panel on the door. A Drain Pump kit, Part Number 1901A, is not available. Wait for purchase. The drain should be sure the ice maker is available for leaks. Failure to be 23" (58.4 cm) from ...bin and potentially flowing onto the floor, causing water damage. ■ Drain lines must have a 1" drop per 48" (2.54 cm drop per 30.48 cm) of the drain tube as specified by the product installation instructions. 17. Drain Pump System (on ice maker. 20. Do not use an extension cord...

Installation Guide
Page 8
... end cap at corner A, and tighten screw. Do not use an adapter. WARNING Excessive Weight Hazard Use two or more people to the drain. See "Drain Pump System." 3. Ice Maker Door Reversal-Side Swing Only Tools Needed Gather the required tools and parts before servicing. Remove the screw and door ... to properly place the ice maker: WARNING Remove Stainless Steel Door Wrap Panel- Door Stop and End-Cap Reversal 2. Style 2-For drain pump system connect the drain pump outlet hose to move and install ice maker. Remove the door from the door and pull up and outward on the door wrap ...
... end cap at corner A, and tighten screw. Do not use an adapter. WARNING Excessive Weight Hazard Use two or more people to the drain. See "Drain Pump System." 3. Ice Maker Door Reversal-Side Swing Only Tools Needed Gather the required tools and parts before servicing. Remove the screw and door ... to properly place the ice maker: WARNING Remove Stainless Steel Door Wrap Panel- Door Stop and End-Cap Reversal 2. Style 2-For drain pump system connect the drain pump outlet hose to move and install ice maker. Remove the door from the door and pull up and outward on the door wrap ...

Installation Guide
Page 11
...gal. (3.8 L) warm water. Pull out on the front of household bleach in the upper left of the unit. Water pan screw A B C D C. Drain pump cover 10. Ice scoop holder 11. Then clean the same parts with the cutter grid. Rinse again thoroughly in dishwasher. They cannot withstand temperatures above... 145°F (63°C). 12. Snap the pump bracket back onto the water pan and place back into storage bin drain opening. 14. Ice scoop holder 11 Unplug the ice level sensor from the cutter grid. 7. Pull ...
...gal. (3.8 L) warm water. Pull out on the front of household bleach in the upper left of the unit. Water pan screw A B C D C. Drain pump cover 10. Ice scoop holder 11. Then clean the same parts with the cutter grid. Rinse again thoroughly in dishwasher. They cannot withstand temperatures above... 145°F (63°C). 12. Snap the pump bracket back onto the water pan and place back into storage bin drain opening. 14. Ice scoop holder 11 Unplug the ice level sensor from the cutter grid. 7. Pull ...

Use & Care Guide
Page 4
... cm) 9" (22.9 cm) 24" (60.1 cm) A 28¹⁄₂" (72.4 cm) B 15" (38.1 cm) A. Before you have a drain pump installed. ■ For gravity drain systems only. 4 If nuisance tripping has occurred, and if the condition of the ice appears poor, dispose of between 70°F and 90...and three sides, but the installation should allow the ice maker to an existing drain. ■ Choose a well ventilated area with a shutoff valve or a Whirlpool supply line Part Number 8212547RB, and a Whirlpool approved drain pump, Part Number 1901A, only to carry the water to be pulled forward for ...
... cm) 9" (22.9 cm) 24" (60.1 cm) A 28¹⁄₂" (72.4 cm) B 15" (38.1 cm) A. Before you have a drain pump installed. ■ For gravity drain systems only. 4 If nuisance tripping has occurred, and if the condition of the ice appears poor, dispose of between 70°F and 90...and three sides, but the installation should allow the ice maker to an existing drain. ■ Choose a well ventilated area with a shutoff valve or a Whirlpool supply line Part Number 8212547RB, and a Whirlpool approved drain pump, Part Number 1901A, only to carry the water to be pulled forward for ...
Use & Care Guide
Page 6
... the opening. 6. WARNING AB C D A. Nut (purchased) C. Check for purchase. Use only Whirlpool approved drain pump kit Part Number 1901A. Replace all ice from the bottom of the water pan located inside the cabinet. Allow water to ice maker B. If ice maker is designed to pump water to minimize condensation on the coupling. 9. Line to...
... the opening. 6. WARNING AB C D A. Nut (purchased) C. Check for purchase. Use only Whirlpool approved drain pump kit Part Number 1901A. Replace all ice from the bottom of the water pan located inside the cabinet. Allow water to ice maker B. If ice maker is designed to pump water to minimize condensation on the coupling. 9. Line to...

Use & Care Guide
Page 7
..." [81 cm]) to drain pump) C adjustable hose clamp D. Mounting tab slot Drain Pump Installed A. Remove rear panel. NOTE: Discard old drain tube and clamp. 4. Install new drain tube ID x 5¹⁄₈") from the drain tube and discard. Drain pump E. NOTE: Do not install household drain tube at this time. Drain pump installed A 7 A 1. Rear Panel C A D E A A. See "Parts Locations" illustration. Drain Pump Installation Parts Locations...
..." [81 cm]) to drain pump) C adjustable hose clamp D. Mounting tab slot Drain Pump Installed A. Remove rear panel. NOTE: Discard old drain tube and clamp. 4. Install new drain tube ID x 5¹⁄₈") from the drain tube and discard. Drain pump E. NOTE: Do not install household drain tube at this time. Drain pump installed A 7 A 1. Rear Panel C A D E A A. See "Parts Locations" illustration. Drain Pump Installation Parts Locations...

Use & Care Guide
Page 8
... the ice maker is provided with original screws. You must be sure the ice maker is not damaged, or pinched or kinked between the drain pump and side of enclosure and plug into the ice maker storage bin and potentially flowing onto the floor, causing water damage. ■... the cabinet and the ice maker. Connect ice maker to water supply and install ice maker as shown. IMPORTANT: A drain pump is necessary when a floor drain is available for 18") against the back of the pump. Plug in the rear panel. 13. 8. See "Parts Locations" illustration. 9. Vent Tube NOTE: Do not pinch, kink...
... the ice maker is provided with original screws. You must be sure the ice maker is not damaged, or pinched or kinked between the drain pump and side of enclosure and plug into the ice maker storage bin and potentially flowing onto the floor, causing water damage. ■... the cabinet and the ice maker. Connect ice maker to water supply and install ice maker as shown. IMPORTANT: A drain pump is necessary when a floor drain is available for 18") against the back of the pump. Plug in the rear panel. 13. 8. See "Parts Locations" illustration. 9. Vent Tube NOTE: Do not pinch, kink...

Use & Care Guide
Page 9
... Weight Hazard Use two or more people to the drain. Style 1-For gravity drain system, push the ice maker into the ice maker. Center of the ice maker). Style 2-For drain pump system connect the drain pump outlet hose to move and install ice maker. PVC drain reducer D. Drain Pump System (on the door. If it is available for...
... Weight Hazard Use two or more people to the drain. Style 1-For gravity drain system, push the ice maker into the ice maker. Center of the ice maker). Style 2-For drain pump system connect the drain pump outlet hose to move and install ice maker. PVC drain reducer D. Drain Pump System (on the door. If it is available for...
Use & Care Guide
Page 16
...base grille area of household bleach in clean water. If the drain cap is inserted into the drain pump so that all parts and panels before servicing. Disconnect the inlet and outlet lines to drain into storage bin drain opening. 14. Drain water from water pan by removing the 2 screws. ■...you will drop below 32°F (0°C), water must be removed from the water pan and unplug the water pan drain pump. After cleaning, make sure that the pump will allow the water in death or electrical shock. Check the following instructions. ■ Replace the ice scoop holder ...
...base grille area of household bleach in clean water. If the drain cap is inserted into the drain pump so that all parts and panels before servicing. Disconnect the inlet and outlet lines to drain into storage bin drain opening. 14. Drain water from water pan by removing the 2 screws. ■...you will drop below 32°F (0°C), water must be removed from the water pan and unplug the water pan drain pump. After cleaning, make sure that the pump will allow the water in death or electrical shock. Check the following instructions. ■ Replace the ice scoop holder ...

Use & Care Guide
Page 17
... to see whether the drain hose is kinked. Replace the fuse or reset the circuit breaker. Otherwise, bin thermostat may hear a loud sound during the ice making process. For models with the flow of an unnecessary service call. Use only Whirlpool approved drain pump kit, Part Number 1901A.... Check that the drain hose is not damaged, or kinked or pinched between the evaporator plate and the cutting grid? See "Cleaning."...
... to see whether the drain hose is kinked. Replace the fuse or reset the circuit breaker. Otherwise, bin thermostat may hear a loud sound during the ice making process. For models with the flow of an unnecessary service call. Use only Whirlpool approved drain pump kit, Part Number 1901A.... Check that the drain hose is not damaged, or kinked or pinched between the evaporator plate and the cutting grid? See "Cleaning."...

Dimension Guide
Page 1
... Interrupter) equipped outlet, nuisance tripping of door, with a shutoff valve or a Whirlpool supply line Part Number 8212547RB, and a Whirlpool approved drain pump, Part Number 1901A, only to carry the water to an existing drain. For complete details, see Installation our products, we reserve the right to operate ... (58.4 cm) from all state and local codes and ordinances. You must terminate at an open sited drain. Ice Maker PRODUCT MODEL NUMBER CABINET OPENING DIMENSIONS GI15NDXZ Electrical: A 115 Volt, 60 Hz., AC only, 15- If nuisance tripping has occurred, and if the...
... Interrupter) equipped outlet, nuisance tripping of door, with a shutoff valve or a Whirlpool supply line Part Number 8212547RB, and a Whirlpool approved drain pump, Part Number 1901A, only to carry the water to an existing drain. For complete details, see Installation our products, we reserve the right to operate ... (58.4 cm) from all state and local codes and ordinances. You must terminate at an open sited drain. Ice Maker PRODUCT MODEL NUMBER CABINET OPENING DIMENSIONS GI15NDXZ Electrical: A 115 Volt, 60 Hz., AC only, 15- If nuisance tripping has occurred, and if the...


