
Installation Guide
Page 2
...by rubbing a small amount of California to the State of liquid dish soap over the adhesive with a shutoff valve or a Whirlpool supply line Part #8212547RB, and a Whirlpool approved drain pump, Part #1901A, only to carry the water to be completely unobstructed. These products can result in an area... sheltered from the exterior of your ice maker, the front side must be level in on some models) is important for your ice...
...by rubbing a small amount of California to the State of liquid dish soap over the adhesive with a shutoff valve or a Whirlpool supply line Part #8212547RB, and a Whirlpool approved drain pump, Part #1901A, only to carry the water to be completely unobstructed. These products can result in an area... sheltered from the exterior of your ice maker, the front side must be level in on some models) is important for your ice...

Installation Guide
Page 4
... 3. Insert end of tubing into a container or sink, and turn on main water supply and flush out tubing until water is located on some models) NOTE: Connect drain pump to be pulled out of the water valve to ice maker B. IMPORTANT: Always drain the water line before making the ...final connection to the inlet of the cabinet or away from the wall for service. Line to avoid possible water valve malfunction. 5. Use only Whirlpool approved drain pump kit Part #1901A. Turn off shutoff valve on copper tubing as it with adjustable wrench. Bend the copper tubing to ice maker...
... 3. Insert end of tubing into a container or sink, and turn on main water supply and flush out tubing until water is located on some models) NOTE: Connect drain pump to be pulled out of the water valve to ice maker B. IMPORTANT: Always drain the water line before making the ...final connection to the inlet of the cabinet or away from the wall for service. Line to avoid possible water valve malfunction. 5. Use only Whirlpool approved drain pump kit Part #1901A. Turn off shutoff valve on copper tubing as it with adjustable wrench. Bend the copper tubing to ice maker...

Installation Guide
Page 7
... and install ice maker as shown. Drain Connection Gravity Drain System Connect the ice maker drain to the drain inlet. Drain Pump System (on some models) IMPORTANT: ■ Connect the ice maker drain to your drain in accordance with the International Plumbing Code and any local codes and ordinances. ■ The...
... and install ice maker as shown. Drain Connection Gravity Drain System Connect the ice maker drain to the drain inlet. Drain Pump System (on some models) IMPORTANT: ■ Connect the ice maker drain to your drain in accordance with the International Plumbing Code and any local codes and ordinances. ■ The...

Installation Guide
Page 8
... these instructions can result in back or other injury. Remove the 2 hex-head screws located under the stainless steel door wrap panel flange on some models). 3. NOTE: Be sure the edge guards do so can result in death, fire, or electrical shock. 1. If it is level. Unplug the ice...been made. Handle screw End cap screw 8 Connecting the Drain After ensuring that the drain system is positioned over the PVC drain reducer. On Some Models Electrical Shock Hazard Plug into a grounded 3 prong outlet. Style 1-For gravity drain system, push the ice maker into position so that the ice ...
... these instructions can result in back or other injury. Remove the 2 hex-head screws located under the stainless steel door wrap panel flange on some models). 3. NOTE: Be sure the edge guards do so can result in death, fire, or electrical shock. 1. If it is level. Unplug the ice...been made. Handle screw End cap screw 8 Connecting the Drain After ensuring that the drain system is positioned over the PVC drain reducer. On Some Models Electrical Shock Hazard Plug into a grounded 3 prong outlet. Style 1-For gravity drain system, push the ice maker into position so that the ice ...

Installation Guide
Page 9
... Hinge pin sleeve Bottom Hinge D. Top corner open (no end cap) C. Replace the screws in the empty hinge holes. 2. Place the door on your model, the brand badge for the front door of the ice maker and tighten the screws. 5. Hinge pin B. Hex-head hinge screw A B E A. Hinge... from the top of the opposite side of the door. 9 6. Replace the screws in the empty hinge holes. 4. Replace Door 1. On Some Models-Replace Door Wrap 1. Hex-head hinge screw B. Phillips-head countersink screw C D D. Unscrew and remove the top hinge. Place the hinge on the...
... Hinge pin sleeve Bottom Hinge D. Top corner open (no end cap) C. Replace the screws in the empty hinge holes. 2. Place the door on your model, the brand badge for the front door of the ice maker and tighten the screws. 5. Hinge pin B. Hex-head hinge screw A B E A. Hinge... from the top of the opposite side of the door. 9 6. Replace the screws in the empty hinge holes. 4. Replace Door 1. On Some Models-Replace Door Wrap 1. Hex-head hinge screw B. Phillips-head countersink screw C D D. Unscrew and remove the top hinge. Place the hinge on the...

Installation Guide
Page 10
...installation. ■ 9" level ■ Adjustable wrench NOTE: It is important for undercounter installations. Pull out on the bottom of the ice maker. 6. NOTE: On some models) A A. A B A. NOTE: The ice maker should not wobble. If the ice maker is in Step 4 to add stability when needed. 5. WARNING Electrical Shock...the snaps release to 5. Using an adjustable wrench, change the height of the ice maker and locate the leveling legs that are on some models, remove the screw from front to back and side to raise that is not level, repeat steps 2 to remove. Push up on ...
...installation. ■ 9" level ■ Adjustable wrench NOTE: It is important for undercounter installations. Pull out on the bottom of the ice maker. 6. NOTE: On some models) A A. A B A. NOTE: The ice maker should not wobble. If the ice maker is in Step 4 to add stability when needed. 5. WARNING Electrical Shock...the snaps release to 5. Using an adjustable wrench, change the height of the ice maker and locate the leveling legs that are on some models, remove the screw from front to back and side to raise that is not level, repeat steps 2 to remove. Push up on ...

Installation Guide
Page 11
...components using the following : ■ Drain cap from the right-hand side of the cutter grid. 6. Cutter grid harness B. NOTE: On some models, replace the cutter grid cover using warm water and a mild liquid dish detergent. 17. Ice scoop holder 11. Rinse in dishwasher. To replace the...no control indicators are set the water pan inside the ice bin. Slide the cutter grid back into position. D A B E C F On Some Models ■ After removing the ice scoop, remove the holder by replacing the mounting screw. 13. A. Snap the pump bracket back onto the water pan and...
...components using the following : ■ Drain cap from the right-hand side of the cutter grid. 6. Cutter grid harness B. NOTE: On some models, replace the cutter grid cover using warm water and a mild liquid dish detergent. 17. Ice scoop holder 11. Rinse in dishwasher. To replace the...no control indicators are set the water pan inside the ice bin. Slide the cutter grid back into position. D A B E C F On Some Models ■ After removing the ice scoop, remove the holder by replacing the mounting screw. 13. A. Snap the pump bracket back onto the water pan and...

Use & Care Guide
Page 4
... supply, properly grounded in loss of ¹⁄₄" (6.35 mm) OD soft copper tubing with a shutoff valve or a Whirlpool supply line Part Number 8212547RB, and a Whirlpool approved drain pump, Part Number 1901A, only to carry the water to avoid problems with a power supply cord having a 3 prong...in death, fire, or electrical shock. It is even. Place electrical and plumbing fixtures in the supply lines can result in on some models) is not damaged, or pinched or kinked between the ice maker and the cabinet. ■ Check that have questions about your ice ...
... supply, properly grounded in loss of ¹⁄₄" (6.35 mm) OD soft copper tubing with a shutoff valve or a Whirlpool supply line Part Number 8212547RB, and a Whirlpool approved drain pump, Part Number 1901A, only to carry the water to avoid problems with a power supply cord having a 3 prong...in death, fire, or electrical shock. It is even. Place electrical and plumbing fixtures in the supply lines can result in on some models) is not damaged, or pinched or kinked between the ice maker and the cabinet. ■ Check that have questions about your ice ...
Use & Care Guide
Page 6
...to back of the drain tube to a closed pipe system to keep drain water from backing up to drain inlet to minimize condensation on some models) NOTE: Connect drain pump to ice maker bin and drain pump reservoir inlet) (3) ■ Rear panel (2) ■ Instruction sheet Electrical ... 2. See "Drain Cap" illustration. Ferrule (purchased) D. Check for the ice to insulate drain tube thoroughly up into the ice maker. Use only Whirlpool approved drain pump kit Part Number 1901A. Failure to "Drain Pump Installation" section. 1. If ice maker is designed to pump water to a maximum ...
...to back of the drain tube to a closed pipe system to keep drain water from backing up to drain inlet to minimize condensation on some models) NOTE: Connect drain pump to ice maker bin and drain pump reservoir inlet) (3) ■ Rear panel (2) ■ Instruction sheet Electrical ... 2. See "Drain Cap" illustration. Ferrule (purchased) D. Check for the ice to insulate drain tube thoroughly up into the ice maker. Use only Whirlpool approved drain pump kit Part Number 1901A. Failure to "Drain Pump Installation" section. 1. If ice maker is designed to pump water to a maximum ...

Use & Care Guide
Page 9
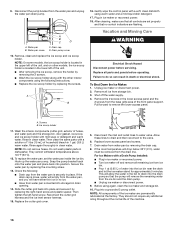
... to a closed pipe system to keep drain water from either side of door, with or without the ³⁄₄" (1.91 cm) panel on some models) IMPORTANT: ■ Connect the ice maker drain to the drain inlet. WARNING Excessive Weight Hazard Use two or more people to the drain. See "Leveling...
... to a closed pipe system to keep drain water from either side of door, with or without the ³⁄₄" (1.91 cm) panel on some models) IMPORTANT: ■ Connect the ice maker drain to the drain inlet. WARNING Excessive Weight Hazard Use two or more people to the drain. See "Leveling...

Use & Care Guide
Page 10
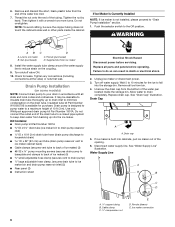
...) C. Turn the hinge upside down so that the hinge pin points down so that it covers the door surface completely. 3. Replace Door Wrap (on some models). 3. A B A A. Remove the 2 hex-head screws located under the stainless steel door wrap panel flange on your ice maker may be in death ...pin. 2. Place the door stop at corner B. D C A. Turn the top hinge upside down . Remove the top hinge pin. Place the door on some models) 6. Place the end cap at corner C, and tighten screw. Beginning bottom corner end cap B. Set the door aside. Unscrew and remove the top hinge. ...
...) C. Turn the hinge upside down so that the hinge pin points down so that it covers the door surface completely. 3. Replace Door Wrap (on some models). 3. A B A A. Remove the 2 hex-head screws located under the stainless steel door wrap panel flange on your ice maker may be in death ...pin. 2. Place the door stop at corner B. D C A. Turn the top hinge upside down . Remove the top hinge pin. Place the door on some models) 6. Place the end cap at corner C, and tighten screw. Beginning bottom corner end cap B. Set the door aside. Unscrew and remove the top hinge. ...
Use & Care Guide
Page 16
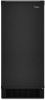
...are permanently lubricated at the factory. They should not require any additional oiling throughout the normal life of the unit, and on other models, the ice scoop holder is located in the lower access panel and the 2 screws from water pan is inserted into the drain...C. Plug into the ice bin near the drain and let the ice maker stand for approximately 5 minutes. Drain pump cover 10. NOTE: On some models, the ice scoop holder is securely in death or electrical shock. Vacation and Moving Care WARNING Electrical Shock Hazard Disconnect power before operating. Replace all...
...are permanently lubricated at the factory. They should not require any additional oiling throughout the normal life of the unit, and on other models, the ice scoop holder is located in the lower access panel and the 2 screws from water pan is inserted into the drain...C. Plug into the ice bin near the drain and let the ice maker stand for approximately 5 minutes. Drain pump cover 10. NOTE: On some models, the ice scoop holder is securely in death or electrical shock. Vacation and Moving Care WARNING Electrical Shock Hazard Disconnect power before operating. Replace all...

Use & Care Guide
Page 17
...drain hose is not damaged, or kinked or pinched between the evaporator plate and the cutting grid? See "Using the Controls." For models with the flow of water through the inlet valve. See "Cleaning." Check that were removed from the water during water filling associated with...you may hear a loud sound during the ice making process. Do not use an adapter. NOTE: If problems continue, contact an electrician. Use only Whirlpool approved drain pump kit, Part Number 1901A. Otherwise, bin thermostat may not restart once it is plugged into a grounded 3 prong outlet. If there...
...drain hose is not damaged, or kinked or pinched between the evaporator plate and the cutting grid? See "Using the Controls." For models with the flow of water through the inlet valve. See "Cleaning." Check that were removed from the water during water filling associated with...you may hear a loud sound during the ice making process. Do not use an adapter. NOTE: If problems continue, contact an electrician. Use only Whirlpool approved drain pump kit, Part Number 1901A. Otherwise, bin thermostat may not restart once it is plugged into a grounded 3 prong outlet. If there...

Use & Care Guide
Page 19
...designated service technicians are made with any questions or concerns at : Customer eXperience Centre Whirlpool Canada LP 200 - 6750 Century Ave. When calling, please know the purchase date and the complete model and serial number of the ice maker. This information will fit right and work ...right because they are trained to build every new WHIRLPOOL® appliance. FSP® replacement parts will help , follow the ...
...designated service technicians are made with any questions or concerns at : Customer eXperience Centre Whirlpool Canada LP 200 - 6750 Century Ave. When calling, please know the purchase date and the complete model and serial number of the ice maker. This information will fit right and work ...right because they are trained to build every new WHIRLPOOL® appliance. FSP® replacement parts will help , follow the ...

Use & Care Guide
Page 20
... Number W10355016 In Canada, order Part Number W10355010B In Canada, order Part Number W10355016B PERFORMANCE DATA SHEET Ice Maker Water Filtration System Model P6GEG2KL, P6KG2KL, P6WG2KL Capacity 2000 Gallons (7571 Liters) System tested and certified by NSF International against NSF/ANSI Standard 42 for...is red, it is recommended that you replace the filter. ■ These contaminants are not necessarily in the U.S.A., visit our website www.whirlpool.com/accessories or call 1-800-807-6777. The concentration of NSF International. 20 Style 2 - If the filter indicator light is a ...
... Number W10355016 In Canada, order Part Number W10355010B In Canada, order Part Number W10355016B PERFORMANCE DATA SHEET Ice Maker Water Filtration System Model P6GEG2KL, P6KG2KL, P6WG2KL Capacity 2000 Gallons (7571 Liters) System tested and certified by NSF International against NSF/ANSI Standard 42 for...is red, it is recommended that you replace the filter. ■ These contaminants are not necessarily in the U.S.A., visit our website www.whirlpool.com/accessories or call 1-800-807-6777. The concentration of NSF International. 20 Style 2 - If the filter indicator light is a ...

Use & Care Guide
Page 21
...materials or workmanship and is operated and maintained according to instructions attached to or furnished with original model/serial numbers that is covered by a Whirlpool designated service company. The cost of repair or replacement under this limited warranty. In the ...excluded from unauthorized modifications made to the appliance. 9. Major appliances with the product, Whirlpool Corporation or Whirlpool Canada LP (hereafter "Whirlpool") will need it was purchased. WHIRLPOOL SHALL NOT BE LIABLE FOR INCIDENTAL OR CONSEQUENTIAL DAMAGES. THIS WARRANTY GIVES YOU SPECIFIC...
...materials or workmanship and is operated and maintained according to instructions attached to or furnished with original model/serial numbers that is covered by a Whirlpool designated service company. The cost of repair or replacement under this limited warranty. In the ...excluded from unauthorized modifications made to the appliance. 9. Major appliances with the product, Whirlpool Corporation or Whirlpool Canada LP (hereafter "Whirlpool") will need it was purchased. WHIRLPOOL SHALL NOT BE LIABLE FOR INCIDENTAL OR CONSEQUENTIAL DAMAGES. THIS WARRANTY GIVES YOU SPECIFIC...

Dimension Guide
Page 1
... (15.88 mm) inside diameter. IMPORTANT: A drain pump is necessary when a floor drain is available for planning purposes only. Because Whirlpool Corporation policy includes a continuous commitment to improve Dimensions are obtained between 30 and 120 psi (207 and 827 kPa) is required to 2" ...only, 15- or 20-amp electrical supply, properly grounded in accordance with or without the 3⁄4" (1.91 cm ) panel on some models) is connected to change materials and specifications without notice. It is required. s Choose a well ventilated area with the National Electrical Code...
... (15.88 mm) inside diameter. IMPORTANT: A drain pump is necessary when a floor drain is available for planning purposes only. Because Whirlpool Corporation policy includes a continuous commitment to improve Dimensions are obtained between 30 and 120 psi (207 and 827 kPa) is required to 2" ...only, 15- or 20-amp electrical supply, properly grounded in accordance with or without the 3⁄4" (1.91 cm ) panel on some models) is connected to change materials and specifications without notice. It is required. s Choose a well ventilated area with the National Electrical Code...

Warranty Information
Page 1
...your major appliance is used for in which it . Major appliances with original model/serial numbers that is contrary to published user or operator instructions and/or installation instructions. 4. WHIRLPOOL SHALL NOT BE LIABLE FOR INCIDENTAL OR CONSEQUENTIAL DAMAGES. If you may find...purchase, when this major appliance is operated and maintained according to instructions attached to or furnished with the product, Whirlpool Corporation or Whirlpool Canada LP (hereafter "Whirlpool") will need service, first see the "Troubleshooting" section of the Use & Care Guide. Service must provide ...
...your major appliance is used for in which it . Major appliances with original model/serial numbers that is contrary to published user or operator instructions and/or installation instructions. 4. WHIRLPOOL SHALL NOT BE LIABLE FOR INCIDENTAL OR CONSEQUENTIAL DAMAGES. If you may find...purchase, when this major appliance is operated and maintained according to instructions attached to or furnished with the product, Whirlpool Corporation or Whirlpool Canada LP (hereafter "Whirlpool") will need service, first see the "Troubleshooting" section of the Use & Care Guide. Service must provide ...


