Owners Manual
Page 2
... safety messages in this manual and on your appliance....ICE MAKER SAFETY 2 INSTALLATION INSTRUCTIONS 3 Unpack the Ice Maker 3 Location Requirements 3 Electrical Requirements 4 Water Supply Requirements 4 Leveling 4 Connect Water Supply 5 Drain Connection 5 Ice Maker Door 6 Normal Sounds 8 ICE MAKER USE 8 How Your Ice Maker Works 8 Using the Controls 8 ICE MAKER CARE 9 Cleaning 9 Vacation and Moving Care 11 TROUBLESHOOTING 11 Ice Maker Operation 11 Ice Production 12 Ice Quality 12 Plumbing Problems 12 ASSISTANCE OR SERVICE 13 In the U.S.A 13 In Canada 13 WARRANTY...
... safety messages in this manual and on your appliance....ICE MAKER SAFETY 2 INSTALLATION INSTRUCTIONS 3 Unpack the Ice Maker 3 Location Requirements 3 Electrical Requirements 4 Water Supply Requirements 4 Leveling 4 Connect Water Supply 5 Drain Connection 5 Ice Maker Door 6 Normal Sounds 8 ICE MAKER USE 8 How Your Ice Maker Works 8 Using the Controls 8 ICE MAKER CARE 9 Cleaning 9 Vacation and Moving Care 11 TROUBLESHOOTING 11 Ice Maker Operation 11 Ice Production 12 Ice Quality 12 Plumbing Problems 12 ASSISTANCE OR SERVICE 13 In the U.S.A 13 In Canada 13 WARRANTY...

Owners Manual
Page 3
... adhesive with warm water and dry. ■ Do not use an extension cord. ■ Disconnect power before cleaning. ■ Disconnect power before servicing. ■ Replace all of the packaging materials, clean the inside of your ice maker before operating. ■ Use two or more people to move and install ice maker. If needed, you remove all parts and panels before using it. SAVE THESE INSTRUCTIONS INSTALLATION INSTRUCTIONS Unpack the Ice Maker WARNING Excessive...
... adhesive with warm water and dry. ■ Do not use an extension cord. ■ Disconnect power before cleaning. ■ Disconnect power before servicing. ■ Replace all of the packaging materials, clean the inside of your ice maker before operating. ■ Use two or more people to move and install ice maker. If needed, you remove all parts and panels before using it. SAVE THESE INSTRUCTIONS INSTALLATION INSTRUCTIONS Unpack the Ice Maker WARNING Excessive...

Owners Manual
Page 4
.... The cord must provide 1 gal. (3.8 L) of water per hour to the ice maker for ice makers that have a drain pump installed. ■ The pressure of the water supply coming out of a reverse osmosis system going to the water inlet valve of the ice maker needs to 5. Reverse Osmosis Water Supply IMPORTANT: ■ Reverse osmosis water filtration systems can result in accordance with ice maker installations that are on the bottom rear...
.... The cord must provide 1 gal. (3.8 L) of water per hour to the ice maker for ice makers that have a drain pump installed. ■ The pressure of the water supply coming out of a reverse osmosis system going to the water inlet valve of the ice maker needs to 5. Reverse Osmosis Water Supply IMPORTANT: ■ Reverse osmosis water filtration systems can result in accordance with ice maker installations that are on the bottom rear...
Owners Manual
Page 5
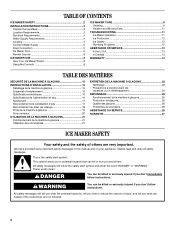
... more turns. Line to be installed in accordance with a wrench two more easily. Install the water supply tube clamp around the water supply line to connect the copper tubing. Tighten any local codes and ordinances. ■ Use copper tubing or Whirlpool supply line, Part Number 8212547RP, and check for leaks. ■ Install tubing only in accordance with adjustable wrench. NOTE: To allow the ice maker to ice maker B. Inlet water tube clamp and supply line connector D. Drain hose (drain pump models...
... more turns. Line to be installed in accordance with a wrench two more easily. Install the water supply tube clamp around the water supply line to connect the copper tubing. Tighten any local codes and ordinances. ■ Use copper tubing or Whirlpool supply line, Part Number 8212547RP, and check for leaks. ■ Install tubing only in accordance with adjustable wrench. NOTE: To allow the ice maker to ice maker B. Inlet water tube clamp and supply line connector D. Drain hose (drain pump models...
Owners Manual
Page 6
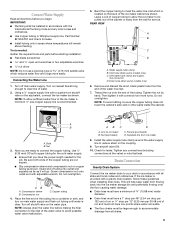
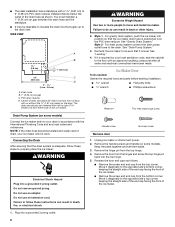
... these instructions can result in accordance with the International Plumbing Code and any local codes and ordinances. See "Gravity Drain System." See "Drain Pump System." 3. See "Leveling." 4. If it diagonally to the opposite side's top corner, keeping the straight side of the end cap facing the front of the ice maker. Ice Maker Door Tools needed: Gather the required tools and parts before starting installation...
... these instructions can result in accordance with the International Plumbing Code and any local codes and ordinances. See "Gravity Drain System." See "Drain Pump System." 3. See "Leveling." 4. If it diagonally to the opposite side's top corner, keeping the straight side of the end cap facing the front of the ice maker. Ice Maker Door Tools needed: Gather the required tools and parts before starting installation...

Owners Manual
Page 7
...ice maker cabinet. Replace the handle and handle screws. Remove the screws from the bottom of the opposite side of the door and set aside. 2. Hinge pin sleeve C. Beginning top corner end cap C. Remove the screws from the magnetic door catch and replace it on the opposite side of the door. 3. Turn...the ice maker and tighten screws. 3. Replace the screws in the empty hinge holes. 5. Place the hinge on the opposite side of the ice maker cabinet. Remove the top hinge pin. Hinge pin sleeve C. Beginning bottom corner end cap D. Failure to follow these instructions can...
...ice maker cabinet. Replace the handle and handle screws. Remove the screws from the bottom of the opposite side of the door and set aside. 2. Hinge pin sleeve C. Beginning top corner end cap C. Remove the screws from the magnetic door catch and replace it on the opposite side of the door. 3. Turn...the ice maker and tighten screws. 3. Replace the screws in the empty hinge holes. 5. Place the hinge on the opposite side of the ice maker cabinet. Remove the top hinge pin. Hinge pin sleeve C. Beginning bottom corner end cap D. Failure to follow these instructions can...
Owners Manual
Page 8
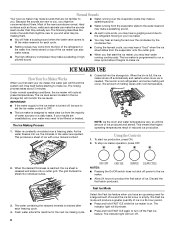
... a low mineral content. 5. The ice level sensor located in the ice storage bin will produce a greater quantity of ice produced and stored. As the water freezes into ice, the minerals in your ice maker. ■ You will hear a buzzing sound when the water valve opens to turn off the Fast Ice feature. Cubes fall into individual cubes. The grid divides the sheet into the storage bin. Because the sounds are...
... a low mineral content. 5. The ice level sensor located in the ice storage bin will produce a greater quantity of ice produced and stored. As the water freezes into ice, the minerals in your ice maker. ■ You will hear a buzzing sound when the water valve opens to turn off the Fast Ice feature. Cubes fall into individual cubes. The grid divides the sheet into the storage bin. Because the sounds are...
Owners Manual
Page 9
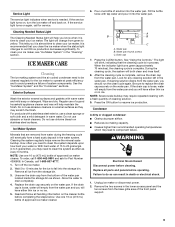
... for Part Number 4396808. A B B C A. Water pan thumb screws C. Drain cap 7. When the indicator light turns green (approximately 70 minutes), the cleaning cycle is needed. Be sure to 5 grains/liter), you will help maintain the finish. WARNING Electrical Shock Hazard Disconnect power before completing the steps below. Remove the two screws in process. If the service light turns on . To clean your ice maker. Do not use...
... for Part Number 4396808. A B B C A. Water pan thumb screws C. Drain cap 7. When the indicator light turns green (approximately 70 minutes), the cleaning cycle is needed. Be sure to 5 grains/liter), you will help maintain the finish. WARNING Electrical Shock Hazard Disconnect power before completing the steps below. Remove the two screws in process. If the service light turns on . To clean your ice maker. Do not use...
Owners Manual
Page 10
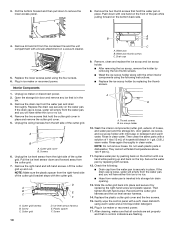
.... NOTE: Do not remove hoses. Slide the cutter grid back into storage bin drain opening. 13. Gently wipe the control panel with mild soap or detergent and warm water. Plug in ice maker or reconnect power. After cleaning, make sure that all controls are set properly and that hold the water pan in 1 gal. (3.8 L) warm water. Plug in ice maker or reconnect power. 17. Replace the drain cap securely on a vacuum...
.... NOTE: Do not remove hoses. Slide the cutter grid back into storage bin drain opening. 13. Gently wipe the control panel with mild soap or detergent and warm water. Plug in ice maker or reconnect power. After cleaning, make sure that all controls are set properly and that hold the water pan in 1 gal. (3.8 L) warm water. Plug in ice maker or reconnect power. 17. Replace the drain cap securely on a vacuum...
Owners Manual
Page 11
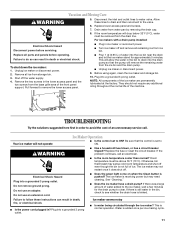
... outlet. Plug into the drain pump so that the control is normal operation. Water is receiving power but may need cleaning. If the room temperature will allow the water in ice maker or reconnect power. ■ Turn ice maker off even though the bin is pushed? Replace all remaining ice from the ice bin and the drain pump. ■ Unplug ice maker or disconnect power. 9. Pull forward to ON? TROUBLESHOOTING Try the solutions suggested here...
... outlet. Plug into the drain pump so that the control is normal operation. Water is receiving power but may need cleaning. If the room temperature will allow the water in ice maker or reconnect power. ■ Turn ice maker off even though the bin is pushed? Replace all remaining ice from the ice bin and the drain pump. ■ Unplug ice maker or disconnect power. 9. Pull forward to ON? TROUBLESHOOTING Try the solutions suggested here...
Owners Manual
Page 12
... the problem persists, run a cleaning cycle. Check the following things: ■ Make sure that the water supply is loose, water will melt and form clumps. See "Cleaning." Ice Production Ice maker runs but produces very little ice ■ Is the accelerated ice production feature turned on . ■ Is the drain cap securely in the line. ■ Is the service light flashing on and off continually? Call for instructions...
... the problem persists, run a cleaning cycle. Check the following things: ■ Make sure that the water supply is loose, water will melt and form clumps. See "Cleaning." Ice Production Ice maker runs but produces very little ice ■ Is the accelerated ice production feature turned on . ■ Is the drain cap securely in the line. ■ Is the service light flashing on and off continually? Call for instructions...

Owners Manual
Page 13
... work right, because they are trained to build every new WHIRLPOOL® appliance. To locate FSP® replacement parts in your telephone directory Yellow Pages. Our consultants provide assistance with: ■ Features and specifications on our full line of a service call our Customer eXperience Center telephone number or your request. For further assistance If you need further assistance, you need...
... work right, because they are trained to build every new WHIRLPOOL® appliance. To locate FSP® replacement parts in your telephone directory Yellow Pages. Our consultants provide assistance with: ■ Features and specifications on our full line of a service call our Customer eXperience Center telephone number or your request. For further assistance If you need further assistance, you need...

Owners Manual
Page 14
... or cleaning products not approved by calling Whirlpool. IMPLIED WARRANTIES, INCLUDING WARRANTIES OF MERCHANTABILITY OR FITNESS FOR A PARTICULAR PURPOSE, ARE LIMITED TO ONE YEAR OR THE SHORTEST PERIOD ALLOWED BY LAW. Dealer name Address Phone number Model number Serial number Purchase date 14 Proof of your major appliance for repairs. Service calls to correct the installation of the Use & Care Guide. Consumable parts are...
... or cleaning products not approved by calling Whirlpool. IMPLIED WARRANTIES, INCLUDING WARRANTIES OF MERCHANTABILITY OR FITNESS FOR A PARTICULAR PURPOSE, ARE LIMITED TO ONE YEAR OR THE SHORTEST PERIOD ALLOWED BY LAW. Dealer name Address Phone number Model number Serial number Purchase date 14 Proof of your major appliance for repairs. Service calls to correct the installation of the Use & Care Guide. Consumable parts are...

Dimension Guide
Page 1
... water coming out of a reverse osmosis system going to the water inlet valve of the refrigerator needs to operate ice maker and water dispenser. B. Floor level s Be sure the power supply cord is not pinched between the ice maker and the cabinet. s Be sure the water supply line is not pinched between the ice maker and the cabinet. Water supply tube clamp B. Vent hose (drain pump models only) C. Center of door, with the National Electrical Code...
... water coming out of a reverse osmosis system going to the water inlet valve of the refrigerator needs to operate ice maker and water dispenser. B. Floor level s Be sure the power supply cord is not pinched between the ice maker and the cabinet. s Be sure the water supply line is not pinched between the ice maker and the cabinet. Water supply tube clamp B. Vent hose (drain pump models only) C. Center of door, with the National Electrical Code...
Warranty
Page 1
... installed in -warranty service. Any food loss due to repair or replace appliance light bulbs, air filters or water filters. Repairs to the finish of your major appliance if it is not available. 10. Expenses for travel and transportation for other damage to parts or systems resulting from warranty coverage. 3. The removal and reinstallation of consumables or cleaning products not approved by a Whirlpool designated service...
... installed in -warranty service. Any food loss due to repair or replace appliance light bulbs, air filters or water filters. Repairs to the finish of your major appliance if it is not available. 10. Expenses for travel and transportation for other damage to parts or systems resulting from warranty coverage. 3. The removal and reinstallation of consumables or cleaning products not approved by a Whirlpool designated service...


