Owners Manual
Page 1
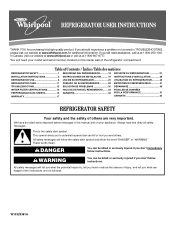
... 1 INSTALLATION INSTRUCTIONS 2 REFRIGERATOR USE 8 REFRIGERATOR CARE 11 TROUBLESHOOTING 12 WATER FILTER CERTIFICATIONS 14 PERFORMANCE DATA SHEETS 15 WARRANTY 17 SEGURIDAD DEL REFRIGERADOR 18 INSTRUCCIONES DE INSTALACIÓN........... 19 USO DE SU REFRIGERADOR 25 CUIDADO DE SU REFRIGERADOR 29 SOLUCIÓN DE PROBLEMAS 30 ...either the word "DANGER" or "WARNING." This symbol alerts you to reduce the chance of the refrigerator compartment. In Canada, visit our website at www.whirlpool.ca or call us at 1-800-807-6777. All safety messages will need assistance, call us ...
... 1 INSTALLATION INSTRUCTIONS 2 REFRIGERATOR USE 8 REFRIGERATOR CARE 11 TROUBLESHOOTING 12 WATER FILTER CERTIFICATIONS 14 PERFORMANCE DATA SHEETS 15 WARRANTY 17 SEGURIDAD DEL REFRIGERADOR 18 INSTRUCCIONES DE INSTALACIÓN........... 19 USO DE SU REFRIGERADOR 25 CUIDADO DE SU REFRIGERADOR 29 SOLUCIÓN DE PROBLEMAS 30 ...either the word "DANGER" or "WARNING." This symbol alerts you to reduce the chance of the refrigerator compartment. In Canada, visit our website at www.whirlpool.ca or call us at 1-800-807-6777. All safety messages will need assistance, call us ...

Owners Manual
Page 2
... over the adhesive with cardboard or hardboard to remove tape or glue. Shelves and covers may not easily climb inside of your refrigerator before using your refrigerator, follow these basic precautions: ■ Plug into many small, pebble-size pieces. Tempered glass is designed to shatter into a...place so that children may break if exposed to cover the floor with your fingers. When moving it . For more information, see "Refrigerator Safety." ■ Dispose of/recycle all packaging materials. 2 Clean Before Using After you are heavy. Wipe with warm water when ...
... over the adhesive with cardboard or hardboard to remove tape or glue. Shelves and covers may not easily climb inside of your refrigerator before using your refrigerator, follow these basic precautions: ■ Plug into many small, pebble-size pieces. Tempered glass is designed to shatter into a...place so that children may break if exposed to cover the floor with your fingers. When moving it . For more information, see "Refrigerator Safety." ■ Dispose of/recycle all packaging materials. 2 Clean Before Using After you are heavy. Wipe with warm water when ...
Owners Manual
Page 3
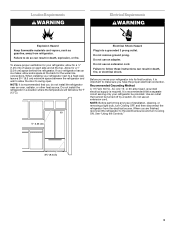
.... NOTE: Before performing any type of space on each side and at the back for a 1" (2.54 cm) space behind the refrigerator. To ensure proper ventilation for your refrigerator, allow for a ¹⁄₂" (1.25 cm) of installation, cleaning, or removing a light bulb, turn Cooling ON. Do... not use an extension cord. Before you move your refrigerator be turned off by a switch. Recommended Grounding Method A 115 Volt, 60 Hz., AC only 15- Do not use an extension cord. Allow for...
.... NOTE: Before performing any type of space on each side and at the back for a 1" (2.54 cm) space behind the refrigerator. To ensure proper ventilation for your refrigerator, allow for a ¹⁄₂" (1.25 cm) of installation, cleaning, or removing a light bulb, turn Cooling ON. Do... not use an extension cord. Before you move your refrigerator be turned off by a switch. Recommended Grounding Method A 115 Volt, 60 Hz., AC only 15- Do not use an extension cord. Allow for...
Owners Manual
Page 4
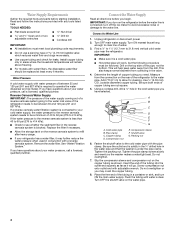
...;" drilled hole in the valve. 4. Water Pressure A cold water supply with a reverse osmosis system. See "Water Filtration System." Unplug refrigerator or disconnect power. 2. Measure from the connection on the reverse osmosis system to operate the water dispenser and ice maker. Pipe clamp ...cut square. 5. Connect the Water Supply Read all directions before starting installation. Add 7 ft (2.1 m) to Water Line 1. Slip the compression sleeve and compression nut on the refrigerator before the water line is clear. Screw compression nut onto outlet end with any tools ...
...;" drilled hole in the valve. 4. Water Pressure A cold water supply with a reverse osmosis system. See "Water Filtration System." Unplug refrigerator or disconnect power. 2. Measure from the connection on the reverse osmosis system to operate the water dispenser and ice maker. Pipe clamp ...cut square. 5. Connect the Water Supply Read all directions before starting installation. Add 7 ft (2.1 m) to Water Line 1. Slip the compression sleeve and compression nut on the refrigerator before the water line is clear. Screw compression nut onto outlet end with any tools ...
Owners Manual
Page 5
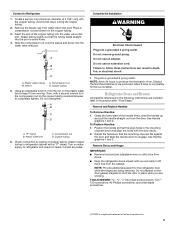
...Do not use an extension cord. Do not use an adapter. Plug into the water valve inlet port. Allow 3 days to refrigerator and check for the refrigerator door while the hinges are included later in death, fire, or electrical shock. 1. Rotate the handle so that the large holes ...instructions can result in this section after "Final Steps." Remove and Replace Handles To Remove Handles: 1. Create a service loop (minimum diameter of 2 ft [61 cm]) with a second wrench turn the compression nut on water supply to completely fill the ice container. Place a compression nut and sleeve on...
...Do not use an extension cord. Do not use an adapter. Plug into the water valve inlet port. Allow 3 days to refrigerator and check for the refrigerator door while the hinges are included later in death, fire, or electrical shock. 1. Rotate the handle so that the large holes ...instructions can result in this section after "Final Steps." Remove and Replace Handles To Remove Handles: 1. Create a service loop (minimum diameter of 2 ft [61 cm]) with a second wrench turn the compression nut on water supply to completely fill the ice container. Place a compression nut and sleeve on...
Owners Manual
Page 6
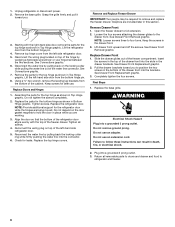
...Hinge graphic. See Drawer Front Replacement graphic. 2. WARNING Electrical Shock Hazard Plug into the connector. 6. Do not use an adapter. Unplug refrigerator or disconnect power. 2. Disconnect the water line by pulling back on the door gasket magnets to follow these instructions can result in this section...upward and off the screws. Completely tighten the four screws. Grasp the grille firmly and pull it toward you to refrigerator and freezer. 6 Lift the refrigerator door from the left -hand side door from the bottom of the hinge by pulling back the locking collar ring ...
...Hinge graphic. See Drawer Front Replacement graphic. 2. WARNING Electrical Shock Hazard Plug into the connector. 6. Do not use an adapter. Unplug refrigerator or disconnect power. 2. Disconnect the water line by pulling back on the door gasket magnets to follow these instructions can result in this section...upward and off the screws. Completely tighten the four screws. Grasp the grille firmly and pull it toward you to refrigerator and freezer. 6 Lift the refrigerator door from the left -hand side door from the bottom of the hinge by pulling back the locking collar ring ...
Owners Manual
Page 7
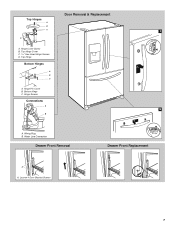
Top Hinge Bottom Hinges A B C A. Door Removal & Replacement Top Hinges A B C 1 D A. Water Line Connection Drawer Front Removal Drawer Front Replacement A A. Wiring Plug B. Loosen 4 Door Bracket Screws 7 Hinge Cover Screw B. Hinge Screws Connections A 2 B A. Hinge Pin Cover B. Top Hinge Cover C. 5/16" Hex-Head Hinge Screws D. Bottom Hinge C.
Top Hinge Bottom Hinges A B C A. Door Removal & Replacement Top Hinges A B C 1 D A. Water Line Connection Drawer Front Removal Drawer Front Replacement A A. Wiring Plug B. Loosen 4 Door Bracket Screws 7 Hinge Cover Screw B. Hinge Screws Connections A 2 B A. Hinge Pin Cover B. Top Hinge Cover C. 5/16" Hex-Head Hinge Screws D. Bottom Hinge C.
Owners Manual
Page 8
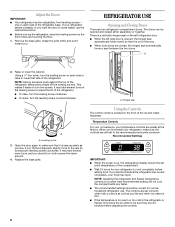
.... NOTE: Having someone push against the top of the compartment. ■ Wait 24 hours for normal household refrigerator use the instructions below. ■ Before moving the refrigerator, raise the leveling screws so the front rollers are preset at the factory. It may take several turns of... the leveling screw to adjust the tilt of the refrigerator. ■ To raise, turn the leveling screw clockwise. ■ To lower, turn the leveling screw counterclockwise. Replace the base grille....
.... NOTE: Having someone push against the top of the compartment. ■ Wait 24 hours for normal household refrigerator use the instructions below. ■ Before moving the refrigerator, raise the leveling screws so the front rollers are preset at the factory. It may take several turns of... the leveling screw to adjust the tilt of the refrigerator. ■ To raise, turn the leveling screw clockwise. ■ To lower, turn the leveling screw counterclockwise. Replace the base grille....
Owners Manual
Page 9
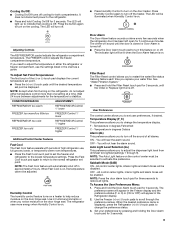
...temperature settings. Cooling On/Off: ■ Cooling On/Off turns off cooling for 5 continuous minutes. Press Humidity Control again to the normal refrigerator set point. ■ Press the (+) or (-) touch pads until the Order or Replace light turns off the heater. To Adjust Set Point...door is closed or Door Alarm is on . Temperature Display (F_C) This preference allows you to turn on the cooling. Temperature in the Refrigerator display. 2. NOTE: The Auto Light feature on . All control center lights, interior lights and alarm tones will be selected to change the...
...temperature settings. Cooling On/Off: ■ Cooling On/Off turns off cooling for 5 continuous minutes. Press Humidity Control again to the normal refrigerator set point. ■ Press the (+) or (-) touch pads until the Order or Replace light turns off the heater. To Adjust Set Point...door is closed or Door Alarm is on . Temperature Display (F_C) This preference allows you to turn on the cooling. Temperature in the Refrigerator display. 2. NOTE: The Auto Light feature on . All control center lights, interior lights and alarm tones will be selected to change the...
Owners Manual
Page 10
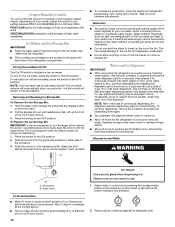
...of fruits and vegetables with the auger driver. See "Using the Controls." Water and Ice Dispenser IMPORTANT: ■ After connecting the refrigerator to the ON position 2. Use a sturdy container to depress and hold the water dispenser pad for 5 seconds, then release it ...9632; Flush the water system before turning on the dispenser control panel. A ■ To increase ice production, lower the freezer and refrigerator temperature. Avoid connecting the ice maker to a softened water supply. This will automatically stop dispensing water to avoid flooding. To manually turn...
...of fruits and vegetables with the auger driver. See "Using the Controls." Water and Ice Dispenser IMPORTANT: ■ After connecting the refrigerator to the ON position 2. Use a sturdy container to depress and hold the water dispenser pad for 5 seconds, then release it ...9632; Flush the water system before turning on the dispenser control panel. A ■ To increase ice production, lower the freezer and refrigerator temperature. Avoid connecting the ice maker to a softened water supply. This will automatically stop dispensing water to avoid flooding. To manually turn...
Owners Manual
Page 11
...compartments, any odors formed in one compartment will transfer to the other harsh cleaning tools that is microbiologically unsafe or of the refrigerator compartment. Water Filtration System The water filter is chosen, replace the filter with the blue bypass cap. or 1-800-807-6777 Canada...the water system. If this option is located in the upper right-hand corner of unknown quality without a water filter installed. Both the refrigerator and freezer sections defrost automatically. Clean the Interior 1. NOTE: Do not spray or wipe liquids directly onto the screen, or over-saturate ...
...compartments, any odors formed in one compartment will transfer to the other harsh cleaning tools that is microbiologically unsafe or of the refrigerator compartment. Water Filtration System The water filter is chosen, replace the filter with the blue bypass cap. or 1-800-807-6777 Canada...the water system. If this option is located in the upper right-hand corner of unknown quality without a water filter installed. Both the refrigerator and freezer sections defrost automatically. Clean the Interior 1. NOTE: Do not spray or wipe liquids directly onto the screen, or over-saturate ...
Owners Manual
Page 12
...Allow 24 hours following installation for the refrigerator to ensure maximum efficiency. Unplug refrigerator or disconnect power. 2. Replace the base grille when finished. 5. Unplug refrigerator or disconnect power. 2. In the U.S.A., www.whirlpool.com In Canada, www.whirlpool.ca The refrigerator will fit your old one due ...occur, clean plastic part with a soft cloth. 3. Remove the base grille. 3. or 1-800-807-6777 Canada. Plug in refrigerator or reconnect power. Clean the Condenser There is added, doors are on the shield into the liner holes and snap into contact ...
...Allow 24 hours following installation for the refrigerator to ensure maximum efficiency. Unplug refrigerator or disconnect power. 2. Replace the base grille when finished. 5. Unplug refrigerator or disconnect power. 2. In the U.S.A., www.whirlpool.com In Canada, www.whirlpool.ca The refrigerator will fit your old one due ...occur, clean plastic part with a soft cloth. 3. Remove the base grille. 3. or 1-800-807-6777 Canada. Plug in refrigerator or reconnect power. Clean the Condenser There is added, doors are on the shield into the liner holes and snap into contact ...
Owners Manual
Page 13
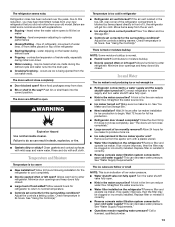
...temperature in 24 hours. There is interior moisture buildup NOTE: Some moisture buildup is blocked by items placed directly in refrigerator ■ Refrigerator air vent blocked? If it correctly. ■ Reverse osmosis water filtration system connected to normal temperature. ■ ... firmly. See "Water Supply Requirements." ■ Questions remain regarding water pressure? may be clogged or incorrectly installed. The refrigerator seems noisy Refrigerator noise has been reduced over the years. The doors will get too cold. Move food packages away from the air vent...
...temperature in 24 hours. There is interior moisture buildup NOTE: Some moisture buildup is blocked by items placed directly in refrigerator ■ Refrigerator air vent blocked? If it correctly. ■ Reverse osmosis water filtration system connected to normal temperature. ■ ... firmly. See "Water Supply Requirements." ■ Questions remain regarding water pressure? may be clogged or incorrectly installed. The refrigerator seems noisy Refrigerator noise has been reduced over the years. The doors will get too cold. Move food packages away from the air vent...
Owners Manual
Page 14
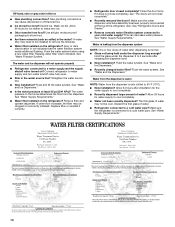
...24 hours after installation for the water supply to your cold water supply? WATER FILTER CERTIFICATIONS 14 Replace water filter when indicated. Connect refrigerator to the home determines the flow from the dispenser is only chilled to a water supply and the supply shutoff valve turned on?...at least 35 psi (241 kPa)? Replace filter or reinstall it does not close completely, see "The doors will not operate properly ■ Refrigerator connected to 50°F (10°C). ■ New installation? Hold the glass under the dispenser 2 to 3 seconds after dispensing is ...
...24 hours after installation for the water supply to your cold water supply? WATER FILTER CERTIFICATIONS 14 Replace water filter when indicated. Connect refrigerator to the home determines the flow from the dispenser is only chilled to a water supply and the supply shutoff valve turned on?...at least 35 psi (241 kPa)? Replace filter or reinstall it does not close completely, see "The doors will not operate properly ■ Refrigerator connected to 50°F (10°C). ■ New installation? Hold the glass under the dispenser 2 to 3 seconds after dispensing is ...
Owners Manual
Page 15
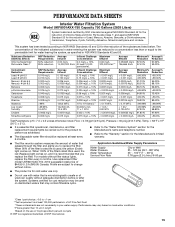
PERFORMANCE DATA SHEETS Interior Water Filtration System Model UKF8001AXX-750 Capacity 750 Gallons (2839 Liters) System tested and certified by NSF International against NSF/ANSI Standard 53 for the reduction of the filter's rated life is used on disinfected waters that may be replaced at least every 6 months. ■ Refer to the "Water Filtration System" section for the Manufacturer's name and telephone number. ■ Refer to the "Warranty" section for the Manufacturer's limited warranty. ■ The filter monitor system measures the amount of water that passes through the filter ...
PERFORMANCE DATA SHEETS Interior Water Filtration System Model UKF8001AXX-750 Capacity 750 Gallons (2839 Liters) System tested and certified by NSF International against NSF/ANSI Standard 53 for the reduction of the filter's rated life is used on disinfected waters that may be replaced at least every 6 months. ■ Refer to the "Water Filtration System" section for the Manufacturer's name and telephone number. ■ Refer to the "Warranty" section for the Manufacturer's limited warranty. ■ The filter monitor system measures the amount of water that passes through the filter ...
Owners Manual
Page 16
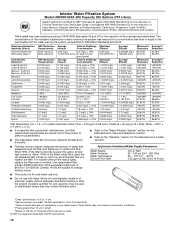
Substance Reduction Aesthetic Effects Chlorine Taste/Odor Particulate Class I *; When 90% of the filter's rated life is recommended that you to the "Warranty" section for the Manufacturer's name and telephone number. ■ Refer to replace the filter. Interior Water Filtration System Model UKF8001AXX-200 Capacity 200 Gallons (757 Liters) System tested and certified by NSF International against NSF/ANSI Standard 53 for the reduction of the indicated substances in water entering the system was reduced to a concentration less than or equal to the permissible limit for water leaving ...
Substance Reduction Aesthetic Effects Chlorine Taste/Odor Particulate Class I *; When 90% of the filter's rated life is recommended that you to the "Warranty" section for the Manufacturer's name and telephone number. ■ Refer to replace the filter. Interior Water Filtration System Model UKF8001AXX-200 Capacity 200 Gallons (757 Liters) System tested and certified by NSF International against NSF/ANSI Standard 53 for the reduction of the indicated substances in water entering the system was reduced to a concentration less than or equal to the permissible limit for water leaving ...
Owners Manual
Page 17
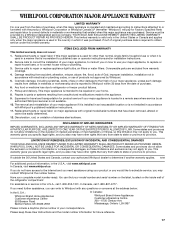
... parts or repair labor on the inside wall of the refrigerator compartment. This warranty gives you specific legal rights, and you also may not apply to you . LIMITATION OF REMEDIES; In Canada, call 1-800-253-1301. Service must be provided by Whirlpool. 5. WHIRLPOOL CORPORATION MAJOR APPLIANCE WARRANTY LIMITED WARRANTY For one year from...
... parts or repair labor on the inside wall of the refrigerator compartment. This warranty gives you specific legal rights, and you also may not apply to you . LIMITATION OF REMEDIES; In Canada, call 1-800-253-1301. Service must be provided by Whirlpool. 5. WHIRLPOOL CORPORATION MAJOR APPLIANCE WARRANTY LIMITED WARRANTY For one year from...
Dimension Guide
Page 1
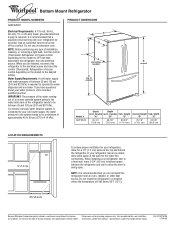
...115-volt, 60-Hz, AC-only, 15- Do not install the refrigerator in a location where the temperature will fall below 55°F (13°C). 3³⁄₄" (9.5 cm) Because Whirlpool Corporation policy includes a continuous commitment to swing open. IMPORTANT: The pressure ...of the water coming out of a reverse osmosis system going to the water inlet valve of the refrigerator needs to be a minimum of installation, cleaning...
...115-volt, 60-Hz, AC-only, 15- Do not install the refrigerator in a location where the temperature will fall below 55°F (13°C). 3³⁄₄" (9.5 cm) Because Whirlpool Corporation policy includes a continuous commitment to swing open. IMPORTANT: The pressure ...of the water coming out of a reverse osmosis system going to the water inlet valve of the refrigerator needs to be a minimum of installation, cleaning...
Energy Guide
Page 1
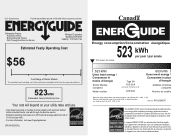
... law prohibits removal of this label before first retail purchase is an energy-efficient appliance. Canada Refrigerator-Freezer ·Automatic Defrost ·Bottom Mounted Freezer ·With Through-the-Door-Ice Service Whirlpool Corporation Model(s):GIOFSAXV Capacity: 19.8 Cubic Feet Estimated Yearly Operating Cost $56 Cost Range of Similar Models The estimated yearly...
... law prohibits removal of this label before first retail purchase is an energy-efficient appliance. Canada Refrigerator-Freezer ·Automatic Defrost ·Bottom Mounted Freezer ·With Through-the-Door-Ice Service Whirlpool Corporation Model(s):GIOFSAXV Capacity: 19.8 Cubic Feet Estimated Yearly Operating Cost $56 Cost Range of Similar Models The estimated yearly...

Warranty
Page 1
...to use your major appliance, to you can write to refrigerator or freezer product failures. 7. Mississauga, Ontario L5N 0B7 Please include a daytime phone number in a remote area where service by a Whirlpool designated service company. Pickup and delivery. The removal and ...reinstallation of the refrigerator compartment. Service calls to the appliance. 9. Some states and provinces do not allow the ...
...to use your major appliance, to you can write to refrigerator or freezer product failures. 7. Mississauga, Ontario L5N 0B7 Please include a daytime phone number in a remote area where service by a Whirlpool designated service company. Pickup and delivery. The removal and ...reinstallation of the refrigerator compartment. Service calls to the appliance. 9. Some states and provinces do not allow the ...
