Owners Manual
Page 1
... of Contents / Índice / Table des matières REFRIGERATOR SAFETY 1 INSTALLATION INSTRUCTIONS 2 REFRIGERATOR USE 8 REFRIGERATOR CARE 11 TROUBLESHOOTING 12 WATER FILTER CERTIFICATIONS 14 PERFORMANCE DATA SHEETS 15 WARRANTY 17 SEGURIDAD DEL REFRIGERADOR 18 INSTRUCCIONES DE INSTALACIÓN........... 19 USO DE SU REFRIGERADOR 25 CUIDADO DE SU REFRIGERADOR 29 SOLUCIÓN DE PROBLEMAS 30 HOJA DE DATOS DEL RENDIMIENTO........ 33 GARANTÍA 35 SÉCURITÉ DU RÉ...
... of Contents / Índice / Table des matières REFRIGERATOR SAFETY 1 INSTALLATION INSTRUCTIONS 2 REFRIGERATOR USE 8 REFRIGERATOR CARE 11 TROUBLESHOOTING 12 WATER FILTER CERTIFICATIONS 14 PERFORMANCE DATA SHEETS 15 WARRANTY 17 SEGURIDAD DEL REFRIGERADOR 18 INSTRUCCIONES DE INSTALACIÓN........... 19 USO DE SU REFRIGERADOR 25 CUIDADO DE SU REFRIGERADOR 29 SOLUCIÓN DE PROBLEMAS 30 HOJA DE DATOS DEL RENDIMIENTO........ 33 GARANTÍA 35 SÉCURITÉ DU RÉ...

Owners Manual
Page 2
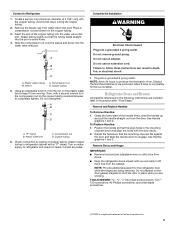
... with warm water and dry. ■ Do not use an extension cord. ■ Disconnect power before servicing. ■ Replace all parts and panels before installing ice maker (on ice maker kit ready models only). ■ Use a sturdy glass when dispensing ice (on some models). ■ Do not hit the refrigerator glass doors (on the refrigerator. Remove the Packaging ■ Remove tape and glue residue from your refrigerator, follow these basic precautions: ■ Plug into many small, pebble-size pieces...
... with warm water and dry. ■ Do not use an extension cord. ■ Disconnect power before servicing. ■ Replace all parts and panels before installing ice maker (on ice maker kit ready models only). ■ Use a sturdy glass when dispensing ice (on some models). ■ Do not hit the refrigerator glass doors (on the refrigerator. Remove the Packaging ■ Remove tape and glue residue from your refrigerator, follow these basic precautions: ■ Plug into many small, pebble-size pieces...
Owners Manual
Page 3
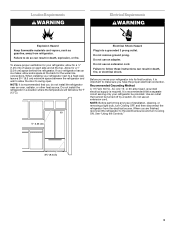
... electrical supply is recommended that a separate circuit serving only your refrigerator has an ice maker, allow for a ¹⁄₂" (1.25 cm) of installation, cleaning, or removing a light bulb, turn Cooling ON. Use an outlet that cannot be provided. Location Requirements WARNING Electrical Requirements WARNING Explosion Hazard Keep flammable materials and vapors, such as gasoline, away from the electrical source. Failure to swing open. Allow for your refrigerator...
... electrical supply is recommended that a separate circuit serving only your refrigerator has an ice maker, allow for a ¹⁄₂" (1.25 cm) of installation, cleaning, or removing a light bulb, turn Cooling ON. Use an outlet that cannot be provided. Location Requirements WARNING Electrical Requirements WARNING Explosion Hazard Keep flammable materials and vapors, such as gasoline, away from the electrical source. Failure to swing open. Allow for your refrigerator...
Owners Manual
Page 4
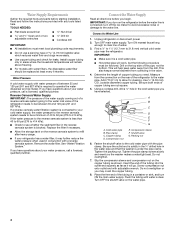
... water supply. Water Pressure A cold water supply with water pressure of copper tubing you may further reduce the water pressure when used in the valve. 4. If a reverse osmosis water filtration system is less than 40 to 60 psi (276 to 414 kPa): ■ Check to 31.8 mm) vertical cold water pipe near the refrigerator. If the water pressure to the reverse osmosis system is connected to operate the water dispenser and ice maker. Replace the filter...
... water supply. Water Pressure A cold water supply with water pressure of copper tubing you may further reduce the water pressure when used in the valve. 4. If a reverse osmosis water filtration system is less than 40 to 60 psi (276 to 414 kPa): ■ Check to 31.8 mm) vertical cold water pipe near the refrigerator. If the water pressure to the reverse osmosis system is connected to operate the water dispenser and ice maker. Replace the filter...
Owners Manual
Page 5
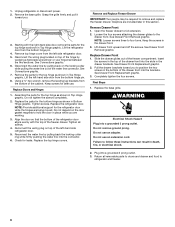
... following instructions are being removed. Position the handle so that the mounting clips are down to lift them free from moving. NOTE: Provide additional support for leaks. Place a compression nut and sleeve on copper tubing. Slide the compression nut over the sleeve and screw into the water valve inlet port. Correct any adjustable door or utility bins from doors. ■ Keep the refrigerator doors closed...
... following instructions are being removed. Position the handle so that the mounting clips are down to lift them free from moving. NOTE: Provide additional support for leaks. Place a compression nut and sleeve on copper tubing. Slide the compression nut over the sleeve and screw into the water valve inlet port. Correct any adjustable door or utility bins from doors. ■ Keep the refrigerator doors closed...
Owners Manual
Page 6
... not use an adapter. 1. Unplug refrigerator or disconnect power. 2. Disconnect the wiring plug located on the locking collar while pulling the water line out of the hinge by pulling back the locking collar ring while firmly pushing the water line into the slots in Top Hinge graphic. Lift the left side refrigerator door. 5. Replace Doors and Hinges 1. Replace the top hinge covers. Remove Drawer Front 1. Open the freezer drawer to the drawer front. See Drawer Front Removal graphic. Replace the...
... not use an adapter. 1. Unplug refrigerator or disconnect power. 2. Disconnect the wiring plug located on the locking collar while pulling the water line out of the hinge by pulling back the locking collar ring while firmly pushing the water line into the slots in Top Hinge graphic. Lift the left side refrigerator door. 5. Replace Doors and Hinges 1. Replace the top hinge covers. Remove Drawer Front 1. Open the freezer drawer to the drawer front. See Drawer Front Removal graphic. Replace the...
Owners Manual
Page 7
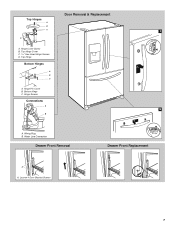
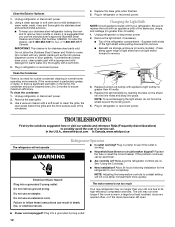
Hinge Cover Screw B. Top Hinge Cover C. 5/16" Hex-Head Hinge Screws D. Wiring Plug B. Loosen 4 Door Bracket Screws 7 Door Removal & Replacement Top Hinges A B C 1 D A. Bottom Hinge C. Hinge Pin Cover B. Hinge Screws Connections A 2 B A. Top Hinge Bottom Hinges A B C A. Water Line Connection Drawer Front Removal Drawer Front Replacement A A.
Hinge Cover Screw B. Top Hinge Cover C. 5/16" Hex-Head Hinge Screws D. Wiring Plug B. Loosen 4 Door Bracket Screws 7 Door Removal & Replacement Top Hinges A B C 1 D A. Bottom Hinge C. Hinge Pin Cover B. Hinge Screws Connections A 2 B A. Top Hinge Bottom Hinges A B C A. Water Line Connection Drawer Front Removal Drawer Front Replacement A A.
Owners Manual
Page 8
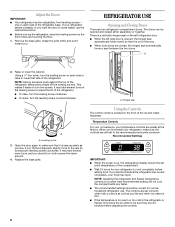
.... Using the Controls The control center is located on the left refrigerator door. ■ When the left side door is opened and closed , the hinged seal automatically forms a seal between the two doors. Adjust the Doors IMPORTANT: ■ Your refrigerator has two adjustable, front leveling screws - A 2. This makes it is a vertically-hinged seal on the front of the ice and water dispenser. Temperature Controls For your convenience, your refrigerator to a colder than recommended setting will not cool...
.... Using the Controls The control center is located on the left refrigerator door. ■ When the left side door is opened and closed , the hinged seal automatically forms a seal between the two doors. Adjust the Doors IMPORTANT: ■ Your refrigerator has two adjustable, front leveling screws - A 2. This makes it is a vertically-hinged seal on the front of the ice and water dispenser. Temperature Controls For your convenience, your refrigerator to a colder than recommended setting will not cool...
Owners Manual
Page 9
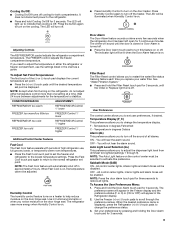
... you need to adjust the temperature in either temperature control more energy when Humidity Control is on the door hinge seal. Temperature in the Refrigerator display. 2. OFF - Use the Freezer (+) or (-) touch pads to scroll through 9). When the desired preference name is Off. The LED will light up to stabilize. Wait 24 hours between adjustments for 3 seconds. 9 When Fast Cool is displayed. Filter Reset The Filter Reset control allows you to restart the water filter...
... you need to adjust the temperature in either temperature control more energy when Humidity Control is on the door hinge seal. Temperature in the Refrigerator display. 2. OFF - Use the Freezer (+) or (-) touch pads to scroll through 9). When the desired preference name is Off. The LED will light up to stabilize. Wait 24 hours between adjustments for 3 seconds. 9 When Fast Cool is displayed. Filter Reset The Filter Reset control allows you to restart the water filter...
Owners Manual
Page 10
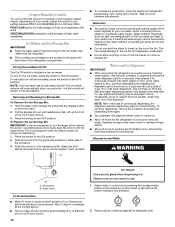
... water supply. To manually turn on top of the ice maker or in a 24-hour period. 10 Cut Hazard Use a sturdy glass when dispensing ice. The ice maker sensors will be avoided, make sure the water softener is operating properly and is felt. See "Using the Controls." Avoid connecting the ice maker to 12 batches of ice in the ice storage bin. Ice Maker and Ice Storage Bin IMPORTANT: ■ Flush the water system before turning on the dispenser control panel. Press...
... water supply. To manually turn on top of the ice maker or in a 24-hour period. 10 Cut Hazard Use a sturdy glass when dispensing ice. The ice maker sensors will be avoided, make sure the water softener is operating properly and is felt. See "Using the Controls." Avoid connecting the ice maker to 12 batches of ice in the ice storage bin. Ice Maker and Ice Storage Bin IMPORTANT: ■ Flush the water system before turning on the dispenser control panel. Press...
Owners Manual
Page 11
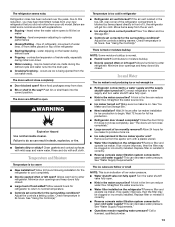
... in refrigerator or reconnect power. 11 Remove the container to avoid odor buildup. REFRIGERATOR CARE Cleaning WARNING Explosion Hazard Use nonflammable cleaner. Both the refrigerator and freezer sections defrost automatically. Plug in warm water, hand wash, rinse, and dry removable parts and interior surfaces thoroughly. 3. It just deactivates all compartments, any odors formed in death, explosion, or fire. Do not use the dispenser, the lever will turn the dispenser light on...
... in refrigerator or reconnect power. 11 Remove the container to avoid odor buildup. REFRIGERATOR CARE Cleaning WARNING Explosion Hazard Use nonflammable cleaner. Both the refrigerator and freezer sections defrost automatically. Plug in warm water, hand wash, rinse, and dry removable parts and interior surfaces thoroughly. 3. It just deactivates all compartments, any odors formed in death, explosion, or fire. Do not use the dispenser, the lever will turn the dispenser light on...
Owners Manual
Page 12
...-efficiency compressor and fans. Do not use an extension cord. In the U.S.A., www.whirlpool.com In Canada, www.whirlpool.ca The refrigerator will not cool either compartment more quickly. Make sure the refrigerator controls are opened often, or if the doors have been left open areas behind the grille and the front surface area of the same size, shape, and wattage (no need for routine condenser cleaning in warm water...
...-efficiency compressor and fans. Do not use an extension cord. In the U.S.A., www.whirlpool.com In Canada, www.whirlpool.ca The refrigerator will not cool either compartment more quickly. Make sure the refrigerator controls are opened often, or if the doors have been left open areas behind the grille and the front surface area of the same size, shape, and wattage (no need for routine condenser cleaning in warm water...
Owners Manual
Page 13
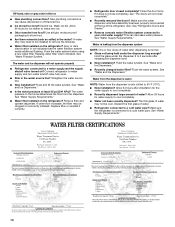
... - occurs as ice is too warm ■ New installation? Failure to your cold water supply? Minimize door openings and keep doors fully closed. Move items away from door. ■ Bin or shelf in the ice maker ejector arm? Check temperature in the line can reduce water flow. A kink in 24 hours. Straighten the water source line. ■ Ice maker turned on the refrigerator? Remove filter and operate ice maker. Replace filter or reinstall it correctly. ■ Reverse osmosis water filtration system connected to do...
... - occurs as ice is too warm ■ New installation? Failure to your cold water supply? Minimize door openings and keep doors fully closed. Move items away from door. ■ Bin or shelf in the ice maker ejector arm? Check temperature in the line can reduce water flow. A kink in 24 hours. Straighten the water source line. ■ Ice maker turned on the refrigerator? Remove filter and operate ice maker. Replace filter or reinstall it correctly. ■ Reverse osmosis water filtration system connected to do...
Owners Manual
Page 14
... a cold water pipe? See "Water Supply Requirements." ■ Water filter installed on the refrigerator? Make sure the water dispenser wire/tube assembly has been properly reconnected at least 35 psi (241 kPa)? Straighten the water source line. ■ New installation? Close the door firmly. If water flow increases, the filter may be cool. If it correctly. ■ Refrigerator door closed completely? See "Water Supply Requirements." Hold the glass under the dispenser long enough? Remove filter and operate dispenser. Allow 24 hours for ice maker...
... a cold water pipe? See "Water Supply Requirements." ■ Water filter installed on the refrigerator? Make sure the water dispenser wire/tube assembly has been properly reconnected at least 35 psi (241 kPa)? Straighten the water source line. ■ New installation? Close the door firmly. If water flow increases, the filter may be cool. If it correctly. ■ Refrigerator door closed completely? See "Water Supply Requirements." Hold the glass under the dispenser long enough? Remove filter and operate dispenser. Allow 24 hours for ice maker...
Owners Manual
Page 15
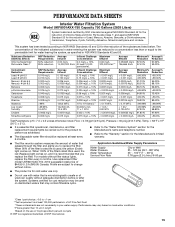
... Manufacturer's name and telephone number. ■ Refer to the "Warranty" section for the Manufacturer's limited warranty. ■ The filter monitor system measures the amount of the filter's rated life is used , the red (Replace) light comes on, and it is used , the yellow (Order) light comes on disinfected waters that operational, maintenance, and filter replacement requirements be used on . When 90% of water that you to perform...
... Manufacturer's name and telephone number. ■ Refer to the "Warranty" section for the Manufacturer's limited warranty. ■ The filter monitor system measures the amount of the filter's rated life is used , the red (Replace) light comes on, and it is used , the yellow (Order) light comes on disinfected waters that operational, maintenance, and filter replacement requirements be used on . When 90% of water that you to perform...
Owners Manual
Page 16
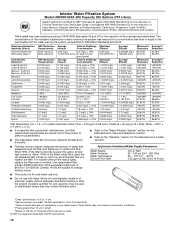
... lights, replace the filter every 6 months. Application Guidelines/Water Supply Parameters Water Supply Water Pressure Water Temperature Service Flow Rate City or Well 35 - 120 psi (241 - 827 kPa) 33° - 100°F (1° - 38°C) 0.55 gpm (2.08 L/min.) @ 60 psi ■ The product is used , the yellow (Order) light comes on , and it is microbiologically unsafe or of the filter's rated life is for cold water use...
... lights, replace the filter every 6 months. Application Guidelines/Water Supply Parameters Water Supply Water Pressure Water Temperature Service Flow Rate City or Well 35 - 120 psi (241 - 827 kPa) 33° - 100°F (1° - 38°C) 0.55 gpm (2.08 L/min.) @ 60 psi ■ The product is used , the yellow (Order) light comes on , and it is microbiologically unsafe or of the filter's rated life is for cold water use...
Owners Manual
Page 17
... made to use of products not approved by a Whirlpool designated service company. Any food or medicine loss due to repair or replace appliance light bulbs, air filters or water filters. Repairs to parts or systems resulting from warranty coverage. 4. Expenses for travel and transportation for product service if your model number and serial number on the label, located on how to the appliance. 9. LIMITATION OF REMEDIES; This warranty gives you specific legal...
... made to use of products not approved by a Whirlpool designated service company. Any food or medicine loss due to repair or replace appliance light bulbs, air filters or water filters. Repairs to parts or systems resulting from warranty coverage. 4. Expenses for travel and transportation for product service if your model number and serial number on the label, located on how to the appliance. 9. LIMITATION OF REMEDIES; This warranty gives you specific legal...
Dimension Guide
Page 1
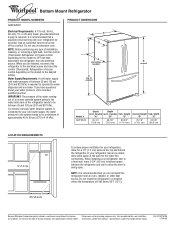
... the back for your refrigerator be a minimum of installation, cleaning, or removing a light bulb, turn the control (Thermostat, Refrigerator or Freezer control depending on the model) to operate the water dispenser and ice maker. W10215185 01-09-09 or 20-amp fused, grounded electrical supply is recommended that cannot be between 35 and 120 psi (241 and 827 kPa). If your water pressure, call a licensed, qualified plumber. Specifications subject to change without notice. When...
... the back for your refrigerator be a minimum of installation, cleaning, or removing a light bulb, turn the control (Thermostat, Refrigerator or Freezer control depending on the model) to operate the water dispenser and ice maker. W10215185 01-09-09 or 20-amp fused, grounded electrical supply is recommended that cannot be between 35 and 120 psi (241 and 827 kPa). If your water pressure, call a licensed, qualified plumber. Specifications subject to change without notice. When...
Energy Guide
Page 1
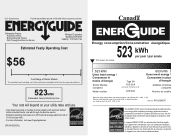
... Model number Type 5A 18.5-20.4 volume in ft3/volume en pi3 GIOFSAXV 653 kWh Uses most energy / Consomme le plus d'énergie Modèles similaires comparés Numéro du modèle Removal of Canada's high efficiency levels. U.S. Canada Refrigerator-Freezer ·Automatic Defrost ·Bottom Mounted Freezer ·With Through-the-Door-Ice Service Whirlpool Corporation Model(s):GIOFSAXV Capacity: 19.8 Cubic Feet Estimated Yearly Operating...
... Model number Type 5A 18.5-20.4 volume in ft3/volume en pi3 GIOFSAXV 653 kWh Uses most energy / Consomme le plus d'énergie Modèles similaires comparés Numéro du modèle Removal of Canada's high efficiency levels. U.S. Canada Refrigerator-Freezer ·Automatic Defrost ·Bottom Mounted Freezer ·With Through-the-Door-Ice Service Whirlpool Corporation Model(s):GIOFSAXV Capacity: 19.8 Cubic Feet Estimated Yearly Operating...

Warranty
Page 1
... do not allow limitations on the inside wall of the refrigerator compartment. Have your model number and serial number on the label, located on the duration of implied warranties of merchantability or fitness, so this limited warranty. Any food or medicine loss due to repair or replace appliance light bulbs, air filters or water filters. For assistance or service in accordance with Whirlpool's published installation instructions. 11. This major appliance is...
... do not allow limitations on the inside wall of the refrigerator compartment. Have your model number and serial number on the label, located on the duration of implied warranties of merchantability or fitness, so this limited warranty. Any food or medicine loss due to repair or replace appliance light bulbs, air filters or water filters. For assistance or service in accordance with Whirlpool's published installation instructions. 11. This major appliance is...


