
User Instructions
Page 1
...able to excessive microwave energy: m Install or locate the microwave oven only in the microwave oven. Para obtener acceso a "lnstrucciones para el usuario de la combinaci6n microondas campana" en espa_ol, o para obtener informaci6n adicional acerca de su producto, visite: www.whirlpool.com Tenga listo... in the shell and sealed containers - All safety messages will follow the specific "PRECAUTIONS TO AVOID POSSIBLE EXPOSURE TO EXCESSIVE MICROWAVE ENERGY" found in this section and in this section. the provided Installation Instructions. Connect only to potential hazards that can ...
...able to excessive microwave energy: m Install or locate the microwave oven only in the microwave oven. Para obtener acceso a "lnstrucciones para el usuario de la combinaci6n microondas campana" en espa_ol, o para obtener informaci6n adicional acerca de su producto, visite: www.whirlpool.com Tenga listo... in the shell and sealed containers - All safety messages will follow the specific "PRECAUTIONS TO AVOID POSSIBLE EXPOSURE TO EXCESSIVE MICROWAVE ENERGY" found in this section and in this section. the provided Installation Instructions. Connect only to potential hazards that can ...

User Instructions
Page 2
...[] Do not store any materials, other part of fire in use. Call an authorized service company for storage purposes. Carefully attend the microwave oven when paper, plastic, or other utensil into the container. Do not use the cavity for examination, repair, or adjustment. THIS COULD...important that the oven door close supervision is specifically designed to be adjusted or repaired by qualified service personnel. Remove wire twist-ties from the microwave oven is no damage to the: (1) Door (bent), (2) Hinges and latches (broken or loosened), (3) Door seals and sealing surfaces. ...
...[] Do not store any materials, other part of fire in use. Call an authorized service company for storage purposes. Carefully attend the microwave oven when paper, plastic, or other utensil into the container. Do not use the cavity for examination, repair, or adjustment. THIS COULD...important that the oven door close supervision is specifically designed to be adjusted or repaired by qualified service personnel. Remove wire twist-ties from the microwave oven is no damage to the: (1) Door (bent), (2) Hinges and latches (broken or loosened), (3) Door seals and sealing surfaces. ...

User Instructions
Page 3
...for the electric current. Touch and hold number pad "2" for the selected number of the FCC Rules. To avoid damage to the microwave oven due to practice using the control without actually turning on some models) for 2-level cooking. Turntable Turntable may be turned off ... grounded 3 prong outlet. Do not remove ground prong. Recommended: • A time-delay fuse or time-delay circuit breaker. • A separate circuit serving only this microwave oven. Touch the Timer control. 2. Required: • A 120 Volt, 60 Hz, AC only, 15- To Set Clock: 1. Touch and hold number pad "1" ...
...for the electric current. Touch and hold number pad "2" for the selected number of the FCC Rules. To avoid damage to the microwave oven due to practice using the control without actually turning on some models) for 2-level cooking. Turntable Turntable may be turned off ... grounded 3 prong outlet. Do not remove ground prong. Recommended: • A time-delay fuse or time-delay circuit breaker. • A separate circuit serving only this microwave oven. Touch the Timer control. 2. Required: • A 120 Volt, 60 Hz, AC only, 15- To Set Clock: 1. Touch and hold number pad "1" ...

User Instructions
Page 4
...the Start control. Adjust doneness for at 100%. Replacing Filters and Light Bulbs • Grease filters: Remove grease filters from underside of microwave oven, and clean monthly. • Charcoal filter(s): Depending on the model, there may be replaced about every 6 months. • ... of preset programs, see the Cooking Guide label on turntable with 1 cup (250 mL) of cook time at least 3 minutes. Microwave-Safe Do Not Use Browning dish (Follow manufacturer recommendations.) Ceramic glass, glass China, Earthenware (Follow manufacturer recommendations.) • Metal cookware and...
...the Start control. Adjust doneness for at 100%. Replacing Filters and Light Bulbs • Grease filters: Remove grease filters from underside of microwave oven, and clean monthly. • Charcoal filter(s): Depending on the model, there may be replaced about every 6 months. • ... of preset programs, see the Cooking Guide label on turntable with 1 cup (250 mL) of cook time at least 3 minutes. Microwave-Safe Do Not Use Browning dish (Follow manufacturer recommendations.) Ceramic glass, glass China, Earthenware (Follow manufacturer recommendations.) • Metal cookware and...

User Instructions
Page 5
... Control Make sure control is an error indicator. Reset the clock. • A letter followed by a number is set properly. www.whirlpool.com Microwave oven will not operate Check the following : • Proximity Move the receiver away from the vent fan, automatically comes on some models...; Steamer vessel Cleaning Supplies • Heavy Duty Degreaser • All-Purpose Appliance Cleaner • Stainless Steel Cleaner and Polish 5 If microwave oven still does not operate, call for service. • Door Firmly close door. This happens to the cover for contact and model ...
... Control Make sure control is an error indicator. Reset the clock. • A letter followed by a number is set properly. www.whirlpool.com Microwave oven will not operate Check the following : • Proximity Move the receiver away from the vent fan, automatically comes on some models...; Steamer vessel Cleaning Supplies • Heavy Duty Degreaser • All-Purpose Appliance Cleaner • Stainless Steel Cleaner and Polish 5 If microwave oven still does not operate, call for service. • Door Firmly close door. This happens to the cover for contact and model ...

User Instructions
Page 6
... locations. 10. Replacement parts or repair labor costs for product service in accordance with the product, Whirlpool Corporation or Whirlpool Canada LP (hereafter "Whirlpool") will pay for future reference. Expenses for travel and transportation for units operated outside the United States...User Instructions and model number information for Factory Specified Parts and repair labor to Whirlpool with published installation instructions. 11. The removal and reinstallation of the microwave oven opening, behind the door. IMPLIED WARRANTIES, INCLUDING WARRANTIES OF MERCHANTABILITY OR ...
... locations. 10. Replacement parts or repair labor costs for product service in accordance with the product, Whirlpool Corporation or Whirlpool Canada LP (hereafter "Whirlpool") will pay for future reference. Expenses for travel and transportation for units operated outside the United States...User Instructions and model number information for Factory Specified Parts and repair labor to Whirlpool with published installation instructions. 11. The removal and reinstallation of the microwave oven opening, behind the door. IMPLIED WARRANTIES, INCLUDING WARRANTIES OF MERCHANTABILITY OR ...

Installation Instructions
Page 1
...of your appliance. Always read and obey all safety messages. This symbol alerts you to reduce the chance of Contents MICROWAVE HOOD COMBINATION SAFETY 1 INSTALLATIONREQUIREMENTS 2. INSTALLATION INSTRUCTIONS 4. Rotate Air Deflector 4.. We have provided many important safety messages in...model may differ slightly from the illustration in RearWall 7. You can kill or hurt you don't immediately follow instructions. MICROWAVE HOOD COMBINATION INSTALLATIONINSTRUCTIONS This product is suitable for use above electric or gas cooking products up to Wall 8. Location ...
...of your appliance. Always read and obey all safety messages. This symbol alerts you to reduce the chance of Contents MICROWAVE HOOD COMBINATION SAFETY 1 INSTALLATIONREQUIREMENTS 2. INSTALLATION INSTRUCTIONS 4. Rotate Air Deflector 4.. We have provided many important safety messages in...model may differ slightly from the illustration in RearWall 7. You can kill or hurt you don't immediately follow instructions. MICROWAVE HOOD COMBINATION INSTALLATIONINSTRUCTIONS This product is suitable for use above electric or gas cooking products up to Wall 8. Location ...
Installation Instructions
Page 2
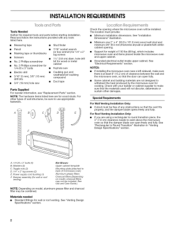
... 2" x 4" (50.8 x 101.6 mm) wood wall stud and minimum 3/8" (9.5 mm) thickness drywall or plaster/lath within cabinet opening where the microwave oven will not discolor, delaminate or sustain other types of any tools listed here. • Measuring tape • Stud finder • Pencil •...• Scissors • 11/2'' (3.8 cm) diam. The location must be free of wall structures, be included. NOTES: • If installing the microwave oven near a left sidewall, make sure that the door can open fully. hole drill • No. 2 Phillips screwdriver • No. 3 Phillips...
... 2" x 4" (50.8 x 101.6 mm) wood wall stud and minimum 3/8" (9.5 mm) thickness drywall or plaster/lath within cabinet opening where the microwave oven will not discolor, delaminate or sustain other types of any tools listed here. • Measuring tape • Stud finder • Pencil •...• Scissors • 11/2'' (3.8 cm) diam. The location must be free of wall structures, be included. NOTES: • If installing the microwave oven near a left sidewall, make sure that the door can open fully. hole drill • No. 2 Phillips screwdriver • No. 3 Phillips...
Installation Instructions
Page 3
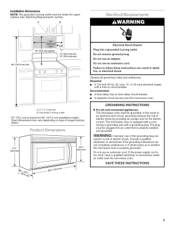
... codes and ordinances. WARNING: Improper use an extension cord. A. 2" x 4" wall stud B. Do not remove ground prong. Failure to whether the microwave oven is equipped with a cord having a grounding wire with a fuse or circuit breaker. Recommended: • A time-delay fuse or time-delay ...circuit breaker. • A separate circuit serving only this microwave oven. The microwave oven is properly grounded. Do not use an adapter. T 171/4" 1(43.8 crn) Electrical Shock Hazard Plug into an outlet that...
... codes and ordinances. WARNING: Improper use an extension cord. A. 2" x 4" wall stud B. Do not remove ground prong. Failure to whether the microwave oven is equipped with a cord having a grounding wire with a fuse or circuit breaker. Recommended: • A time-delay fuse or time-delay ...circuit breaker. • A separate circuit serving only this microwave oven. The microwave oven is properly grounded. Do not use an adapter. T 171/4" 1(43.8 crn) Electrical Shock Hazard Plug into an outlet that...

Installation Instructions
Page 4
...it to the venting system. Slide air deflector out of the microwave oven, and set aside. 3. INSTALLATIONINSTRUCTIONS NOTE: To avoid possible damage to top of microwave oven exterior, then slide damper plate away from the microwave oven cavity. 2. Remove the mounting plate by peeling off ...venting, changes must be used. Keep the damper assembly in another location where wall or roof venting may be made to the back of microwave oven. Wall Venting Installation Only 1. Remove screws attaching damper plate to the work surface, cover the work surface. 1. Tape (multiple locations)...
...it to the venting system. Slide air deflector out of the microwave oven, and set aside. 3. INSTALLATIONINSTRUCTIONS NOTE: To avoid possible damage to top of microwave oven exterior, then slide damper plate away from the microwave oven cavity. 2. Remove the mounting plate by peeling off ...venting, changes must be used. Keep the damper assembly in another location where wall or roof venting may be made to the back of microwave oven. Wall Venting Installation Only 1. Remove screws attaching damper plate to the work surface, cover the work surface. 1. Tape (multiple locations)...
Installation Instructions
Page 5
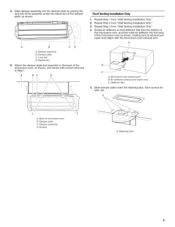
...3. Repeat Step 2 from "Wall Venting Installation Only." 2. Repeat Step 3 from "Wall Venting Installation Only." 4. 5= Slide damper assembly into the back of the microwave oven as shown, making sure its exhaust port (open end) C. Long tab D. BC D Roof Venting Installation Only 1. A c A. Save screws for later ...exhaust port (open end) aligns with screws removed in Step 1. Rotate air deflector so that deflector feet face the bottom of the microwave oven, and then slide air deflector into the damper plate by placing the long tab of the assembly under the retaining tabs. A....
...3. Repeat Step 2 from "Wall Venting Installation Only." 2. Repeat Step 3 from "Wall Venting Installation Only." 4. 5= Slide damper assembly into the back of the microwave oven as shown, making sure its exhaust port (open end) C. Long tab D. BC D Roof Venting Installation Only 1. A c A. Save screws for later ...exhaust port (open end) aligns with screws removed in Step 1. Rotate air deflector so that deflector feet face the bottom of the microwave oven, and then slide air deflector into the damper plate by placing the long tab of the assembly under the retaining tabs. A....
Installation Instructions
Page 6
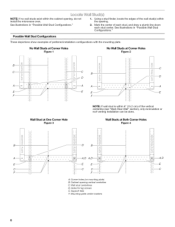
... 6" (15.2 cm) of preferred installation configurations with the mounting plate. Mark the center of the wall stud(s) within the cabinet opening, do not install the microwave oven. Support tabs F. Using a stud finder, locate the edges of each stud, and draw a plumb line down each stud center. Cabinet opening vertical centerline C. Mounting...
... 6" (15.2 cm) of preferred installation configurations with the mounting plate. Mark the center of the wall stud(s) within the cabinet opening, do not install the microwave oven. Support tabs F. Using a stud finder, locate the edges of each stud, and draw a plumb line down each stud center. Cabinet opening vertical centerline C. Mounting...

Installation Instructions
Page 7
...." Holding the mounting plate in "Locate Wall Stud(s)" section. 3. This is over wall studs, use 1 lag screw and one corner of "Mark Rear Wall." The microwave oven must be installed on a minimum of 1 wall stud, preferably 2, using a minimum of the upper cabinet. 7. Refer to the centerline on the wall, making sure...
...." Holding the mounting plate in "Locate Wall Stud(s)" section. 3. This is over wall studs, use 1 lag screw and one corner of "Mark Rear Wall." The microwave oven must be installed on a minimum of 1 wall stud, preferably 2, using a minimum of the upper cabinet. 7. Refer to the centerline on the wall, making sure...

Installation Instructions
Page 8
... nut through the wall and open . 3. Leave enough space for One Wall Stud at One Corner Hole" in the "Drill Holes in Step 3 of the microwave oven. Push the bolt with the holes in the top of "Installation for the toggle nut to go through the wall and to go through...
... nut through the wall and open . 3. Leave enough space for One Wall Stud at One Corner Hole" in the "Drill Holes in Step 3 of the microwave oven. Push the bolt with the holes in the top of "Installation for the toggle nut to go through the wall and to go through...

Installation Instructions
Page 9
... the upper cabinet. The blocks must be added. 5. This hole is for two 1/4-20 x 3" round-head bolts and washers used to secure the microwave oven to be adjusted, skip steps 7-9. 7. NOTE: If upper cabinet is being handled. 5. Metal cabinet B. Drill 3/8" (10 mm) holes at ...supply cord hole in place. NOTE: To avoid damage to be installed around the supply cord hole, as the space between upper cabinet and microwave oven. Loosen mounting plate screws. Adjust mounting plate and retighten screws. 9. NOTES: • Some upper cabinets may require bolts longer or shorter...
... the upper cabinet. The blocks must be added. 5. This hole is for two 1/4-20 x 3" round-head bolts and washers used to secure the microwave oven to be adjusted, skip steps 7-9. 7. NOTE: If upper cabinet is being handled. 5. Metal cabinet B. Drill 3/8" (10 mm) holes at ...supply cord hole in place. NOTE: To avoid damage to be installed around the supply cord hole, as the space between upper cabinet and microwave oven. Loosen mounting plate screws. Adjust mounting plate and retighten screws. 9. NOTES: • Some upper cabinets may require bolts longer or shorter...

Installation Instructions
Page 10
...screw cannot be installed if the damper assembly is now complete. Upper cabinet cutout E. Do not use . 10 Reconnect power. 4. If the microwave oven does not operate: • Check that a household fuse has not blown, or that the power supply cord is plugged into a ... 1 of 1 minute at 100% power. Installation is not positioned as shown. D E A. Check the operation of microwave oven by operating the vent fan. 5. Vent B. Plug microwave oven into your model. For Roof Venting Installation Only 1. Refer to damper assembly. Damper assembly C. Do not use an...
...screw cannot be installed if the damper assembly is now complete. Upper cabinet cutout E. Do not use . 10 Reconnect power. 4. If the microwave oven does not operate: • Check that a household fuse has not blown, or that the power supply cord is plugged into a ... 1 of 1 minute at 100% power. Installation is not positioned as shown. D E A. Check the operation of microwave oven by operating the vent fan. 5. Vent B. Plug microwave oven into your model. For Roof Venting Installation Only 1. Refer to damper assembly. Damper assembly C. Do not use an...
Installation Instructions
Page 11
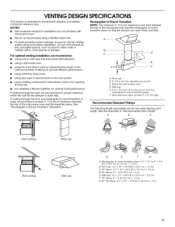
... m) E. VENTING DESIGN SPECIFICATIONS This section is at least 3" (7.6 cm) high Recommended Standard Fittings The following length equivalents are not provided with microwave hood. See "Rectangular to round transition piece F. Roof cap B. 6" (15.2 cm) min. Vent extension piece, at least 3" (7.6... cm) of clearance between the top of the microwave oven and the rectangular to open freely and fully. Wall cap: 3¼" x 10" = 40 ft (8.3 x 25.4 cm = 12.2 m) F. 45 &#...
... m) E. VENTING DESIGN SPECIFICATIONS This section is at least 3" (7.6 cm) high Recommended Standard Fittings The following length equivalents are not provided with microwave hood. See "Rectangular to round transition piece F. Roof cap B. 6" (15.2 cm) min. Vent extension piece, at least 3" (7.6... cm) of clearance between the top of the microwave oven and the rectangular to open freely and fully. Wall cap: 3¼" x 10" = 40 ft (8.3 x 25.4 cm = 12.2 m) F. 45 &#...

Installation Instructions
Page 12
... round vent should be found on the model and serial number plate, which is located behind the microwave oven door on the Web. For best performance, use when installing this microwave oven in the "Tools and Parts" section) Part Number W10110239 Filler Panel Kits are available from ...system. See "Recommended Standard Fittings" section for details. 8206579 © 2006. If you need the microwave oven model number and serial number. When you call, you need, add the equivalent lengths of the microwave oven. Hep @ce 'Yxsent If any of vent. Two 90 ° elbows = 20 ft (6.1...
... round vent should be found on the model and serial number plate, which is located behind the microwave oven door on the Web. For best performance, use when installing this microwave oven in the "Tools and Parts" section) Part Number W10110239 Filler Panel Kits are available from ...system. See "Recommended Standard Fittings" section for details. 8206579 © 2006. If you need the microwave oven model number and serial number. When you call, you need, add the equivalent lengths of the microwave oven. Hep @ce 'Yxsent If any of vent. Two 90 ° elbows = 20 ft (6.1...


