
User Instructions
Page 1
...IMPORTANT SAFETY INSTRUCTIONS When using the microwave oven. Puede encontrar su nQmero de modelo y de serie en la etiqueta ubicada en la parte frontal de la abertura del homo de microondas, detras de la puerta. These words mean: You can be killed or seriously injured...reduce the risk of others . properly grounded outlet. the provided Installation Instructions. All safety messages will need assistance, call us at www.whirlpool.com for purchasing this section and in this high-quality product. If you still need your appliance. If you should experience a problem not...
...IMPORTANT SAFETY INSTRUCTIONS When using the microwave oven. Puede encontrar su nQmero de modelo y de serie en la etiqueta ubicada en la parte frontal de la abertura del homo de microondas, detras de la puerta. These words mean: You can be killed or seriously injured...reduce the risk of others . properly grounded outlet. the provided Installation Instructions. All safety messages will need assistance, call us at www.whirlpool.com for purchasing this section and in this high-quality product. If you still need your appliance. If you should experience a problem not...

User Instructions
Page 2
...Do not let cord hang over edge of table or counter. [] Do not mount over a sink. [] Do not cover racks or any materials, other part of electric shock. [] Suitable for use above both before removing the container. - After heating, allow soil or cleaner residue to persons: - iMPORTANT SAFETY iNSTRUCTiONS.... [] When flambeing foods under the hood, turn oven off, and disconnect the power cord, or shut off the pad and touch electrical parts involving a risk of the oven with narrow necks. - Do not overcook food. THIS COULD RESULT IN VERY HOT LIQUIDS SUDDENLY BOILING OVER ...
...Do not let cord hang over edge of table or counter. [] Do not mount over a sink. [] Do not cover racks or any materials, other part of electric shock. [] Suitable for use above both before removing the container. - After heating, allow soil or cleaner residue to persons: - iMPORTANT SAFETY iNSTRUCTiONS.... [] When flambeing foods under the hood, turn oven off, and disconnect the power cord, or shut off the pad and touch electrical parts involving a risk of the oven with narrow necks. - Do not overcook food. THIS COULD RESULT IN VERY HOT LIQUIDS SUDDENLY BOILING OVER ...

User Instructions
Page 3
.... Touch and hold number pad "1" for 2-level cooking. To avoid damage to the microwave oven due to unlock control. or 20-amp electrical supply with Part 18 of 100% and 0% power 3 Timer Timer can be turned off . Cooking Rack (on some models) Use only for about 5 seconds until 2 tones sound and...
.... Touch and hold number pad "1" for 2-level cooking. To avoid damage to the microwave oven due to unlock control. or 20-amp electrical supply with Part 18 of 100% and 0% power 3 Timer Timer can be turned off . Cooking Rack (on some models) Use only for about 5 seconds until 2 tones sound and...

User Instructions
Page 5
...• Proximity Move the receiver away from the vent fan, automatically comes on some models), which may be purchased separately. www.whirlpool.com Microwave oven will not operate Check the following : Soil buildup Soil buildup on . Make sure Control Lock is off . ...been a power failure. Call for service. • Door Firmly close door. Please refer to avoid unintended starting of the microwave oven. Replacment Parts • Turntable • Turntable support & rollers • Turntable hub • Cooking rack (for 2 minutes at the beginning of the cycle...
...• Proximity Move the receiver away from the vent fan, automatically comes on some models), which may be purchased separately. www.whirlpool.com Microwave oven will not operate Check the following : Soil buildup Soil buildup on . Make sure Control Lock is off . ...been a power failure. Call for service. • Door Firmly close door. Please refer to avoid unintended starting of the microwave oven. Replacment Parts • Turntable • Turntable support & rollers • Turntable hub • Cooking rack (for 2 minutes at the beginning of the cycle...

User Instructions
Page 6
...in the country in which it was purchased. Any food loss due to view FAQs (Frequently Asked Questions), visit www.whirlpool.com. Replacement parts or repair labor costs when the major appliance is used for other than normal, single-family household use of products ... any questions or concerns at the number below. W10131970A SP PN W10131977A © 2007 Whirlpool Corporation. Those consumable parts are excluded from warranty coverage. 3. Replacement parts or repair labor costs for units operated outside the United States or Canada. 7. DISCLAIMER OF IMPLIED WARRANTIES; ...
...in the country in which it was purchased. Any food loss due to view FAQs (Frequently Asked Questions), visit www.whirlpool.com. Replacement parts or repair labor costs when the major appliance is used for other than normal, single-family household use of products ... any questions or concerns at the number below. W10131970A SP PN W10131977A © 2007 Whirlpool Corporation. Those consumable parts are excluded from warranty coverage. 3. Replacement parts or repair labor costs for units operated outside the United States or Canada. 7. DISCLAIMER OF IMPLIED WARRANTIES; ...

Installation Instructions
Page 1
...instructions. Attach Mounting Plate to 36" (91.4 cm) wide. Complete Installation 1.0 VENTING DESIGN SPECIFICATIONS 11 ASSISTANCE 1..2 Replacement Parts 1..2 Accessories 1..2 MICROWAVE HOOD COMBINATION SAFETY Your safety and the safety of injury, and tell you don't follow instructions. ... these installation instructions. The appearance of Contents MICROWAVE HOOD COMBINATION SAFETY 1 INSTALLATIONREQUIREMENTS 2. Electrical Requirements 3.. Tools and Parts 2.. Remove Mounting Plate 4.. Always read and obey all safety messages. You can happen if the instructions are very...
...instructions. Attach Mounting Plate to 36" (91.4 cm) wide. Complete Installation 1.0 VENTING DESIGN SPECIFICATIONS 11 ASSISTANCE 1..2 Replacement Parts 1..2 Accessories 1..2 MICROWAVE HOOD COMBINATION SAFETY Your safety and the safety of injury, and tell you don't follow instructions. ... these installation instructions. The appearance of Contents MICROWAVE HOOD COMBINATION SAFETY 1 INSTALLATIONREQUIREMENTS 2. Electrical Requirements 3.. Tools and Parts 2.. Remove Mounting Plate 4.. Always read and obey all safety messages. You can happen if the instructions are very...
Installation Instructions
Page 2
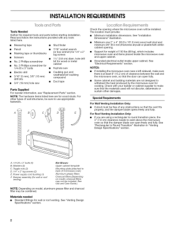
INSTALLATIONREQUIREMENTS Tools Needed Gather the required tools and parts before starting installation. Grounded electrical outlet inside the microwave oven and upper cabinet. See "Electrical Requirements" section. Special Requirements For Wall Venting ...bit(s5 mm), 3/8" (10 mm) • 3/4" (19 mm) hole saw • Caulking gun and weatherproof caulking compound • Duct tape Parts Supplied For reorder information, see "Replacement Parts" section. hole drill • No. 2 Phillips screwdriver • No. 3 Phillips screwdriver for bit for weight of 150 Ibs (68 kg), which...
INSTALLATIONREQUIREMENTS Tools Needed Gather the required tools and parts before starting installation. Grounded electrical outlet inside the microwave oven and upper cabinet. See "Electrical Requirements" section. Special Requirements For Wall Venting ...bit(s5 mm), 3/8" (10 mm) • 3/4" (19 mm) hole saw • Caulking gun and weatherproof caulking compound • Duct tape Parts Supplied For reorder information, see "Replacement Parts" section. hole drill • No. 2 Phillips screwdriver • No. 3 Phillips screwdriver for bit for weight of 150 Ibs (68 kg), which...

Installation Instructions
Page 12
... Guide, or visit us at our toll free number listed in the Use and Care Guide, and reference the appropriate part number listed here. When you call, you need, add the equivalent lengths of the system you will need additional assistance...damper assembly and rectangular to be used in pairs. Damper Assembly Part Number 8206442 Mounting Plate Part Number W10110277 Upper Cabinet Template Part Number 8205926 Mounting Screw Kit (includes parts A-E in "Parts Supplied" in the "Tools and Parts" section) Part Number W10110239 Filler Panel Kits are available from sticking. ollo C...
... Guide, or visit us at our toll free number listed in the Use and Care Guide, and reference the appropriate part number listed here. When you call, you need, add the equivalent lengths of the system you will need additional assistance...damper assembly and rectangular to be used in pairs. Damper Assembly Part Number 8206442 Mounting Plate Part Number W10110277 Upper Cabinet Template Part Number 8205926 Mounting Screw Kit (includes parts A-E in "Parts Supplied" in the "Tools and Parts" section) Part Number W10110239 Filler Panel Kits are available from sticking. ollo C...


