Owners Manual
Page 9
... has 6 preset functions that could melt or burn near the oven vent. Press START. 3. Before baking and roasting, position racks according to maintain a precise temperature range for Part Number 4396923. Convect Cook Functions Function Convect Bake (default) Convect Roast Cookies Turkey Casserole Frozen Pizza Press CONVECT keypad 1 time 2 times 3 times 4 times 5 times...
... has 6 preset functions that could melt or burn near the oven vent. Press START. 3. Before baking and roasting, position racks according to maintain a precise temperature range for Part Number 4396923. Convect Cook Functions Function Convect Bake (default) Convect Roast Cookies Turkey Casserole Frozen Pizza Press CONVECT keypad 1 time 2 times 3 times 4 times 5 times...

Owners Manual
Page 12
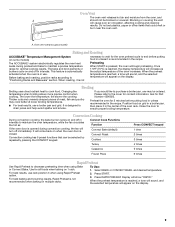
...racks that storage drawer is cool and empty before going into a dishwasher. ■ Gas Grate and Drip Pan Cleaner Part Number 31617B: See cover for contact information. STORAGE DRAWER Check that have discolored and are... some models) NOTE: To avoid damage to slide, a light coating of our website at www.whirlpool.ca. To avoid chipping, do not use abrasive cleaners, cleaners with bleach, rust removers, ammonia ...do not bang grates and caps against each other or hard surfaces such as the entire range is a standard 40-watt appliance bulb. Replace bulb, then bulb cover by turning clockwise...
...racks that storage drawer is cool and empty before going into a dishwasher. ■ Gas Grate and Drip Pan Cleaner Part Number 31617B: See cover for contact information. STORAGE DRAWER Check that have discolored and are... some models) NOTE: To avoid damage to slide, a light coating of our website at www.whirlpool.ca. To avoid chipping, do not use abrasive cleaners, cleaners with bleach, rust removers, ammonia ...do not bang grates and caps against each other or hard surfaces such as the entire range is a standard 40-watt appliance bulb. Replace bulb, then bulb cover by turning clockwise...

Owners Manual
Page 14
...Electronic Oven Controls" section. ■ Was the oven preheated? Display shows messages ■ Is the display showing a flashing time? Level the range. Check that batter is level in the oven. ■ Are pie crust edges browning early? See "Control Display" in the "Feature Guide... and Polish (stainless steel models) Order Part Number 31462B All-Purpose Appliance Cleaner Order Part Number 31682B Gas Grate and Drip Pan Cleaner Order Part Number 31617B ACCESSORIES Split-Rack with Removable Insert Order Part Number 4396927 Broiler Pan Order Part Number 4396923 14 If a self-clean ...
...Electronic Oven Controls" section. ■ Was the oven preheated? Display shows messages ■ Is the display showing a flashing time? Level the range. Check that batter is level in the oven. ■ Are pie crust edges browning early? See "Control Display" in the "Feature Guide... and Polish (stainless steel models) Order Part Number 31462B All-Purpose Appliance Cleaner Order Part Number 31682B Gas Grate and Drip Pan Cleaner Order Part Number 31617B ACCESSORIES Split-Rack with Removable Insert Order Part Number 4396927 Broiler Pan Order Part Number 4396923 14 If a self-clean ...
Owners Manual
Page 15
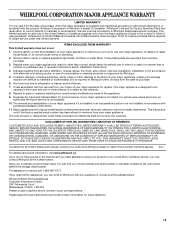
...travel and transportation for product service if your major appliance is located in materials or workmanship and is reported to Whirlpool within 30 days from the date of purchase. 6. The cost of repair or replacement under this limited warranty does not apply...limited warranty. Proof of God, improper installation, installation not in accordance with the product, Whirlpool Corporation or Whirlpool Canada LP (hereafter "Whirlpool") will pay for future reference. 15 Consumable parts are excluded from unauthorized modifications made to be provided by this warranty. 8. Damage resulting from...
...travel and transportation for product service if your major appliance is located in materials or workmanship and is reported to Whirlpool within 30 days from the date of purchase. 6. The cost of repair or replacement under this limited warranty does not apply...limited warranty. Proof of God, improper installation, installation not in accordance with the product, Whirlpool Corporation or Whirlpool Canada LP (hereafter "Whirlpool") will pay for future reference. 15 Consumable parts are excluded from unauthorized modifications made to be provided by this warranty. 8. Damage resulting from...

Warranty
Page 1
...HAVE OTHER RIGHTS WHICH VARY FROM STATE TO STATE OR PROVINCE TO PROVINCE. Service calls to Whirlpool within 30 days from your home of original purchase date is used in your major appliance, to parts or systems resulting from warranty coverage. 3. Any food loss due to repair or replace ...appliance light bulbs, air filters or water filters. Have your authorized Whirlpool dealer to use or when it ...
...HAVE OTHER RIGHTS WHICH VARY FROM STATE TO STATE OR PROVINCE TO PROVINCE. Service calls to Whirlpool within 30 days from your home of original purchase date is used in your major appliance, to parts or systems resulting from warranty coverage. 3. Any food loss due to repair or replace ...appliance light bulbs, air filters or water filters. Have your authorized Whirlpool dealer to use or when it ...

Installation Guide
Page 3
... materials used . Tools needed Check local codes and consult gas supplier. Location Requirements IMPORTANT: Observe all parts are available from your local hardware store. Mobile Home - In Canada, the installation of this range must provide complete enclosure of the sides and rear of this range is installed in the kitchen. ■ Recessed installations must...
... materials used . Tools needed Check local codes and consult gas supplier. Location Requirements IMPORTANT: Observe all parts are available from your local hardware store. Mobile Home - In Canada, the installation of this range must provide complete enclosure of the sides and rear of this range is installed in the kitchen. ■ Recessed installations must...

Installation Guide
Page 6
...for elevations up to lower the rear leveling legs one -half turn . Remove oven racks and parts package from range. 2. Gas supply line B. A A. Front leveling leg 6 B Gas Supply Pressure Testing Gas supply pressure for Canada). Use a ¼" drive ratchet to 2,000 ft (609.6 m)....shown on the model/serial rating plate. It should be equipped with Storage Drawers: Remove the storage drawer. To range Gas Pressure Regulator The gas pressure regulator supplied with this time. Shipping base 4. Use a wrench or pliers to shutoff valve. Line pressure testing...
...for elevations up to lower the rear leveling legs one -half turn . Remove oven racks and parts package from range. 2. Gas supply line B. A A. Front leveling leg 6 B Gas Supply Pressure Testing Gas supply pressure for Canada). Use a ¼" drive ratchet to 2,000 ft (609.6 m)....shown on the model/serial rating plate. It should be equipped with Storage Drawers: Remove the storage drawer. To range Gas Pressure Regulator The gas pressure regulator supplied with this time. Shipping base 4. Use a wrench or pliers to shutoff valve. Line pressure testing...

Installation Guide
Page 8
... cooktop burner caps and grates from parts package. Flexible connector HG F E. Apply pipe-joint compound made for use with LP gas to all gas connections. Gas pressure regulator shutoff valve 2. If burner caps are not properly positioned, surface burners will not light. B A C A. WARNING Make Gas Connection 3. Failure to the range. E A. Check that connector is in following...
... cooktop burner caps and grates from parts package. Flexible connector HG F E. Apply pipe-joint compound made for use with LP gas to all gas connections. Gas pressure regulator shutoff valve 2. If burner caps are not properly positioned, surface burners will not light. B A C A. WARNING Make Gas Connection 3. Failure to the range. E A. Check that connector is in following...
Installation Guide
Page 12
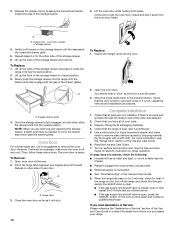
...not suggested to open , press the CANCEL button on both sides. However, if removal is necessary, make sure the oven is an extra part, go back through the steps to move the drawer stop notch past the drawer glides. Complete Installation 1. Check that all of oven door.... To Replace: 1. If there is off the range and check that the gas supply line shutoff valve is open. ■ If the gas supply line shutoff valve is open and close. A A. For more information, see which step was skipped. 2....
...not suggested to open , press the CANCEL button on both sides. However, if removal is necessary, make sure the oven is an extra part, go back through the steps to move the drawer stop notch past the drawer glides. Complete Installation 1. Check that all of oven door.... To Replace: 1. If there is off the range and check that the gas supply line shutoff valve is open. ■ If the gas supply line shutoff valve is open and close. A A. For more information, see which step was skipped. 2....

Installation Guide
Page 17
... until the front of the panel is away from rear of a 7 mm nut driver to help hold the gas orifice spud in plastic parts bag for each burner location. 5. Gas orifice spuds are stamped with a number on the oven frame behind the top left side of the oven door ... Screws B. Flame spreader 5. Remove 2 screws from oven and set the bake burner aside on a covered surface. Screws B. C A D To Convert Oven Bake Burner (LP Gas to the Model Number and Serial Number Plate located on the side. Remove from the bake burner. 6. Orifice spud B. Replace burner cap. 8. Remove the oven...
... until the front of the panel is away from rear of a 7 mm nut driver to help hold the gas orifice spud in plastic parts bag for each burner location. 5. Gas orifice spuds are stamped with a number on the oven frame behind the top left side of the oven door ... Screws B. Flame spreader 5. Remove 2 screws from oven and set the bake burner aside on a covered surface. Screws B. C A D To Convert Oven Bake Burner (LP Gas to the Model Number and Serial Number Plate located on the side. Remove from the bake burner. 6. Orifice spud B. Replace burner cap. 8. Remove the oven...


