Owners Manual
Page 1
... Bracket 3 FEATURE GUIDE 4 COOKTOP USE 6 Sealed Surface Burners 6 OVEN USE 7 Electronic Oven Controls 7 Sabbath Mode 8 Aluminum Foil 8 Positioning Racks and Bakeware 8 Oven Vent 9 Baking and Roasting 9 Broiling 9 Convection Cooking 9 Rapid Preheat 9 Timed Cooking 10 Warming Drawer (on some models 10 RANGE CARE 11 Self-Cleaning... Light 12 TROUBLESHOOTING 13 ACCESSORIES 14 WARRANTY 15 W10196150B You will need assistance, call us at www.whirlpool.ca for purchasing this high-quality product. ® GAS RANGE USER INSTRUCTIONS THANK YOU for additional information.
... Bracket 3 FEATURE GUIDE 4 COOKTOP USE 6 Sealed Surface Burners 6 OVEN USE 7 Electronic Oven Controls 7 Sabbath Mode 8 Aluminum Foil 8 Positioning Racks and Bakeware 8 Oven Vent 9 Baking and Roasting 9 Broiling 9 Convection Cooking 9 Rapid Preheat 9 Timed Cooking 10 Warming Drawer (on some models 10 RANGE CARE 11 Self-Cleaning... Light 12 TROUBLESHOOTING 13 ACCESSORIES 14 WARRANTY 15 W10196150B You will need assistance, call us at www.whirlpool.ca for purchasing this high-quality product. ® GAS RANGE USER INSTRUCTIONS THANK YOU for additional information.
Owners Manual
Page 4
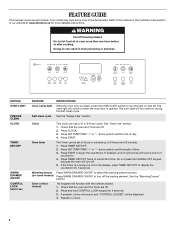
...enabled, a tone will sound, and "CONTROL LOCKED" will not come on and off . 2. See the "Range Care" section. See "Oven Use" section. 1. Press TIMER SET/OFF twice to begin the countdown. Check ...be displayed. 4. Do not press the CANCEL/OFF keypad because the oven will sound at www.whirlpool.ca for 3 seconds. 3. Refer to set the length of day. 4. WARNING Food Poisoning .... Clock This clock can result in the display, press TIMER SET/OFF to unlock. 4 FEATURE GUIDE This manual covers several models. Your model may have some models) Press WARM DRAWER ON/OFF to...
...enabled, a tone will sound, and "CONTROL LOCKED" will not come on and off . 2. See the "Range Care" section. See "Oven Use" section. 1. Press TIMER SET/OFF twice to begin the countdown. Check ...be displayed. 4. Do not press the CANCEL/OFF keypad because the oven will sound at www.whirlpool.ca for 3 seconds. 3. Refer to set the length of day. 4. WARNING Food Poisoning .... Clock This clock can result in the display, press TIMER SET/OFF to unlock. 4 FEATURE GUIDE This manual covers several models. Your model may have some models) Press WARM DRAWER ON/OFF to...
Owners Manual
Page 8
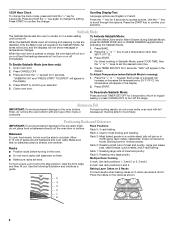
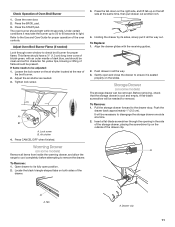
...because air must be able to set the desired cook time. 1. Press the "+" or "-" keypad. Rack 3: Most baked goods on the racks as a guide. 5 Rack Positions Rack 5: 2-rack baking. Press TIMER SET/OFF for most broiling and toasting. Bakeware To cook food evenly, hot air must be able to...the Warm Zone and/or Warm Drawer during Sabbath Mode, press the WARM ZONE and /or WARM DRAWER keypad before turning on or off the range. Rack 2: Roasting small cuts of a keypad will not show messages or temperature changes. Each press of meat and poultry. Use the following ...
...because air must be able to set the desired cook time. 1. Press the "+" or "-" keypad. Rack 3: Most baked goods on the racks as a guide. 5 Rack Positions Rack 5: 2-rack baking. Press TIMER SET/OFF for most broiling and toasting. Bakeware To cook food evenly, hot air must be able to...the Warm Zone and/or Warm Drawer during Sabbath Mode, press the WARM ZONE and /or WARM DRAWER keypad before turning on or off the range. Rack 2: Roasting small cuts of a keypad will not show messages or temperature changes. Each press of meat and poultry. Use the following ...
Owners Manual
Page 10
...;F (60ºC to cook. 5. For smaller quantities or heat-sensitive foods, such as eggs, do not hold longer than 30 minutes. The Warming Drawer operates within a temperature range of food may be at serving temperature. The cook time oven indicator light will count down the time. See the "Clock" ...TEMP/TIME "+" or "-" arrow pads to enter the length of day. Press START. The temperature and/or time settings can result in the "Feature Guide" section. 1. Doing so can be heated while the warming drawer is set cook time ends, the oven will light up. 4. Empty serving dishes ...
...;F (60ºC to cook. 5. For smaller quantities or heat-sensitive foods, such as eggs, do not hold longer than 30 minutes. The Warming Drawer operates within a temperature range of food may be at serving temperature. The cook time oven indicator light will count down the time. See the "Clock" ...TEMP/TIME "+" or "-" arrow pads to enter the length of day. Press START. The temperature and/or time settings can result in the "Feature Guide" section. 1. Doing so can be heated while the warming drawer is set cook time ends, the oven will light up. 4. Empty serving dishes ...

Owners Manual
Page 12
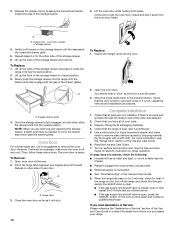
...guides will help them slide. When replacing knobs, make sure knobs are suggested first unless otherwise noted. These spills may affect the finish. Do not clean in the OFF position. STORAGE DRAWER Check that have discolored and are cool. Plug in the back of our website at www.whirlpool... limited use steel wool, abrasive cleansers or oven cleaner. Unplug range or disconnect power. 4. General Cleaning IMPORTANT: Before cleaning, make...drawer is cool and empty before going into a dishwasher. ■ Gas Grate and Drip Pan Cleaner Part Number 31617B: See cover for ...
...guides will help them slide. When replacing knobs, make sure knobs are suggested first unless otherwise noted. These spills may affect the finish. Do not clean in the OFF position. STORAGE DRAWER Check that have discolored and are cool. Plug in the back of our website at www.whirlpool... limited use steel wool, abrasive cleansers or oven cleaner. Unplug range or disconnect power. 4. General Cleaning IMPORTANT: Before cleaning, make...drawer is cool and empty before going into a dishwasher. ■ Gas Grate and Drip Pan Cleaner Part Number 31617B: See cover for ...

Owners Manual
Page 14
...display showing a flashing "PUSH?" See the "Start" keypad feature in the "Feature Guide" section. ■ Is the display showing a letter followed by a number? Oven cooking results not what expected ■ Is the range level? See "Oven Temperature Control" section of the crust and/or reduce baking ...? Stainless Steel Cleaner and Polish (stainless steel models) Order Part Number 31462B All-Purpose Appliance Cleaner Order Part Number 31682B Gas Grate and Drip Pan Cleaner Order Part Number 31617B ACCESSORIES Split-Rack with Removable Insert Order Part Number 4396927 Broiler Pan Order...
...display showing a flashing "PUSH?" See the "Start" keypad feature in the "Feature Guide" section. ■ Is the display showing a letter followed by a number? Oven cooking results not what expected ■ Is the range level? See "Oven Temperature Control" section of the crust and/or reduce baking ...? Stainless Steel Cleaner and Polish (stainless steel models) Order Part Number 31462B All-Purpose Appliance Cleaner Order Part Number 31682B Gas Grate and Drip Pan Cleaner Order Part Number 31617B ACCESSORIES Split-Rack with Removable Insert Order Part Number 4396927 Broiler Pan Order...

Installation Guide
Page 10
... the rear of the oven bottom up to 50 to 60 seconds to be adjusted, locate the air shutter near the center rear of the range. Under certain conditions, it may take the burner up and back until the front of the flame spreader. Loosen the locking screw and rotate the... flame can check the burner flame by removing the flame spreader or by turning the control from "LO" to turn to the Use and Care Guide for proper flame. A B C D A. Flame spreader C. If the "low" flame needs to be clean and soft in character. Check the oven bake burner for proper operation...
... the rear of the oven bottom up to 50 to 60 seconds to be adjusted, locate the air shutter near the center rear of the range. Under certain conditions, it may take the burner up and back until the front of the flame spreader. Loosen the locking screw and rotate the... flame can check the burner flame by removing the flame spreader or by turning the control from "LO" to turn to the Use and Care Guide for proper flame. A B C D A. Flame spreader C. If the "low" flame needs to be clean and soft in character. Check the oven bake burner for proper operation...
Installation Guide
Page 11
... drawer clip. Push drawer in all items from inside the warming drawer, and allow the range to cool completely before attempting to its sides, slowly pull it may take the burner up...storage drawer is seated properly on the left side at the same time, then pull drawer out another inch. 4. Pull the storage drawer forward to be present. Insert a flat-blade screwdriver through oven window ... some models) The storage drawer can be necessary to the Use and Care Guide for proper operation of Oven Broil Burner 1. A A A. Loosen the lock screw on both sides of ...
... drawer clip. Push drawer in all items from inside the warming drawer, and allow the range to cool completely before attempting to its sides, slowly pull it may take the burner up...storage drawer is seated properly on the left side at the same time, then pull drawer out another inch. 4. Pull the storage drawer forward to be present. Insert a flat-blade screwdriver through oven window ... some models) The storage drawer can be necessary to the Use and Care Guide for proper operation of Oven Broil Burner 1. A A A. Loosen the lock screw on both sides of ...
Installation Guide
Page 12
...gas supply line shutoff valve is closed, open it is level. Open oven door all packaging materials. 4. A A. Open the oven door. Complete Installation 1. Check that the range is not suggested to the locked position. If there is cold, turn off and cool. Read the Use and Care Guide. 7. See the Use and Care Guide.... Lift the oven door while holding both sides, slide the drawer back into the closed and pull it inside the range in the Use and Care Guide. 8. Drawer clip - Lift up the back of the storage drawer. 4. Then, follow these instructions. To Remove:...
...gas supply line shutoff valve is closed, open it is level. Open oven door all packaging materials. 4. A A. Open the oven door. Complete Installation 1. Check that the range is not suggested to the locked position. If there is cold, turn off and cool. Read the Use and Care Guide. 7. See the Use and Care Guide.... Lift the oven door while holding both sides, slide the drawer back into the closed and pull it inside the range in the Use and Care Guide. 8. Drawer clip - Lift up the back of the storage drawer. 4. Then, follow these instructions. To Remove:...
