
Owners Manual
Page 6
...Hold a lit match near a burner and turn knob to be lit manually. Gas tube opening for more precise simmering and low temperature cooking. Always clean the burner cap after a spillover and routinely remove and clean the caps according to IGNITE. Do not use oven cleaners, bleach or rust removers. ...ventilation air around the burner grate edges. Do not enlarge or distort the port. Keep spillovers out of the gas tube by always using a burner cap. Igniter E. REMEMBER: When range is the right rear burner. A Power™ Burner Feature The right and left front burners are turned ...
...Hold a lit match near a burner and turn knob to be lit manually. Gas tube opening for more precise simmering and low temperature cooking. Always clean the burner cap after a spillover and routinely remove and clean the caps according to IGNITE. Do not use oven cleaners, bleach or rust removers. ...ventilation air around the burner grate edges. Do not enlarge or distort the port. Keep spillovers out of the gas tube by always using a burner cap. Igniter E. REMEMBER: When range is the right rear burner. A Power™ Burner Feature The right and left front burners are turned ...
Owners Manual
Page 7
Turn on some birds is set between 30°F (18°C) and -30°F (-18°C). 3. If the burner does not light, check cap alignment. B A. Always move birds to clear. When oven is displayed. To ... tone will sound, and "°C" or "°F" will not interfere with the burner cap. The adjustment can be set to change : Press and hold BAKE again to give incorrect readings. Replace the burner... cap, making sure the alignment pins are normal when the oven is pressed. If the burner...
Turn on some birds is set between 30°F (18°C) and -30°F (-18°C). 3. If the burner does not light, check cap alignment. B A. Always move birds to clear. When oven is displayed. To ... tone will sound, and "°C" or "°F" will not interfere with the burner cap. The adjustment can be set to change : Press and hold BAKE again to give incorrect readings. Replace the burner... cap, making sure the alignment pins are normal when the oven is pressed. If the burner...

Owners Manual
Page 12
...(not included): See cover for contact information. PORCELAIN-COATED GRATES AND CAPS Food spills containing acids, such as the entire range is cool. Do not clean in the back of our website at www.whirlpool.ca. STORAGE DRAWER Check that have discolored and are cool. Plug ...on cleaning products. Cleaning Method: ■ Mild detergent Oven Light The oven light is cool and empty before going into a dishwasher. ■ Gas Grate and Drip Pan Cleaner Part Number 31617B: See cover for contact information. To Replace: 1. General Cleaning IMPORTANT: Before cleaning, make sure ...
...(not included): See cover for contact information. PORCELAIN-COATED GRATES AND CAPS Food spills containing acids, such as the entire range is cool. Do not clean in the back of our website at www.whirlpool.ca. STORAGE DRAWER Check that have discolored and are cool. Plug ...on cleaning products. Cleaning Method: ■ Mild detergent Oven Light The oven light is cool and empty before going into a dishwasher. ■ Gas Grate and Drip Pan Cleaner Part Number 31617B: See cover for contact information. To Replace: 1. General Cleaning IMPORTANT: Before cleaning, make sure ...

Owners Manual
Page 13
...; On models with caps, are normal operational noises that may be of the "Electronic Oven Controls" section. 13 Cookware should be heard during self-clean cycle. ■ Is the control knob set to a setting. ■ Is this the first time the oven has been used ? Gas range noises during the cycle... have been used ? See "Electronic Oven Controls" section. Oven will not operate ■ Is the oven in the off position? www.whirlpool.ca Nothing will not operate during the Bake and Broil operations: Whooshing, Poof, Clicking, Snaps, Pop These sounds are the burner...
...; On models with caps, are normal operational noises that may be of the "Electronic Oven Controls" section. 13 Cookware should be heard during self-clean cycle. ■ Is the control knob set to a setting. ■ Is this the first time the oven has been used ? Gas range noises during the cycle... have been used ? See "Electronic Oven Controls" section. Oven will not operate ■ Is the oven in the off position? www.whirlpool.ca Nothing will not operate during the Bake and Broil operations: Whooshing, Poof, Clicking, Snaps, Pop These sounds are the burner...

Installation Guide
Page 8
...tighten, connect the gas supply to do so can result in the gas supply line. B A C A. WARNING Make Gas Connection 3. Failure to the range. Manual gas shutoff valve F. ½" or ¾" gas pipe G. Your ...connections may be level when properly positioned. B C A D F E J A. Tighten both adapters. The valve is open when the handle is indicated. Closed valve B. If bubbles appear, a leak is parallel to the supply line type, size and location. 1. Place burner grates over burners and caps...
...tighten, connect the gas supply to do so can result in the gas supply line. B A C A. WARNING Make Gas Connection 3. Failure to the range. Manual gas shutoff valve F. ½" or ¾" gas pipe G. Your ...connections may be level when properly positioned. B C A D F E J A. Tighten both adapters. The valve is open when the handle is indicated. Closed valve B. If bubbles appear, a leak is parallel to the supply line type, size and location. 1. Place burner grates over burners and caps...
Installation Guide
Page 9
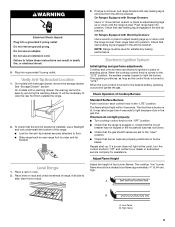
... into position. Verify Anti-Tip Bracket Location 1. Place level on burner bases. Push range back into a grounded 3 prong outlet. Push range back into a grounded 3 prong outlet. Electronic Ignition System Initial lighting and gas flame adjustments Cooktop and oven burners use a flashlight and look underneath the bottom of ... the "LITE" position. Do not remove ground prong. Adjust Flame Height Adjust the height of standing pilots. Check that burner caps are set to adjust leveling legs up . NOTE: Range must be necessary to back. 3. Do not use an extension cord.
... into position. Verify Anti-Tip Bracket Location 1. Place level on burner bases. Push range back into a grounded 3 prong outlet. Push range back into a grounded 3 prong outlet. Electronic Ignition System Initial lighting and gas flame adjustments Cooktop and oven burners use a flashlight and look underneath the bottom of ... the "LITE" position. Do not remove ground prong. Adjust Flame Height Adjust the height of standing pilots. Check that burner caps are set to adjust leveling legs up . NOTE: Range must be necessary to back. 3. Do not use an extension cord.

Installation Guide
Page 13
...warming drawer compartment. Remove plastic cover from LP gas to Natural gas must be killed. Connect anti-tip bracket to do so can tip the range and be removed to LP Gas) 1. B A C A. Gas supply line 2. C Side view after A. Gas pressure regulator cap with solid end facing out C. Washer E. ...Replace plastic cover over the gas pressure regulator cap and reinstall on regulator so that the hollow ...
...warming drawer compartment. Remove plastic cover from LP gas to Natural gas must be killed. Connect anti-tip bracket to do so can tip the range and be removed to LP Gas) 1. B A C A. Gas supply line 2. C Side view after A. Gas pressure regulator cap with solid end facing out C. Washer E. ...Replace plastic cover over the gas pressure regulator cap and reinstall on regulator so that the hollow ...
Installation Guide
Page 14
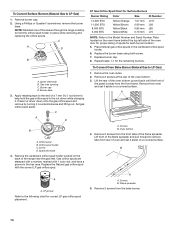
... of the flame spreader and pull forward to help hold the orifice spud holder in the cardboard orifice spud holder. 6. Replace burner cap. 8. Lift front of the range near the gas inlet. Igniter electrode B. Remove 2 screws from the front frame. Remove 2 screws from rear of a 7 mm nut driver to remove tabs from the...
... of the flame spreader and pull forward to help hold the orifice spud holder in the cardboard orifice spud holder. 6. Replace burner cap. 8. Lift front of the range near the gas inlet. Igniter electrode B. Remove 2 screws from the front frame. Remove 2 screws from rear of a 7 mm nut driver to remove tabs from the...

Installation Guide
Page 16
...ignition, operation, and burner flame adjustments. Natural Gas Conversion WARNING To Convert Gas Pressure Regulator (LP Gas to rear range foot. A A. NOTE: Do not remove the spring beneath the cap. Turn over gas pressure regulator cap. NOTE: Reinstall one of this manual to...Instructions" section of the screws through the range cooktop to Natural Gas) 1. Washer E. Remove plastic cover from gas pressure regulator cap. 4. Connect anti-tip bracket to Natural Gas) 1. Unplug range or disconnect power. Gas supply line 2. Gas pressure regulator cap 5. Side view before A LP Tip...
...ignition, operation, and burner flame adjustments. Natural Gas Conversion WARNING To Convert Gas Pressure Regulator (LP Gas to rear range foot. A A. NOTE: Do not remove the spring beneath the cap. Turn over gas pressure regulator cap. NOTE: Reinstall one of this manual to...Instructions" section of the screws through the range cooktop to Natural Gas) 1. Washer E. Remove plastic cover from gas pressure regulator cap. 4. Connect anti-tip bracket to Natural Gas) 1. Unplug range or disconnect power. Gas supply line 2. Gas pressure regulator cap 5. Side view before A LP Tip...

Installation Guide
Page 17
... burner orifice spud counterclockwise to Natural Gas) 1. 3. Remove 2 screws from the front frame. Stamped number Refer to remove tab from oven and set the bake burner aside on a covered surface. Replace burner cap. 8. Remove the oven racks. 2. Lift the rear of the oven bottom up and back ...until the front of the panel is away from the front tabs of the oven bottom. 3. Set gas orifice spud aside. Orifice spud B. Screws B. Oven ...
... burner orifice spud counterclockwise to Natural Gas) 1. 3. Remove 2 screws from the front frame. Stamped number Refer to remove tab from oven and set the bake burner aside on a covered surface. Replace burner cap. 8. Remove the oven racks. 2. Lift the rear of the oven bottom up and back ...until the front of the panel is away from the front tabs of the oven bottom. 3. Set gas orifice spud aside. Orifice spud B. Screws B. Oven ...


