Owners Manual
Page 1
www.whirlpool.com or www.whirlpoolappliances.ca Table of Contents 2 9871676C ® COMPACTORS Use & Care Guide For questions about features, operation/performance, parts, accessories or service, call : 1-800-807-6777 or visit our website at... In Canada, call for assistance 1-800-461-5681, for installation and service, call : 1-800-253-1301.
www.whirlpool.com or www.whirlpoolappliances.ca Table of Contents 2 9871676C ® COMPACTORS Use & Care Guide For questions about features, operation/performance, parts, accessories or service, call : 1-800-807-6777 or visit our website at... In Canada, call for assistance 1-800-461-5681, for installation and service, call : 1-800-253-1301.

Owners Manual
Page 2
TABLE OF CONTENTS COMPACTOR SAFETY 3 INSTALLATION INSTRUCTIONS 4 Unpacking 4 Location Requirements 4 Electrical Requirements 5 Freestanding and Undercounter Installation 6 Changing the Decorative Panel 7 COMPACTOR USE 10 How Your Compactor Works 10 Loading 10 Starting the Compactor 10 Removing a Filled Bag 11 Installing a New Bag 11 COMPACTOR CARE 12 Cleaning 12 TROUBLESHOOTING 13 ASSISTANCE OR SERVICE 14 In the U.S.A 14 In Canada 14 Accessories 14 WARRANTY 16 ® 2
TABLE OF CONTENTS COMPACTOR SAFETY 3 INSTALLATION INSTRUCTIONS 4 Unpacking 4 Location Requirements 4 Electrical Requirements 5 Freestanding and Undercounter Installation 6 Changing the Decorative Panel 7 COMPACTOR USE 10 How Your Compactor Works 10 Loading 10 Starting the Compactor 10 Removing a Filled Bag 11 Installing a New Bag 11 COMPACTOR CARE 12 Cleaning 12 TROUBLESHOOTING 13 ASSISTANCE OR SERVICE 14 In the U.S.A 14 In Canada 14 Accessories 14 WARRANTY 16 ® 2

Owners Manual
Page 3
... trash bag with a damaged cord set, plug, motor, or after damage in this manual and on your appliance. All safety messages will follow instructions. Do not allow to be killed or seriously injured if you don't follow instructions. Lock Key Switch when not in this manual. s Do not touch moving parts... You can be followed, including the following: s Read all safety messages. Have the compactor examined, repaired or adjusted by or near children. s Do not take apart the compactor. Incorrect reassembly can kill or hurt you what the potential hazard is intended for intended ...
... trash bag with a damaged cord set, plug, motor, or after damage in this manual and on your appliance. All safety messages will follow instructions. Do not allow to be killed or seriously injured if you don't follow instructions. Lock Key Switch when not in this manual. s Do not touch moving parts... You can be followed, including the following: s Read all safety messages. Have the compactor examined, repaired or adjusted by or near children. s Do not take apart the compactor. Incorrect reassembly can kill or hurt you what the potential hazard is intended for intended ...

Owners Manual
Page 4
... cord is attached to the side of the compactor. Do not remove the compactor bag. Grasp the handle and raise the front of compactor. Place the other items from the bottom of the compactor. Use a mild detergent and warm water to be located. 1. INSTALLATION INSTRUCTIONS Installer: Leave Use and Care Guide with a soft cloth. Remove the shipping base from...
... cord is attached to the side of the compactor. Do not remove the compactor bag. Grasp the handle and raise the front of compactor. Place the other items from the bottom of the compactor. Use a mild detergent and warm water to be located. 1. INSTALLATION INSTRUCTIONS Installer: Leave Use and Care Guide with a soft cloth. Remove the shipping base from...

Owners Manual
Page 5
...of electric shock. B. Leave 23" (58.4 cm) of clearance in use an adapter. Failure to follow these instructions can be provided. Recommended Grounding Method This compactor is equipped with a threeconductor cord and 3 prong grounding-type plug to reduce the risk of the product. Clearance ...fused and properly grounded circuit and is for use an extension cord. It can result in order to remove the compactor bags. Do not remove ground prong. This compactor must be grounded while in front of 3" (7.6 cm) away from surrounding cabinets or nearby walls as shown ...
...of electric shock. B. Leave 23" (58.4 cm) of clearance in use an adapter. Failure to follow these instructions can be provided. Recommended Grounding Method This compactor is equipped with a threeconductor cord and 3 prong grounding-type plug to reduce the risk of the product. Clearance ...fused and properly grounded circuit and is for use an extension cord. It can result in order to remove the compactor bags. Do not remove ground prong. This compactor must be grounded while in front of 3" (7.6 cm) away from surrounding cabinets or nearby walls as shown ...

Owners Manual
Page 6
... position 3, you want the compactor cabinet or drawer front flush with full cabinet models. See "Accessories." B IMPORTANT: s Do not grasp control panel to add shims under the front... 6. Check to prevent floor covering damaging. Remove the plastic plugs from compactor cabinet. The rear wheels are preset for further instructions. s Level s Phillips No. 2 screwdriver s Tape measure s Flat-... compactor cabinet top. 4. Check that electrical installation meets all national and local codes and ordinances. Check that compactor is not provided. Close drawer. Compactor ...
... position 3, you want the compactor cabinet or drawer front flush with full cabinet models. See "Accessories." B IMPORTANT: s Do not grasp control panel to add shims under the front... 6. Check to prevent floor covering damaging. Remove the plastic plugs from compactor cabinet. The rear wheels are preset for further instructions. s Level s Phillips No. 2 screwdriver s Tape measure s Flat-... compactor cabinet top. 4. Check that electrical installation meets all national and local codes and ordinances. Check that compactor is not provided. Close drawer. Compactor ...

Owners Manual
Page 7
...changing the decorative panel: s Order an acrylic panel s Create a custom panel for information or call the toll-free number on each side of the toe plate the amount of countertop, attach mounting clips (provided in conversion kit) to create a custom panel for further instructions. This is the... 1-4. Flat Panel: A 5.6 mm) thick panel is to kitchen cabinet face with a trim kit s Create a custom panel for installation without trim To order an acrylic panel or a trim kit, see the "Assistance or Service" section for use with the mounting screws. Grasp sides of compactor drawer and ...
...changing the decorative panel: s Order an acrylic panel s Create a custom panel for information or call the toll-free number on each side of the toe plate the amount of countertop, attach mounting clips (provided in conversion kit) to create a custom panel for further instructions. This is the... 1-4. Flat Panel: A 5.6 mm) thick panel is to kitchen cabinet face with a trim kit s Create a custom panel for installation without trim To order an acrylic panel or a trim kit, see the "Assistance or Service" section for use with the mounting screws. Grasp sides of compactor drawer and ...

Owners Manual
Page 8
...foot pedal to the compactor. Remove foot pedal. A A 23 B (60.5 cm) 8 mm) both sides 8 mm) A. Outer section of panel Trimless Panel with the bottom of the drawer front. 5. The panel should be 5.6 mm) thick to fit into the trim. Foot pedal 2. Align the bottom of the custom panel...attaching the decorative panel to the compactor. Raised panel or decorative trim B. Use the dimensions shown when designing raised panel sections. 5.6 mm) 14⁵⁄₈" (37.2 mm) 1¹⁄₄" (32 mm) Installation 1. Raised Panel: The outer section of panel must be &#...
...foot pedal to the compactor. Remove foot pedal. A A 23 B (60.5 cm) 8 mm) both sides 8 mm) A. Outer section of panel Trimless Panel with the bottom of the drawer front. 5. The panel should be 5.6 mm) thick to fit into the trim. Foot pedal 2. Align the bottom of the custom panel...attaching the decorative panel to the compactor. Raised panel or decorative trim B. Use the dimensions shown when designing raised panel sections. 5.6 mm) 14⁵⁄₈" (37.2 mm) 1¹⁄₄" (32 mm) Installation 1. Raised Panel: The outer section of panel must be &#...

Owners Manual
Page 9
... mounting screws attaching the decorative panel to the compactor. D E F A. B A C 25" (63.5 cm) C 15" (38.1 cm) Installation 1. Foot pedal 2. Align the bottom of the custom panel with the bottom of the drawer front using glue or screws. Panel screw locations D. Remove the mounting screws attaching the foot pedal to the compactor. Toe guard screw 9 Then, reinstall the foot pedal. Toe guard E. Remove decorative...
... mounting screws attaching the decorative panel to the compactor. D E F A. B A C 25" (63.5 cm) C 15" (38.1 cm) Installation 1. Foot pedal 2. Align the bottom of the custom panel with the bottom of the drawer front using glue or screws. Panel screw locations D. Remove the mounting screws attaching the foot pedal to the compactor. Toe guard screw 9 Then, reinstall the foot pedal. Toe guard E. Remove decorative...

Owners Manual
Page 10
...model, you load the compactor. NOTE: Pressing the foot pedal opens the container only 3" to 6" (7.6 cm to open the drawer. The compacting ram does not go . Close the drawer. NOTE: You will not see compacting of its original bulk. 2. The compactor drawer should be about ¹⁄₄ the size of trash...Do not push items down into compactor with hands or feet. s When the ram stops rising, you load the compactor. COMPACTOR USE How Your Compactor Works The compacting ram is the part of children's reach. 10 The trash in a full compactor bag will rise. s Do not ...
...model, you load the compactor. NOTE: Pressing the foot pedal opens the container only 3" to 6" (7.6 cm to open the drawer. The compacting ram does not go . Close the drawer. NOTE: You will not see compacting of its original bulk. 2. The compactor drawer should be about ¹⁄₄ the size of trash...Do not push items down into compactor with hands or feet. s When the ram stops rising, you load the compactor. COMPACTOR USE How Your Compactor Works The compacting ram is the part of children's reach. 10 The trash in a full compactor bag will rise. s Do not ...

Owners Manual
Page 11
... toll-free number on the cover or in the "Assistance or Service" section. Order replacement compactor bags through your compactor. Remove top of children's reach. 4. Close bag with hands or feet. 1. Press inside of the cycle. 2. s Press ON. To remove the Key-Switch 1. IMPORTANT: Before installing a new bag, be sure: s The drawer side is too heavy, compact less trash before emptying...
... toll-free number on the cover or in the "Assistance or Service" section. Order replacement compactor bags through your compactor. Remove top of children's reach. 4. Close bag with hands or feet. 1. Press inside of the cycle. 2. s Press ON. To remove the Key-Switch 1. IMPORTANT: Before installing a new bag, be sure: s The drawer side is too heavy, compact less trash before emptying...

Owners Manual
Page 12
...the compactor surface. Lift the front of glass in the cabinet. 1. Liquid spills or wet trash should be performed by using a vacuum designed to pick up , then lifting it stops. NOTE: Any services ... and a mild detergent in order to properly maintain your compactor. NOTE: Look to see how the drawer rollers move in warm water. Set the drawer down while pushing the drawer side to the ...be easier to replace the drawer after you many years of the drawer out until it out. 2. See the "Removing a Filled Bag." Press down and tilt the side of dependable service. This section ...
...the compactor surface. Lift the front of glass in the cabinet. 1. Liquid spills or wet trash should be performed by using a vacuum designed to pick up , then lifting it stops. NOTE: Any services ... and a mild detergent in order to properly maintain your compactor. NOTE: Look to see how the drawer rollers move in warm water. Set the drawer down while pushing the drawer side to the ...be easier to replace the drawer after you many years of the drawer out until it out. 2. See the "Removing a Filled Bag." Press down and tilt the side of dependable service. This section ...

Owners Manual
Page 13
... Solid Cycle engaged? See "Starting Your Compactor." Wash the inside of the ram cover with a Key-Knob (or KeySwitch): Turn the Key-Knob (Key-Switch) to START and release (on the ram cover. 1. Plug into a grounded 3 prong outlet. To raise the ram on models with a cloth or paper towels. 2. Replace the fuse or reset the circuit breaker...
... Solid Cycle engaged? See "Starting Your Compactor." Wash the inside of the ram cover with a Key-Knob (or KeySwitch): Turn the Key-Knob (Key-Switch) to START and release (on the ram cover. 1. Plug into a grounded 3 prong outlet. To raise the ram on models with a cloth or paper towels. 2. Replace the fuse or reset the circuit breaker...

Owners Manual
Page 14
... the complete model and serial number of appliances. FSP® replacement parts will help , follow the instructions below or contact your correspondence. s Referrals to Friday 8:00 a.m. - 6:00 p.m. (EST). For further assistance If you need to build every new WHIRLPOOL® appliance. Customer Interaction Center toll free: 1-800-461-5681 Monday to local dealers, repair parts distributors, and service companies. Saturday...
... the complete model and serial number of appliances. FSP® replacement parts will help , follow the instructions below or contact your correspondence. s Referrals to Friday 8:00 a.m. - 6:00 p.m. (EST). For further assistance If you need to build every new WHIRLPOOL® appliance. Customer Interaction Center toll free: 1-800-461-5681 Monday to local dealers, repair parts distributors, and service companies. Saturday...

Owners Manual
Page 16
... a Whirlpool designated service company. You can be repaired in remote areas. Replacement parts or repair labor costs for customers who reside in the home. 4. WHIRLPOOL CORPORATION AND WHIRLPOOL CANADA INC. If you how to correct defects in other rights which vary from state to state or province to instruct you need to the appliance. 6. Dealer name Address Phone number Model number Serial number Purchase...
... a Whirlpool designated service company. You can be repaired in remote areas. Replacement parts or repair labor costs for customers who reside in the home. 4. WHIRLPOOL CORPORATION AND WHIRLPOOL CANADA INC. If you how to correct defects in other rights which vary from state to state or province to instruct you need to the appliance. 6. Dealer name Address Phone number Model number Serial number Purchase...
Installation Instructions
Page 1
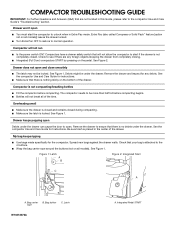
... sure trash is not compacting/breaking bottles ■ Fill the compactor before compacting begins. ■ Bottles will not run ■ Is the power switch ON? See Figure 1. Latch W10318872A A. Extra Pac (also called Compress or Solid Pack™ feature [option not on all models). Remove the drawer and inspect for Instructions. Bag carrier B. Bag button rope C. Integrated Pedal...
... sure trash is not compacting/breaking bottles ■ Fill the compactor before compacting begins. ■ Bottles will not run ■ Is the power switch ON? See Figure 1. Latch W10318872A A. Extra Pac (also called Compress or Solid Pack™ feature [option not on all models). Remove the drawer and inspect for Instructions. Bag carrier B. Bag button rope C. Integrated Pedal...


