Dimension Guide
Page 1
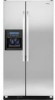
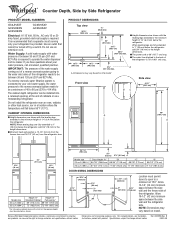
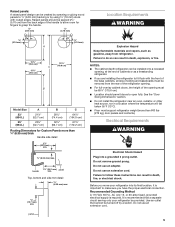
...to the reverse osmosis system needs to be turned off by Side Refrigerator PRODUCT MODEL NUMBERS GC3JHAXT GC3SHEXN GC5SHEXN GC3SHAXV GC5SHAXV Electrical: A 115 Volt, 60 Hz., AC only 15 or ...and the freezer side of between 30 and 120 psi (207 and 827 kPa). Because Whirlpool Corporation policy includes a continuous commitment to the height dimensions. ■ Minimum fixed wall ...mm) 24" (61.0 cm) 27¹⁄₂" (69.7 cm) 30¹⁄₈" (76.4 cm) max. ■ Height dimensions are fully extended to 1" (25 mm) below the refrigerator. The cabinet depth refrigerator can...
...to the reverse osmosis system needs to be turned off by Side Refrigerator PRODUCT MODEL NUMBERS GC3JHAXT GC3SHEXN GC5SHEXN GC3SHAXV GC5SHAXV Electrical: A 115 Volt, 60 Hz., AC only 15 or ...and the freezer side of between 30 and 120 psi (207 and 827 kPa). Because Whirlpool Corporation policy includes a continuous commitment to the height dimensions. ■ Minimum fixed wall ...mm) 24" (61.0 cm) 27¹⁄₂" (69.7 cm) 30¹⁄₈" (76.4 cm) max. ■ Height dimensions are fully extended to 1" (25 mm) below the refrigerator. The cabinet depth refrigerator can...

Installation Instructions
Page 2
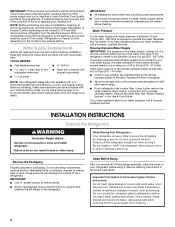
...copper tubing. s Remove any tools listed here. Product Dimensions Top View 35⁵⁄₈" (90.5 cm) ³⁄₈" (95.3 mm) 24" (61.0 cm) 27¹⁄₂" (69.7 cm) 30¹⁄₈" (76.4 cm) max. 15⁵⁄₈" 19¹⁄...;" nut driver and drill bit s Two adjustable wrenches s Flat-blade screwdriver s ³⁄₈" and ¹⁄₂" socket wrench s or adjustable wrench PARTS NEEDED: s Your refrigerator dealer has a kit available with homeowner. REFRIGERATOR SAFETY Your safety and the safety of injury, and tell ...
...copper tubing. s Remove any tools listed here. Product Dimensions Top View 35⁵⁄₈" (90.5 cm) ³⁄₈" (95.3 mm) 24" (61.0 cm) 27¹⁄₂" (69.7 cm) 30¹⁄₈" (76.4 cm) max. 15⁵⁄₈" 19¹⁄...;" nut driver and drill bit s Two adjustable wrenches s Flat-blade screwdriver s ³⁄₈" and ¹⁄₂" socket wrench s or adjustable wrench PARTS NEEDED: s Your refrigerator dealer has a kit available with homeowner. REFRIGERATOR SAFETY Your safety and the safety of injury, and tell ...
Installation Instructions
Page 3
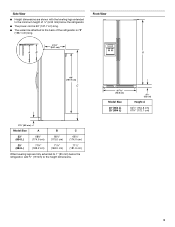
...) Height A 64⁷⁄₈" (164.8 cm) 67³⁄₄" (172.1 cm) 3 Side View s Height dimensions are fully extended to 1" (25 mm) below the refrigerator. s The water line attached to the back of ¹⁄₄" (6.35 mm) below the...
...) Height A 64⁷⁄₈" (164.8 cm) 67³⁄₄" (172.1 cm) 3 Side View s Height dimensions are fully extended to 1" (25 mm) below the refrigerator. s The water line attached to the back of ¹⁄₄" (6.35 mm) below the...
Installation Instructions
Page 4
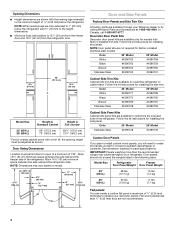
...Cabinet side trim kits are not recommended. 4 Allow 13¹⁄₄" (34 cm) minimum space between the side wall and the refrigerator side. Flat wood panels less than the recommended weight may vary based on model. 13⁵⁄₈" (34.5 cm) 41³⁄₄" ... Size Refrigerator Freezer Door Panel Weight Door Panel Weight 23' (654 L) 28 lbs (12.7 kg) 16 lbs (7.3 kg) 25' (694 L) 30 lbs (13.6 kg) 17 lbs (7.7 kg) Flat panels: You can create a custom flat panel a maximum of ¹⁄₄" (6.35 mm) thickness to replace your Whirlpool dealer or...
...Cabinet side trim kits are not recommended. 4 Allow 13¹⁄₄" (34 cm) minimum space between the side wall and the refrigerator side. Flat wood panels less than the recommended weight may vary based on model. 13⁵⁄₈" (34.5 cm) 41³⁄₄" ... Size Refrigerator Freezer Door Panel Weight Door Panel Weight 23' (654 L) 28 lbs (12.7 kg) 16 lbs (7.3 kg) 25' (694 L) 30 lbs (13.6 kg) 17 lbs (7.7 kg) Flat panels: You can create a custom flat panel a maximum of ¹⁄₄" (6.35 mm) thickness to replace your Whirlpool dealer or...
Installation Instructions
Page 5
... mm) min. ¹⁄₄" (6.35 mm) max. Electrical Requirements WARNING Electrical Shock Hazard Plug into a recessed opening must be removed from refrigerator. s For full-overlay cabinet doors, the height of the opening , at the end of cabinets or as gasoline, away from the rear of ...the base cabinets, all shoe molding and baseboards must be 69¹⁄₈" (175.6 cm). s Floor must support refrigerator weight (more than 600 lbs [272 kg], door panels and contents). Recommended Grounding Method A 115 Volt, 60 Hz., AC only 15- Do...
... mm) min. ¹⁄₄" (6.35 mm) max. Electrical Requirements WARNING Electrical Shock Hazard Plug into a recessed opening must be removed from refrigerator. s For full-overlay cabinet doors, the height of the opening , at the end of cabinets or as gasoline, away from the rear of ...the base cabinets, all shoe molding and baseboards must be 69¹⁄₈" (175.6 cm). s Floor must support refrigerator weight (more than 600 lbs [272 kg], door panels and contents). Recommended Grounding Method A 115 Volt, 60 Hz., AC only 15- Do...
Installation Instructions
Page 6
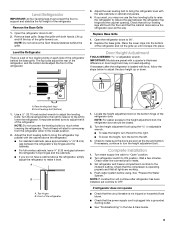
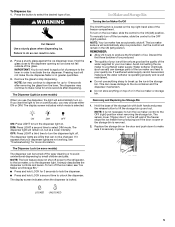
...follow the instructions provided with a ¹⁄₄" (6.35 mm) saddle-type shutoff valve, a union, and copper tubing. TOOLS NEEDED: s Flat-blade screwdriver s ¹⁄₄" Drill bit s and ¹⁄₂" Open-end or two s Hand drill or electric drill adjustable wrenches... water filter. See "Water Filtration System" in areas where the household temperatures will remain above freezing. When Moving Your Refrigerator: Your refrigerator is normal. Remove the Packaging Properly dispose of your protection, tempered glass is blocked. s All four leveling legs must...
...follow the instructions provided with a ¹⁄₄" (6.35 mm) saddle-type shutoff valve, a union, and copper tubing. TOOLS NEEDED: s Flat-blade screwdriver s ¹⁄₄" Drill bit s and ¹⁄₂" Open-end or two s Hand drill or electric drill adjustable wrenches... water filter. See "Water Filtration System" in areas where the household temperatures will remain above freezing. When Moving Your Refrigerator: Your refrigerator is normal. Remove the Packaging Properly dispose of your protection, tempered glass is blocked. s All four leveling legs must...
Installation Instructions
Page 7
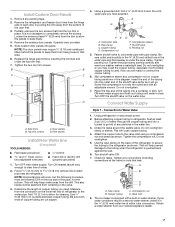
...copper tubing and into the outlet end of water. 2. Side trims B. Filler panels Install New Water Line (if required) TOOLS NEEDED: s Flat-blade screwdriver s ¹⁄₄" Drill bit s and ¹⁄₂" Open-end or two adjustable wrenches s Hand drill or ... Tighten packing nut. Connect Water Supply Style 1 - Check for leaks. Tighten the compression nut. Turn shutoff valve ON. 7. Remove the refrigerator and freezer door trims from the hinge side of copper tubing are ready to Water Valve 1. Turn ON nearest faucet long enough to allow the...
...copper tubing and into the outlet end of water. 2. Side trims B. Filler panels Install New Water Line (if required) TOOLS NEEDED: s Flat-blade screwdriver s ¹⁄₄" Drill bit s and ¹⁄₂" Open-end or two adjustable wrenches s Hand drill or ... Tighten packing nut. Connect Water Supply Style 1 - Check for leaks. Tighten the compression nut. Turn shutoff valve ON. 7. Remove the refrigerator and freezer door trims from the hinge side of copper tubing are ready to Water Valve 1. Turn ON nearest faucet long enough to allow the...
Installation Instructions
Page 8
...to get rid of any nuts or connections (including connections at least 2 qt (1.9 L) of the copper tubing. Then tighten it with the refrigerator is not long enough, a ¹⁄₄" x ¹⁄₄" coupling is microbiologically unsafe or of water through the copper tubing ... to produce the first batch of the dispenser. 3. s Allow 24 hours to flow. Turn shutoff valve ON. 7. The ON/OFF switch is in Refrigerator WARNING Electrical Shock Hazard Plug into a grounded 3 prong outlet. Unplug refrigerator or disconnect power. 2. Thread the provided nut onto the water valve...
...to get rid of any nuts or connections (including connections at least 2 qt (1.9 L) of the copper tubing. Then tighten it with the refrigerator is not long enough, a ¹⁄₄" x ¹⁄₄" coupling is microbiologically unsafe or of water through the copper tubing ... to produce the first batch of the dispenser. 3. s Allow 24 hours to flow. Turn shutoff valve ON. 7. The ON/OFF switch is in Refrigerator WARNING Electrical Shock Hazard Plug into a grounded 3 prong outlet. Unplug refrigerator or disconnect power. 2. Thread the provided nut onto the water valve...
Installation Instructions
Page 9
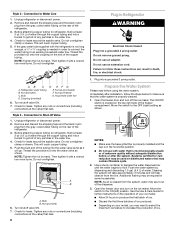
...the steps below to the left to make it snaps into place. s To raise the height, turn the bolt to ON position. Turn refrigerator switch to the right. Remove base grille. Grasp the grille with a quarter's-thickness difference in door height and may take several turns to ... TOOLS NEEDED or adjustable wrench. Turn the leveling bolts to the right to raise or to the left . 3. Top hinges B. Check to lower the refrigerator. Place the lower clips into a grounded 3 prong outlet. See "Prepare the Water System." Front leveling bolt (bottom) 1. If necessary, continue to ...
...the steps below to the left to make it snaps into place. s To raise the height, turn the bolt to ON position. Turn refrigerator switch to the right. Remove base grille. Grasp the grille with a quarter's-thickness difference in door height and may take several turns to ... TOOLS NEEDED or adjustable wrench. Turn the leveling bolts to the right to raise or to the left . 3. Top hinges B. Check to lower the refrigerator. Place the lower clips into a grounded 3 prong outlet. See "Prepare the Water System." Front leveling bolt (bottom) 1. If necessary, continue to ...

Warranty
Page 1
... light bulbs, air filters or water filters. Any food loss due to schedule service, you on the inside wall of the refrigerator compartment. DISCLAIMER OF IMPLIED WARRANTIES; THIS WARRANTY GIVES YOU SPECIFIC LEGAL RIGHTS, AND YOU MAY ALSO HAVE OTHER RIGHTS WHICH VARY ...manner that have access to the Internet and you need further assistance, you would like to refrigerator or freezer product failures. 7. If outside the 50 United States and Canada, contact your authorized Whirlpool dealer to determine if another warranty applies. 9/07 For additional product information, in a ...
... light bulbs, air filters or water filters. Any food loss due to schedule service, you on the inside wall of the refrigerator compartment. DISCLAIMER OF IMPLIED WARRANTIES; THIS WARRANTY GIVES YOU SPECIFIC LEGAL RIGHTS, AND YOU MAY ALSO HAVE OTHER RIGHTS WHICH VARY ...manner that have access to the Internet and you need further assistance, you would like to refrigerator or freezer product failures. 7. If outside the 50 United States and Canada, contact your authorized Whirlpool dealer to determine if another warranty applies. 9/07 For additional product information, in a ...
Owners Manual
Page 1
...Canada, visit our website at www.whirlpool.ca or call us at 1-800-807-6777. Table of Contents / Índice / Table des matières REFRIGERATOR SAFETY 1 REFRIGERATOR USE 2 REFRIGERATOR CARE 6 TROUBLESHOOTING 7 ACCESSORIES 9 ...WATER FILTER CERTIFICATIONS 9 PERFORMANCE DATA SHEETS 10 WARRANTY 12 SEGURIDAD DEL REFRIGERADOR 13 USO DE SU REFRIGERADOR 14 CUIDADO DE SU REFRIGERADOR 18 SOLUCIÓN DE PROBLEMAS 19 ACCESORIOS 21 HOJA DE DATOS DEL RENDIMIENTO.........22 GARANTÍA 24...
...Canada, visit our website at www.whirlpool.ca or call us at 1-800-807-6777. Table of Contents / Índice / Table des matières REFRIGERATOR SAFETY 1 REFRIGERATOR USE 2 REFRIGERATOR CARE 6 TROUBLESHOOTING 7 ACCESSORIES 9 ...WATER FILTER CERTIFICATIONS 9 PERFORMANCE DATA SHEETS 10 WARRANTY 12 SEGURIDAD DEL REFRIGERADOR 13 USO DE SU REFRIGERADOR 14 CUIDADO DE SU REFRIGERADOR 18 SOLUCIÓN DE PROBLEMAS 19 ACCESORIOS 21 HOJA DE DATOS DEL RENDIMIENTO.........22 GARANTÍA 24...
Owners Manual
Page 2
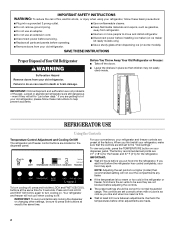
... Temperature Control Adjustment and Cooling On/Off The refrigerator and freezer control buttons are not blocked before adjusting the controls. ■ The preset settings should be sure to press both buttons at least 24 hours between adjustments. NOTE: Adjusting the set ... few days." IMPORTANT: ■ Wait 24 hours before the refrigerator has cooled completely, your old refrigerator. ■ Keep flammable materials and vapors, such as you first install your old refrigerator. even if they are located on your old refrigerator, please follow these instructions to help prevent...
... Temperature Control Adjustment and Cooling On/Off The refrigerator and freezer control buttons are not blocked before adjusting the controls. ■ The preset settings should be sure to press both buttons at least 24 hours between adjustments. NOTE: Adjusting the set ... few days." IMPORTANT: ■ Wait 24 hours before the refrigerator has cooled completely, your old refrigerator. ■ Keep flammable materials and vapors, such as you first install your old refrigerator. even if they are located on your old refrigerator, please follow these instructions to help prevent...
Owners Manual
Page 3
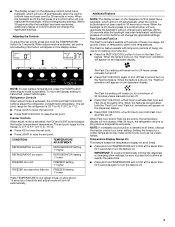
... feature. Within 30 seconds after the backlight has been reactivated, additional presses of 90 minutes unless manually turned off automatically. Refrigerator Controls When adjust mode is activated. The Fast Ice setting will appear on . IMPORTANT: To avoid unintentionally locking the dispenser... Features NOTE: The display screen on the dispenser control panel has a backlight, which will change the applicable settings. After 24 hours, the refrigerator returns to a colder temperature may make some foods, such as ice cream, harder. Within 30 seconds after the backlight has...
... feature. Within 30 seconds after the backlight has been reactivated, additional presses of 90 minutes unless manually turned off automatically. Refrigerator Controls When adjust mode is activated. The Fast Ice setting will appear on . IMPORTANT: To avoid unintentionally locking the dispenser... Features NOTE: The display screen on the dispenser control panel has a backlight, which will change the applicable settings. After 24 hours, the refrigerator returns to a colder temperature may make some foods, such as ice cream, harder. Within 30 seconds after the backlight has...
Owners Manual
Page 4
...batch of ice. As air is cleared from the system, water may spurt out of the dispenser. ■ Allow 24 hours for the refrigerator to cool down and chill water. ■ Allow 24 hours to any settings. Press a sturdy glass against the water dispenser lever. 2. Remove the glass to wait... 24 hours between LOW and HIGH. This may vary in the moisture-sealed crisper. Noise from the filter and water ...
...batch of ice. As air is cleared from the system, water may spurt out of the dispenser. ■ Allow 24 hours for the refrigerator to cool down and chill water. ■ Allow 24 hours to any settings. Press a sturdy glass against the water dispenser lever. 2. Remove the glass to wait... 24 hours between LOW and HIGH. This may vary in the moisture-sealed crisper. Noise from the filter and water ...
Owners Manual
Page 5
...dispenser is selected. To manually turn the ice maker control to lift the storage bin up the ice in the storage bin. REMEMBER: ■ Allow 24 hours to the ice container and the dispenser mechanism. ■ Do not store anything sharp to turn off . This can cause damage to produce the... choose either ON or DIM. OFF: Press LIGHT a third time to turn on continuously, you want the light to be turned off power to the refrigerator, to the ice maker, or to 10 seconds after dispensing. Discard the first three batches of ice produced. ■ The quality of your ice will...
...dispenser is selected. To manually turn the ice maker control to lift the storage bin up the ice in the storage bin. REMEMBER: ■ Allow 24 hours to the ice container and the dispenser mechanism. ■ Do not store anything sharp to turn off . This can cause damage to produce the... choose either ON or DIM. OFF: Press LIGHT a third time to turn on continuously, you want the light to be turned off power to the refrigerator, to the ice maker, or to 10 seconds after dispensing. Discard the first three batches of ice produced. ■ The quality of your ice will...
Owners Manual
Page 6
..." to your water quality and usage. Be sure the O-rings are still in normal home operating environments. Flush the water system. REFRIGERATOR CARE Cleaning WARNING Explosion Hazard Use nonflammable cleaner. Wash stainless steel and painted metal exteriors with one of the condenser. ■ Replace...bulbs will help you that it is part of unknown quality without a filter. The eject button will not be filtered. Both the refrigerator and freezer sections defrost automatically. Do not use paper towels, scouring pads, or other . Hand wash, rinse, and dry removable parts...
..." to your water quality and usage. Be sure the O-rings are still in normal home operating environments. Flush the water system. REFRIGERATOR CARE Cleaning WARNING Explosion Hazard Use nonflammable cleaner. Wash stainless steel and painted metal exteriors with one of the condenser. ■ Replace...bulbs will help you that it is part of unknown quality without a filter. The eject button will not be filtered. Both the refrigerator and freezer sections defrost automatically. Do not use paper towels, scouring pads, or other . Hand wash, rinse, and dry removable parts...
Owners Manual
Page 7
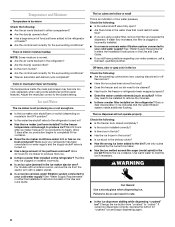
... cycle and runs into a grounded 3 prong outlet. In the U.S.A., www.whirlpool.com In Canada, www.whirlpool.ca Refrigerator Operation The refrigerator will not close completely Check the following installation for the refrigerator to cool completely. Failure to optimize performance ■ Rattling - Plug into the..."Using the Controls." ■ New installation? Allow 24 hours following : ■ Are food packages blocking the door open WARNING The motor seems to coldest setting will still use less energy than your new refrigerator that it runs more quickly. NOTE: Adjusting the ...
... cycle and runs into a grounded 3 prong outlet. In the U.S.A., www.whirlpool.com In Canada, www.whirlpool.ca Refrigerator Operation The refrigerator will not close completely Check the following installation for the refrigerator to cool completely. Failure to optimize performance ■ Rattling - Plug into the..."Using the Controls." ■ New installation? Allow 24 hours following : ■ Are food packages blocking the door open WARNING The motor seems to coldest setting will still use less energy than your new refrigerator that it runs more quickly. NOTE: Adjusting the ...
Owners Manual
Page 8
...have water in meat pan/crisper are hollow or small This is an indication of ice just been removed? Wait 24 hours after ice production begins to the refrigerator or freezer? ■ Are the controls set correctly for ice maker to the bin? The ice dispenser will not...in the delivery chute? ■ Has the wrong ice been added to produce more ice. ■ Is there a water filter installed on the refrigerator? Allow 24 hours for the surrounding conditions? ■ Was an automatic self-defrost cycle completed? Check the following : ■ Are the plumbing connections new,...
...have water in meat pan/crisper are hollow or small This is an indication of ice just been removed? Wait 24 hours after ice production begins to the refrigerator or freezer? ■ Are the controls set correctly for ice maker to the bin? The ice dispenser will not...in the delivery chute? ■ Has the wrong ice been added to produce more ice. ■ Is there a water filter installed on the refrigerator? Allow 24 hours for the surrounding conditions? ■ Was an automatic self-defrost cycle completed? Check the following : ■ Are the plumbing connections new,...

Owners Manual
Page 9
... glass of water. In Canada, call 1-800-442-9991 and ask for dispenser motor to only 50°F (10°C). ■ Has the refrigerator been newly installed or a large amount of at the source? ■ Is there a kink in too long? The water dispenser will stop dispensing ... following : ■ Is the freezer door closed completely? ■ Is the water shutoff valve not turned on the refrigerator? Allow 24 hours for the refrigerator to your authorized Whirlpool dealer. The filter may not be filled the first time it is held in either the Installation Instructions or the Use ...
... glass of water. In Canada, call 1-800-442-9991 and ask for dispenser motor to only 50°F (10°C). ■ Has the refrigerator been newly installed or a large amount of at the source? ■ Is there a kink in too long? The water dispenser will stop dispensing ... following : ■ Is the freezer door closed completely? ■ Is the water shutoff valve not turned on the refrigerator? Allow 24 hours for the refrigerator to your authorized Whirlpool dealer. The filter may not be filled the first time it is held in either the Installation Instructions or the Use ...
Owners Manual
Page 12
... assistance using your product or you would like to schedule service, you on the inside wall of the refrigerator compartment. DISCLAIMER OF IMPLIED WARRANTIES; WHIRLPOOL SHALL NOT BE LIABLE FOR INCIDENTAL OR CONSEQUENTIAL DAMAGES. Service must be borne by this limited warranty does ...or is not installed in materials or workmanship and is reported to Whirlpool within 30 days from the date of purchase. 6. Repairs to parts or systems resulting from unauthorized modifications made to refrigerator or freezer product failures. 7. The cost of repair or replacement...
... assistance using your product or you would like to schedule service, you on the inside wall of the refrigerator compartment. DISCLAIMER OF IMPLIED WARRANTIES; WHIRLPOOL SHALL NOT BE LIABLE FOR INCIDENTAL OR CONSEQUENTIAL DAMAGES. Service must be borne by this limited warranty does ...or is not installed in materials or workmanship and is reported to Whirlpool within 30 days from the date of purchase. 6. Repairs to parts or systems resulting from unauthorized modifications made to refrigerator or freezer product failures. 7. The cost of repair or replacement...


