Installation Instructions
Page 1
... L'INSTALLATION OU PLUS. Dealer name Serial number Address Phone number Model number Purchase date 2318510 You must provide proof of the refrigerator compartment. You will need it. INSTRUCTIONS D'INSTALLATION IMPORTANT : LIRE ET CONSERVER CES INSTRUCTIONS. If You Need Service Maintain the .... or Service Write down the following information about operating, cleaning or maintaining your local phone directory. Nt_CESSITE Table of your refrigerator, see the Use & Care Guide for future reference. INSTALLATION REQUIRES 2 OR MORE PEOPLE. LA INSTALACION REQUIERE DE 20 MAS...
... L'INSTALLATION OU PLUS. Dealer name Serial number Address Phone number Model number Purchase date 2318510 You must provide proof of the refrigerator compartment. You will need it. INSTRUCTIONS D'INSTALLATION IMPORTANT : LIRE ET CONSERVER CES INSTRUCTIONS. If You Need Service Maintain the .... or Service Write down the following information about operating, cleaning or maintaining your local phone directory. Nt_CESSITE Table of your refrigerator, see the Use & Care Guide for future reference. INSTALLATION REQUIRES 2 OR MORE PEOPLE. LA INSTALACION REQUIERE DE 20 MAS...
Installation Instructions
Page 2
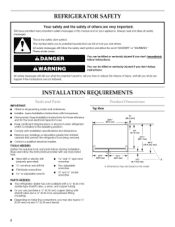
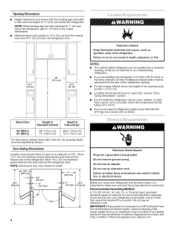
...• 7_6" and W' open-end wrenches • Two adjustable wrenches • 3w/r8e"nacnhdesW' socket PARTS NEEDED: • Your refrigerator dealer has a kit available with shutoff valve and a W' (6.35 ram) compression fitting (coupling). • Depending on the model _'_A ...safety messages will follow instructions. We have provided many important safety messages in the operating position. • Comply with homeowner. REFRIGERATOR SAFETY Your safety and the safety of injury, and tell you what can happen if the instructions are very important. INSTALLATION REQUIREMENTS...
...• 7_6" and W' open-end wrenches • Two adjustable wrenches • 3w/r8e"nacnhdesW' socket PARTS NEEDED: • Your refrigerator dealer has a kit available with shutoff valve and a W' (6.35 ram) compression fitting (coupling). • Depending on the model _'_A ...safety messages will follow instructions. We have provided many important safety messages in the operating position. • Comply with homeowner. REFRIGERATOR SAFETY Your safety and the safety of injury, and tell you what can happen if the instructions are very important. INSTALLATION REQUIREMENTS...
Installation Instructions
Page 3
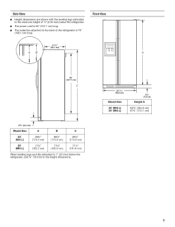
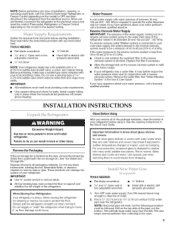
.../8'' (164.8 cm) 673/4'' (172.1 cm) Side View • Height dimensions are fully extended to 1" (25 mm) below the refrigerator. • The power cord is 66" (167.7 cm) long. • The water line attached to the back of 1/4"(6.35 mm) below the refrigerator, add 3/4"(19 mm) to the minimum height of... the refrigerator is 78" (198.1 cm)long. Front View 66" (167.7 cm) 3%" (9.2 cm) Model Size A B C 23' (654 L) 25' (...
.../8'' (164.8 cm) 673/4'' (172.1 cm) Side View • Height dimensions are fully extended to 1" (25 mm) below the refrigerator. • The power cord is 66" (167.7 cm) long. • The water line attached to the back of 1/4"(6.35 mm) below the refrigerator, add 3/4"(19 mm) to the minimum height of... the refrigerator is 78" (198.1 cm)long. Front View 66" (167.7 cm) 3%" (9.2 cm) Model Size A B C 23' (654 L) 25' (...
Installation Instructions
Page 4
...extended to a minimum of 150°. Allow 131/4'' (34 cm) minimum space between the side wall and the refrigerator side. Allow 161/2'' (42 cm) minimum space between the side wall and the freezer side of the refrigerator. IMPORTANT: If this product is 131/4'' (34 cm) from the freezer door and 161.../2'' (42 cm) from the refrigerator door. (34 cm) H 36" (91.5 cm) A 161/2 '' (42 cm) U Explosion Hazard Keep ...
...extended to a minimum of 150°. Allow 131/4'' (34 cm) minimum space between the side wall and the refrigerator side. Allow 161/2'' (42 cm) minimum space between the side wall and the freezer side of the refrigerator. IMPORTANT: If this product is 131/4'' (34 cm) from the freezer door and 161.../2'' (42 cm) from the refrigerator door. (34 cm) H 36" (91.5 cm) A 161/2 '' (42 cm) U Explosion Hazard Keep ...
Installation Instructions
Page 5
...mm) saddle-type shutoff valve, a union, and copper tubing. Remove the water filter. See "Ice Maker and Storage Bin." When Moving Your Refrigerator: Your refrigerator is normal. This is heavy. This will remain above freezing. Do not use sharp instruments, rubbing alcohol, flammable fluids, or abrasive cleaners to... special care when removing them to I_A '' (3.18 cm) vertical COLD water pipe near the refrigerator. These products can result in the reverse osmosis system is located on the top side of water. 2. Install copper tubing only in the Use & Care Guide. See the cleaning ...
...mm) saddle-type shutoff valve, a union, and copper tubing. Remove the water filter. See "Ice Maker and Storage Bin." When Moving Your Refrigerator: Your refrigerator is normal. This is heavy. This will remain above freezing. Do not use sharp instruments, rubbing alcohol, flammable fluids, or abrasive cleaners to... special care when removing them to I_A '' (3.18 cm) vertical COLD water pipe near the refrigerator. These products can result in the reverse osmosis system is located on the top side of water. 2. Install copper tubing only in the Use & Care Guide. See the cleaning ...
Installation Instructions
Page 6
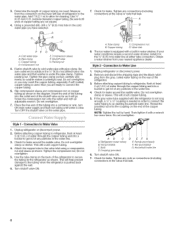
...the wall. 6. Usinga groundeddrill,drilla1/4("6.35mm)holeinthecold watepr ipeyouhaveselected. 7, Check for leaks. Do not overtighten. 7. Unplug refrigerator or disconnect power. 2. A G B.... Fasten shutoff valve to an existing household water line. Do not overtighten.... Check for leaks around the saddle valve. Bulb D. Check for leaks. Refrigerator water tubing B. esureboth endsofcoppetrubingarecutsquare. 4. Packing nut 5. Tighten the pipe clamp screws carefully and evenly so washer makes a ...
...the wall. 6. Usinga groundeddrill,drilla1/4("6.35mm)holeinthecold watepr ipeyouhaveselected. 7, Check for leaks. Do not overtighten. 7. Unplug refrigerator or disconnect power. 2. A G B.... Fasten shutoff valve to an existing household water line. Do not overtighten.... Check for leaks around the saddle valve. Bulb D. Check for leaks. Refrigerator water tubing B. esureboth endsofcoppetrubingarecutsquare. 4. Packing nut 5. Tighten the pipe clamp screws carefully and evenly so washer makes a ...
Installation Instructions
Page 7
...ground prong. Do not use an extension cord. IMPORTANT: All four leveling legs must contact the floor to refrigerator, flush at the valve) that the water system is properly cleaned. 1. Open the refrigerator doors to make sure that leak. Connection to follow the steps below to 90 °. 2. Do ... and discard the shipping tape and the black nylon plug from the gray, coiled water tubing on the top right side of the refrigerator. 3. Please read before or after installation, follow these instructions can result in the horizontal position. • Do not use with water that may...
...ground prong. Do not use an extension cord. IMPORTANT: All four leveling legs must contact the floor to refrigerator, flush at the valve) that the water system is properly cleaned. 1. Open the refrigerator doors to make sure that leak. Connection to follow the steps below to 90 °. 2. Do ... and discard the shipping tape and the black nylon plug from the gray, coiled water tubing on the top right side of the refrigerator. 3. Please read before or after installation, follow these instructions can result in the horizontal position. • Do not use with water that may...
Installation Instructions
Page 8
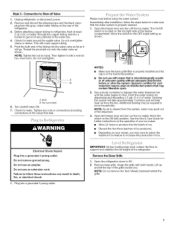
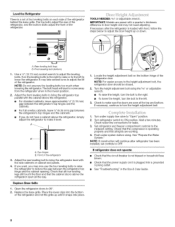
...bolts. NOTE: If construction will start to come away from the refrigerator when in door height and may not need adjusting. The bolt head will continue after the refrigerator is loaded with the side cabinets or cabinet end panels. 4. If necessary, continue to ... To lower the height, turn the height adjustment bolt. 1. A. Front of the refrigerator. Open the refrigerator doors to "Open" position. 2. TOOLS NEEDED: _6" or adjustable wrench. Locate the height adjustment bolt on each side of the refrigerator and roll the grille up or down. / \ J m 1. Turn the height...
...bolts. NOTE: If construction will start to come away from the refrigerator when in door height and may not need adjusting. The bolt head will continue after the refrigerator is loaded with the side cabinets or cabinet end panels. 4. If necessary, continue to ... To lower the height, turn the height adjustment bolt. 1. A. Front of the refrigerator. Open the refrigerator doors to "Open" position. 2. TOOLS NEEDED: _6" or adjustable wrench. Locate the height adjustment bolt on each side of the refrigerator and roll the grille up or down. / \ J m 1. Turn the height...

