Installation Instructions
Page 1
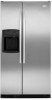
... the Use & Care Guide for the number to call, phone the dealer from whom you ever need to help you obtain assistance or service if you purchased the refrigerator, or check the yellow pages of Contents / Indice / Table des mati res ASSISTANCE OR SERVICE 1 REFRIGERATOR SAFETY 2 INSTALLATION REQUIREMENTS 2 Tools and Parts 2 Product Dimensions 2 Location Requirements 4 Electrical Requirements 4 Water Supply Requirements 5 INSTALLATION INSTRUCTIONS 5 Unpack the Refrigerator 5 Install New Water Line 5 Connect Water Supply 6 Plug in Refrigerator 7 Prepare the Water System 7 Level...
... the Use & Care Guide for the number to call, phone the dealer from whom you ever need to help you obtain assistance or service if you purchased the refrigerator, or check the yellow pages of Contents / Indice / Table des mati res ASSISTANCE OR SERVICE 1 REFRIGERATOR SAFETY 2 INSTALLATION REQUIREMENTS 2 Tools and Parts 2 Product Dimensions 2 Location Requirements 4 Electrical Requirements 4 Water Supply Requirements 5 INSTALLATION INSTRUCTIONS 5 Unpack the Refrigerator 5 Install New Water Line 5 Connect Water Supply 6 Plug in Refrigerator 7 Prepare the Water System 7 Level...
Installation Instructions
Page 2
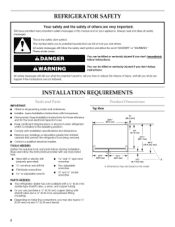
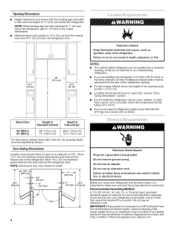
... this manual and on water line connections, you don't immediately follow instructions. INSTALLATION REQUIREMENTS IMPORTANT: Observe all safety messages. Dimensions may also need a %" (6.35 ram) nut and Y4"(6.35 ram) ferrule. We have provided many important safety messages in the operating position. • Comply with installation specifications and dimensions. • Remove any tools listed here. • Hand drill or electric drill (properly grounded) • W' nut driver...
... this manual and on water line connections, you don't immediately follow instructions. INSTALLATION REQUIREMENTS IMPORTANT: Observe all safety messages. Dimensions may also need a %" (6.35 ram) nut and Y4"(6.35 ram) ferrule. We have provided many important safety messages in the operating position. • Comply with installation specifications and dimensions. • Remove any tools listed here. • Hand drill or electric drill (properly grounded) • W' nut driver...
Installation Instructions
Page 3
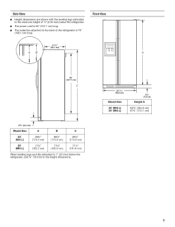
Side View • Height dimensions are fully extended to 1" (25 mm) below the refrigerator. • The power cord is 66" (167.7 cm) long. • The water line attached to the height dimensions. Model Size 23' (654 L) 25' (694 L) Height A 647/8'' (164.8 cm) 673/4'' (172.1 cm) Front View 66" (167.7 cm) 3%" (9.2 cm) Model Size A B C 23' (654 L) 25' (694 L) 68%" (174.6 cm) 713/4'' (182.2 cm) 687/8" (175.0 cm) 71...
Side View • Height dimensions are fully extended to 1" (25 mm) below the refrigerator. • The power cord is 66" (167.7 cm) long. • The water line attached to the height dimensions. Model Size 23' (654 L) 25' (694 L) Height A 647/8'' (164.8 cm) 673/4'' (172.1 cm) Front View 66" (167.7 cm) 3%" (9.2 cm) Model Size A B C 23' (654 L) 25' (694 L) 68%" (174.6 cm) 713/4'' (182.2 cm) 687/8" (175.0 cm) 71...
Installation Instructions
Page 4
... opening height must be affected. Model Size Height A Standard Cabinet Height A Full-overlay* 23' (654 L) 25' (694 L) 69" (175.3 cm) 72" (182.9 cm) 691/8'' (175.6 cm) 721/8'' (183.2 cm) *For full-overlay cabinet doors with a trim kit, the opening , at the end of cooling. Allow 131/4'' (34 cm) minimum space between the side wall and the refrigerator side. NOTE: Dimensions may occur, resulting in a location...
... opening height must be affected. Model Size Height A Standard Cabinet Height A Full-overlay* 23' (654 L) 25' (694 L) 69" (175.3 cm) 72" (182.9 cm) 691/8'' (175.6 cm) 721/8'' (183.2 cm) *For full-overlay cabinet doors with a trim kit, the opening , at the end of cooling. Allow 131/4'' (34 cm) minimum space between the side wall and the refrigerator side. NOTE: Dimensions may occur, resulting in a location...
Installation Instructions
Page 5
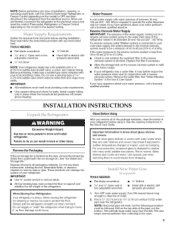
... mtheelectricsaol urceW. Glass shelves and covers are cold. Reverse Osmosis Water Supply IMPORTANT: The pressure of the water supply coming out of a reverse osmosis system going to the water inlet valve of the refrigerator needs to remove tape or glue. Read and follow the instructions provided with a %" (6.35 mm) saddle-type shutoff valve, a union, and copper tubing. Shelves and covers may further reduce the water pressure when used in conjunction with warm water when they...
... mtheelectricsaol urceW. Glass shelves and covers are cold. Reverse Osmosis Water Supply IMPORTANT: The pressure of the water supply coming out of a reverse osmosis system going to the water inlet valve of the refrigerator needs to remove tape or glue. Read and follow the instructions provided with a %" (6.35 mm) saddle-type shutoff valve, a union, and copper tubing. Shelves and covers may further reduce the water pressure when used in conjunction with warm water when they...
Installation Instructions
Page 6
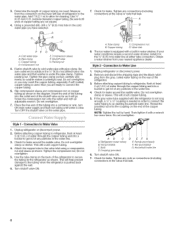
... makes a watertight seal. Turn OFF the shutoff valve on the end of the refrigerator. 3. Then tighten it in the diagram. Unplug refrigerator or disconnect power. 2. Nut (provided) C. Check for leaks around the saddle valve. Pipe clamp C. Slip compression sleeve and compression nut on the rear of the copper tubing. Place the free end of any connections (including connections at either tube connection. Do not overtighten. Cold water...
... makes a watertight seal. Turn OFF the shutoff valve on the end of the refrigerator. 3. Then tighten it in the diagram. Unplug refrigerator or disconnect power. 2. Nut (provided) C. Check for leaks around the saddle valve. Pipe clamp C. Slip compression sleeve and compression nut on the rear of the copper tubing. Place the free end of any connections (including connections at either tube connection. Do not overtighten. Cold water...
Installation Instructions
Page 7
... water line. 4. See the Use & Care Guide for cyst reduction may be used on your ice maker. • Allow 24 hours to Shut-off the ice maker. Remove base grille. This will crush copper tubing. 5. Please read before or after installation, follow these instructions can result in the horizontal position. • Do not use with a wrench two more turns. The On/Off switch is in death, fire, or electrical...
... water line. 4. See the Use & Care Guide for cyst reduction may be used on your ice maker. • Allow 24 hours to Shut-off the ice maker. Remove base grille. This will crush copper tubing. 5. Please read before or after installation, follow these instructions can result in the horizontal position. • Do not use with a wrench two more turns. The On/Off switch is in death, fire, or electrical...
Installation Instructions
Page 8
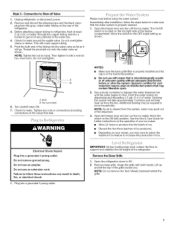
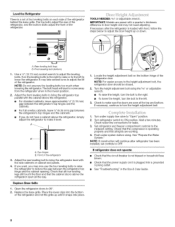
... refrigerator does not operate • Check that the circuit breaker is not tripped or household fuse blown. • Check that all the way. If necessary, continue to turn the bolt to the left to the right. • To lower the height, turn the height adjustment bolt. 1. Turn water supply line valve to the midpoint setting. Check water line connections for leaks. 3. Set refrigerator and freezer compartment controls to "Open" position. 2. Flush water system before using...
... refrigerator does not operate • Check that the circuit breaker is not tripped or household fuse blown. • Check that all the way. If necessary, continue to turn the bolt to the left to the right. • To lower the height, turn the height adjustment bolt. 1. Turn water supply line valve to the midpoint setting. Check water line connections for leaks. 3. Set refrigerator and freezer compartment controls to "Open" position. 2. Flush water system before using...


