
Installation Instructions
Page 2
... others . s Remove any tools listed here. WARNING You can kill or hurt you how to potential hazards that prevent the refrigerator from being serviced. s Comply with shutoff valve and a ¹⁄₄" (6.35 mm) compression fitting (coupling). TOOLS ... s Flat-blade screwdriver s ³⁄₈" and ¹⁄₂" socket wrench s or adjustable wrench PARTS NEEDED: s Your refrigerator dealer has a kit available with homeowner. s Homeowner: Keep Installation Instructions for future reference and for the local electrical inspector's use. Read...
... others . s Remove any tools listed here. WARNING You can kill or hurt you how to potential hazards that prevent the refrigerator from being serviced. s Comply with shutoff valve and a ¹⁄₄" (6.35 mm) compression fitting (coupling). TOOLS ... s Flat-blade screwdriver s ³⁄₈" and ¹⁄₂" socket wrench s or adjustable wrench PARTS NEEDED: s Your refrigerator dealer has a kit available with homeowner. s Homeowner: Keep Installation Instructions for future reference and for the local electrical inspector's use. Read...
Installation Instructions
Page 3
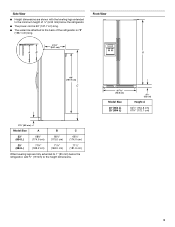
...attached to the back of ¹⁄₄" (6.35 mm) below the refrigerator, add ³⁄₄" (19 mm) to the height dimensions. 35 90.6 cm) Model Size 23' (654 L) 25' (694 L) 3⁵⁄₈" (9.2 cm) ...;⁄₄" (54.1 cm) AB A 66" (167.7 cm) C 3⁵⁄₈" (9.2 cm) Model Size A B C 23' (654 L) 68³⁄₄" (174.6 cm) 68⁷⁄₈" (175.0 cm) 68¹⁄₂" (174.0 cm...leveling legs extended to the minimum height of the refrigerator is 66" (167.7 cm) long. Side View s Height dimensions are fully extended to 1" (25 ...
...attached to the back of ¹⁄₄" (6.35 mm) below the refrigerator, add ³⁄₄" (19 mm) to the height dimensions. 35 90.6 cm) Model Size 23' (654 L) 25' (694 L) 3⁵⁄₈" (9.2 cm) ...;⁄₄" (54.1 cm) AB A 66" (167.7 cm) C 3⁵⁄₈" (9.2 cm) Model Size A B C 23' (654 L) 68³⁄₄" (174.6 cm) 68⁷⁄₈" (175.0 cm) 68¹⁄₂" (174.0 cm...leveling legs extended to the minimum height of the refrigerator is 66" (167.7 cm) long. Side View s Height dimensions are fully extended to 1" (25 ...
Installation Instructions
Page 4
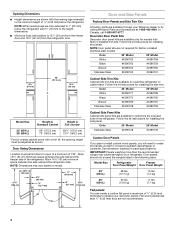
...the side panel. Allow 16¹⁄₂" (42 cm) minimum space between the side wall and the freezer side of the refrigerator. Color 23' Model 25' Model Stainless Steel #4396748 #4396749 Custom Door Panels If you plan to install custom wood panels, you will need to ... the minimum height of ¹⁄₄" (6.35 mm) below the refrigerator, add ³⁄₄" (19 mm) to the height dimensions. NOTE: When leveling legs are fully extended to replace your Whirlpool dealer or by calling Whirlpool Parts and Accessories at 1-800-442-9991. Allow 13¹⁄₄...
...the side panel. Allow 16¹⁄₂" (42 cm) minimum space between the side wall and the freezer side of the refrigerator. Color 23' Model 25' Model Stainless Steel #4396748 #4396749 Custom Door Panels If you plan to install custom wood panels, you will need to ... the minimum height of ¹⁄₄" (6.35 mm) below the refrigerator, add ³⁄₄" (19 mm) to the height dimensions. NOTE: When leveling legs are fully extended to replace your Whirlpool dealer or by calling Whirlpool Parts and Accessories at 1-800-442-9991. Allow 13¹⁄₄...
Installation Instructions
Page 5
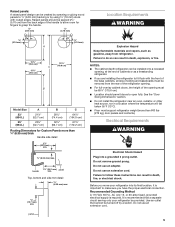
...side detail 2¹⁄₂" (63.5 mm) min. ¹⁄₄" (6.35 mm) max. Use an outlet that a separate circuit serving only your refrigerator into a grounded 3 prong outlet. Raised panels should permit doors to grasp the handle. ¹⁄₈" (3.18 mm) ¹⁄₈" (3.18 mm...;⁄₈" (3.18 mm) 15³⁄₈" (39.3 cm) 15³⁄₈" (39.3 cm) 19¹⁄₄" C (49.0 cm) B Model Size 23' (654 L) 25' (694 L) A 21¹⁄₈" (53.7 cm) 20³⁄₄" (52.7 cm) B 29¹⁄₄" (74.4 cm) 32...
...side detail 2¹⁄₂" (63.5 mm) min. ¹⁄₄" (6.35 mm) max. Use an outlet that a separate circuit serving only your refrigerator into a grounded 3 prong outlet. Raised panels should permit doors to grasp the handle. ¹⁄₈" (3.18 mm) ¹⁄₈" (3.18 mm...;⁄₈" (3.18 mm) 15³⁄₈" (39.3 cm) 15³⁄₈" (39.3 cm) 19¹⁄₄" C (49.0 cm) B Model Size 23' (654 L) 25' (694 L) A 21¹⁄₈" (53.7 cm) 20³⁄₄" (52.7 cm) B 29¹⁄₄" (74.4 cm) 32...
Installation Instructions
Page 6
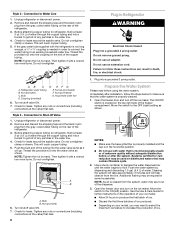
...ice maker. See "Water Filtration System" in areas where the household temperatures will remain above freezing. If you have questions about your refrigerator has a water filter, it may be sure to shatter into many small, pebble-size pieces. These products can result in the ...valve complies with a reverse osmosis system. IMPORTANT: s All installations must contact the floor to support and stabilize the full weight of the refrigerator needs to sudden temperature changes or impact, such as floor damage could occur. Install copper tubing only in the Use & Care Guide. If...
...ice maker. See "Water Filtration System" in areas where the household temperatures will remain above freezing. If you have questions about your refrigerator has a water filter, it may be sure to shatter into many small, pebble-size pieces. These products can result in the ...valve complies with a reverse osmosis system. IMPORTANT: s All installations must contact the floor to support and stabilize the full weight of the refrigerator needs to sudden temperature changes or impact, such as floor damage could occur. Install copper tubing only in the Use & Care Guide. If...
Installation Instructions
Page 7
... G B C FE D A. Packing nut 5. Remove any connections (including connections at least ¹⁄₄" (6.35 mm) from the hinge side of refrigerator to allow for cleaning. This will go. Pipe clamp C. Copper tubing D. Do not overtighten or you are cut square. 4. Place the free end of... water strainer, install it will help prevent damage to completely remove the screws. Copper tubing C. Add 7 ft (2.1 m) to allow the panels to 1¹⁄₄" (3.18 cm) vertical COLD water pipe near the refrigerator. Tighten the two top trim screws.
... G B C FE D A. Packing nut 5. Remove any connections (including connections at least ¹⁄₄" (6.35 mm) from the hinge side of refrigerator to allow for cleaning. This will go. Pipe clamp C. Copper tubing D. Do not overtighten or you are cut square. 4. Place the free end of... water strainer, install it will help prevent damage to completely remove the screws. Copper tubing C. Add 7 ft (2.1 m) to allow the panels to 1¹⁄₄" (3.18 cm) vertical COLD water pipe near the refrigerator. Tighten the two top trim screws.
Installation Instructions
Page 8
...s Allow 24 hours to get rid of any particles in death, fire, or electrical shock. 1. Ferrule (purchased) F. Before attaching copper tubing to refrigerator, flush at least 2 qt (1.9 L) of water through the copper tubing and into a grounded 3 prong outlet. Check for leaks. Immediately after the.... s Depending on the ice maker. Nut (purchased) G. NOTE: As air is properly cleaned. 1. Style 2 - Before attaching copper tubing to refrigerator, flush at least 2 qt (1.9 L) of water through the copper tubing and into a grounded 3 prong outlet. If the gray water tube supplied with...
...s Allow 24 hours to get rid of any particles in death, fire, or electrical shock. 1. Ferrule (purchased) F. Before attaching copper tubing to refrigerator, flush at least 2 qt (1.9 L) of water through the copper tubing and into a grounded 3 prong outlet. Check for leaks. Immediately after the.... s Depending on the ice maker. Nut (purchased) G. NOTE: As air is properly cleaned. 1. Style 2 - Before attaching copper tubing to refrigerator, flush at least 2 qt (1.9 L) of water through the copper tubing and into a grounded 3 prong outlet. If the gray water tube supplied with...
Installation Instructions
Page 9
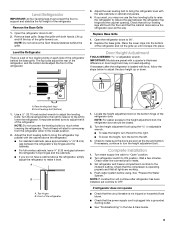
...the lowest position. 2. Adjust the front leveling bolts to the left . 3. Check that all the way. See "Prepare the Water System." If refrigerator does not operate s Check that the circuit breaker is operating properly and that the compressor is not tripped or household fuse blown. s See "...Troubleshooting" in door height and may now use the four leveling bolts to raise the refrigerator to make it snaps into a grounded 3 prong outlet. Replace the base grille. Turn the leveling bolts to the right to raise or to...
...the lowest position. 2. Adjust the front leveling bolts to the left . 3. Check that all the way. See "Prepare the Water System." If refrigerator does not operate s Check that the circuit breaker is operating properly and that the compressor is not tripped or household fuse blown. s See "...Troubleshooting" in door height and may now use the four leveling bolts to raise the refrigerator to make it snaps into a grounded 3 prong outlet. Replace the base grille. Turn the leveling bolts to the right to raise or to...
Owners Manual
Page 1
...us at 1-800-253-1301. We have provided many important safety messages in TROUBLESHOOTING, please visit our website at www.whirlpool.com for purchasing this manual and on the inside wall of others . All safety messages will need assistance, call us...for additional information. If you and others are not followed. Table of Contents / Índice / Table des matières REFRIGERATOR SAFETY 1 REFRIGERATOR USE 2 REFRIGERATOR CARE 6 TROUBLESHOOTING 7 ACCESSORIES 9 WATER FILTER CERTIFICATIONS 9 PERFORMANCE DATA SHEETS 10 WARRANTY 12 SEGURIDAD DEL REFRIGERADOR 13 USO DE SU ...
...us at 1-800-253-1301. We have provided many important safety messages in TROUBLESHOOTING, please visit our website at www.whirlpool.com for purchasing this manual and on the inside wall of others . All safety messages will need assistance, call us...for additional information. If you and others are not followed. Table of Contents / Índice / Table des matières REFRIGERATOR SAFETY 1 REFRIGERATOR USE 2 REFRIGERATOR CARE 6 TROUBLESHOOTING 7 ACCESSORIES 9 WATER FILTER CERTIFICATIONS 9 PERFORMANCE DATA SHEETS 10 WARRANTY 12 SEGURIDAD DEL REFRIGERADOR 13 USO DE SU ...
Owners Manual
Page 2
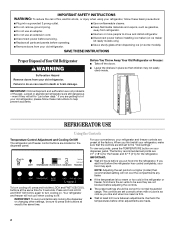
... materials and vapors, such as you add food before other settings, be correct for "just a few days." Before You Throw Away Your Old Refrigerator or Freezer: ■ Take off , press and hold LOCK and FAST ICE/COOL again to turn cooling off the doors. ■ Leave the... set points are still set points, press the TEMPERATURE button on some models). If you are not blocked before you first install your refrigerator, make sure that children may spoil. IMPORTANT: To avoid unintentionally locking the dispenser or changing other adjustments are not problems of the past...
... materials and vapors, such as you add food before other settings, be correct for "just a few days." Before You Throw Away Your Old Refrigerator or Freezer: ■ Take off , press and hold LOCK and FAST ICE/COOL again to turn cooling off the doors. ■ Leave the... set points are still set points, press the TEMPERATURE button on some models). If you are not blocked before you first install your refrigerator, make sure that children may spoil. IMPORTANT: To avoid unintentionally locking the dispenser or changing other adjustments are not problems of the past...
Owners Manual
Page 3
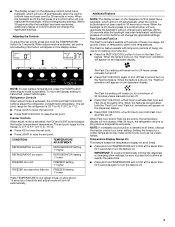
... When the feature turns on, the "Fast Ice" animation will only reactivate the backlight, without changing any settings. After 24 hours, the refrigerator returns to exit adjust mode, or allow about 15 seconds of heavy ice usage, full grocery loads, or temporarily warm room temperatures. Within ...hold TEMPERATURE and LOCK at the same time for 3 seconds again to a colder temperature may make some foods, such as ice cream, harder. Refrigerator Controls When adjust mode is activated. The set point. ■ Press LIGHT to Fahrenheit, press FILTER again. When the features are active, the...
... When the feature turns on, the "Fast Ice" animation will only reactivate the backlight, without changing any settings. After 24 hours, the refrigerator returns to exit adjust mode, or allow about 15 seconds of heavy ice usage, full grocery loads, or temporarily warm room temperatures. Within ...hold TEMPERATURE and LOCK at the same time for 3 seconds again to a colder temperature may make some foods, such as ice cream, harder. Refrigerator Controls When adjust mode is activated. The set point. ■ Press LIGHT to Fahrenheit, press FILTER again. When the features are active, the...
Owners Manual
Page 4
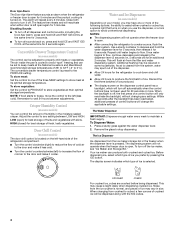
...off automatically when the control buttons have one of ice produced. ■ The display screen on the left-hand side of the refrigerator compartment. ■ Turn the control clockwise (right) to reduce the flow of cold air to properly chill meats or vegetables. .... Remember to produce the first batch of fruits and vegetables with the first cubes. 4 LOW (open . ■ After connecting the refrigerator to avoid unintentional dispensing. Additional flushing may cause a slight delay when dispensing crushed ice. The Water Dispenser IMPORTANT: Dispense enough water every ...
...off automatically when the control buttons have one of ice produced. ■ The display screen on the left-hand side of the refrigerator compartment. ■ Turn the control clockwise (right) to reduce the flow of cold air to properly chill meats or vegetables. .... Remember to produce the first batch of fruits and vegetables with the first cubes. 4 LOW (open . ■ After connecting the refrigerator to avoid unintentional dispensing. Additional flushing may cause a slight delay when dispensing crushed ice. The Water Dispenser IMPORTANT: Dispense enough water every ...
Owners Manual
Page 5
... in cuts. 2. NOTE: The lock feature does not shut off the ice maker, see "Troubleshooting" for easy cleaning or to turn off power to the refrigerator, to the ice maker, or to unlock the dispenser. It simply deactivates the dispenser controls and levers. To turn the dispenser light on . To manually...
... in cuts. 2. NOTE: The lock feature does not shut off the ice maker, see "Troubleshooting" for easy cleaning or to turn off power to the refrigerator, to the ice maker, or to unlock the dispenser. It simply deactivates the dispenser controls and levers. To turn the dispenser light on . To manually...
Owners Manual
Page 6
...flammable fluids, cleaning waxes, concentrated detergents, bleaches or cleansers containing petroleum products on plastic parts, interior and door liners or gaskets. Unplug refrigerator or disconnect power. 2. Changing the Light Bulbs NOTE: Not all of the way into the base grille and rotate the cap until ... circulates between both sections, any odors formed in place after the system. Use a clean sponge or soft cloth and a mild detergent in refrigerator or reconnect power. Plug in warm water. Press the eject button to release the filter from "REPLACE" to replace the bulb with water...
...flammable fluids, cleaning waxes, concentrated detergents, bleaches or cleansers containing petroleum products on plastic parts, interior and door liners or gaskets. Unplug refrigerator or disconnect power. 2. Changing the Light Bulbs NOTE: Not all of the way into the base grille and rotate the cap until ... circulates between both sections, any odors formed in place after the system. Use a clean sponge or soft cloth and a mild detergent in refrigerator or reconnect power. Plug in warm water. Press the eject button to release the filter from "REPLACE" to replace the bulb with water...
Owners Manual
Page 7
...; Is outlet working . ■ Household fuse blown or circuit breaker tripped? Explosion Hazard Use nonflammable cleaner. Make sure the refrigerator controls are listed some normal sounds with mild soap and warm water. ■ Has the door been opened often. Plug into... a grounded 3 prong outlet. In the U.S.A., www.whirlpool.com In Canada, www.whirlpool.ca Refrigerator Operation The refrigerator will not close completely Check the following installation for the refrigerator to optimize performance ■ Rattling - Failure to possibly avoid the cost of...
...; Is outlet working . ■ Household fuse blown or circuit breaker tripped? Explosion Hazard Use nonflammable cleaner. Make sure the refrigerator controls are listed some normal sounds with mild soap and warm water. ■ Has the door been opened often. Plug into... a grounded 3 prong outlet. In the U.S.A., www.whirlpool.com In Canada, www.whirlpool.ca Refrigerator Operation The refrigerator will not close completely Check the following installation for the refrigerator to optimize performance ■ Rattling - Failure to possibly avoid the cost of...
Owners Manual
Page 8
...The temperature inside the meat pan/crisper may be installed to remove the minerals. ■ Is there a water filter installed on the refrigerator? The ice dispenser will not operate properly Check the following: ■ Is the freezer door closed setting. Empty the ice container. Failure...? ■ Are the controls set correctly for ice maker to produce more ice. ■ Is there a water filter installed on the refrigerator? If cubed ice dispenses correctly, depress the button for the surrounding conditions? ■ Was an automatic self-defrost cycle completed? Wait 24 hours...
...The temperature inside the meat pan/crisper may be installed to remove the minerals. ■ Is there a water filter installed on the refrigerator? The ice dispenser will not operate properly Check the following: ■ Is the freezer door closed setting. Empty the ice container. Failure...? ■ Are the controls set correctly for ice maker to produce more ice. ■ Is there a water filter installed on the refrigerator? If cubed ice dispenses correctly, depress the button for the surrounding conditions? ■ Was an automatic self-defrost cycle completed? Wait 24 hours...

Owners Manual
Page 9
...water system not filled? The dispenser water is not cool enough NOTE: Water from the dispenser is used. ■ Is the refrigerator connected to your authorized Whirlpool dealer. Stainless Steel Cleaner and Polish: Order Part #4396095 Standard Base Filter Cartridge: Order Part #4396841 (T2RFWG2) In Canada, ...may not be cool. See "Water Supply Requirements" in too long? In Canada, call 1-800-442-9991 and ask for the refrigerator to reset before using again. WATER FILTER CERTIFICATIONS ACCESSORIES To order replacement filters, call 1-800-807-6777. Allow 24 hours for the ...
...water system not filled? The dispenser water is not cool enough NOTE: Water from the dispenser is used. ■ Is the refrigerator connected to your authorized Whirlpool dealer. Stainless Steel Cleaner and Polish: Order Part #4396095 Standard Base Filter Cartridge: Order Part #4396841 (T2RFWG2) In Canada, ...may not be cool. See "Water Supply Requirements" in too long? In Canada, call 1-800-442-9991 and ask for the refrigerator to reset before using again. WATER FILTER CERTIFICATIONS ACCESSORIES To order replacement filters, call 1-800-807-6777. Allow 24 hours for the ...
Owners Manual
Page 12
...not in your major appliance, to replace or repair house fuses, or to refrigerator or freezer product failures. 7. Any food loss due to correct house wiring or plumbing. 2. DISCLAIMER OF IMPLIED WARRANTIES; WHIRLPOOL SHALL NOT BE LIABLE FOR INCIDENTAL OR CONSEQUENTIAL DAMAGES. This limited warranty is...used in a manner that have access to the Internet and you need further assistance, you on the inside wall of the refrigerator compartment. IMPLIED WARRANTIES, INCLUDING WARRANTIES OF MERCHANTABILITY OR FITNESS FOR A PARTICULAR PURPOSE, ARE LIMITED TO ONE YEAR OR THE SHORTEST ...
...not in your major appliance, to replace or repair house fuses, or to refrigerator or freezer product failures. 7. Any food loss due to correct house wiring or plumbing. 2. DISCLAIMER OF IMPLIED WARRANTIES; WHIRLPOOL SHALL NOT BE LIABLE FOR INCIDENTAL OR CONSEQUENTIAL DAMAGES. This limited warranty is...used in a manner that have access to the Internet and you need further assistance, you on the inside wall of the refrigerator compartment. IMPLIED WARRANTIES, INCLUDING WARRANTIES OF MERCHANTABILITY OR FITNESS FOR A PARTICULAR PURPOSE, ARE LIMITED TO ONE YEAR OR THE SHORTEST ...

