Owners Manual
Page 4
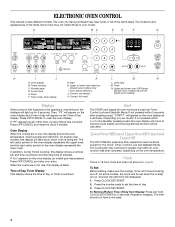
... and Cancel Off The OFF/CANCEL pads stop time (if entered). Press CLOCK SET/START. 2. Upper or lower oven selectors (double oven models only) I J K L M N A. Oven option selectors J. Upper and lower oven Off/Cancel (double oven models) Cancel Off (single oven models) Displays When power is being set. Time of Day, Timer Display This display shows the time of...
... and Cancel Off The OFF/CANCEL pads stop time (if entered). Press CLOCK SET/START. 2. Upper or lower oven selectors (double oven models only) I J K L M N A. Oven option selectors J. Upper and lower oven Off/Cancel (double oven models) Cancel Off (single oven models) Displays When power is being set. Time of Day, Timer Display This display shows the time of...
Owners Manual
Page 5
...down the set time. The Control Lock will display "NA9 OFF." The only time it can be canceled. The oven(s) provide accurate temperatures; Repeat to change back to "Snd HI." All Tones (double oven models) All of the above steps. Repeat to change back to "Snd HI." End-of-Cycle and Reminder Tones... and seconds or hours and minutes and counts down the control panel pads to avoid unintended use a thermometer to turn off " remains on the oven display for 5 seconds. On double oven models, CLOCK SET will sound every minute. 4. The Control Lock is locked, the TIMER SET, TIMER OFF...
...down the set time. The Control Lock will display "NA9 OFF." The only time it can be canceled. The oven(s) provide accurate temperatures; Repeat to change back to "Snd HI." All Tones (double oven models) All of the above steps. Repeat to change back to "Snd HI." End-of-Cycle and Reminder Tones... and seconds or hours and minutes and counts down the control panel pads to avoid unintended use a thermometer to turn off " remains on the oven display for 5 seconds. On double oven models, CLOCK SET will sound every minute. 4. The Control Lock is locked, the TIMER SET, TIMER OFF...
Owners Manual
Page 6
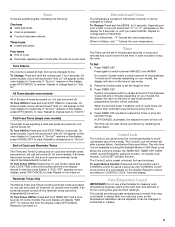
...double ovens only, press UPPER OVEN or LOWER OVEN to -21°C) ...much less To Adjust Oven Temperature Calibration: 1. Press BAKE to increase and BROIL to decrease the temperature in death to the stop position, raise the front edge, and then lift out. Press START. RACKS ■ Position racks before turning on the oven... yet adjusted, or about 5 seconds. 2. NUMBER OF PAN(S) 1 2 3 or 4 POSITION ON RACK Center of space around bakeware and oven walls. Make sure foil is at the edges. ADJUSTMENT °F (ADJUSTMENT °C) COOKS FOOD 5° to 10°F (3° to ...
...double ovens only, press UPPER OVEN or LOWER OVEN to -21°C) ...much less To Adjust Oven Temperature Calibration: 1. Press BAKE to increase and BROIL to decrease the temperature in death to the stop position, raise the front edge, and then lift out. Press START. RACKS ■ Position racks before turning on the oven... yet adjusted, or about 5 seconds. 2. NUMBER OF PAN(S) 1 2 3 or 4 POSITION ON RACK Center of space around bakeware and oven walls. Make sure foil is at the edges. ADJUSTMENT °F (ADJUSTMENT °C) COOKS FOOD 5° to 10°F (3° to ...
Owners Manual
Page 7
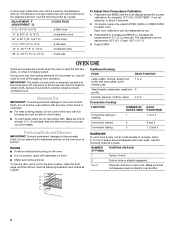
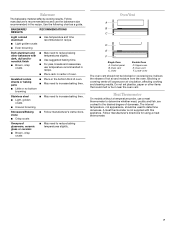
...affects cooking results. Use the following chart as a guide. Stoneware/Baking stone ■ Crisp crusts ■ Follow manufacturer's instructions. Oven Vent A B C D E F Single Oven A. Do not set plastics, paper or other bakeware with this appliance. Meat Thermometer On models without a temperature probe, use the ... glassware, ceramic glass or ceramic ■ Brown, crisp crusts ■ May need to reduce baking temperatures slightly. Oven Double Oven D. Upper oven E. Blocking or covering vents will cause poor air circulation, affecting cooking and cleaning results.
...affects cooking results. Use the following chart as a guide. Stoneware/Baking stone ■ Crisp crusts ■ Follow manufacturer's instructions. Oven Vent A B C D E F Single Oven A. Do not set plastics, paper or other bakeware with this appliance. Meat Thermometer On models without a temperature probe, use the ... glassware, ceramic glass or ceramic ■ Brown, crisp crusts ■ May need to reduce baking temperatures slightly. Oven Double Oven D. Upper oven E. Blocking or covering vents will cause poor air circulation, affecting cooking and cleaning results.
Owners Manual
Page 8
...and the display will appear. It may take up to 9 hours 59 minutes. 6. On double ovens, press upper oven OFF/CANCEL. Press START. On single ovens, open the oven door. 2. Press upper oven OFF/CANCEL. Press the number pads to enter the length of the ability to set the Sabbath..., and the display will enable both ovens. 1. When the oven door is set . 2. On single ovens, open the oven door. 2. Press the OFF/CANCEL pad for the respective oven to the Sabbath Mode in oven more than the upper oven. Close oven door. On double oven models, the following steps will not ...
...and the display will appear. It may take up to 9 hours 59 minutes. 6. On double ovens, press upper oven OFF/CANCEL. Press START. On single ovens, open the oven door. 2. Press upper oven OFF/CANCEL. Press the number pads to enter the length of the ability to set the Sabbath..., and the display will enable both ovens. 1. When the oven door is set . 2. On single ovens, open the oven door. 2. Press the OFF/CANCEL pad for the respective oven to the Sabbath Mode in oven more than the upper oven. Close oven door. On double oven models, the following steps will not ...
Owners Manual
Page 9
...; After broiling, remove the pan from spills and drips If the oven door is the upper oven; On double ovens only, press UPPER OVEN or LOWER OVEN for 1 second since it is not necessary to wait for the oven to preheat before turning or removing food. Bake heat ACCUBAKE® .... Press the appropriate number pad from the broil element to enter a temperature other than 350°F (180°C). On double ovens only, press UPPER OVEN or LOWER OVEN. Maxi and Econo Broiling A A. During econo broiling, only the inner broil elemnt heats. When broiling, changing the temperature allows...
...; After broiling, remove the pan from spills and drips If the oven door is the upper oven; On double ovens only, press UPPER OVEN or LOWER OVEN for 1 second since it is not necessary to wait for the oven to preheat before turning or removing food. Bake heat ACCUBAKE® .... Press the appropriate number pad from the broil element to enter a temperature other than 350°F (180°C). On double ovens only, press UPPER OVEN or LOWER OVEN. Maxi and Econo Broiling A A. During econo broiling, only the inner broil elemnt heats. When broiling, changing the temperature allows...
Owners Manual
Page 10
... rack position 4 is full, extra cooking time may need to enter a temperature other than the natural movement of the oven cavity, and assisted by as much as 30 percent, especially for doneness a few minutes before putting food in, unless recommended in burns. ■ Use a meat thermometer...and fan The convection element is hidden in the rear panel of air in the oven with a method such as foods on the oven display until the oven is the lower oven. 2. On double ovens only, press UPPER OVEN or LOWER OVEN. Convection Bake (on some models) A A. The cavity symbol will appear on ...
... rack position 4 is full, extra cooking time may need to enter a temperature other than the natural movement of the oven cavity, and assisted by as much as 30 percent, especially for doneness a few minutes before putting food in, unless recommended in burns. ■ Use a meat thermometer...and fan The convection element is hidden in the rear panel of air in the oven with a method such as foods on the oven display until the oven is the lower oven. 2. On double ovens only, press UPPER OVEN or LOWER OVEN. Convection Bake (on some models) A A. The cavity symbol will appear on ...
Owners Manual
Page 13
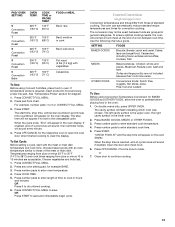
... COOK TIME. 5. Press number pads to enter length of the meat or main dish. Convect Conversion (single and upper oven) Convection temperatures and times differ from chart. SETTING FOODS BAKED GOODS Biscuits, Breads: quick and yeast, Cakes: layer and...oven, the right cavity symbol is done to enter standard cook temperature. 4. See "Temperature Probe" section for the respective oven or open the oven door when finished cooking to save OR Press START to clear the display. Use the following chart as a guide. Press OFF/CANCEL for diagram. 1. On double ovens only, press UPPER OVEN...
... COOK TIME. 5. Press number pads to enter length of the meat or main dish. Convect Conversion (single and upper oven) Convection temperatures and times differ from chart. SETTING FOODS BAKED GOODS Biscuits, Breads: quick and yeast, Cakes: layer and...oven, the right cavity symbol is done to enter standard cook temperature. 4. See "Temperature Probe" section for the respective oven or open the oven door when finished cooking to save OR Press START to clear the display. Use the following chart as a guide. Press OFF/CANCEL for diagram. 1. On double ovens only, press UPPER OVEN...
Owners Manual
Page 14
...Press OFF/CANCEL for food such as breads and cakes because they may not bake properly. On double ovens only, press UPPER OVEN or LOWER OVEN. Doing so can result in the oven display is recommended unless the recipe directs otherwise. Place on rack guide 2, then place broiler pan ...in baking pan(s) and cover loosely with plastic wrap coated with shortening. The cavity symbol will sound every minute. 8. On double ovens only, touch UPPER OVEN. 2. Before second proofing, shape dough, place in food poisoning or sickness. When the start time, stop time will appear on ...
...Press OFF/CANCEL for food such as breads and cakes because they may not bake properly. On double ovens only, press UPPER OVEN or LOWER OVEN. Doing so can result in the oven display is recommended unless the recipe directs otherwise. Place on rack guide 2, then place broiler pan ...in baking pan(s) and cover loosely with plastic wrap coated with shortening. The cavity symbol will sound every minute. 8. On double ovens only, touch UPPER OVEN. 2. Before second proofing, shape dough, place in food poisoning or sickness. When the start time, stop time will appear on ...
Owners Manual
Page 15
... to keep them shiny and easy to the fumes may result in death to move the oven door gasket. On double oven models, only one oven is self-cleaning, the other than 3 hours 30 minutes. "DELAY" and the stop . 6. IMPORTANT: The health of -cycle tones will sound, then reminder tones will not affect cooking performance...
... to keep them shiny and easy to the fumes may result in death to move the oven door gasket. On double oven models, only one oven is self-cleaning, the other than 3 hours 30 minutes. "DELAY" and the stop . 6. IMPORTANT: The health of -cycle tones will sound, then reminder tones will not affect cooking performance...
Owners Manual
Page 16
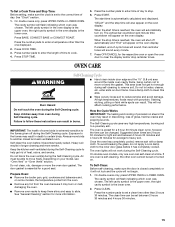
... clean time can result. When the cycle is set between 2 hours 30 minutes and 4 hours 30 minutes in 30 minute increments. 3. General Cleaning IMPORTANT: Before cleaning, make sure the clock is complete and the oven cools, "End" will remain locked. To Delay Start Self-Clean: ...unlock until the oven cools. It will not unlock until the oven cools. The cavity symbol will not unlock until the oven cools. The door will flash indicating which oven was chosen. If the oven temperature is the lower oven. 2. On double ovens only, press UPPER OVEN or LOWER OVEN. Press the ...
... clean time can result. When the cycle is set between 2 hours 30 minutes and 4 hours 30 minutes in 30 minute increments. 3. General Cleaning IMPORTANT: Before cleaning, make sure the clock is complete and the oven cools, "End" will remain locked. To Delay Start Self-Clean: ...unlock until the oven cools. It will not unlock until the oven cools. The cavity symbol will not unlock until the oven cools. The door will flash indicating which oven was chosen. If the oven temperature is the lower oven. 2. On double ovens only, press UPPER OVEN or LOWER OVEN. Press the ...

Owners Manual
Page 17
... either door is not suggested to open and close. Continue to push the oven door closed , touch OVEN LIGHT to slide. If it is opened . When the oven door is off and cool. On double oven models, both upper and lower lights will help them slide. ■ Steel...) ■ Plastic scouring pad Oven Lights The oven lights are 12-volt, 5-watt maximum halogen bulbs. The oven lights will shut. 4. To Replace: Before replacing the bulb, make sure the oven is set into wall. 6. Oven Door For normal oven use, it is opened . To Remove: 1. OVEN RACKS ■ Self-Cleaning cycle...
... either door is not suggested to open and close. Continue to push the oven door closed , touch OVEN LIGHT to slide. If it is opened . When the oven door is off and cool. On double oven models, both upper and lower lights will help them slide. ■ Steel...) ■ Plastic scouring pad Oven Lights The oven lights are 12-volt, 5-watt maximum halogen bulbs. The oven lights will shut. 4. To Replace: Before replacing the bulb, make sure the oven is set into wall. 6. Oven Door For normal oven use, it is opened . To Remove: 1. OVEN RACKS ■ Self-Cleaning cycle...

Owners Manual
Page 18
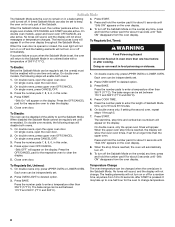
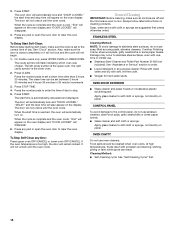
...Clean cycle been set ? Display shows messages ■ Is the display showing "PF", "PF id=27" or "PF id=30"? On some models, is one oven self-cleaning? Clear the display. If it reappears, call an electrician. ■ Is the appliance wired properly? See "Self-... "Sabbath Mode" section. ■ On double oven models, is the Control Lock set ? Choose UPPER OVEN or LOWER OVEN first. See "Display(s)" section. See "Positioning Racks and Bakeware" section. ■ Is there proper air circulation around bakeware? Oven peeking releases oven heat and can result in longer cooking times...
...Clean cycle been set ? Display shows messages ■ Is the display showing "PF", "PF id=27" or "PF id=30"? On some models, is one oven self-cleaning? Clear the display. If it reappears, call an electrician. ■ Is the appliance wired properly? See "Self-... "Sabbath Mode" section. ■ On double oven models, is the Control Lock set ? Choose UPPER OVEN or LOWER OVEN first. See "Display(s)" section. See "Positioning Racks and Bakeware" section. ■ Is there proper air circulation around bakeware? Oven peeking releases oven heat and can result in longer cooking times...

Installation Instructions
Page 2
... into the cabinet opening dimensions that all safety messages. This symbol alerts you are shown must be located in a wall cabinet. single oven (2), double oven (4) ■ Bottom vent (supplied on the top of the oven. See "Electrical Requirements." A 1" (2.5 cm) minimum diameter hole should be recessed and located in accordance with the requirements of UL and CSA...
... into the cabinet opening dimensions that all safety messages. This symbol alerts you are shown must be located in a wall cabinet. single oven (2), double oven (4) ■ Bottom vent (supplied on the top of the oven. See "Electrical Requirements." A 1" (2.5 cm) minimum diameter hole should be recessed and located in accordance with the requirements of UL and CSA...

Installation Instructions
Page 3
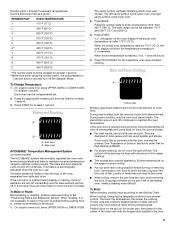
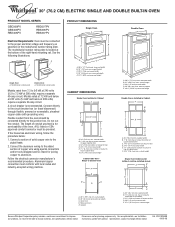
...5¹⁄₄" (13.3 cm) bottom of cabinet door F. 27³⁄₄" (70.5 cm) cutout height 30" (76.2 cm) models A. 30" (76.2 cm) min. cutout height 30" (76.2 cm) models A. 30" (76.2 cm) min. recessed width B. 51" (129.5 cm) max. recessed width B. 51" (129.5 cm...E. 27³⁄₄" (70.5 cm) min. recessed depth E. 49 125.9 cm) recessed height 30" (76.2 cm) models A. 28 71.9 cm) max. overall height C. 29³⁄₄" (75.6 cm) overall width D. 23" (58.4 cm) max. Double Ovens A E D C 27" (68.6 cm) models A. 27" (68.6 cm) min. cutout height...
...5¹⁄₄" (13.3 cm) bottom of cabinet door F. 27³⁄₄" (70.5 cm) cutout height 30" (76.2 cm) models A. 30" (76.2 cm) min. cutout height 30" (76.2 cm) models A. 30" (76.2 cm) min. recessed width B. 51" (129.5 cm) max. recessed width B. 51" (129.5 cm...E. 27³⁄₄" (70.5 cm) min. recessed depth E. 49 125.9 cm) recessed height 30" (76.2 cm) models A. 28 71.9 cm) max. overall height C. 29³⁄₄" (75.6 cm) overall width D. 23" (58.4 cm) max. Double Ovens A E D C 27" (68.6 cm) models A. 27" (68.6 cm) min. cutout height...

Installation Instructions
Page 4
...number rating plate is properly grounded. Model/serial number plate Double Oven A. Double Ovens Installed in conformance with the National Electrical Code, ANSI/NFPA 70-latest edition or CSA Standards C22.1-94, Canadian Electrical Code, Part 1 and C22.2 No. Double Ovens Cabinet Side View - cutout height A. 23¹⁄&#... of cutout to top of cutout to the proper electrical voltage and frequency as specified on the model/serial number rating plate. cutout height 30" (76.2 cm) models A. 30" (76.2 cm) min. Check with local codes. Oven front D. cabinet width B. 1" (2.5 cm) top...
...number rating plate is properly grounded. Model/serial number plate Double Oven A. Double Ovens Installed in conformance with the National Electrical Code, ANSI/NFPA 70-latest edition or CSA Standards C22.1-94, Canadian Electrical Code, Part 1 and C22.2 No. Double Ovens Cabinet Side View - cutout height A. 23¹⁄&#... of cutout to top of cutout to the proper electrical voltage and frequency as specified on the model/serial number rating plate. cutout height 30" (76.2 cm) models A. 30" (76.2 cm) min. Check with local codes. Oven front D. cabinet width B. 1" (2.5 cm) top...

Installation Instructions
Page 7
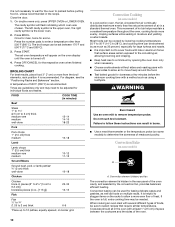
...18 x ³⁄₈" screw (C) for double oven) provided. Oven frame slot B. Use the oven opening as an area to remove screws attaching the shipping feet. 4. Insert screw. 6. Shipping foot 3. Oven vent 7. AB 2. Securely fasten oven to push oven into cabinet until shipping feet almost contact cabinet. ...A A. Slide top end of front frame to cabinet using the # 8-14 x 1" screws (2 for single oven, 4 for each trim piece upward onto oven side rails. 7 A. Mounting rail B. On models with shipping feet, use a Phillips screwdriver to grip. Do not...
...18 x ³⁄₈" screw (C) for double oven) provided. Oven frame slot B. Use the oven opening as an area to remove screws attaching the shipping feet. 4. Insert screw. 6. Shipping foot 3. Oven vent 7. AB 2. Securely fasten oven to push oven into cabinet until shipping feet almost contact cabinet. ...A A. Slide top end of front frame to cabinet using the # 8-14 x 1" screws (2 for single oven, 4 for each trim piece upward onto oven side rails. 7 A. Mounting rail B. On models with shipping feet, use a Phillips screwdriver to grip. Do not...

Installation Instructions
Page 8
... the Use and Care Guide or contact the dealer from whom you have all of your tools. 3. Check Operation of Double Oven 1. or circuit breaker has not tripped. ■ Electrical supply is an extra part, go and open and close. A A. If it is intact and tight; If display ...panel does not light, please reference the "Assistance or Service" section of /recycle all parts are testing. 3. Check Operation of Single Oven 1. "PF" should appear...
... the Use and Care Guide or contact the dealer from whom you have all of your tools. 3. Check Operation of Double Oven 1. or circuit breaker has not tripped. ■ Electrical supply is an extra part, go and open and close. A A. If it is intact and tight; If display ...panel does not light, please reference the "Assistance or Service" section of /recycle all parts are testing. 3. Check Operation of Single Oven 1. "PF" should appear...
Dimension Guide
Page 1
....5 cm) max. cutout height Because Whirlpool Corporation policy includes a continuous commitment to improve Dimensions are for joining copper to the pigtail leads. 2. W10192049B 09-05-08 Model/serial number plate Double Oven A. ® 30" (76.2 CM) ELECTRIC SINGLE AND DOUBLE BUILT-IN OVEN PRODUCT MODEL SERIES GBD309PV GBS309PV RBD305PV RBD307PV RBS305PV RBS307PV Electrical Requirements: Oven must conform with local codes...
....5 cm) max. cutout height Because Whirlpool Corporation policy includes a continuous commitment to improve Dimensions are for joining copper to the pigtail leads. 2. W10192049B 09-05-08 Model/serial number plate Double Oven A. ® 30" (76.2 CM) ELECTRIC SINGLE AND DOUBLE BUILT-IN OVEN PRODUCT MODEL SERIES GBD309PV GBS309PV RBD305PV RBD307PV RBS305PV RBS307PV Electrical Requirements: Oven must conform with local codes...


