
Owners Manual
Page 3
Be sure the oven is properly installed and grounded by a qualified technician. ■ Never Use the Oven for a good seal. They should never be allowed to sit or stand on any part ... Parts Listed in color. Loose-fitting or hanging garments should not be worn while using the oven, follow basic precautions, including the following: ■ Proper Installation - Build-up of Oven Racks - Children should be hot even though they have had sufficient time to a qualified technician. ■ Storage in the manual. All...
Be sure the oven is properly installed and grounded by a qualified technician. ■ Never Use the Oven for a good seal. They should never be allowed to sit or stand on any part ... Parts Listed in color. Loose-fitting or hanging garments should not be worn while using the oven, follow basic precautions, including the following: ■ Proper Installation - Build-up of Oven Racks - Children should be hot even though they have had sufficient time to a qualified technician. ■ Storage in the manual. All...

Owners Manual
Page 17
... with bare fingers. 5. They will shut. 4. Oven Door For normal oven use, it away from socket. 4. The oven door is not, repeat the removal and installation procedures. 17 Reconnect power. 2. On double oven models, both sides. You should hear a "click" as it is heavy. To Replace: Before replacing the bulb, make...
... with bare fingers. 5. They will shut. 4. Oven Door For normal oven use, it away from socket. 4. The oven door is not, repeat the removal and installation procedures. 17 Reconnect power. 2. On double oven models, both sides. You should hear a "click" as it is heavy. To Replace: Before replacing the bulb, make...

Owners Manual
Page 18
...Self-Cleaning Cycle" section. ■ Has a delay start Self-Clean cycle been set to avoid the cost of an unnecessary service call. See the Installation Instructions. ■ Is the proper temperature set ? Double-check the recipe in a reliable cookbook. ■ Is the proper oven temperature calibration set ...operate ■ Is the oven door open? Replace the fuse or reset the circuit breaker. If the problem continues, call for service. See Installation Instructions. See "Control Lock" section. ■ On some models, is self-cleaning, the other oven cannot be set ? When one oven...
...Self-Cleaning Cycle" section. ■ Has a delay start Self-Clean cycle been set to avoid the cost of an unnecessary service call. See the Installation Instructions. ■ Is the proper temperature set ? Double-check the recipe in a reliable cookbook. ■ Is the proper oven temperature calibration set ...operate ■ Is the oven door open? Replace the fuse or reset the circuit breaker. If the problem continues, call for service. See Installation Instructions. See "Control Lock" section. ■ On some models, is self-cleaning, the other oven cannot be set ? When one oven...
Owners Manual
Page 19
... Please include a daytime phone number in the United States. Whirlpool Canada LP designated service technicians are trained to local dealers, repair parts distributors and service companies. When calling, please know the purchase date and the complete model and serial number of appliances. ■ Installation information. ■ Use and maintenance procedures. ■ Accessory...
... Please include a daytime phone number in the United States. Whirlpool Canada LP designated service technicians are trained to local dealers, repair parts distributors and service companies. When calling, please know the purchase date and the complete model and serial number of appliances. ■ Installation information. ■ Use and maintenance procedures. ■ Accessory...

Owners Manual
Page 20
... may find this information on the model and serial number label located on how to use your authorized Whirlpool dealer to published user or operator instructions and/or installation instructions. 4. Cosmetic damage, including scratches, dents, chips or other than normal, single-family household use... of consumables or cleaning products not approved by calling Whirlpool. The cost of repair or replacement under this limited warranty. Service must provide proof of purchase or installation date for other damage to the finish of your major appliance, unless...
... may find this information on the model and serial number label located on how to use your authorized Whirlpool dealer to published user or operator instructions and/or installation instructions. 4. Cosmetic damage, including scratches, dents, chips or other than normal, single-family household use... of consumables or cleaning products not approved by calling Whirlpool. The cost of repair or replacement under this limited warranty. Service must provide proof of purchase or installation date for other damage to the finish of your major appliance, unless...

Installation Instructions
Page 2
... dimensions and approved oven cooktop combinations (separate sheet). 2 Always read and obey all electrical connections be made by a licensed, qualified electrical installer. This symbol alerts you what can be killed or seriously injured if you don't follow instructions. bottom vent ■ Side trim Check ...local codes. NOTE: For undercounter installation, it is installed in the adjacent right or left corner of the cabinet; All safety messages will tell you to make sure that can kill...
... dimensions and approved oven cooktop combinations (separate sheet). 2 Always read and obey all electrical connections be made by a licensed, qualified electrical installer. This symbol alerts you what can be killed or seriously injured if you don't follow instructions. bottom vent ■ Side trim Check ...local codes. NOTE: For undercounter installation, it is installed in the adjacent right or left corner of the cabinet; All safety messages will tell you to make sure that can kill...

Installation Instructions
Page 3
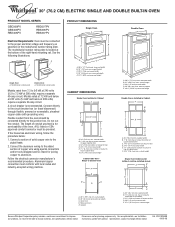
Single Ovens A Single Ovens Installed in Cabinet A B B E D C 27" (68.6 cm) models A. 25 64.3 cm) max. overall height C. 26³⁄₄" (67.9 cm) overall width D. 23" (58.4 cm) max. recessed ....4 cm) cutout width E. 27³⁄₄" (70.5 cm) min. Product Dimensions - recessed width B. 29" (73.7 cm) max. Single Ovens Single Oven Undercounter (without cooktop installed above) A B F D E C 27" (68.6 cm) models A. 27" (68.6 cm) min. bottom of cutout to top of cutout to underside of countertop C. 5¹⁄₄" (13.3 cm...
Single Ovens A Single Ovens Installed in Cabinet A B B E D C 27" (68.6 cm) models A. 25 64.3 cm) max. overall height C. 26³⁄₄" (67.9 cm) overall width D. 23" (58.4 cm) max. recessed ....4 cm) cutout width E. 27³⁄₄" (70.5 cm) min. Product Dimensions - recessed width B. 29" (73.7 cm) max. Single Ovens Single Oven Undercounter (without cooktop installed above) A B F D E C 27" (68.6 cm) models A. 27" (68.6 cm) min. bottom of cutout to top of cutout to underside of countertop C. 5¹⁄₄" (13.3 cm...

Installation Instructions
Page 4
...Association One Batterymarch Park Quincy, MA 02269 CSA International 8501 East Pleasant Valley Road Cleveland, OH 44131-5575 Single Oven A. Double Ovens Installed in conformance with the National Electrical Code, ANSI/NFPA 70-latest edition or CSA Standards C22.1-94, Canadian Electrical Code, Part 1 ...72.4 cm) cutout width E. 1¹⁄₂" (3.8 cm) min. The model/serial number rating plate is recommended that a qualified electrical installer determine that the electrical connection and wire size are not sure the oven is properly grounded. cutout depth B. 23" (58.4 cm) recessed ...
...Association One Batterymarch Park Quincy, MA 02269 CSA International 8501 East Pleasant Valley Road Cleveland, OH 44131-5575 Single Oven A. Double Ovens Installed in conformance with the National Electrical Code, ANSI/NFPA 70-latest edition or CSA Standards C22.1-94, Canadian Electrical Code, Part 1 ...72.4 cm) cutout width E. 1¹⁄₂" (3.8 cm) min. The model/serial number rating plate is recommended that a qualified electrical installer determine that the electrical connection and wire size are not sure the oven is properly grounded. cutout depth B. 23" (58.4 cm) recessed ...

Installation Instructions
Page 5
.... See "Make Electrical Connection" section. ■ Flexible conduit from inside the oven. 6. Follow the electrical connector manufacturer's recommended procedure. INSTALLATION INSTRUCTIONS Prepare Built-In Oven 1. Lift and pull oven door toward you and remove. Remove and set the oven onto cardboard prior to... trims (after oven is manufactured with local codes and industry accepted wiring practices. Oven door latch in locked position B. This oven is installed in cabinet) are located on a covered work surface. Models rated at 7.2 kW and below at 240 volts (5.4 kW and below at...
.... See "Make Electrical Connection" section. ■ Flexible conduit from inside the oven. 6. Follow the electrical connector manufacturer's recommended procedure. INSTALLATION INSTRUCTIONS Prepare Built-In Oven 1. Lift and pull oven door toward you and remove. Remove and set the oven onto cardboard prior to... trims (after oven is manufactured with local codes and industry accepted wiring practices. Oven door latch in locked position B. This oven is installed in cabinet) are located on a covered work surface. Models rated at 7.2 kW and below at 240 volts (5.4 kW and below at...

Installation Instructions
Page 6
... black wires (C) together using a UL listed wire connector. 5. Cable from Home Power Supply - UL listed wire connectors H. A A. Black wires D. Install junction box cover. Red wires D. 4-wire flexible conduit from the oven. 4. Green (or bare) ground wires I . UL listed or CSA approved .... 6. White wires E. White wires G. Tighten screws on conduit connector. 7. 3. Remove junction box cover, if it is present. 4. Install a UL listed or CSA approved conduit connector to the green (or bare) ground wire (in Canada. Connect the 2 red wires (C) together...
... black wires (C) together using a UL listed wire connector. 5. Cable from Home Power Supply - UL listed wire connectors H. A A. Black wires D. Install junction box cover. Red wires D. 4-wire flexible conduit from the oven. 4. Green (or bare) ground wires I . UL listed or CSA approved .... 6. White wires E. White wires G. Tighten screws on conduit connector. 7. 3. Remove junction box cover, if it is present. 4. Install a UL listed or CSA approved conduit connector to the green (or bare) ground wire (in Canada. Connect the 2 red wires (C) together...

Installation Instructions
Page 7
... oven opening as an area to do so can result in mounting rails. AB 2. Push against seal area of the vent, fasten vent securely to install. ■ Insert the vent tabs (B) into slots (A) in the oven frame. ■ With one # 8-18 x ³⁄₈" screw (C) for double oven) ...provided. Slide top end of each side of front frame to move and install oven. NOTE: Push against outside edges. Oven vent 7. Mounting rail B. Insert the screws through holes in back or other injury. 1. Oven frame slot B. Do...
... oven opening as an area to do so can result in mounting rails. AB 2. Push against seal area of the vent, fasten vent securely to install. ■ Insert the vent tabs (B) into slots (A) in the oven frame. ■ With one # 8-18 x ³⁄₈" screw (C) for double oven) ...provided. Slide top end of each side of front frame to move and install oven. NOTE: Push against outside edges. Oven vent 7. Mounting rail B. Insert the screws through holes in back or other injury. 1. Oven frame slot B. Do...

Installation Instructions
Page 8
...3. Repeat for heat. Press OFF/CANCEL. Turn power on . If it is connected. ■ See "Troubleshooting" section in the display. Complete Installation 1. For oven use and cleaning, read the Use and Care Guide. "PF" should appear in the screw bag assembly, to attach each trim piece... door. 16. Check Operation of Single Oven 1. or circuit breaker has not tripped. ■ Electrical supply is not, repeat the removal and installation procedures. "BROIL" will appear in as far as they will light briefly, and "PF" should appear in the display. 2. Press UPPER OVEN...
...3. Repeat for heat. Press OFF/CANCEL. Turn power on . If it is connected. ■ See "Troubleshooting" section in the display. Complete Installation 1. For oven use and cleaning, read the Use and Care Guide. "PF" should appear in the screw bag assembly, to attach each trim piece... door. 16. Check Operation of Single Oven 1. or circuit breaker has not tripped. ■ Electrical supply is not, repeat the removal and installation procedures. "BROIL" will appear in as far as they will light briefly, and "PF" should appear in the display. 2. Press UPPER OVEN...
Warranty
Page 1
... if your major appliance, to replace or repair house fuses, or to or furnished with the product, Whirlpool Corporation or Whirlpool Canada LP (hereafter "Whirlpool") will need it is installed in -warranty service. Service calls to be repaired in the home and only in-home service is located...and Canada, this information on the model and serial number label located on how to Whirlpool within 30 days from accident, alteration, misuse, abuse, fire, flood, acts of God, improper installation, installation not in materials or workmanship. You will pay for other damage to the finish ...
... if your major appliance, to replace or repair house fuses, or to or furnished with the product, Whirlpool Corporation or Whirlpool Canada LP (hereafter "Whirlpool") will need it is installed in -warranty service. Service calls to be repaired in the home and only in-home service is located...and Canada, this information on the model and serial number label located on how to Whirlpool within 30 days from accident, alteration, misuse, abuse, fire, flood, acts of God, improper installation, installation not in materials or workmanship. You will pay for other damage to the finish ...
Dimension Guide
Page 1
... width D. 23" (58.4 cm) max. recessed width B. 51" (129.5 cm) max. recessed depth E. 49 125.9 cm) recessed height Double Ovens Installed in Cabinet A B F D E C A. 30" (76.2 cm) min. Instructions packed with grounding wire). W10192049B 09-05-08 The length of cabinet ...(72.4 cm) cutout width E. 27³⁄₄" (70.5 cm) min. cutout height Because Whirlpool Corporation policy includes a continuous commitment to top of cutout to change materials and specifications without cooktop installed above) A B E D C A. 30" (76.2 cm) min. Specifications subject to floor D....
... width D. 23" (58.4 cm) max. recessed width B. 51" (129.5 cm) max. recessed depth E. 49 125.9 cm) recessed height Double Ovens Installed in Cabinet A B F D E C A. 30" (76.2 cm) min. Instructions packed with grounding wire). W10192049B 09-05-08 The length of cabinet ...(72.4 cm) cutout width E. 27³⁄₄" (70.5 cm) min. cutout height Because Whirlpool Corporation policy includes a continuous commitment to top of cutout to change materials and specifications without cooktop installed above) A B E D C A. 30" (76.2 cm) min. Specifications subject to floor D....


