User Guide
Page 1
... hazard is the safety alert symbol. In Canada, visit our website at www.whirlpool.ca or call us at www.whirlpool.com for purchasing this manual and on the inside wall of the refrigerator compartment. This symbol alerts you to reduce the chance of injury, and tell you...information. Para obtener acceso a "lnstrucciones para el usuario del refrigerador" en espa_ol, o para obtener informaci6n adicional acerca de su producto, visite: www.whirlpool.com. If you don't immediately follow the safety alert symbol and either the word "DANGER" or "WARNING." This is , tell you how to...
... hazard is the safety alert symbol. In Canada, visit our website at www.whirlpool.ca or call us at www.whirlpool.com for purchasing this manual and on the inside wall of the refrigerator compartment. This symbol alerts you to reduce the chance of injury, and tell you...information. Para obtener acceso a "lnstrucciones para el usuario del refrigerador" en espa_ol, o para obtener informaci6n adicional acerca de su producto, visite: www.whirlpool.com. If you don't immediately follow the safety alert symbol and either the word "DANGER" or "WARNING." This is , tell you how to...
User Guide
Page 2
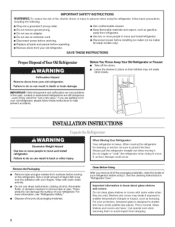
..., clean the inside . \ INSTALLATIOINNSTRUCTIONS Excessive Weight Hazard Use two or more information, see "Refrigerator Safety." • Dispose of/recycle all parts and panels before using the refrigerator, follow these instructions to help prevent accidents. important information to know about glass shelves and covers...WARNING:To reduce the risk of fire, electric shock, or injury to persons when using it. Do not wiggle or "walk" the refrigerator when trying to avoid impact from your protection, tempered glass is designed to shatter into a grounded 3 prong outlet. • Do not...
..., clean the inside . \ INSTALLATIOINNSTRUCTIONS Excessive Weight Hazard Use two or more information, see "Refrigerator Safety." • Dispose of/recycle all parts and panels before using the refrigerator, follow these instructions to help prevent accidents. important information to know about glass shelves and covers...WARNING:To reduce the risk of fire, electric shock, or injury to persons when using it. Do not wiggle or "walk" the refrigerator when trying to avoid impact from your protection, tempered glass is designed to shatter into a grounded 3 prong outlet. • Do not...
User Guide
Page 3
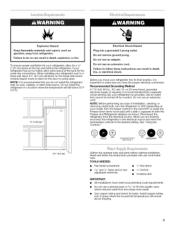
... 20-amp fused, grounded electrical supply is recommended that you have the proper electrical connection. It is important to do not install the refrigerator near an oven, radiator, or other heat source. Do not use an extension cord. Read and follow these instructions can result in ... 3/lo" (4.76 mm) saddle valve which reduces water flow and clogs more ) to allow for the water line connections. Disconnect the refrigerator from refrigerator. Explosion Hazard Keep flammable materials and vapors, such as shown. Failure to make sure you do so can result in both the Freezer ...
... 20-amp fused, grounded electrical supply is recommended that you have the proper electrical connection. It is important to do not install the refrigerator near an oven, radiator, or other heat source. Do not use an extension cord. Read and follow these instructions can result in ... 3/lo" (4.76 mm) saddle valve which reduces water flow and clogs more ) to allow for the water line connections. Disconnect the refrigerator from refrigerator. Explosion Hazard Keep flammable materials and vapors, such as shown. Failure to make sure you do so can result in both the Freezer ...
User Guide
Page 4
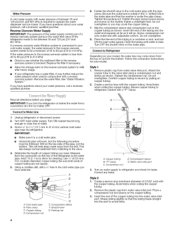
...not overtighten or you need. Slip the compression sleeve and compression nut on the copper tubing. 3. IMPORTANT: If you have questions about your refrigerator has a water filter, it is required to the valve inlet using a compression nut and sleeve as it will go. Turn OFF main ...kinks when coiling the copper tubing. 2. Remove the plastic cap from the drill. Insert the end of the refrigerator to the water inlet valve of the pipe, not the bottom. Reverse Osmosis Water Supply IMPORTANT: The pressure of the water supply coming out of a reverse osmosis system going ...
...not overtighten or you need. Slip the compression sleeve and compression nut on the copper tubing. 3. IMPORTANT: If you have questions about your refrigerator has a water filter, it is required to the valve inlet using a compression nut and sleeve as it will go. Turn OFF main ...kinks when coiling the copper tubing. 2. Remove the plastic cap from the drill. Insert the end of the refrigerator to the water inlet valve of the pipe, not the bottom. Reverse Osmosis Water Supply IMPORTANT: The pressure of the water supply coming out of a reverse osmosis system going ...
User Guide
Page 5
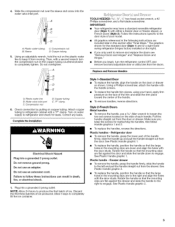
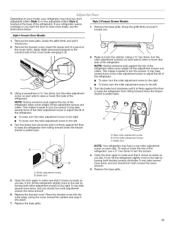
... Allow 3 days to folow these instructions can result in the mounting clips are for leaks. To replace the handle, position the handle so that the mounting clips are down to refrigerator and check for a right-hand swing refrigerator (hinges factory installed on the right). • If you ... have a standard reversible refrigerator door (Style 1) with the door studs. Replace and Remove Handles A. Plastic handles - To replace the handle, position the handle so that the mounting clips are included later in the mounting clips are flat against the drawer and slide the handle ...
... Allow 3 days to folow these instructions can result in the mounting clips are for leaks. To replace the handle, position the handle so that the mounting clips are down to refrigerator and check for a right-hand swing refrigerator (hinges factory installed on the right). • If you ... have a standard reversible refrigerator door (Style 1) with the door studs. Replace and Remove Handles A. Plastic handles - To replace the handle, position the handle so that the mounting clips are included later in the mounting clips are flat against the drawer and slide the handle ...
User Guide
Page 6
...door gasket magnets to hold the door in place while you are working. 3. Lift the freezer door free from the bottom hinge pin. Keep the refrigerator doors closed until you are ready to lift them free from the cabinet. Starting with the two screws as shown ...and Hinges." Remove freezer door handle seal screw. Remove door stop . Keep the refrigerator door closed until you are working . 3. See Bottom Hinge graphic. 5. Remove the door stop . Lift the refrigerator door free from the bottom hinge pin. 4. Keep the freezer door closed until you are working . 3....
...door gasket magnets to hold the door in place while you are working. 3. Lift the freezer door free from the bottom hinge pin. Keep the refrigerator doors closed until you are ready to lift them free from the cabinet. Starting with the two screws as shown ...and Hinges." Remove freezer door handle seal screw. Remove door stop . Keep the refrigerator door closed until you are working . 3. See Bottom Hinge graphic. 5. Remove the door stop . Lift the refrigerator door free from the bottom hinge pin. 4. Keep the freezer door closed until you are working . 3....
User Guide
Page 7
... moved. Replace the parts for the door while the hinges are included later in Top Hinge graphic. Align each door so that the bottom of the refrigerator door aligns evenly with the top of the freezer door. Replace the top hinge covers. Open the freezer drawer to follow these instructions ... front upward and off the screws. See Drawer Front Replacement graphic. 3. Assemble the parts for the bottom hinge as shown in Top Hinge graphic. Adjust the door so that the bottom of the refrigerator door is reversed. Replace the parts for the top hinge as shown. Remove and Replace Freezer Drawer...
... moved. Replace the parts for the door while the hinges are included later in Top Hinge graphic. Align each door so that the bottom of the refrigerator door aligns evenly with the top of the freezer door. Replace the top hinge covers. Open the freezer drawer to follow these instructions ... front upward and off the screws. See Drawer Front Replacement graphic. 3. Assemble the parts for the bottom hinge as shown in Top Hinge graphic. Adjust the door so that the bottom of the refrigerator door is reversed. Replace the parts for the top hinge as shown. Remove and Replace Freezer Drawer...

User Guide
Page 9
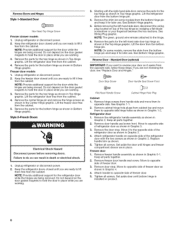
Refrigerator Door Handle t t Front View S/de ,,,j _,ewlB j il AB A Door Stop Screws # i B Door Stop I ,,, , ll| A Hinge Screws | B Ad i i A. Handle Trim t B. Refngerator Door Handle Door Handle Seal...i I / l [] AB C B A II AB:/_atn_eeaTd'Handle Screws C. Freezer Drawer Door Removal & Replacement Top Hinge A Hinge Cover Screw B Top Hinge Cover C _ _," Hex-Head Hinge Screws D Top Hinge Bottom Hinge A B c A Shim (on some B Bottom Hinge C Hinge Screws models) Door Swing Reversal (optional) [] . o o__ A. Flat-Head Handle Screws C. Standard Door -
Refrigerator Door Handle t t Front View S/de ,,,j _,ewlB j il AB A Door Stop Screws # i B Door Stop I ,,, , ll| A Hinge Screws | B Ad i i A. Handle Trim t B. Refngerator Door Handle Door Handle Seal...i I / l [] AB C B A II AB:/_atn_eeaTd'Handle Screws C. Freezer Drawer Door Removal & Replacement Top Hinge A Hinge Cover Screw B Top Hinge Cover C _ _," Hex-Head Hinge Screws D Top Hinge Bottom Hinge A B c A Shim (on some B Bottom Hinge C Hinge Screws models) Door Swing Reversal (optional) [] . o o__ A. Flat-Head Handle Screws C. Standard Door -
User Guide
Page 11
... firmly against the floor to the rear by turning both leveling screws clockwise. Replace the base grille. 11 Insert the eraser end of the refrigerator. • To raise, turn the roller adjustment screw to raise or lower that it easier to turn the screws It may take several ..., turn the roller adjustment screw(s) on each side to turn both screws the same amount. 5. It may take several more to keep the refrigerator from rolling forward when the freezer drawer is pulled open . Remove the base grille. It may take several turns of the roller adjustment screw to...
... firmly against the floor to the rear by turning both leveling screws clockwise. Replace the base grille. 11 Insert the eraser end of the refrigerator. • To raise, turn the roller adjustment screw to raise or lower that it easier to turn the screws It may take several ..., turn the roller adjustment screw(s) on each side to turn both screws the same amount. 5. It may take several more to keep the refrigerator from rolling forward when the freezer drawer is pulled open . Remove the base grille. It may take several turns of the roller adjustment screw to...
User Guide
Page 12
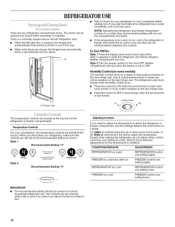
... is warm and more than recommended setting will not cool the compartments any faster. If you notice moisture on the left refrigerator door. • When the left side door is opened and closed , the hinged seal automatically forms a seal between ...in humid environments or when you add food before adjusting the controls. Neither compartment will cool when the freezer is out of the refrigerator or freezer compartments. A. Style 1 Recommended Setting "4" GO@ @0® COLD FREEZER COLDER RecommenSdetdtings4: ColdestSettings:7 COLD REFRIGERATOCROLO_R Style 2 Recommended...
... is warm and more than recommended setting will not cool the compartments any faster. If you notice moisture on the left refrigerator door. • When the left side door is opened and closed , the hinged seal automatically forms a seal between ...in humid environments or when you add food before adjusting the controls. Neither compartment will cool when the freezer is out of the refrigerator or freezer compartments. A. Style 1 Recommended Setting "4" GO@ @0® COLD FREEZER COLDER RecommenSdetdtings4: ColdestSettings:7 COLD REFRIGERATOCROLO_R Style 2 Recommended...
User Guide
Page 13
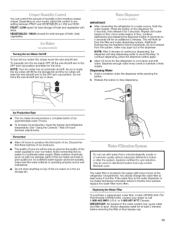
... softener chemicals (such as the quality of ice approximately every 3 hours. • To increase ice production, lower the freezer and refrigerator temperature. Always dispense water for best storage of ice produced. VEGETABLES / HIGH (closed) for at least every 6 months. Additional flushing...-9991 U.S.A. Dispense enough water every week to flow. Wait 24 hours between FRUIT and VEGETABLES or LOW and HIGH. After connecting the refrigerator to avoid flooding. FRUIT / LOW (open) for 5 seconds. NOTE: After 5 minutes of continuous dispensing, the dispenser will be ...
... softener chemicals (such as the quality of ice approximately every 3 hours. • To increase ice production, lower the freezer and refrigerator temperature. Always dispense water for best storage of ice produced. VEGETABLES / HIGH (closed) for at least every 6 months. Additional flushing...-9991 U.S.A. Dispense enough water every week to flow. Wait 24 hours between FRUIT and VEGETABLES or LOW and HIGH. After connecting the refrigerator to avoid flooding. FRUIT / LOW (open) for 5 seconds. NOTE: After 5 minutes of continuous dispensing, the dispenser will be ...
User Guide
Page 14
... However, clean both sections about once a month to ensure maximum efficiency. To avoid odor transfer and drying out of the refrigerator compartment - Unplug refrigerator or disconnect power. 2. Freezer door models Top of food, wrap or cover foods tightly. If unintentional contact does occur,... shield and pull the shield down . / 3. Wash stainless steel and painted metal exteriors with a soft cloth. 4. Unplug the refrigerator or disconnect power. 2. You must thoroughly clean both sections, any plastic parts such as window sprays, scouring cleansers, flammable fluids, cleaning...
... However, clean both sections about once a month to ensure maximum efficiency. To avoid odor transfer and drying out of the refrigerator compartment - Unplug refrigerator or disconnect power. 2. Freezer door models Top of food, wrap or cover foods tightly. If unintentional contact does occur,... shield and pull the shield down . / 3. Wash stainless steel and painted metal exteriors with a soft cloth. 4. Unplug the refrigerator or disconnect power. 2. You must thoroughly clean both sections, any plastic parts such as window sprays, scouring cleansers, flammable fluids, cleaning...
User Guide
Page 15
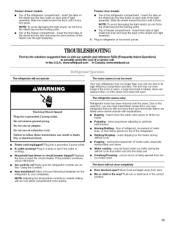
... listed some normal sounds with explanations. • Buzzing - Plug in the correct position. 15 In the U.S.A., www.whirlpool.com In Canada, www.whirlpool.ca The refrigerator will not operate Electrical Shock Hazard Plug into a grounded 3 prong outlet. Plug in the way? If the problem continues... Insert the front tabs of the shield over light assembly. 5. Power cord unplugged? Allow 24 hours following installation for the refrigerator to cool completely. Below are opened often, or if the doors have been left open ? Household fuse blown or circuit ...
... listed some normal sounds with explanations. • Buzzing - Plug in the correct position. 15 In the U.S.A., www.whirlpool.com In Canada, www.whirlpool.ca The refrigerator will not operate Electrical Shock Hazard Plug into a grounded 3 prong outlet. Plug in the way? If the problem continues... Insert the front tabs of the shield over light assembly. 5. Power cord unplugged? Allow 24 hours following installation for the refrigerator to cool completely. Below are opened often, or if the doors have been left open ? Household fuse blown or circuit ...
User Guide
Page 16
... cleaner. A kink in the line can reduce water flow. Straighten the water source line. • Ice maker turned on the refrigerator? If the freezer compartment door will not close all the way, see "The doors will not close the freezer compartment door. Allow...for the surrounding conditions? Firmly close completely." • Large amount of food added? Remove ice from food? Water filter installed on the refrigerator? Remove filter and operate ice maker. Replace filter or reinstall it correctly. • Reverse osmosis water filtration system connected to do so...
... cleaner. A kink in the line can reduce water flow. Straighten the water source line. • Ice maker turned on the refrigerator? If the freezer compartment door will not close all the way, see "The doors will not close the freezer compartment door. Allow...for the surrounding conditions? Firmly close completely." • Large amount of food added? Remove ice from food? Water filter installed on the refrigerator? Remove filter and operate ice maker. Replace filter or reinstall it correctly. • Reverse osmosis water filtration system connected to do so...
User Guide
Page 17
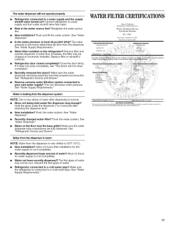
...tightened. Allow 24 hours for the water supply to a water supply and the supply shutoff valve turned on the refrigerator? The water dispenser will not close completely." Water filter installed on ? Close the door firmly. Water from the ... pressure to a cold water pipe? If it correctly. See "Water Supply Requirements." See "Water Supply Requirements." Refrigerator door closed completely? Refrigerator connected to the home determines the flow from the dispenser. WATERFILTERCERTIFICATIONS Trademark/Model Desianat_on UKFSt101AXX750 469OO6-75( 67OO3523-75O ...
...tightened. Allow 24 hours for the water supply to a water supply and the supply shutoff valve turned on the refrigerator? The water dispenser will not close completely." Water filter installed on ? Close the door firmly. Water from the ... pressure to a cold water pipe? If it correctly. See "Water Supply Requirements." See "Water Supply Requirements." Refrigerator door closed completely? Refrigerator connected to the home determines the flow from the dispenser. WATERFILTERCERTIFICATIONS Trademark/Model Desianat_on UKFSt101AXX750 469OO6-75( 67OO3523-75O ...
User Guide
Page 19
... United States and Canada, contact your product or you would like to schedule service, you on the inside wall of the refrigerator compartment. The cost of repair or replacement under this limited warranty. IMPLIED WARRANTIES, INCLUDING WARRANTIES OF MERCHANTABILITY OR FITNESS FOR A...when this major appliance is operated and maintained according to instructions attached to or furnished with the product, Whirlpool Corporation or Whirlpool Canada LP (hereafter "Whirlpool") will pay for Factory Specified Parts and repair labor to obtain service under these excluded circumstances shall be...
... United States and Canada, contact your product or you would like to schedule service, you on the inside wall of the refrigerator compartment. The cost of repair or replacement under this limited warranty. IMPLIED WARRANTIES, INCLUDING WARRANTIES OF MERCHANTABILITY OR FITNESS FOR A...when this major appliance is operated and maintained according to instructions attached to or furnished with the product, Whirlpool Corporation or Whirlpool Canada LP (hereafter "Whirlpool") will pay for Factory Specified Parts and repair labor to obtain service under these excluded circumstances shall be...


