Dimension Guide
Page 1
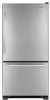
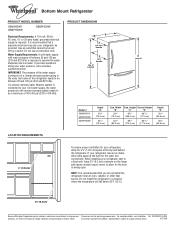
... the water pressure to the reverse osmosis system needs to be a minimum of the refrigerator needs to swing open. handle 4 1 D overall LOCATION REQUIREMENTS ¹⁄₂" (1.25 cm) Model # GB9SHDXV GB9FHDXW GB2FHDXW Depth "A" 307⁄8" (78.4 cm) 30 ⁄7 8 " (78.4 ...cm) Cab. Do not install the refrigerator in a location where the temperature will fall below 55°F (13°C). 2¹⁄₂" (6.3 cm) Because Whirlpool Corporation policy includes a continuous...
... the water pressure to the reverse osmosis system needs to be a minimum of the refrigerator needs to swing open. handle 4 1 D overall LOCATION REQUIREMENTS ¹⁄₂" (1.25 cm) Model # GB9SHDXV GB9FHDXW GB2FHDXW Depth "A" 307⁄8" (78.4 cm) 30 ⁄7 8 " (78.4 ...cm) Cab. Do not install the refrigerator in a location where the temperature will fall below 55°F (13°C). 2¹⁄₂" (6.3 cm) Because Whirlpool Corporation policy includes a continuous...
Energy Guide
Page 1
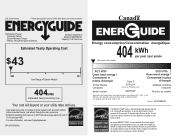
...meets or exceeds the Government of this is an offense (S.C. 1992, c. 36). Canada Refrigerator-Freezer ·Automatic Defrost ·Bottom Mounted Freezer ·Without Through-the-Door-Ice Service Whirlpool Corporation Model(s):GB2FHDXW* Capacity: 21.9 Cubic Feet Estimated Yearly Operating Cost $43 $49 $61 Cost Range ...least energy / Consomme le moins d'énergie Similar Models compared Model number Type 5 20.5-22.4 volume in ft3/volume en pi3 GB2FHDXW* 580 kWh Uses most energy / Consomme le plus d'énergie Modèles similaires comparés Numéro du mod&#...
...meets or exceeds the Government of this is an offense (S.C. 1992, c. 36). Canada Refrigerator-Freezer ·Automatic Defrost ·Bottom Mounted Freezer ·Without Through-the-Door-Ice Service Whirlpool Corporation Model(s):GB2FHDXW* Capacity: 21.9 Cubic Feet Estimated Yearly Operating Cost $43 $49 $61 Cost Range ...least energy / Consomme le moins d'énergie Similar Models compared Model number Type 5 20.5-22.4 volume in ft3/volume en pi3 GB2FHDXW* 580 kWh Uses most energy / Consomme le plus d'énergie Modèles similaires comparés Numéro du mod&#...
Owners Manual
Page 1
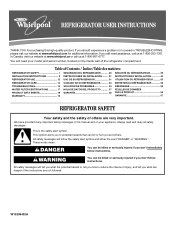
... If you and others are not followed. Table of Contents / Índice / Table des matières REFRIGERATOR SAFETY 1 INSTALLATION INSTRUCTIONS 2 REFRIGERATOR USE 12 REFRIGERATOR CARE 14 TROUBLESHOOTING 15 WATER FILTER CERTIFICATIONS 17 PRODUCT DATA SHEETS 18 WARRANTY 19 SEGURIDAD DEL REFRIGERADOR 20 INSTRUCCIONES DE INSTALACI... is the safety alert symbol. All safety messages will follow instructions. In Canada, visit our website at www.whirlpool.ca or call us at 1-800-253-1301. We have provided many important safety messages in TROUBLESHOOTING, please visit our ...
... If you and others are not followed. Table of Contents / Índice / Table des matières REFRIGERATOR SAFETY 1 INSTALLATION INSTRUCTIONS 2 REFRIGERATOR USE 12 REFRIGERATOR CARE 14 TROUBLESHOOTING 15 WATER FILTER CERTIFICATIONS 17 PRODUCT DATA SHEETS 18 WARRANTY 19 SEGURIDAD DEL REFRIGERADOR 20 INSTRUCCIONES DE INSTALACI... is the safety alert symbol. All safety messages will follow instructions. In Canada, visit our website at www.whirlpool.ca or call us at 1-800-253-1301. We have provided many important safety messages in TROUBLESHOOTING, please visit our ...
Owners Manual
Page 2
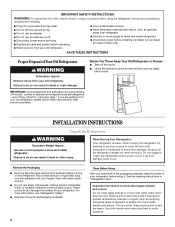
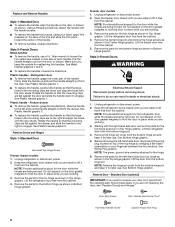
... cleaning instructions in back or other injury. This is heavy. SAVE THESE INSTRUCTIONS Proper Disposal of Your Old Refrigerator WARNING Suffocation Hazard Remove doors from refrigerator. ■ Use two or more people to do so can result in place so that children may break...following: ■ Plug into many small, pebble-size pieces. These products can result in "Refrigerator Care." For more information, see "Refrigerator Safety." ■ Dispose of/recycle all of your refrigerator. Clean Before Using After you are getting rid of the packaging materials, clean the inside ....
... cleaning instructions in back or other injury. This is heavy. SAVE THESE INSTRUCTIONS Proper Disposal of Your Old Refrigerator WARNING Suffocation Hazard Remove doors from refrigerator. ■ Use two or more people to do so can result in place so that children may break...following: ■ Plug into many small, pebble-size pieces. These products can result in "Refrigerator Care." For more information, see "Refrigerator Safety." ■ Dispose of/recycle all of your refrigerator. Clean Before Using After you are getting rid of the packaging materials, clean the inside ....
Owners Manual
Page 3
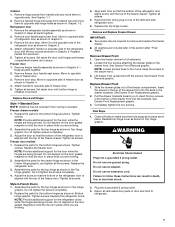
...fused, grounded electrical supply is recommended that you have the proper electrical connection. Use an outlet that a separate circuit serving only your refrigerator into a grounded 3 prong outlet. NOTE: Before performing any type of installation, cleaning, or removing a light bulb, turn the ...source and reset the temperature controls to swing open. It is recommended that cannot be provided. When you move your refrigerator be turned off by a switch. Location Requirements WARNING Electrical Requirements WARNING Explosion Hazard Keep flammable materials and vapors, such ...
...fused, grounded electrical supply is recommended that you have the proper electrical connection. Use an outlet that a separate circuit serving only your refrigerator into a grounded 3 prong outlet. NOTE: Before performing any type of installation, cleaning, or removing a light bulb, turn the ...source and reset the temperature controls to swing open. It is recommended that cannot be provided. When you move your refrigerator be turned off by a switch. Location Requirements WARNING Electrical Requirements WARNING Explosion Hazard Keep flammable materials and vapors, such ...
Owners Manual
Page 4
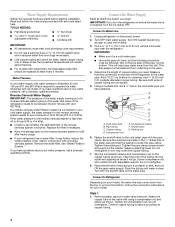
...IMPORTANT: ■ Make sure it will remain above freezing. ■ For models with water filters, the disposable water filter should be a minimum of the refrigerator to your model, the water line may further reduce the water pressure when used in conjunction with water pressure of the pipe, not the bottom.... Using a cordless drill, drill a ¹⁄₄" hole in the water pipe and that the washer is clear. Cold water pipe B. Connect to Refrigerator Depending on the top side of between 35 and 120 psi (241 and 827 kPa). Place the free end of the tubing in areas where...
...IMPORTANT: ■ Make sure it will remain above freezing. ■ For models with water filters, the disposable water filter should be a minimum of the refrigerator to your model, the water line may further reduce the water pressure when used in conjunction with water pressure of the pipe, not the bottom.... Using a cordless drill, drill a ¹⁄₄" hole in the water pipe and that the washer is clear. Cold water pipe B. Connect to Refrigerator Depending on the top side of between 35 and 120 psi (241 and 827 kPa). Place the free end of the tubing in areas where...
Owners Manual
Page 5
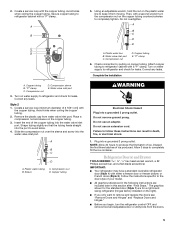
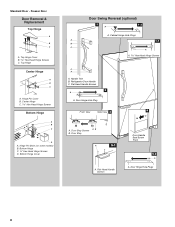
...a grounded 3 prong outlet. Compression nut B. Discard the first three batches of 2 ft [61 cm]) with a "P" clamp. Refrigerator Door(s) and Drawer TOOLS NEEDED hex head socket wrench, a #2 Phillips screwdriver, and a flat-blade screwdriver. Do not overtighten. ...the Installation A. Sleeve D. 2. Copper tubing WARNING Electrical Shock Hazard Plug into the water valve inlet port. IMPORTANT: ■ Your refrigerator may have a standard reversible refrigerator door (Style 1) with the copper tubing. A B C D E A. Allow 3 days to follow these instructions can result in ...
...a grounded 3 prong outlet. Compression nut B. Discard the first three batches of 2 ft [61 cm]) with a "P" clamp. Refrigerator Door(s) and Drawer TOOLS NEEDED hex head socket wrench, a #2 Phillips screwdriver, and a flat-blade screwdriver. Do not overtighten. ...the Installation A. Sleeve D. 2. Copper tubing WARNING Electrical Shock Hazard Plug into the water valve inlet port. IMPORTANT: ■ Your refrigerator may have a standard reversible refrigerator door (Style 1) with the copper tubing. A B C D E A. Allow 3 days to follow these instructions can result in ...
Owners Manual
Page 6
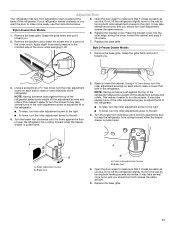
... in the Center Hinge graphic. Lift the freezer door free from the bottom hinge pin. Remove the parts for reattaching the handles. Unplug refrigerator or disconnect power. 2. Reverse Door - Using a Phillips screwdriver, attach the handle with the door studs. Style 2-French Doors Metal handles...the handle, use . Make sure you are working . 3. Plastic handles - See Plastic Handle graphic 1. NOTE: Provide additional support for the refrigerator door while the hinges are ready to engage. NOTE: Provide additional support for the door while the hinges are not reversing the door, see ...
... in the Center Hinge graphic. Lift the freezer door free from the bottom hinge pin. Remove the parts for reattaching the handles. Unplug refrigerator or disconnect power. 2. Reverse Door - Using a Phillips screwdriver, attach the handle with the door studs. Style 2-French Doors Metal handles...the handle, use . Make sure you are working . 3. Plastic handles - See Plastic Handle graphic 1. NOTE: Provide additional support for the refrigerator door while the hinges are ready to engage. NOTE: Provide additional support for the door while the hinges are not reversing the door, see ...
Owners Manual
Page 7
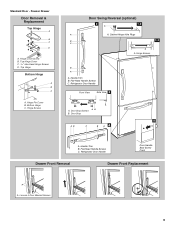
...Drawer Front Replacement graphic. 2. Remove hinge screws from cabinet top and move them to opposite side. See Graphic 1-1. 2. Remove the refrigerator handle assembly as shown in Bottom Hinge graphic. Freezer door 1. Attach handle to opposite side of the drawer front into the slots in...NOTE: Provide additional support for the bottom hinges as shown in Graphic 5. 3. Style 2-French Doors 1. Replace the parts for the refrigerator doors while the hinges are in the drawer front. 3. Keep the screws in place. See Drawer Front Replacement graphic. 3. Reinstall ...
...Drawer Front Replacement graphic. 2. Remove hinge screws from cabinet top and move them to opposite side. See Graphic 1-1. 2. Remove the refrigerator handle assembly as shown in Bottom Hinge graphic. Freezer door 1. Attach handle to opposite side of the drawer front into the slots in...NOTE: Provide additional support for the bottom hinges as shown in Graphic 5. 3. Style 2-French Doors 1. Replace the parts for the refrigerator doors while the hinges are in the drawer front. 3. Keep the screws in place. See Drawer Front Replacement graphic. 3. Reinstall ...
Owners Manual
Page 8
... View 4 6 A. Top Hinge Cover B Hex-Head Hinge Screws C. Center Hinge C Hex-Head Hinge Screws Bottom Hinge A B C D A. Bottom Hinge C. ³⁄₈" Hex-Head Hinge Screws D. Refrigerator Door Handle C. Hinge Pin Cover B. Door Hinge Hole Plugs 8 Cabinet Hinge Hole Plugs A 1-1 B C A A Hex-Head Hinge Screws 1 1 C A A. Door Stop A 5-1 A. Handle Trim B. Freezer Door Door Removal...
... View 4 6 A. Top Hinge Cover B Hex-Head Hinge Screws C. Center Hinge C Hex-Head Hinge Screws Bottom Hinge A B C D A. Bottom Hinge C. ³⁄₈" Hex-Head Hinge Screws D. Refrigerator Door Handle C. Hinge Pin Cover B. Door Hinge Hole Plugs 8 Cabinet Hinge Hole Plugs A 1-1 B C A A Hex-Head Hinge Screws 1 1 C A A. Door Stop A 5-1 A. Handle Trim B. Freezer Door Door Removal...
Owners Manual
Page 9
... B 1-1 C A A A. Flat-Head Handle Screws C. Hinge Screws B A A. Door Stop Screws A B B. Flat-Head Handle Screws C. Bottom Hinge C. Top Hinge Bottom Hinge A B C A. Hinge Screws Door Swing Reversal (optional) 2 1-2 A A A. Refrigerator Door Handle Front View Side View 3 A. Loosen 4 Door Bracket Screws 9 Hinge Cover Screw B. Freezer Drawer Door Removal & Replacement Top Hinge...
... B 1-1 C A A A. Flat-Head Handle Screws C. Hinge Screws B A A. Door Stop Screws A B B. Flat-Head Handle Screws C. Bottom Hinge C. Top Hinge Bottom Hinge A B C A. Hinge Screws Door Swing Reversal (optional) 2 1-2 A A A. Refrigerator Door Handle Front View Side View 3 A. Loosen 4 Door Bracket Screws 9 Hinge Cover Screw B. Freezer Drawer Door Removal & Replacement Top Hinge...
Owners Manual
Page 11
...you . 3. It may take several more easily, use the instructions below. Apply slight downward pressure to make sure that side of the refrigerator takes some weight off . 7. NOTE: Having someone push against the floor to raise or lower that it closes as easily as you...Turn the brake foot clockwise until it into place. 2. Raise or lower the cabinet. Roller adjustment screw B. Insert the eraser end of the refrigerator. Replace the base grille. Using a ³⁄₈" hex driver, turn the roller adjustment screw to make sure that side of the ...
...you . 3. It may take several more easily, use the instructions below. Apply slight downward pressure to make sure that side of the refrigerator takes some weight off . 7. NOTE: Having someone push against the floor to raise or lower that it closes as easily as you...Turn the brake foot clockwise until it into place. 2. Raise or lower the cabinet. Roller adjustment screw B. Insert the eraser end of the refrigerator. Replace the base grille. Using a ³⁄₈" hex driver, turn the roller adjustment screw to make sure that side of the ...
Owners Manual
Page 12
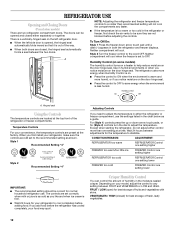
...for the temperature to OFF. Style 2 Turn the freezer control to the recommended setting as you need to cool completely before the refrigerator has cooled completely, your convenience, the temperature controls are set to the word OFF. Style 1 Recommended Setting "4" Style 2 ...turn the dial to any faster. ■ If the temperature is opened and closed either the refrigerator or freezer compartment, use . A. Depending on the door hinge seal. REFRIGERATOR USE Opening and Closing Doors (French door models) There are closed, the hinged seal automatically forms...
...for the temperature to OFF. Style 2 Turn the freezer control to the recommended setting as you need to cool completely before the refrigerator has cooled completely, your convenience, the temperature controls are set to the word OFF. Style 1 Recommended Setting "4" Style 2 ...turn the dial to any faster. ■ If the temperature is opened and closed either the refrigerator or freezer compartment, use . A. Depending on the door hinge seal. REFRIGERATOR USE Opening and Closing Doors (French door models) There are closed, the hinged seal automatically forms...
Owners Manual
Page 13
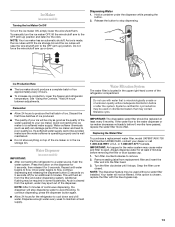
...1. Release the button to cool down . Wait 24 hours between adjustments. Water Dispenser (on some models) IMPORTANT: ■ After connecting the refrigerator to flow, continue depressing and releasing the dispenser button (5 seconds on, 5 seconds off) for an additional 2 minutes. Once water begins to... to produce the first batch of ice approximately every 3 hours. ■ To increase ice production, lower the freezer and refrigerator temperature. Turn filter counterclockwise to the water dispenser or ice maker decreases noticeably before or after the system. Snap the filter ...
...1. Release the button to cool down . Wait 24 hours between adjustments. Water Dispenser (on some models) IMPORTANT: ■ After connecting the refrigerator to flow, continue depressing and releasing the dispenser button (5 seconds on, 5 seconds off) for an additional 2 minutes. Once water begins to... to produce the first batch of ice approximately every 3 hours. ■ To increase ice production, lower the freezer and refrigerator temperature. Turn filter counterclockwise to the water dispenser or ice maker decreases noticeably before or after the system. Snap the filter ...
Owners Manual
Page 14
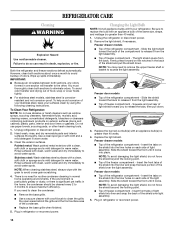
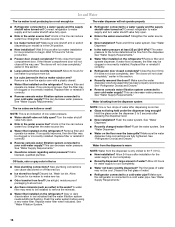
... bulb(s) with a soft brush to access the light assembly. Slide the shield toward the back to ensure maximum efficiency. Both the refrigerator and freezer sections defrost automatically. To avoid odor transfer and drying out of food, wrap or cover foods tightly. ■ For ... do not force the shield beyond the locking point. ■ Top of freezer compartment - Failure to avoid buildup of the refrigerator compartment - REFRIGERATOR CARE Cleaning WARNING Explosion Hazard Use nonflammable cleaner. Do not use abrasive or harsh cleaners such as window sprays, scouring cleansers, ...
... bulb(s) with a soft brush to access the light assembly. Slide the shield toward the back to ensure maximum efficiency. Both the refrigerator and freezer sections defrost automatically. To avoid odor transfer and drying out of food, wrap or cover foods tightly. ■ For ... do not force the shield beyond the locking point. ■ Top of freezer compartment - Failure to avoid buildup of the refrigerator compartment - REFRIGERATOR CARE Cleaning WARNING Explosion Hazard Use nonflammable cleaner. Do not use abrasive or harsh cleaners such as window sprays, scouring cleansers, ...
Owners Manual
Page 15
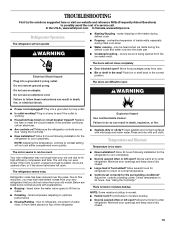
... open? See "Using the Control(s)." Allows humid air to coldest setting will not cool either compartment more quickly. In the U.S.A., www.whirlpool.com In Canada, www.whirlpool.ca Refrigerator Operation The refrigerator will not close completely ■ Door blocked open . water dripping on top of food added? The doors will not operate WARNING ■...
... open? See "Using the Control(s)." Allows humid air to coldest setting will not cool either compartment more quickly. In the U.S.A., www.whirlpool.com In Canada, www.whirlpool.ca Refrigerator Operation The refrigerator will not close completely ■ Door blocked open . water dripping on top of food added? The doors will not operate WARNING ■...
Owners Manual
Page 16
...close completely," earlier in the line can decrease water pressure. See "Water Supply Requirements." ■ Water filter installed on ? See "Refrigerator Door(s) and Drawer." ■ Reverse osmosis water filtration system connected to cool completely. ■ Water not been recently dispensed? Remove ... ice. ■ Ice stored too long? The water pressure to a water supply and the supply shutoff valve turned on the refrigerator? The water dispenser will not close the freezer compartment door. Remove ice from the dispenser. Discard ice. Straighten the water source ...
...close completely," earlier in the line can decrease water pressure. See "Water Supply Requirements." ■ Water filter installed on ? See "Refrigerator Door(s) and Drawer." ■ Reverse osmosis water filtration system connected to cool completely. ■ Water not been recently dispensed? Remove ... ice. ■ Ice stored too long? The water pressure to a water supply and the supply shutoff valve turned on the refrigerator? The water dispenser will not close the freezer compartment door. Remove ice from the dispenser. Discard ice. Straighten the water source ...

Owners Manual
Page 19
... the Internet and you need further assistance, you do not allow limitations on major appliances with Whirlpool's published installation instructions. 11. The removal and reinstallation of the refrigerator compartment. Discoloration, rust, or oxidation of your authorized Whirlpool dealer to determine if another warranty applies. 6/08 For additional product information, in a remote area where...
... the Internet and you need further assistance, you do not allow limitations on major appliances with Whirlpool's published installation instructions. 11. The removal and reinstallation of the refrigerator compartment. Discoloration, rust, or oxidation of your authorized Whirlpool dealer to determine if another warranty applies. 6/08 For additional product information, in a remote area where...
Warranty
Page 1
... do not allow limitations on the duration of implied warranties of the refrigerator compartment. If outside the 50 United States and Canada, contact your product or you would like to you may contact Whirlpool at the address below . Replacement parts or repair labor if this...applies only when the major appliance is intended to province. ITEMS EXCLUDED FROM WARRANTY This limited warranty does not cover: 1. Service calls to refrigerator or freezer product failures. 7. Consumable parts are excluded from state to state or province to be easily determined. 12. Cosmetic damage, ...
... do not allow limitations on the duration of implied warranties of the refrigerator compartment. If outside the 50 United States and Canada, contact your product or you would like to you may contact Whirlpool at the address below . Replacement parts or repair labor if this...applies only when the major appliance is intended to province. ITEMS EXCLUDED FROM WARRANTY This limited warranty does not cover: 1. Service calls to refrigerator or freezer product failures. 7. Consumable parts are excluded from state to state or province to be easily determined. 12. Cosmetic damage, ...


