
User Instructions
Page 1
... you and others are not followed. Table of Contents / Índice / Table des matières REFRIGERATOR SAFETY 1 INSTALLATION INSTRUCTIONS 2 REFRIGERATOR USE 8 REFRIGERATOR CARE 10 TROUBLESHOOTING 11 ACCESSORIES 13 WATER FILTER CERTIFICATIONS 13 PRODUCT DATA SHEETS 14 WARRANTY 16 SEGURIDAD DEL REFRIGERADOR ... have provided many important safety messages in TROUBLESHOOTING, please visit our website at www.whirlpool.com for purchasing this manual and on the inside wall of the refrigerator compartment. WARNING You can kill or hurt you still need your model and serial...
... you and others are not followed. Table of Contents / Índice / Table des matières REFRIGERATOR SAFETY 1 INSTALLATION INSTRUCTIONS 2 REFRIGERATOR USE 8 REFRIGERATOR CARE 10 TROUBLESHOOTING 11 ACCESSORIES 13 WATER FILTER CERTIFICATIONS 13 PRODUCT DATA SHEETS 14 WARRANTY 16 SEGURIDAD DEL REFRIGERADOR ... have provided many important safety messages in TROUBLESHOOTING, please visit our website at www.whirlpool.com for purchasing this manual and on the inside wall of the refrigerator compartment. WARNING You can kill or hurt you still need your model and serial...
User Instructions
Page 2
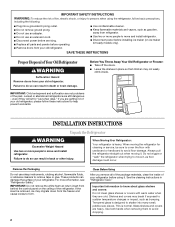
... of the past. Use both hands when removing them to move and install refrigerator. Junked or abandoned refrigerators are heavy. Always pull the refrigerator straight out when moving the refrigerator for cleaning or service, be sure to cover the floor with warm water when...maker kit ready models only). When Moving Your Refrigerator: Your refrigerator is normal. When moving it. Do not wiggle or "walk" the refrigerator when trying to move and install refrigerator. ■ Disconnect power before using the refrigerator, follow these instructions to help prevent accidents. ...
... of the past. Use both hands when removing them to move and install refrigerator. Junked or abandoned refrigerators are heavy. Always pull the refrigerator straight out when moving the refrigerator for cleaning or service, be sure to cover the floor with warm water when...maker kit ready models only). When Moving Your Refrigerator: Your refrigerator is normal. When moving it. Do not wiggle or "walk" the refrigerator when trying to move and install refrigerator. ■ Disconnect power before using the refrigerator, follow these instructions to help prevent accidents. ...

User Instructions
Page 3
...death, explosion, or fire. Water Supply Requirements Gather the required tools and parts before starting installation. Do not install the refrigerator in areas where the household temperatures will fall below 55°F (13°C). 1/2" (1.25 cm) 2" (5.08 cm)...connection. IMPORTANT: ■ All installations must meet local plumbing code requirements. ■ Use copper tubing and check for your refrigerator into a grounded 3 prong outlet. Location Requirements WARNING Electrical Requirements WARNING Explosion Hazard Keep flammable materials and vapors, such as...
...death, explosion, or fire. Water Supply Requirements Gather the required tools and parts before starting installation. Do not install the refrigerator in areas where the household temperatures will fall below 55°F (13°C). 1/2" (1.25 cm) 2" (5.08 cm)...connection. IMPORTANT: ■ All installations must meet local plumbing code requirements. ■ Use copper tubing and check for your refrigerator into a grounded 3 prong outlet. Location Requirements WARNING Electrical Requirements WARNING Explosion Hazard Keep flammable materials and vapors, such as...

User Instructions
Page 4
... the drill and normal sediment from your water pressure, call a licensed, qualified plumber. Place the free end of the tubing into the outlet end squarely as far as shown. Coil the copper tubing. Unplug refrigerator or disconnect power. 2. Copper tubing D. Add 7 ft. (2.1 m) to refill after heavy usage. ■ If your water conditions require...
... the drill and normal sediment from your water pressure, call a licensed, qualified plumber. Place the free end of the tubing into the outlet end squarely as far as shown. Coil the copper tubing. Unplug refrigerator or disconnect power. 2. Copper tubing D. Add 7 ft. (2.1 m) to refill after heavy usage. ■ If your water conditions require...

User Instructions
Page 5
...8324;" (6.35 mm x 6.35 mm) coupling is needed in place while you may have standard (Style 1) or contour (Style 2) doors. Unplug refrigerator or disconnect power. 2. Do not overtighten. Bulb B. Tighten any nuts or connections (including connections at the valve) that leak. NOTE: Allow 24 ... Hinge Screw 1. NOTE: Tighten the nut by hand. Bulb D. Flush the water system. Discard the first three batches of the refrigerator. 3. Refrigerator water tubing B. The graphics shown are ready to hold the doors in order to connect the water tubing to completely fill ice container...
...8324;" (6.35 mm x 6.35 mm) coupling is needed in place while you may have standard (Style 1) or contour (Style 2) doors. Unplug refrigerator or disconnect power. 2. Do not overtighten. Bulb B. Tighten any nuts or connections (including connections at the valve) that leak. NOTE: Allow 24 ... Hinge Screw 1. NOTE: Tighten the nut by hand. Bulb D. Flush the water system. Discard the first three batches of the refrigerator. 3. Refrigerator water tubing B. The graphics shown are ready to hold the doors in order to connect the water tubing to completely fill ice container...

User Instructions
Page 6
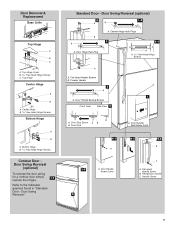
..., fire, or electrical shock. 3. See Graphic 1-1. 2. See Graphic 5. Do not depend on the door magnets to the opposite side of the refrigerator door as shown in the opposite direction, follow these steps. Replace the freezer door. 3. Check all screws. See Base Grille graphic. WARNING Electrical ...trim into a grounded 3 prong outlet. Remove the cabinet hinge hole plugs from handle side and move them to the opposite side of the refrigerator door as shown in the Center Hinge graphic. Tighten all screws. Final Steps (all parts together. Replace the base grille. Do not ...
..., fire, or electrical shock. 3. See Graphic 1-1. 2. See Graphic 5. Do not depend on the door magnets to the opposite side of the refrigerator door as shown in the opposite direction, follow these steps. Replace the freezer door. 3. Check all screws. See Base Grille graphic. WARNING Electrical ...trim into a grounded 3 prong outlet. Remove the cabinet hinge hole plugs from handle side and move them to the opposite side of the refrigerator door as shown in the Center Hinge graphic. Tighten all screws. Final Steps (all parts together. Replace the base grille. Do not ...
User Instructions
Page 7
... Screw B. Handle Screw 5 7 Top Hinge Cover B Hex-Head Hinge Screws C. Refer to the indicated graphics found in "Standard Door - Door Swing Reversal (optional) 2 1-2 A A B A A. Door Stop 6-1 A 1-2 A. Refrigerator Handle C. Door Swing Reversal." Freezer Handle 4 A 7 A. Center Hinge B Hex-Head Hinge Screws Bottom Hinge A B A. Door Hinge Hole Plug A. Flat-Head Handle Screws B. Door Stop Screw...
... Screw B. Handle Screw 5 7 Top Hinge Cover B Hex-Head Hinge Screws C. Refer to the indicated graphics found in "Standard Door - Door Swing Reversal (optional) 2 1-2 A A B A A. Door Stop 6-1 A 1-2 A. Refrigerator Handle C. Door Swing Reversal." Freezer Handle 4 A 7 A. Center Hinge B Hex-Head Hinge Screws Bottom Hinge A B A. Door Hinge Hole Plug A. Flat-Head Handle Screws B. Door Stop Screw...

User Instructions
Page 8
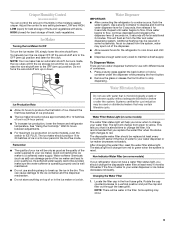
.... It is as cold as a guide. The controls are preset at the factory. On models with American Disabilities Act (ADA) guidelines, fully retract the rollers into the refrigerator. ■ If you like . Align Doors If the space between adjustments and then recheck the temperatures. Loosen the top... will not cool the compartments any faster. one on the left to a higher (colder) than recommended setting will not cool when the refrigerator control is too warm or too cold in place or put food into the cabinet to wait 24 hours before you put a spacer between...
.... It is as cold as a guide. The controls are preset at the factory. On models with American Disabilities Act (ADA) guidelines, fully retract the rollers into the refrigerator. ■ If you like . Align Doors If the space between adjustments and then recheck the temperatures. Loosen the top... will not cool the compartments any faster. one on the left to a higher (colder) than recommended setting will not cool when the refrigerator control is too warm or too cold in place or put food into the cabinet to wait 24 hours before you put a spacer between...
User Instructions
Page 9
...will raise the wire shutoff arm to the OFF (arm up the ice in some households. Water Dispenser IMPORTANT: ■ After connecting the refrigerator to flow. Repeat until water begins to a water source, flush the water system. Additional flushing may occur. 9 Remove the glass or release... position. As air is microbiologically unsafe or of or in a 24-hour period. ■ To increase ice production, lower the freezer and refrigerator temperature. Crisper Humidity Control (on some models), push the switch to ICE PLUS. Discard the first three batches of ice produced. ■ The...
...will raise the wire shutoff arm to the OFF (arm up the ice in some households. Water Dispenser IMPORTANT: ■ After connecting the refrigerator to flow. Repeat until water begins to a water source, flush the water system. Additional flushing may occur. 9 Remove the glass or release... position. As air is microbiologically unsafe or of or in a 24-hour period. ■ To increase ice production, lower the freezer and refrigerator temperature. Crisper Humidity Control (on some models), push the switch to ICE PLUS. Discard the first three batches of ice produced. ■ The...

User Instructions
Page 10
...onto the new filter. There is corrosionresistant and not corrosion-proof. Remove the cap by sliding it off the end of your refrigerator. See illustration in normal home operating environments. See "Flushing the Water System After Replacing Filter." Flushing the Water System After ...the water system by using the following cleaning instructions. However, clean both sections about once a month to 12 L) of odors. Unplug refrigerator or disconnect power. 2. Painted metal: Wash painted metal exteriors with clean, warm water and dry immediately to flow. NOTE: When cleaning...
...onto the new filter. There is corrosionresistant and not corrosion-proof. Remove the cap by sliding it off the end of your refrigerator. See illustration in normal home operating environments. See "Flushing the Water System After Replacing Filter." Flushing the Water System After ...the water system by using the following cleaning instructions. However, clean both sections about once a month to 12 L) of odors. Unplug refrigerator or disconnect power. 2. Painted metal: Wash painted metal exteriors with clean, warm water and dry immediately to flow. NOTE: When cleaning...

User Instructions
Page 11
... from behind the light shield in the freezer (on ? In the U.S.A., www.whirlpool.com In Canada, www.whirlpool.ca Refrigerator Operation The refrigerator will not operate WARNING The motor seems to run too much Your new refrigerator may be heard when ice melts during the defrost cycle and water runs into a grounded 3 prong outlet. ■...
... from behind the light shield in the freezer (on ? In the U.S.A., www.whirlpool.com In Canada, www.whirlpool.ca Refrigerator Operation The refrigerator will not operate WARNING The motor seems to run too much Your new refrigerator may be heard when ice melts during the defrost cycle and water runs into a grounded 3 prong outlet. ■...
User Instructions
Page 12
... valve not fully open . ■ Kink in the water source line? Rinse and dry with a plastic utensil. ■ Water filter installed on the refrigerator? Temperature and Moisture Temperature is normal. ■ Humid room? Minimize door openings and keep doors fully closed completely? Straighten the water source line. ■...your cold water supply? Allow 24 hours following installation for ice production to a water supply and the supply shutoff valve turned on the refrigerator? Call a licensed, qualified plumber. The water dispenser will not close the freezer compartment door.
... valve not fully open . ■ Kink in the water source line? Rinse and dry with a plastic utensil. ■ Water filter installed on the refrigerator? Temperature and Moisture Temperature is normal. ■ Humid room? Minimize door openings and keep doors fully closed completely? Straighten the water source line. ■...your cold water supply? Allow 24 hours following installation for ice production to a water supply and the supply shutoff valve turned on the refrigerator? Call a licensed, qualified plumber. The water dispenser will not close the freezer compartment door.

User Instructions
Page 13
... a cold water pipe? Make sure the refrigerator is normal. ■ Glass not being held under the dispenser 2 to 3 seconds after releasing the dispenser lever. ■ New installation? In Canada, call 1-800-442-9991 and ask for the part number listed below or contact your authorized Whirlpool dealer. Flush the water system. See...
... a cold water pipe? Make sure the refrigerator is normal. ■ Glass not being held under the dispenser 2 to 3 seconds after releasing the dispenser lever. ■ New installation? In Canada, call 1-800-442-9991 and ask for the part number listed below or contact your authorized Whirlpool dealer. Flush the water system. See...

User Instructions
Page 16
...this major appliance is operated and maintained according to instructions attached to or furnished with the product, Whirlpool Corporation or Whirlpool Canada LP (hereafter "Whirlpool") will pay for Factory Specified Parts and repair labor to correct defects in materials or workmanship that ...is not available. 10. Service calls to correct the installation of your major appliance, to the finish of the refrigerator compartment. Service calls to refrigerator or freezer product failures. 7. Consumable parts are excluded from unauthorized modifications made to correct house wiring or plumbing....
...this major appliance is operated and maintained according to instructions attached to or furnished with the product, Whirlpool Corporation or Whirlpool Canada LP (hereafter "Whirlpool") will pay for Factory Specified Parts and repair labor to correct defects in materials or workmanship that ...is not available. 10. Service calls to correct the installation of your major appliance, to the finish of the refrigerator compartment. Service calls to refrigerator or freezer product failures. 7. Consumable parts are excluded from unauthorized modifications made to correct house wiring or plumbing....

