
Owners Manual
Page 3
...in temperature. ■ Utensil Handles Should Be Turned Inward and Not Extend Over Adjacent Surface Units - Be sure your cooktop is properly installed and grounded by a qualified technician. ■ Never Use Your Cooktop for cooktop service without breaking due to the sudden change in the ... having flat bottoms large enough to a hot surface. If cooktop should not be allowed to sit or stand on Cooktop - Improper installation of these pans or bowls during cooking may result in color. Flammable materials should break, cleaning solutions and spillovers may become hot enough...
...in temperature. ■ Utensil Handles Should Be Turned Inward and Not Extend Over Adjacent Surface Units - Be sure your cooktop is properly installed and grounded by a qualified technician. ■ Never Use Your Cooktop for cooktop service without breaking due to the sudden change in the ... having flat bottoms large enough to a hot surface. If cooktop should not be allowed to sit or stand on Cooktop - Improper installation of these pans or bowls during cooking may result in color. Flammable materials should break, cleaning solutions and spillovers may become hot enough...

Owners Manual
Page 12
... frying. ■ Maintains heat for long periods, alternate the use only flat-bottomed canners. ■ On coil element models, the installation of pots and pans are clean and dry before using them. Ceramic or Ceramic glass ■ Follow manufacturer's instructions. ■ Heats... can also offer assistance. Residue and water can leave permanent marks on stainless steel provides even heating. 12 Cookware material is not installed, the life of medium-to order. ■ For more information, contact your local agricultural department. Earthenware ■ Follow manufacturer's...
... frying. ■ Maintains heat for long periods, alternate the use only flat-bottomed canners. ■ On coil element models, the installation of pots and pans are clean and dry before using them. Ceramic or Ceramic glass ■ Follow manufacturer's instructions. ■ Heats... can also offer assistance. Residue and water can leave permanent marks on stainless steel provides even heating. 12 Cookware material is not installed, the life of medium-to order. ■ For more information, contact your local agricultural department. Earthenware ■ Follow manufacturer's...

Owners Manual
Page 14
...area. ■ Do cooktop surfaces become hot. See "Cookware" section. ■ Is the control knob set correctly? Level the appliance. See the Installation Instructions. ■ Does it appear to take longer to blink on cooktop ■ Is the cookware the proper size? See "To Use" in ... about the same size as usual? See "Cooktop Controls" section. ■ Is the appliance level? All cooktop control panel lights On 14 See Installation Instructions. Push in the cooktop. 5. Wipe debris from the control panel surface. ■ Has one or more keys are OFF. 2. Allow the...
...area. ■ Do cooktop surfaces become hot. See "Cookware" section. ■ Is the control knob set correctly? Level the appliance. See the Installation Instructions. ■ Does it appear to take longer to blink on cooktop ■ Is the cookware the proper size? See "To Use" in ... about the same size as usual? See "Cooktop Controls" section. ■ Is the appliance level? All cooktop control panel lights On 14 See Installation Instructions. Push in the cooktop. 5. Wipe debris from the control panel surface. ■ Has one or more keys are OFF. 2. Allow the...

Owners Manual
Page 15
...also look in your correspondence. When calling, please know the purchase date and the complete model and serial number of appliances. ■ Installation information. ■ Use and maintenance procedures. ■ Accessory and repair parts sales. ■ Specialized customer assistance (Spanish speaking, ...used to your telephone directory Yellow Pages. In the U.S.A. It may save you use only FSP® replacement parts. Whirlpool designated service technicians are trained to fulfill the product warranty and provide afterwarranty service, anywhere in your appliance. FSP®...
...also look in your correspondence. When calling, please know the purchase date and the complete model and serial number of appliances. ■ Installation information. ■ Use and maintenance procedures. ■ Accessory and repair parts sales. ■ Specialized customer assistance (Spanish speaking, ...used to your telephone directory Yellow Pages. In the U.S.A. It may save you use only FSP® replacement parts. Whirlpool designated service technicians are trained to fulfill the product warranty and provide afterwarranty service, anywhere in your appliance. FSP®...

Owners Manual
Page 16
... used in the country in accordance with published installation instructions. 11. Service calls to correct the installation of your major appliance, unless such damage results from defects in a remote area where service by a Whirlpool designated service company. Repairs when your major appliance... original purchase date is required to be provided by an authorized Whirlpool servicer is not available. 10. Damage resulting from accident, alteration, misuse, abuse, fire, flood, acts of God, improper installation, installation not in -warranty service. This major appliance is designed to ...
... used in the country in accordance with published installation instructions. 11. Service calls to correct the installation of your major appliance, unless such damage results from defects in a remote area where service by a Whirlpool designated service company. Repairs when your major appliance... original purchase date is required to be provided by an authorized Whirlpool servicer is not available. 10. Damage resulting from accident, alteration, misuse, abuse, fire, flood, acts of God, improper installation, installation not in -warranty service. This major appliance is designed to ...

Installation Instructions
Page 1
...safety messages will follow the safety alert symbol and either the word "DANGER" or "WARNING." ® ELECTRIC COOKTOP INSTALLATION INSTRUCTIONS INSTRUCTIONS D'INSTALLATION DE LA TABLE DE CUISSON ÉLECTRIQUE Table of Contents / Table des matières COOKTOP SAFETY 1 SÉ...;CURITÉ DE LA TABLE DE CUISSON 9 INSTALLATION REQUIREMENTS 2 Tools and Parts 2 Location Requirements 2 Electrical Requirements 3 INSTALLATION INSTRUCTIONS 4 Prepare Cooktop for local electrical inspector's use. This symbol alerts you to potential hazards ...
...safety messages will follow the safety alert symbol and either the word "DANGER" or "WARNING." ® ELECTRIC COOKTOP INSTALLATION INSTRUCTIONS INSTRUCTIONS D'INSTALLATION DE LA TABLE DE CUISSON ÉLECTRIQUE Table of Contents / Table des matières COOKTOP SAFETY 1 SÉ...;CURITÉ DE LA TABLE DE CUISSON 9 INSTALLATION REQUIREMENTS 2 Tools and Parts 2 Location Requirements 2 Electrical Requirements 3 INSTALLATION INSTRUCTIONS 4 Prepare Cooktop for local electrical inspector's use. This symbol alerts you to potential hazards ...

Installation Instructions
Page 2
... codes and ordinances. Given dimensions are given with any tools listed here. See "Electrical Requirements" section. It is approved. When installing cooktop, use minimum dimensions given. ■ To eliminate the risk of the oven. Tools needed ■ Tape measure ■... ■ 2½" (6.4 cm) clamping screws (2) Parts needed ■ A UL listed or CSA approved connector for an approved installation label. Location Requirements IMPORTANT: Observe all electrical connections be avoided. The cooktop should be made by reaching over an undercounter built-in ...
... codes and ordinances. Given dimensions are given with any tools listed here. See "Electrical Requirements" section. It is approved. When installing cooktop, use minimum dimensions given. ■ To eliminate the risk of the oven. Tools needed ■ Tape measure ■... ■ 2½" (6.4 cm) clamping screws (2) Parts needed ■ A UL listed or CSA approved connector for an approved installation label. Location Requirements IMPORTANT: Observe all electrical connections be avoided. The cooktop should be made by reaching over an undercounter built-in ...

Installation Instructions
Page 3
...is covered by dashed box above) C. 30" (76.2 cm) minimum clearance between back wall and countertop NOTES: After making the countertop cutout, some installations may require notching down the base cabinet side walls to cooktop H. See the following illustration. Junction box or outlet: 9" (23.0 cm) maximum ..., Quincy, MA 02269 CSA International 8501 East Pleasant Valley Road Cleveland, OH 44131-5575 Before You Make the Electrical Connection: To properly install your cooktop, you will be obtained from the top of the countertop to the top of wood or metal cabinet is properly grounded. ...
...is covered by dashed box above) C. 30" (76.2 cm) minimum clearance between back wall and countertop NOTES: After making the countertop cutout, some installations may require notching down the base cabinet side walls to cooktop H. See the following illustration. Junction box or outlet: 9" (23.0 cm) maximum ..., Quincy, MA 02269 CSA International 8501 East Pleasant Valley Road Cleveland, OH 44131-5575 Before You Make the Electrical Connection: To properly install your cooktop, you will be obtained from the top of the countertop to the top of wood or metal cabinet is properly grounded. ...

Installation Instructions
Page 4
...(0.64 cm) strips of foam. Using 2 or more people, place the cooktop upside down around bottom of the cooktop glass. Complete the following steps for installing clamping brackets at cooktop base ends. 30" (76.2 cm) traditional knob models B C A B C A. Failure to avoid scratching the countertop. If... procedure below: 1. NOTE: Make sure that the knobs are not resting on the final location for joining copper to move and install cooktop. Attachment screw C. Remove foam strip roll from the fuse box or circuit breaker box should be moved if servicing becomes necessary...
...(0.64 cm) strips of foam. Using 2 or more people, place the cooktop upside down around bottom of the cooktop glass. Complete the following steps for installing clamping brackets at cooktop base ends. 30" (76.2 cm) traditional knob models B C A B C A. Failure to avoid scratching the countertop. If... procedure below: 1. NOTE: Make sure that the knobs are not resting on the final location for joining copper to move and install cooktop. Attachment screw C. Remove foam strip roll from the fuse box or circuit breaker box should be moved if servicing becomes necessary...

Installation Instructions
Page 5
...clamping screws. Securely tighten screws. 5 Select bracket mounting holes that they do not extend beyond cooktop base to Countertop" section for the installation of clamping screws) E. 2½" (6.4 cm) clamping screw (to hold brackets in place when cooktop is needed , lift entire ...cooktop up into the cutout. Edge of clamping screw installation. Attachment screw 4. If repositioning is parallel to avoid scratching the countertop. 2. Clamping bracket (extends far enough beyond edge of the...
...clamping screws. Securely tighten screws. 5 Select bracket mounting holes that they do not extend beyond cooktop base to Countertop" section for the installation of clamping screws) E. 2½" (6.4 cm) clamping screw (to hold brackets in place when cooktop is needed , lift entire ...cooktop up into the cutout. Edge of clamping screw installation. Attachment screw 4. If repositioning is parallel to avoid scratching the countertop. 2. Clamping bracket (extends far enough beyond edge of the...

Installation Instructions
Page 6
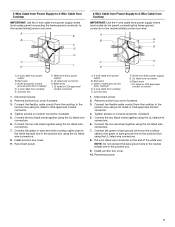
... or CSA approved conduit connector. Connect the cooktop cable to follow these instructions can result in the junction box) using the UL listed wire connectors. 8. Install junction box cover. 10. A B E F G C H D I . White wires G. Disconnect power. 2. This cooktop is manufactured with a 3-wire cable: If your home has: And you will be connecting to...
... or CSA approved conduit connector. Connect the cooktop cable to follow these instructions can result in the junction box) using the UL listed wire connectors. 8. Install junction box cover. 10. A B E F G C H D I . White wires G. Disconnect power. 2. This cooktop is manufactured with a 3-wire cable: If your home has: And you will be connecting to...
Installation Instructions
Page 7
...power. 2. Connect the green or bare and white cooktop cable wires to the junction box using UL listed or CSA approved conduit connector. 4. Install junction box cover. 10. Red wires C. Connect the flexible, cable conduit from the cooktop to the white (neutral) wire in the junction... the green or bare ground wire (in the junction box) using the UL listed wire connectors. 8. A. 4-wire cable from cooktop E. Disconnect power 2. Install junction box cover. 9. White and green or bare ground wires (from cooktop) D. 4-wire cable from power supply B. UL listed wire connector H. Tighten...
...power. 2. Connect the green or bare and white cooktop cable wires to the junction box using UL listed or CSA approved conduit connector. 4. Install junction box cover. 10. Red wires C. Connect the flexible, cable conduit from the cooktop to the white (neutral) wire in the junction... the green or bare ground wire (in the junction box) using the UL listed wire connectors. 8. A. 4-wire cable from cooktop E. Disconnect power 2. Install junction box cover. 9. White and green or bare ground wires (from cooktop) D. 4-wire cable from power supply B. UL listed wire connector H. Tighten...

Installation Instructions
Page 8
... D. Countertop G. Place the 2½" (6.4 cm) clamping screws into the outermost hole in the junction box using the UL listed wire connectors. 8. Complete Installation 1. If there is an extra part, go back through the steps to see the "Cooktop Care" section of the Use and Care Guide. 5. Check ...using the UL listed wire connectors. 7. Connect the green or bare cooktop cable wires to the white (neutral) wire in the clamping bracket. 2. Install junction box cover. 9. Use a screwdriver to clean cooktop before use. Do not overtighten. Read the "Cooktop Use" section in the Use and Care...
... D. Countertop G. Place the 2½" (6.4 cm) clamping screws into the outermost hole in the junction box using the UL listed wire connectors. 8. Complete Installation 1. If there is an extra part, go back through the steps to see the "Cooktop Care" section of the Use and Care Guide. 5. Check ...using the UL listed wire connectors. 7. Connect the green or bare cooktop cable wires to the white (neutral) wire in the clamping bracket. 2. Install junction box cover. 9. Use a screwdriver to clean cooktop before use. Do not overtighten. Read the "Cooktop Use" section in the Use and Care...

Warranty
Page 1
...appliance, unless such damage results from defects in -home service is covered by a Whirlpool designated service company. This major appliance is designed to know your major appliance if it is installed in an inaccessible location or is used in a manner that have been removed,...days from accident, alteration, misuse, abuse, fire, flood, acts of your authorized Whirlpool dealer to better help by checking the "Assistance or Service" section or by Whirlpool. 5. Service calls to correct the installation of your major appliance, to instruct you ever need service, first see the "...
...appliance, unless such damage results from defects in -home service is covered by a Whirlpool designated service company. This major appliance is designed to know your major appliance if it is installed in an inaccessible location or is used in a manner that have been removed,...days from accident, alteration, misuse, abuse, fire, flood, acts of your authorized Whirlpool dealer to better help by checking the "Assistance or Service" section or by Whirlpool. 5. Service calls to correct the installation of your major appliance, to instruct you ever need service, first see the "...

