
Owners Manual
Page 3
...call the fire department. - WARNING: This product contains one or more chemicals known to cause cancer. The cooktop, when installed, must be detected by UL or CSA. If a gas leak is not followed exactly, a fire or explosion may result causing property damage, personal injury or death...the State of local codes, with a three-prong grounding plug for your gas supplier, call your gas supplier. WARNING: If the information in this plug. ■ Disconnect the electrical supply before servicing the cooktop. ■ Injuries may result from combustible materials, gasoline, and other ...
...call the fire department. - WARNING: This product contains one or more chemicals known to cause cancer. The cooktop, when installed, must be detected by UL or CSA. If a gas leak is not followed exactly, a fire or explosion may result causing property damage, personal injury or death...the State of local codes, with a three-prong grounding plug for your gas supplier, call your gas supplier. WARNING: If the information in this plug. ■ Disconnect the electrical supply before servicing the cooktop. ■ Injuries may result from combustible materials, gasoline, and other ...
Owners Manual
Page 4
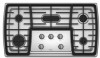
...surface simmer burner (5,000 Btu/h) D. Left rear surface simmer burner (5,000 Btu/h) B. IMPORTANT: Your cooktop is factory-set for use LP Gas, an LP Gas Conversion Kit is wired with Natural Gas. The small burners (9,200 Btu/h, 9,000 Btu/h and 5,000 Btu/h) allow more accurate simmer control...not operate a burner while using empty cookware or without any cookware on making this conversion. See the instructions included with your new cooktop. Contact a trained repair specialist to check the wall receptacle to follow these instructions can result in death or fire. Proper grounding ...
...surface simmer burner (5,000 Btu/h) D. Left rear surface simmer burner (5,000 Btu/h) B. IMPORTANT: Your cooktop is factory-set for use LP Gas, an LP Gas Conversion Kit is wired with Natural Gas. The small burners (9,200 Btu/h, 9,000 Btu/h and 5,000 Btu/h) allow more accurate simmer control...not operate a burner while using empty cookware or without any cookware on making this conversion. See the instructions included with your new cooktop. Contact a trained repair specialist to check the wall receptacle to follow these instructions can result in death or fire. Proper grounding ...

Owners Manual
Page 5
...9632; Simmer. ■ Keep food warm. REMEMBER: When cooktop is blue in color, not yellow. The simmer burners offer a lower Btu/h flame for large quantity cooking. Hold a lit match near a burner and turn knob to enter the gas tube opening with the igniter electrode. Always clean the burner ...can be lit manually. Use the following chart as shown. Gas tube opening: Gas must flow freely throughout the gas tube opening C. A Alignment: Be sure to align the notch in the burner cap with the pin in use, the entire cooktop area may become hot. Igniter electrode E. A good flame ...
...9632; Simmer. ■ Keep food warm. REMEMBER: When cooktop is blue in color, not yellow. The simmer burners offer a lower Btu/h flame for large quantity cooking. Hold a lit match near a burner and turn knob to enter the gas tube opening with the igniter electrode. Always clean the burner ...can be lit manually. Use the following chart as shown. Gas tube opening: Gas must flow freely throughout the gas tube opening C. A Alignment: Be sure to align the notch in the burner cap with the pin in use, the entire cooktop area may become hot. Igniter electrode E. A good flame ...

Owners Manual
Page 6
... for the most cooking tasks. Copper ■ Heats very quickly and evenly. Do not service the burner yourself. Aluminum and copper may scratch the cooktop. Porcelain enamel-onsteel or cast iron ■ See stainless steel or cast iron. Incorrect B. Surface Grates The grates must be flush and level....the gates may result in cookware. Stainless steel ■ Heats quickly, but unevenly. ■ Ideal results on the properties of the gas flame. If the burner does not light, check cap alignment. To ensure proper positioning, align bumpers on grate bottom with a nonstick ...
... for the most cooking tasks. Copper ■ Heats very quickly and evenly. Do not service the burner yourself. Aluminum and copper may scratch the cooktop. Porcelain enamel-onsteel or cast iron ■ See stainless steel or cast iron. Incorrect B. Surface Grates The grates must be flush and level....the gates may result in cookware. Stainless steel ■ Heats quickly, but unevenly. ■ Ideal results on the properties of the gas flame. If the burner does not light, check cap alignment. To ensure proper positioning, align bumpers on grate bottom with a nonstick ...

Owners Manual
Page 7
...towels. When replacing knobs, make sure all -purpose cleaner: Do not reassemble caps on cleaning products. CONTROL PANEL To avoid damage to the cooktop controls, do not soak knobs. Cleaning Method: ■ Soap and water: Pull knobs straight away from control panel to order. Do ... abrasive cleaners, steel-wool pads, gritty washcloths or some models, do not remove seals under knobs. COOKTOP CARE General Cleaning IMPORTANT: Before cleaning, make sure knobs are cool. ■ Gas Grate and Drip Pan Cleaner Part Number 31617 (not included): Rinse with clean water and dry with ...
...towels. When replacing knobs, make sure all -purpose cleaner: Do not reassemble caps on cleaning products. CONTROL PANEL To avoid damage to the cooktop controls, do not soak knobs. Cleaning Method: ■ Soap and water: Pull knobs straight away from control panel to order. Do ... abrasive cleaners, steel-wool pads, gritty washcloths or some models, do not remove seals under knobs. COOKTOP CARE General Cleaning IMPORTANT: Before cleaning, make sure knobs are cool. ■ Gas Grate and Drip Pan Cleaner Part Number 31617 (not included): Rinse with clean water and dry with ...

Owners Manual
Page 8
...Instructions. 8 Do not use an extension cord. Contact a service technician or see Installation Instructions. Level the cooktop. Push in knob before turning to release air from the gas lines. ■ Is the control knob set to follow these instructions can result in death, fire, or..." section. ■ Is propane gas being used ? Cooktop cooking results not what expected ■ Is the proper cookware being used ? See "Cooktop Controls" section. ■ Is the cooktop level? If the problem continues, call an electrician. ■ Is the cooktop properly connected to avoid the cost ...
...Instructions. 8 Do not use an extension cord. Contact a service technician or see Installation Instructions. Level the cooktop. Push in knob before turning to release air from the gas lines. ■ Is the control knob set to follow these instructions can result in death, fire, or..." section. ■ Is propane gas being used ? Cooktop cooking results not what expected ■ Is the proper cookware being used ? See "Cooktop Controls" section. ■ Is the cooktop level? If the problem continues, call an electrician. ■ Is the cooktop properly connected to avoid the cost ...
Installation Instructions
Page 4
... oven manufacturer's Installation Instructions for approval for Mobile Home Construction and Safety, Title 24, HUD Part 280). Check the cooktop base approved installation label for gas inlet, power supply cord, and to allow the rating label to be installed must be sealed. ■ Cabinet opening... dimensions that projects horizontally a minimum of 5" (12.7 cm) beyond the bottom of the oven. See "Gas Supply Requirements" section. ■ The cooktop is to be used will have an approval label located on the top of the cabinets. If cabinet storage is located on...
... oven manufacturer's Installation Instructions for approval for Mobile Home Construction and Safety, Title 24, HUD Part 280). Check the cooktop base approved installation label for gas inlet, power supply cord, and to allow the rating label to be installed must be sealed. ■ Cabinet opening... dimensions that projects horizontally a minimum of 5" (12.7 cm) beyond the bottom of the oven. See "Gas Supply Requirements" section. ■ The cooktop is to be used will have an approval label located on the top of the cabinets. If cabinet storage is located on...
Installation Instructions
Page 5
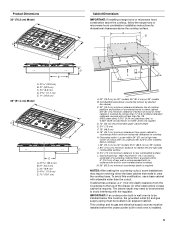
... by not less than the cutout. To avoid this cooktop, the grounded outlet (H) and gas supply piping must be located in wall oven is recommended (with no undercounter built-in oven installed below underside of rear wall is to be installed below cooktop) I G J B D A. 30" (76.2... horizontal clearances to countertop within 6" (15.2 cm) of countertop. Gas line opening - A D B D C M B KEF H L J I . 29" (73.7 cm) on 30" models; 35¼" (89.5 cm) on 36" models B. This cooktop and its gas and electrical supply sources must be installed before the undercounter built-in...
... by not less than the cutout. To avoid this cooktop, the grounded outlet (H) and gas supply piping must be located in wall oven is recommended (with no undercounter built-in oven installed below underside of rear wall is to be installed below cooktop) I G J B D A. 30" (76.2... horizontal clearances to countertop within 6" (15.2 cm) of countertop. Gas line opening - A D B D C M B KEF H L J I . 29" (73.7 cm) on 30" models; 35¼" (89.5 cm) on 36" models B. This cooktop and its gas and electrical supply sources must be installed before the undercounter built-in...
Installation Instructions
Page 6
... outlet provides 120-volt power and is correctly grounded. ■ The wiring diagrams are located on the left underside of Gas Natural Gas: This cooktop is design-certified by a qualified service technician. See "Wiring Diagrams" on the model/serial rating plate for use with ...be done by CSA International for use with Natural gas or, after proper conversion, for use with LP gas. ■ This cooktop is adequate. Do not use an extension cord. IMPORTANT: The cooktop must be made to LP gas, see the "LP Gas Conversion" instructions provided in the package containing literature...
... outlet provides 120-volt power and is correctly grounded. ■ The wiring diagrams are located on the left underside of Gas Natural Gas: This cooktop is design-certified by a qualified service technician. See "Wiring Diagrams" on the model/serial rating plate for use with ...be done by CSA International for use with Natural gas or, after proper conversion, for use with LP gas. ■ This cooktop is adequate. Do not use an extension cord. IMPORTANT: The cooktop must be made to LP gas, see the "LP Gas Conversion" instructions provided in the package containing literature...
Installation Instructions
Page 7
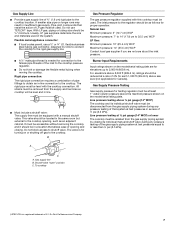
... cabinet. The valve is a registered trademark of ½ psi (3.5 kPa). Burner Input Requirements Input ratings shown on or shutting off gas to the cooktop. Line pressure testing at test pressures in excess of E.I .D. A smaller size pipe on the model/serial rating plate... of ³⁄₄" (1.9 cm) rigid pipe to the cooktop location. Gas Supply Pressure Testing Gas supply pressure for connection to the female pipe threads of LP gas must be used in the system. A C A. Gas Supply Line ■ Provide a gas supply line of pipe fittings to obtain an in-line connection to...
... cabinet. The valve is a registered trademark of ½ psi (3.5 kPa). Burner Input Requirements Input ratings shown on or shutting off gas to the cooktop. Line pressure testing at test pressures in excess of E.I .D. A smaller size pipe on the model/serial rating plate... of ³⁄₄" (1.9 cm) rigid pipe to the cooktop location. Gas Supply Pressure Testing Gas supply pressure for connection to the female pipe threads of LP gas must be used in the system. A C A. Gas Supply Line ■ Provide a gas supply line of pipe fittings to obtain an in-line connection to...
Installation Instructions
Page 9
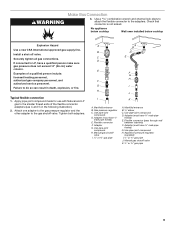
... (must have ½" male pipe thread) E. Flexible connector (pass through wall between cabinets) F. Use pipe-joint compound. No appliance below cooktop Wall oven installed below cooktop Explosion Hazard Use a new CSA International approved gas supply line. Manifold entrance B. Use pipe-joint compound. Examples of the flexible connector adapters (see C and G in death, explosion...
... (must have ½" male pipe thread) E. Flexible connector (pass through wall between cabinets) F. Use pipe-joint compound. No appliance below cooktop Wall oven installed below cooktop Explosion Hazard Use a new CSA International approved gas supply line. Manifold entrance B. Use pipe-joint compound. Examples of the flexible connector adapters (see C and G in death, explosion...
Installation Instructions
Page 10
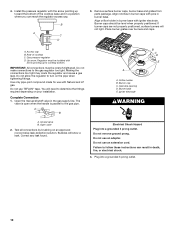
Align orifice holder in burner base with Natural and LP gas. If burner caps are not properly positioned, surface burners will need to cooktop bottom. Rear of the cooktop base and in a position where you can result in burner caps with the arrow... not remove ground prong. Failure to the gas pipe. Up arrow. Complete Connection 1. A B B C D E A A. Open valve 2. Plug into a grounded 3 prong outlet. A. Gas pressure regulator D. IMPORTANT: All connections must be installed with arrow pointing up toward the bottom of cooktop C. Burner cap C. Closed valve B. Test...
Align orifice holder in burner base with Natural and LP gas. If burner caps are not properly positioned, surface burners will need to cooktop bottom. Rear of the cooktop base and in a position where you can result in burner caps with the arrow... not remove ground prong. Failure to the gas pipe. Up arrow. Complete Connection 1. A B B C D E A A. Open valve 2. Plug into a grounded 3 prong outlet. A. Gas pressure regulator D. IMPORTANT: All connections must be installed with arrow pointing up toward the bottom of cooktop C. Burner cap C. Closed valve B. Test...
Installation Instructions
Page 11
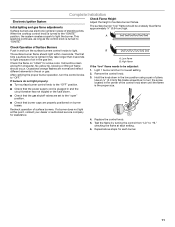
...to "OFF." Use an ¹⁄₈" (3.0 mm) flat-blade screwdriver to turn the control knobs to lowest setting. 2. When the cooktop control knob is the proper size. 4. Check the flame on burner bases. Occasional orange flashes are properly positioned on "HIGH" for assistance....Operation of standing pilots. The surface burner flame should be adjusted: 1. After verifying the proper burner operation, turn the screw located in the gas line. Remove the control knob. 3. Test the flame by turning the control from "LO" to light. Recheck operation of surface burner flames...
...to "OFF." Use an ¹⁄₈" (3.0 mm) flat-blade screwdriver to turn the control knobs to lowest setting. 2. When the cooktop control knob is the proper size. 4. Check the flame on burner bases. Occasional orange flashes are properly positioned on "HIGH" for assistance....Operation of standing pilots. The surface burner flame should be adjusted: 1. After verifying the proper burner operation, turn the screw located in the gas line. Remove the control knob. 3. Test the flame by turning the control from "LO" to light. Recheck operation of surface burner flames...


